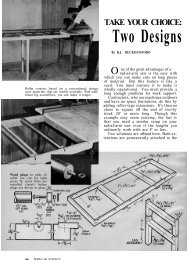
Leaf burner rolls to the job - Vintage Projects
Leaf burner rolls to the job - Vintage Projects
Leaf burner rolls to the job - Vintage Projects

Create successful ePaper yourself
Turn your PDF publications into a flip-book with our unique Google optimized e-Paper software.
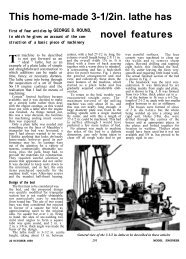
<strong>Leaf</strong> <strong>burner</strong><br />
<strong>rolls</strong> <strong>to</strong> <strong>the</strong> <strong>job</strong><br />
By MANLY BANISTER<br />
Where <strong>to</strong> burn <strong>the</strong> leaves?<br />
Let this incinera<strong>to</strong>r-on-wheels<br />
help solve <strong>the</strong> problem next autumn.<br />
And when it's not being used<br />
for yard work it'll come in handy<br />
-<strong>the</strong> year 'round—as a trash <strong>burner</strong>.<br />
Its 30-gal. steel drum gives you<br />
a capacity of almost 3 bushels<br />
• HANDY AS IT IS in autumn, this mobile leaf<br />
<strong>burner</strong> won't stand idle <strong>the</strong> rest of <strong>the</strong> year. It<br />
makes a fine roll-away trash <strong>burner</strong> that dumps<br />
ashes from <strong>the</strong> bot<strong>to</strong>m with a flip of a lever.<br />
The 30-gal. steel drum is 31 in. high and has<br />
an inside diameter of 18 in., giving <strong>the</strong> <strong>burner</strong><br />
a capacity of almost three bushels above <strong>the</strong><br />
7-in.-deep ash pit. Wheels for <strong>the</strong> pilot model<br />
were salvaged from an old hand lawnmower and<br />
have <strong>the</strong> advantage of being an exact fit for <strong>the</strong><br />
15/16-in. dia. of 3/4-in. thin-wall conduit used for<br />
<strong>the</strong> axle. If you decide <strong>to</strong> use regular 10-in.<br />
utility wheels with 1/2-in. bearings, substitute<br />
1/2-in. steel rod.<br />
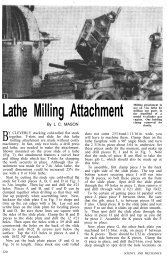
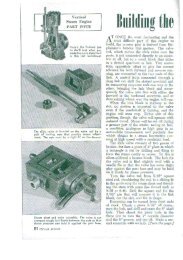
All joints in <strong>the</strong> carriage and ash-dumping
Ash-dumping doors fit in<strong>to</strong> a 10-in.-wide opening<br />
sawed out of <strong>the</strong> bot<strong>to</strong>m of <strong>the</strong> 30-gal. drum. Orient<br />
<strong>the</strong> cu<strong>to</strong>ut so drum seam will be at rear of <strong>burner</strong><br />
mechanism should be brazed with a bronze<br />
brazing rod (Oxweld 25M, or similar). In building<br />
<strong>the</strong> pilot model, a Prest-O-Lite air-acetylene<br />
<strong>to</strong>rch with a #4 burning tip was used. If welding<br />
equipment is available, <strong>the</strong> joints may be<br />
welded.<br />
The first step is <strong>to</strong> cut a 10-in-wide opening<br />
in <strong>the</strong> bot<strong>to</strong>m of <strong>the</strong> drum for <strong>the</strong> ash-dumping<br />
doors. (Save <strong>the</strong> cut-out piece <strong>to</strong> use as a<br />
pattern for <strong>the</strong> doors.) Next, install <strong>the</strong> grate.<br />
This is composed of 10 lengths of 1/4-in. steel<br />
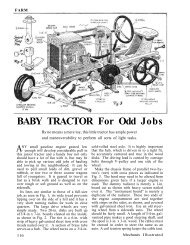
Holes in side of drum should be drilled with<br />
1/2-in. bit in 3/8-in. slow-speed drill. To locate<br />
<strong>the</strong>m, tape paper pattern over <strong>the</strong> drum<br />
Levers controlling ash-dumping mechanism are<br />
brazed <strong>to</strong> door pivots and connected by linking<br />
bar. Note cotter pins in linking-bar pivots<br />
When brazing <strong>the</strong> ash doors <strong>to</strong> <strong>the</strong>ir 1/2-in.<br />
conduit pivots, support <strong>the</strong>m horizontally<br />
on insulation bricks piled on <strong>the</strong> grate.<br />
These bricks won't conduct <strong>the</strong> heat<br />
welding rod—five installed crosswise <strong>to</strong> <strong>the</strong><br />
opening and five parallel <strong>to</strong> it. While you should<br />
braze or weld <strong>the</strong> rods at each crossing <strong>to</strong> make<br />
a solid unit, it isn't necessary <strong>to</strong> braze <strong>the</strong> grate<br />
<strong>to</strong> <strong>the</strong> drum. Now, with <strong>the</strong> drum upside down,<br />
drill 5/16-in. holes every 2 in. around <strong>the</strong> under<br />
surface of <strong>the</strong> rolling flange. Then lay out and<br />
drill <strong>the</strong> pattern of 1/2-in. holes on each side of<br />
<strong>the</strong> drum.<br />
Make <strong>the</strong> ash doors from 14-ga. ungalvanized<br />
sheet metal, using <strong>the</strong> cu<strong>to</strong>ut from <strong>the</strong> drum
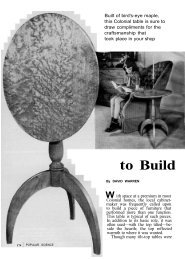
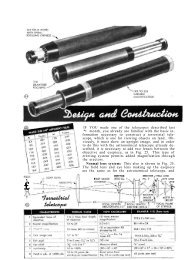
Conical hood for <strong>burner</strong> is cut from<br />
24-ga. sheet metal using pattern<br />
below. Hardware-cloth screen over<br />
opening traps hot ashes, keeps <strong>the</strong>m<br />
from flying out <strong>to</strong>p of <strong>burner</strong> when<br />
caught in updraft from <strong>the</strong> fire
The <strong>burner</strong> may be used anywhere on your lawn with<br />
out damaging <strong>the</strong> grass. When <strong>the</strong> 7-in. ash dump in<br />
<strong>the</strong> bot<strong>to</strong>m is full, you merely wheel <strong>the</strong> cart <strong>to</strong> <strong>the</strong><br />
trash heap and dump it with <strong>the</strong> flip of a lever<br />
bot<strong>to</strong>m as a pattern. The doors should swing<br />
90 deg. in <strong>the</strong> opening provided. First, determine<br />
<strong>the</strong> amount <strong>to</strong> be ground from <strong>the</strong> shoulders for<br />
clearance by trial. Locate <strong>the</strong> pivot holes in <strong>the</strong><br />
base of <strong>the</strong> drum. Drill <strong>the</strong>se out <strong>to</strong> 1/2-in. dia.,<br />
<strong>the</strong>n file <strong>the</strong>m with a round file <strong>to</strong> 3/4-in. dia. <strong>to</strong><br />
fit <strong>the</strong> pivots of 1/2-in. thin-wall conduit. The door<br />
pivots are of two different lengths. Slit <strong>the</strong> two<br />
shorter ones with a hacksaw, braze <strong>the</strong>m <strong>to</strong><br />
<strong>the</strong>ir respective doors and install <strong>the</strong> doors in<br />
<strong>the</strong> drum <strong>to</strong> check for ease of opening and<br />
closing. If necessary, correct <strong>the</strong> fit by grinding<br />
or filing, <strong>the</strong>n prop <strong>the</strong> doors in a horizontal<br />
position, slit <strong>the</strong> longer pivots and install in<br />
<strong>the</strong> drum, brazing <strong>the</strong>m <strong>to</strong> <strong>the</strong> doors.<br />
All strap-iron requirements of <strong>the</strong> construction<br />
can be met with one 36-in. length of<br />
1/8-in. x 1-1/2-in. strap. Make <strong>the</strong> ash-dumping<br />
mechanism as shown on this page. Braze or<br />
weld <strong>the</strong> levers <strong>to</strong> <strong>the</strong> door pivots with <strong>the</strong> drum
on its side and <strong>the</strong> doors open. You'll find it<br />
easier <strong>to</strong> position and hold <strong>the</strong> levers in place<br />
if you mount <strong>the</strong> linking bar and run <strong>the</strong> nuts<br />
up tight. Braze a short length of 1/4-in. steel<br />
welding rod in<strong>to</strong> each joint <strong>to</strong> streng<strong>the</strong>n it.<br />
Also, braze <strong>the</strong> fulcrum pins in <strong>the</strong> levers before<br />
<strong>the</strong> unit is mounted, and drill <strong>the</strong>se for cotter<br />
pins <strong>to</strong> prevent losing nuts.<br />
To make <strong>the</strong> carriage, you'll use most of two<br />
10-ft. lengths of 3/4-in. thin-wall conduit. Bend<br />
<strong>the</strong> side members of <strong>the</strong> frame before cutting<br />
<strong>to</strong> length so as <strong>to</strong> have plenty of leverage. A<br />
standard 3/4-in. conduit bender, which has a 6-in.<br />
radius, is <strong>the</strong> best <strong>to</strong>ol for making <strong>the</strong>se bends.<br />
(If you don't own a bender, you can rent one<br />
from your local hardware s<strong>to</strong>re.) Cut <strong>the</strong> first<br />
side frame 20-1/2 in. from <strong>the</strong> second bend, <strong>the</strong>n<br />
bend <strong>the</strong> o<strong>the</strong>r frame and cut it <strong>to</strong> length. Check<br />
<strong>the</strong>se frames for congruency.<br />
mount bent frames<br />
Mount <strong>the</strong> bent frames on <strong>the</strong> drum bot<strong>to</strong>m<br />
14 in. apart, center-<strong>to</strong>-center, using 1/4-in. machine<br />
bolts with lock washers under both head<br />
and nut. Install <strong>the</strong>se bolts as close <strong>to</strong> <strong>the</strong> side<br />
of <strong>the</strong> drum as practical. Cut <strong>the</strong> crossbars<br />
13-1/2 in. long <strong>to</strong> allow 1/4 in. on each end for<br />
fitting. To install <strong>the</strong> handle, turn <strong>the</strong> drum<br />
upside down and squeeze <strong>the</strong> side members of<br />
<strong>the</strong> frame <strong>to</strong> <strong>the</strong> handle with a bar clamp. Then<br />
braze <strong>the</strong> handle in place. Install, clamp and<br />
braze <strong>the</strong> crossbar in <strong>the</strong> same manner.<br />
Next, mark and file <strong>the</strong> side members of <strong>the</strong><br />
carriage, and braze <strong>the</strong> axle in place. The wheels<br />
can be positioned and retained on <strong>the</strong> axle with<br />
shaft collars. If you are using 3/4-in. conduit for<br />
an axle, make shaft collars by cutting slices<br />
from standard 3/4-in. pipe coupling. Face <strong>the</strong>m<br />
with a file and fit with setscrews. With wheels<br />
mounted, turn <strong>the</strong> unit right side up and block<br />
up <strong>the</strong> back of <strong>the</strong> drum until it is level. Bend<br />
<strong>the</strong> rear support from 3/4-in. thin wall, starting<br />
<strong>the</strong> second bend where <strong>the</strong> first leaves off. Fitting<br />
<strong>the</strong> support and Y-braces is a matter of trialand-error.<br />
When <strong>the</strong> parts fit correctly, braze<br />
<strong>the</strong>m <strong>to</strong>ge<strong>the</strong>r.<br />
Now turn <strong>the</strong> unit upside down again and install<br />
<strong>the</strong> ash-hopper inserts. These are 24-ga.,<br />
sheet-metal plates mounted at a 45-deg. angle<br />
<strong>to</strong> facilitate dumping ashes. Their outline is an<br />
elongated arc like that of <strong>the</strong> end of an oval.<br />
Make a cardboard pattern first and try it for<br />
size. When you arrive at an outline that fits,<br />
transfer it <strong>to</strong> sheet metal and cut it out, remembering<br />
<strong>to</strong> leave a 3/4-in. x3/4-in tab at <strong>the</strong> <strong>to</strong>p<br />
for bolting <strong>to</strong> <strong>the</strong> sidewall of <strong>the</strong> drum. Leave<br />
a 1-1/2-in. wide tab across <strong>the</strong> bot<strong>to</strong>m and bend<br />
it over at a 45-deg. angle. Fasten <strong>the</strong>se hopper<br />
inserts with 3/16-in. s<strong>to</strong>ve bolts through <strong>the</strong> side<br />
of <strong>the</strong> drum and three sheet-metal screws<br />
through <strong>the</strong> drum bot<strong>to</strong>m.<br />
Next, lay out a pattern for <strong>the</strong> conical hood<br />
on a piece of 24-ga. sheet metal and cut it<br />
out. If a sheet-metal-forming machine is not<br />
available, you can form <strong>the</strong> cone easily by hand.<br />
Just clamp <strong>the</strong> edge opposite <strong>the</strong> riveting tab <strong>to</strong><br />
<strong>the</strong> edge of a table, roll <strong>the</strong> tab side over until<br />
<strong>the</strong> tab overlaps <strong>the</strong> opposite edge, and clamp<br />
<strong>the</strong> two ends <strong>to</strong>ge<strong>the</strong>r with a pair of clamping<br />
pliers. Adjust <strong>the</strong> small end of <strong>the</strong> cone <strong>to</strong> <strong>the</strong><br />
correct overlap and clamp it. Rivet <strong>the</strong> overlap<br />
every inch, drilling each hole and riveting it before<br />
going <strong>to</strong> <strong>the</strong> next. You can ei<strong>the</strong>r use 2-lb.<br />
tinned rivets and a rivet set, or small roundhead<br />
machine screws, tightening <strong>the</strong> nuts, <strong>the</strong>n peening<br />
over <strong>the</strong> ends.<br />
attach hood<br />
Attach <strong>the</strong> hood <strong>to</strong> <strong>the</strong> drum with a strap<br />
hinge, one leaf of which has been cut off and<br />
mounted on a piece of bent strap iron which is<br />
bolted <strong>to</strong> <strong>the</strong> drum. Mount a barn-door pull on<br />
<strong>the</strong> hood opposite <strong>the</strong> hinge. To keep hot ashes<br />
from flying out of <strong>the</strong> <strong>to</strong>p, install a screen of<br />
%-in. mesh hardware cloth in <strong>the</strong> hood. Form<br />
this screen over a coffee can so that it fits inside<br />
<strong>the</strong> <strong>to</strong>p of <strong>the</strong> hood, cutting <strong>the</strong> wires where <strong>the</strong>y<br />
buckle. Install <strong>the</strong> screen with 3/16-in. s<strong>to</strong>ve bolts,<br />
using 1-in. squares of sheet metal for washers<br />
inside. In installing <strong>the</strong> draft cover, lay out <strong>the</strong><br />
sheet metal and bend <strong>the</strong> end tabs first. Clamp<br />
<strong>the</strong> tab between a board and <strong>the</strong> edge of a table<br />
and bend it by hand. Hammer <strong>the</strong> bend with<br />
a mallet <strong>to</strong> sharpen it, <strong>the</strong>n move <strong>the</strong> tab out<br />
<strong>to</strong> <strong>the</strong> second mark and bend it in <strong>the</strong> opposite<br />
direction <strong>to</strong> a 45-deg. angle.<br />
To make <strong>the</strong> draft cover fit, give it a radius<br />
bend before installing. Then attach it <strong>to</strong> <strong>the</strong><br />
drum with 3/16-in. s<strong>to</strong>ve bolts. The notched catch<br />
which holds <strong>the</strong> ash-dump lever in place is<br />
mounted on <strong>the</strong> outside of <strong>the</strong> side frame. Drill<br />
a 5/16-in. hole through <strong>the</strong> conduit and strap-iron<br />
catch for a 1/4-in. x 2-in. s<strong>to</strong>ve bolt, <strong>the</strong>n mount<br />
<strong>the</strong> catch, using a compression spring between<br />
two washers <strong>to</strong> hold <strong>the</strong> catch tight <strong>to</strong> <strong>the</strong> frame<br />
while allowing it <strong>to</strong> be turned back when<br />
necessary. Install a cotter pin in <strong>the</strong> end of <strong>the</strong><br />
bolt <strong>to</strong> keep <strong>the</strong> nut tight.