30 Dirty Tricks for Acrobat - Adobe Blogs
30 Dirty Tricks for Acrobat - Adobe Blogs
30 Dirty Tricks for Acrobat - Adobe Blogs

Create successful ePaper yourself
Turn your PDF publications into a flip-book with our unique Google optimized e-Paper software.
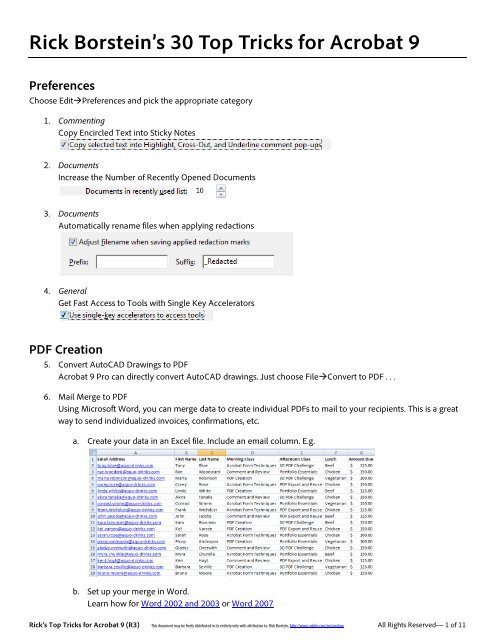
Rick Borstein’s <strong>30</strong> Top <strong>Tricks</strong> <strong>for</strong> <strong>Acrobat</strong> 9<br />
Preferences<br />
Choose EditPreferences and pick the appropriate category<br />
1. Commenting<br />
Copy Encircled Text into Sticky Notes<br />
2. Documents<br />
Increase the Number of Recently Opened Documents<br />
3. Documents<br />
Automatically rename files when applying redactions<br />
4. General<br />
Get Fast Access to Tools with Single Key Accelerators<br />
PDF Creation<br />
5. Convert AutoCAD Drawings to PDF<br />
<strong>Acrobat</strong> 9 Pro can directly convert AutoCAD drawings. Just choose FileConvert to PDF . . .<br />
6. Mail Merge to PDF<br />
Using Microsoft Word, you can merge data to create individual PDFs to mail to your recipients. This is a great<br />
way to send individualized invoices, confirmations, etc.<br />
a. Create your data in an Excel file. Include an email column. E.g.<br />
b. Set up your merge in Word.<br />
Learn how <strong>for</strong> Word 2002 and 2003 or Word 2007<br />
Rick’s Top <strong>Tricks</strong> <strong>for</strong> <strong>Acrobat</strong> 9 (R3) This document may be freely distributed in its entirety only with attribution to: Rick Borstein, http://www.adobe.com/go/acrolaw All Rights Reserved— 1 of 11
c. From the <strong>Acrobat</strong> menu or ribbon, choose Mail Merge<br />
7. Create PDF from the Clipboard<br />
There are many uses <strong>for</strong> this tip:<br />
— Take a Take a screen grab and instantly convert it to a PDF<br />
— Select text in FireFox and convert to PDF (no PDF Maker needed!)<br />
a. Select text or images from any application<br />
b. Choose FileCreate PDFFrom Clipboard . . .<br />
8. Create PDF from non-PDFs inside a PDF Portfolio<br />
a. Right-click Convert to PDF<br />
Search<br />
9. Search PDFs across a directory<br />
a. EditSearch to open the Search panel<br />
b. Choose All PDF Documents in and locate the folder you wish to search<br />
10. Index a directory <strong>for</strong> faster searches<br />
See: http://blogs.adobe.com/acrolaw/?p=46<br />
11. Embed a search index in a single PDF<br />
a. Choose AdvancedDocument Processing Manage Embedded Index . . .<br />
12. Embed a search index in a Portfolio<br />
a. Choose AdvancedDocument Processing Manage Embedded Index . . .<br />
Rick’s Top <strong>Tricks</strong> <strong>for</strong> <strong>Acrobat</strong> 9 (R3) This document may be freely distributed in its entirety only with attribution to: Rick Borstein, http://www.adobe.com/go/acrolaw All Rights Reserved— 2 of 11
Annotations and Comments<br />
13. Use the Properties Bar to edit Text Boxes<br />
Using the Properties Bar, you can edit all aspects of a Text Box annotation<br />
a. ViewToolbars Properties Bar (CTRL-E or CMD-E)<br />
b. Select text inside a text box to change font, color, style, etc.<br />
c. Select the text box itself to change border width, border, color, fill, etc.<br />
14. Use the Snapshot Tool<br />
The Snapshot tool takes a picture of any selection of a PDF page—or — the entire page.<br />
See: http://blogs.adobe.com/acrolaw/?p=63<br />
a. Right-click on the Zoom tool to turn on the Snapshot tool<br />
b. Click to grab an entire page or click and drag to grab a selection<br />
15. Create a Custom Stamp<br />
A custom stamp may be created from image files (JPEG, GIF) or from any other PDF document.<br />
See: http://blogs.adobe.com/acrolaw/?p=21<br />
16. Create a Transparent Signature Stamp<br />
See: http://blogs.adobe.com/acrolaw/?p=35<br />
17. Using the Pencil or Line tool as a highlighter<br />
You can’t use the standard text highlight tool on image-only PDFs, but you can change the properties of either<br />
of the these tools to make it easier to highlight.<br />
See: http://blogs.adobe.com/acrolaw/?p=18<br />
See: http://blogs.adobe.com/acrolaw/?p=59<br />
Add a pencil or line annotation to the page, then right-click and choose Properties<br />
a. Set thickness to 8-12 pts<br />
b. Change to the color of your choice (orange, yellow green, etc.)<br />
c. Change the opacity (transparency) to 50%<br />
d. Check “Make Properties Default”<br />
e. Click OK<br />
Working with PDFs<br />
18. Reducing File Size of scanned documents<br />
See: http://blogs.adobe.com/acrolaw/?p=105<br />
a. DocumentOptimize Scanned PDF<br />
b. Drag sliders to compress more or less<br />
Rick’s Top <strong>Tricks</strong> <strong>for</strong> <strong>Acrobat</strong> 9 (R3) This document may be freely distributed in its entirety only with attribution to: Rick Borstein, http://www.adobe.com/go/acrolaw All Rights Reserved— 3 of 11
19. Checking and Reducing File Size using the PDF Optimizer<br />
a. Advanced PDF Optimizer<br />
b. Click the Audit button to see which items are affecting file size<br />
20. Place an Image in a PDF<br />
See: http://blogs.adobe.com/acrolaw/?p=34<br />
a. Choose ToolsAdvanced EditingTouchup Object Tool<br />
b. Right-click to place an image in the PDF<br />
21. Cleaning up Scanned Documents using Redaction Tools<br />
<strong>Acrobat</strong> can redact to “No Color”.<br />
a. View ToolbarsRedaction<br />
b. Use the Mark <strong>for</strong> Redaction tool to highlight text or images to be deleted<br />
c. Right-click on the redaction mark and choose Properties<br />
d. Set to No Color and click OK<br />
TIP: Use the Properties bar (CTRL-E Win, CMD-E Mac) to adjust redaction color.<br />
For Tips 23-26, open two documents, then choose Choose WindowTileVertically<br />
Or, using the keyboard: CTRL-Shift-L on Windows, CMD-Shift-L on Mac<br />
22. Copy Pages between two documents<br />
a. Drag to the pages panel of the second document<br />
23. Copy Multiple Pages<br />
a. CTRL-Click to select individual pages<br />
b. Drag to the pages panel of the second document<br />
24. Move a Page<br />
Shift-Drag to the pages panel of the second document<br />
25. To replace a Page<br />
CTRL-ALT-Drag (Command-Option-Drag on Mac) to the pages panel of the second document<br />
Rick’s Top <strong>Tricks</strong> <strong>for</strong> <strong>Acrobat</strong> 9 (R3) This document may be freely distributed in its entirety only with attribution to: Rick Borstein, http://www.adobe.com/go/acrolaw All Rights Reserved— 4 of 11
26. Extracting a Discontinuous Range of Pages from one or more documents using Combine<br />
It seems counterintuitive, but <strong>Acrobat</strong>’s Combine function allows you pull out pages from several documents<br />
and merge them into a new document.<br />
See: http://blogs.adobe.com/acrolaw/?p=70<br />
a. FileCombineMerge Files into a single PDF . . .<br />
b. Click the Add Files button and locate the documents <strong>for</strong> page extraction<br />
c. Select a document from the list and click Choose Pages<br />
d. Enter the pages you wish to extract<br />
e. Click the Combine Files button<br />
f. <strong>Acrobat</strong> will pull all of the selected pages out into a new PDF document<br />
27. Use Page Labels to draw attention to pages<br />
You can label sections of your document uniquely to aid discovery via the Pages Panel.<br />
a. Open the Pages Panel<br />
b. Select the pages which you want to label, then right-click and choose Number Pages<br />
Rick’s Top <strong>Tricks</strong> <strong>for</strong> <strong>Acrobat</strong> 9 (R3) This document may be freely distributed in its entirety only with attribution to: Rick Borstein, http://www.adobe.com/go/acrolaw All Rights Reserved— 5 of 11
c. Set a prefix (e.g. TOC) <strong>for</strong> the pages<br />
d. The result:<br />
Rick’s Top <strong>Tricks</strong> <strong>for</strong> <strong>Acrobat</strong> 9 (R3) This document may be freely distributed in its entirety only with attribution to: Rick Borstein, http://www.adobe.com/go/acrolaw All Rights Reserved— 6 of 11
Batch Sequences<br />
28. Run the PDF Optimizer in Batch and reduce the size of many documents at once<br />
a. To create a Batch Sequence<br />
I. AdvancedDocument ProcessingBatch Processing<br />
II. Click the New Sequence button.<br />
III. Give the sequence a name<br />
IV. Click Output Options<br />
V. Click the PDF Optimizer checkmark<br />
VI. Click the Settings button<br />
VII. Enable PDF Optimizer<br />
VIII. Click the Settings Button<br />
Which setting should you use <strong>for</strong> monochrome (B&W) images?<br />
• JBIG2 Lossless is very efficient and preserves the exact appearance of the text.<br />
• Consider trying JBIG2 Lossy which causes some visual degradation, but can be up to 70% smaller than JBIG2<br />
Lossless.<br />
IX. Click OK<br />
X. Give the revised settings a name such as “B&W Lossy”.<br />
Rick’s Top <strong>Tricks</strong> <strong>for</strong> <strong>Acrobat</strong> 9 (R3) This document may be freely distributed in its entirety only with attribution to: Rick Borstein, http://www.adobe.com/go/acrolaw All Rights Reserved— 7 of 11
. To run the Batch Sequence<br />
I. Place all the files you wish to process in a single folder on your hard drive.<br />
II. Choose Advanced Document Processing Batch Processing<br />
III. Select the sequence to run<br />
IV. Click OK<br />
V. Click OK in the Batch Sequence confirmation window<br />
VI. Locate the files you wish to process and click the Select button<br />
29. Create a Batch Sequence (General Advice)<br />
<strong>Acrobat</strong> has over 40 different commands that may be run in batch. Since the combinations are nearly infinite,<br />
here are the general considerations:<br />
a. What do you need to do to the files?<br />
Click the Select Commands button to stack up several operations<br />
b. Where are the files to be processed?<br />
c. Where do you want to put the files when the sequence is complete?<br />
d. Do you wish to rename the files, optimize them or change the PDF version?<br />
Click the Output Options button<br />
e. Add a prefix or suffix to the file name<br />
f. Use the PDF Optimizer to optimize the file or change the PDF version<br />
Rick’s Top <strong>Tricks</strong> <strong>for</strong> <strong>Acrobat</strong> 9 (R3) This document may be freely distributed in its entirety only with attribution to: Rick Borstein, http://www.adobe.com/go/acrolaw All Rights Reserved— 8 of 11
Web<br />
<strong>30</strong>. Adding a Print Button to a PDF<br />
PDFs accessed through the browser can be confusing to print. Choosing the browser’s print function will not<br />
actually print the PDF. Instead, add a Print button to the document to make it easy <strong>for</strong> users who access the<br />
file.<br />
a. Open the PDF<br />
b. Click the Forms button and choose Add or Edit Fields<br />
c. When asked, click “No” to auto detection<br />
d. Click the Add New Field button and choose Button<br />
e. Click to place the button on the document<br />
f. Click the Show All Properties link<br />
g. Click the Appearance Tab and set as below:<br />
Rick’s Top <strong>Tricks</strong> <strong>for</strong> <strong>Acrobat</strong> 9 (R3) This document may be freely distributed in its entirety only with attribution to: Rick Borstein, http://www.adobe.com/go/acrolaw All Rights Reserved— 9 of 11
h. Click the Options Tab and enter text <strong>for</strong> the button label (e.g Print Document):<br />
i. Click the Actions Tab and do the following:<br />
i. Choose Execute Menu Item from the Select Action menu<br />
ii. Click the Add button<br />
iii. Choose FilePrint from the list<br />
iv. Click OK<br />
v. Click Close<br />
Rick’s Top <strong>Tricks</strong> <strong>for</strong> <strong>Acrobat</strong> 9 (R3) This document may be freely distributed in its entirety only with attribution to: Rick Borstein, http://www.adobe.com/go/acrolaw All Rights Reserved— 10 of 11
Bonus Tip<br />
31. Open the containing folder and get the file path of any PDF (Windows only)<br />
a. Choose FileProperties<br />
b. Click the Description tab<br />
c. Click the file path in the Location field<br />
Rick’s Top <strong>Tricks</strong> <strong>for</strong> <strong>Acrobat</strong> 9 (R3) This document may be freely distributed in its entirety only with attribution to: Rick Borstein, http://www.adobe.com/go/acrolaw All Rights Reserved— 11 of 11