How to configure the HL2170W to print wireless - Brother Solutions ...
How to configure the HL2170W to print wireless - Brother Solutions ...
How to configure the HL2170W to print wireless - Brother Solutions ...
Create successful ePaper yourself
Turn your PDF publications into a flip-book with our unique Google optimized e-Paper software.
<strong>How</strong> do I <strong>configure</strong> <strong>the</strong> <strong>wireless</strong> <strong>print</strong>er with a network cable and install <strong>the</strong><br />
<strong>print</strong>er driver in Macin<strong>to</strong>sh OS X?<br />
NOTE: For successful <strong>wireless</strong> setup, you will need <strong>to</strong> have a<br />
network cable for a temporary connection <strong>to</strong> your <strong>wireless</strong> router<br />
or access point, and you must know your network settings.<br />
STEP I: Ga<strong>the</strong>r <strong>the</strong> <strong>wireless</strong> network settings of your <strong>wireless</strong><br />
access point or <strong>wireless</strong> router<br />
The network settings information for your network can be found<br />
on <strong>the</strong> network configuration sheet of your <strong>wireless</strong> access point<br />
or <strong>wireless</strong> router. Please contact <strong>the</strong> manufacturer of your<br />
<strong>wireless</strong> access point or <strong>wireless</strong> router or refer <strong>to</strong> <strong>the</strong> user’s<br />
guide for your <strong>wireless</strong> access point or <strong>wireless</strong> router for<br />
instructions on <strong>print</strong>ing a network configuration sheet. This<br />
information includes:<br />
A. SSID (Service Set ID or Network Name). Your access point<br />
or router is identified by an SSID or network name.<br />
B. Encryption Method required by your access point or router.<br />
For example, Open System, Shared Key, WPA-PSK,<br />
LEAP, etc.<br />
C. If you are using WEP, you will need <strong>the</strong> WEP KEY (in HEX<br />
key format). For example, a 64-bit key uses 10 digits of<br />
hexadecimal data: i.e. 71f2234aba, while a 128-bit key<br />
uses 26 digits of hexadecimal data: i.e.<br />
71f2234ab56cd709e5412aa3ba.<br />
D. If you are using WPA-PSK (TKIP), you will need <strong>the</strong><br />
PASSPHRASE. For routers that use a Pre-Shared Key<br />
(PSK), <strong>the</strong> PASSPHRASE is more than 7 characters and<br />
less than 64 characters in length.<br />
E. If you are using MAC (Media Access Control) Filtering/MAC<br />
Address Access Control on your router, add <strong>the</strong> <strong>print</strong>er’s<br />
MAC Address <strong>to</strong> <strong>the</strong> table. The MAC Address is available<br />
on <strong>the</strong> Wireless Settings Page. Make sure <strong>the</strong> Node Type is<br />
Bro<strong>the</strong>r NC-7400w.<br />
NOTE: If you do not have this network settings information, or<br />
cannot find this information, do not proceed with <strong>the</strong> <strong>wireless</strong><br />
setup. Contact <strong>the</strong> manufacturer of your <strong>wireless</strong> access point<br />
or <strong>wireless</strong> router for this network information.<br />
STEP II: Perform a fac<strong>to</strong>ry reset on <strong>the</strong> <strong>print</strong>er<br />
1. Check that <strong>the</strong> front cover of <strong>the</strong> <strong>print</strong>er is closed. Turn OFF<br />
<strong>the</strong> power switch on <strong>the</strong> right side of <strong>the</strong> <strong>print</strong>er.<br />
2. Hold down <strong>the</strong> GO but<strong>to</strong>n as you turn on <strong>the</strong> power switch.<br />
The GO but<strong>to</strong>n is located on <strong>the</strong> <strong>to</strong>p left side of <strong>the</strong> <strong>print</strong>er<br />
below <strong>the</strong> Toner, Drum, and Error LEDs.<br />
3. Keep <strong>the</strong> GO but<strong>to</strong>n pressed down until <strong>the</strong> Toner, Drum,<br />
and Error LEDs light up. Release <strong>the</strong> GO but<strong>to</strong>n. Make sure<br />
that all <strong>the</strong> LEDs turn off.<br />
4. Press <strong>the</strong> GO but<strong>to</strong>n 8 times. The Ready LED (blue light)<br />
will flash while <strong>the</strong> <strong>print</strong>er is reset. After <strong>the</strong> <strong>print</strong>er is reset<br />
<strong>the</strong> Ready LED will be lit.<br />
STEP III: Perform a fac<strong>to</strong>ry reset on <strong>the</strong> <strong>print</strong>er network card<br />
1. Turn OFF <strong>the</strong> power switch on <strong>the</strong> right side of <strong>the</strong> <strong>print</strong>er.<br />
2. Hold down <strong>the</strong> GO but<strong>to</strong>n as you turn on <strong>the</strong> power switch.<br />
The GO but<strong>to</strong>n is located on <strong>the</strong> <strong>to</strong>p left side of <strong>the</strong> <strong>print</strong>er<br />
below <strong>the</strong> Toner, Drum, and Error LEDs.<br />
3. Keep <strong>the</strong> GO but<strong>to</strong>n pressed down until <strong>the</strong> Toner, Drum,<br />
and Error LEDs light up. Release <strong>the</strong> GO but<strong>to</strong>n. Make sure<br />
that all <strong>the</strong> LEDs turn off.<br />
4. Press <strong>the</strong> GO but<strong>to</strong>n 7 times with 5 seconds. The network<br />
card is now reset.<br />
STEP IV: Connect <strong>the</strong> <strong>print</strong>er via network cable and <strong>configure</strong><br />
<strong>the</strong> <strong>wireless</strong> settings<br />
1. Connect <strong>the</strong> Bro<strong>the</strong>r <strong>print</strong>er directly <strong>to</strong> an available port on<br />
<strong>the</strong> <strong>wireless</strong> access point, <strong>wireless</strong> hub, or <strong>wireless</strong> router<br />
using a network cable.<br />
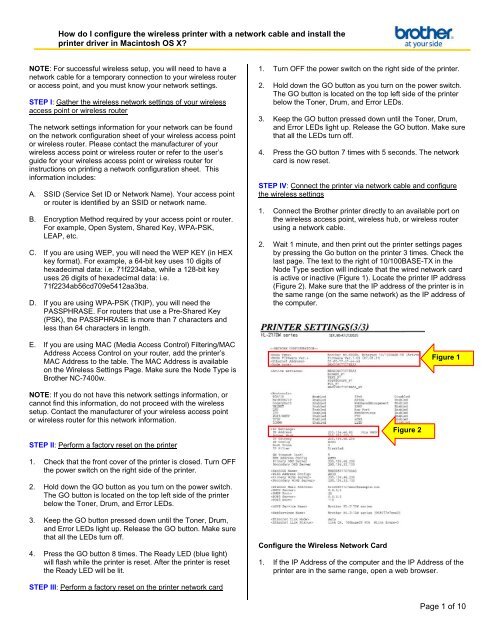
2. Wait 1 minute, and <strong>the</strong>n <strong>print</strong> out <strong>the</strong> <strong>print</strong>er settings pages<br />
by pressing <strong>the</strong> Go but<strong>to</strong>n on <strong>the</strong> <strong>print</strong>er 3 times. Check <strong>the</strong><br />
last page. The text <strong>to</strong> <strong>the</strong> right of 10/100BASE-TX in <strong>the</strong><br />
Node Type section will indicate that <strong>the</strong> wired network card<br />
is active or inactive (Figure 1). Locate <strong>the</strong> <strong>print</strong>er IP address<br />
(Figure 2). Make sure that <strong>the</strong> IP address of <strong>the</strong> <strong>print</strong>er is in<br />
<strong>the</strong> same range (on <strong>the</strong> same network) as <strong>the</strong> IP address of<br />
<strong>the</strong> computer.<br />
Configure <strong>the</strong> Wireless Network Card<br />
Figure 2<br />
Figure 1<br />
1. If <strong>the</strong> IP Address of <strong>the</strong> computer and <strong>the</strong> IP Address of <strong>the</strong><br />
<strong>print</strong>er are in <strong>the</strong> same range, open a web browser.<br />
Page 1 of 10
2. Enter <strong>the</strong> IP Address of <strong>the</strong> <strong>print</strong>er in<strong>to</strong> <strong>the</strong> web browser<br />
screen and press ENTER. The Bro<strong>the</strong>r Web Management<br />
screen will appear.<br />
NOTE: If <strong>the</strong> Bro<strong>the</strong>r Web Management screen doesn’t appear,<br />
verify your Mac is <strong>configure</strong>d with <strong>the</strong> same network information<br />
as <strong>the</strong> <strong>print</strong>er. To determine <strong>the</strong> computer’s IP address:<br />
Mac OS 10.5<br />
a. Select System Preferences from under <strong>the</strong> blue Apple in<br />
<strong>the</strong> <strong>to</strong>p left corner.<br />
b. Select Network.<br />
c. Click on Advanced. The Airport connection will indicate that<br />
it has a self-assigned IP Address.<br />
d. Click on <strong>the</strong> TCP/IP tab. Locate <strong>the</strong> IP Address. This<br />
number should be similar <strong>to</strong> <strong>the</strong> IP Address of <strong>the</strong> <strong>print</strong>er.<br />
The <strong>print</strong>er’s IP Address can be found on <strong>the</strong> Printer<br />
Settings pages you <strong>print</strong>ed out previously. The first two sets<br />
of numbers should be <strong>the</strong> same.<br />
For example:<br />
Computer IP Address is: 205.134.x.x<br />
Printer IP Address is: 205.134.x.x<br />
Mac OS 10.4<br />
a. Select System Preferences from under <strong>the</strong> blue Apple in<br />
<strong>the</strong> <strong>to</strong>p left corner.<br />
b. Select Network.<br />
c. Click on Configure. The Airport connection will indicate that<br />
it is connected <strong>to</strong> <strong>the</strong> Computer-<strong>to</strong>-Computer network<br />
SETUP.<br />
Page 2 of 10
d. Click on <strong>the</strong> TCP/IP tab. Locate <strong>the</strong> IP Address line. This<br />
number should be similar <strong>to</strong> <strong>the</strong> IP Address of <strong>the</strong> <strong>print</strong>er.<br />
The <strong>print</strong>er’s IP Address can be found on <strong>the</strong> Settings<br />
Pages you <strong>print</strong>ed out previously. The first two sets of<br />
numbers should be <strong>the</strong> same.<br />
For example:<br />
Computer IP Address is: 205.134.x.x<br />
Printer IP Address is: 205.134.x.x<br />
NOTE: If <strong>the</strong>se numbers are not similar (not in <strong>the</strong> same range),<br />
return <strong>to</strong> STEP III <strong>to</strong> perform a fac<strong>to</strong>ry reset on <strong>the</strong> <strong>print</strong>er<br />
network card. After <strong>the</strong> network card is reset, wait one minute,<br />
and <strong>the</strong>n press <strong>the</strong> GO but<strong>to</strong>n 3 times <strong>to</strong> <strong>print</strong> <strong>the</strong> settings<br />
pages. Review <strong>the</strong> last page for <strong>the</strong> <strong>print</strong>er IP address again. If<br />
<strong>the</strong> <strong>print</strong>er IP address is not similar <strong>to</strong> <strong>the</strong> computer IP address,<br />
DO NOT proceed with <strong>wireless</strong> setup. Please go <strong>to</strong> STEP III<br />
and reset <strong>the</strong> network card again.<br />
3. Click on Network Configuration near <strong>the</strong> <strong>to</strong>p of <strong>the</strong> screen.<br />
(Figure 3).<br />
4. A login screen will appear. Enter <strong>the</strong> following:<br />
Username: admin.<br />
Password: access.<br />
Then Click OK.<br />
Figure 3<br />
5. Click Configure Wireless (Figure 4).<br />
Figure 4<br />
6. Change <strong>the</strong> Communication Mode <strong>to</strong> Infrastructure (Figure<br />
5).<br />
7. Click BROWSE next <strong>to</strong> <strong>the</strong> Wireless Network Name (SSID)<br />
(Figure 5). For <strong>the</strong> SSID, refer <strong>to</strong> <strong>the</strong> network settings<br />
information ga<strong>the</strong>red in STEP I.<br />
Figure 5<br />
Page 3 of 10
8. Select <strong>the</strong> appropriate Name (SSID) from <strong>the</strong> list and click<br />
OK (Figure 6). Refer <strong>to</strong> <strong>the</strong> network settings information<br />
ga<strong>the</strong>red in STEP I.<br />
9. Leave <strong>the</strong> Channel setting as is.<br />
Figure 6<br />
10. Select <strong>the</strong> appropriate Au<strong>the</strong>ntication Method from <strong>the</strong> drop<br />
down list (Figure 7). Refer <strong>to</strong> <strong>the</strong> network settings<br />
information ga<strong>the</strong>red in STEP I.<br />
Figure 7<br />
11. Select <strong>the</strong> appropriate Encryption Method (Figure 8). Refer<br />
<strong>to</strong> <strong>the</strong> network settings information ga<strong>the</strong>red in STEP I.<br />
Figure 8<br />
NOTE: If WEP is selected as <strong>the</strong> Encryption Method, enter <strong>the</strong><br />
hex code for <strong>the</strong> WEP Key 1. There is no need <strong>to</strong> enter <strong>the</strong><br />
Passphrase for WEP Encryption.<br />
NOTE: If an Au<strong>the</strong>ntication Method o<strong>the</strong>r than Open or Shared<br />
is selected, <strong>the</strong>n a Passphrase must be entered on <strong>the</strong><br />
Passphrase line (Figure 9).<br />
12. Click Submit <strong>to</strong> update <strong>the</strong> <strong>print</strong>er with your <strong>wireless</strong><br />
settings (Figure 10).<br />
Figure 10<br />
Figure 9<br />
13. You will be prompted <strong>to</strong> enable <strong>the</strong> <strong>wireless</strong> interface. Click<br />
Yes (Figure 11).<br />
Figure 11<br />
14. The computer should display a screen indicating <strong>the</strong><br />
settings have been updated successfully and a reminder <strong>to</strong><br />
disconnect <strong>the</strong> network cable from <strong>the</strong> back of <strong>the</strong> <strong>print</strong>er<br />
(Figure 12). Disconnect <strong>the</strong> network cable from <strong>the</strong> <strong>print</strong>er.<br />
Figure 12<br />
NOTE: 2 pages will <strong>print</strong> out. The second page is <strong>the</strong> <strong>wireless</strong><br />
settings page. The Node Type will display <strong>the</strong> network card as<br />
inactive if <strong>the</strong> network cable is still connected. Once you<br />
disconnect <strong>the</strong> cable, <strong>the</strong> Wireless interface will become active.<br />
Page 4 of 10
NOTE: The IP Address will be 0.0.0.0. This is expected.<br />
Continue with <strong>the</strong> next step.<br />
15. The Wireless Network Card on <strong>the</strong> <strong>print</strong>er is now Active on<br />
<strong>the</strong> network.<br />
16. Verify <strong>the</strong> <strong>print</strong>er is now attached <strong>to</strong> <strong>the</strong> <strong>wireless</strong> access<br />
point or <strong>wireless</strong> router.<br />
a. Wait approximately one minute.<br />
b. Press <strong>the</strong> GO but<strong>to</strong>n 3 times <strong>to</strong> <strong>print</strong> <strong>the</strong> settings<br />
pages.<br />
NOTE: 4 Pages should <strong>print</strong> out. If only 3 pages <strong>print</strong> out, verify<br />
on <strong>the</strong> last page <strong>the</strong> Node Type. If <strong>the</strong> Node Type is NOT <strong>the</strong><br />
NC-7400W, <strong>the</strong> <strong>wireless</strong> interface is not enabled. To enable <strong>the</strong><br />
<strong>wireless</strong> interface, press and hold down <strong>the</strong> GO but<strong>to</strong>n until a<br />
page <strong>print</strong>s out. It should take about 20 seconds.<br />
c. Look at <strong>the</strong> last page <strong>print</strong>ed out. Confirm that <strong>the</strong> IP<br />
address on that page is assigned via DHCP (Figure<br />
13).<br />
d. Confirm <strong>the</strong> Comm. Mode is set <strong>to</strong> Infrastructure, <strong>the</strong><br />
Name (SSID) matches your access point or router and<br />
<strong>the</strong> Wireless Link Status is Link OK (Figure 14).<br />
Figure 13<br />
Figure 14<br />
NOTE: If <strong>the</strong> IP Address is still 0.0.0.0, wait ano<strong>the</strong>r minute and<br />
<strong>print</strong> out <strong>the</strong> settings pages again. If <strong>the</strong> IP Address is still<br />
0.0.0.0, please reset <strong>the</strong> router by powering it off, <strong>the</strong>n back on.<br />
Also, turn <strong>the</strong> <strong>print</strong>er off, <strong>the</strong>n back on. Wait approximately one<br />
minute. Print out <strong>the</strong> Network Settings page again and verify <strong>the</strong><br />
settings. If <strong>the</strong> IP Address is still a 0.0.0.0 number, please verify<br />
your security information in STEP I is correct and start again<br />
from STEP III.<br />
If <strong>the</strong> IP Address is a 169.254.x.x number and <strong>the</strong> Wireless Link<br />
Status in LINK OK, please check your router for MAC filtering. If<br />
MAC filtering is enabled, please enter <strong>the</strong> MAC address <strong>to</strong> <strong>the</strong><br />
list. If MAC filtering is not enable, please reset <strong>the</strong> router by<br />
powering it off, <strong>the</strong>n back on. Also, turn <strong>the</strong> <strong>print</strong>er off, <strong>the</strong>n back<br />
on. Wait approximately one minute. Print out <strong>the</strong> Network<br />
Settings page again and verify <strong>the</strong> settings. If <strong>the</strong> IP Address is<br />
still a 169.254.x.x number, please verify your security<br />
information in STEP I is correct and start again from STEP III.<br />
If <strong>the</strong> IP Address is a 169.254.x.x number and <strong>the</strong> Wireless Link<br />
Status in FAILED TO ASSOCIATE, please reset <strong>the</strong> router by<br />
powering it off, <strong>the</strong>n back on. Also, turn <strong>the</strong> <strong>print</strong>er off, <strong>the</strong>n back<br />
on. Print out <strong>the</strong> Network Settings page again and verify <strong>the</strong><br />
settings. If <strong>the</strong> IP Address is still a 169.254.x.x number, please<br />
verify your security information in STEP I is correct and start<br />
again from STEP III.<br />
The <strong>print</strong>er is now <strong>configure</strong>d and is operating on your network.<br />
If you have Bro<strong>the</strong>r software CD, proceed <strong>to</strong> STEP V. If you<br />
do not have <strong>the</strong> CD, proceed <strong>to</strong> STEP VI.<br />
STEP V: Install <strong>the</strong> <strong>print</strong>er driver from <strong>the</strong> CD<br />
1. Insert <strong>the</strong> Bro<strong>the</strong>r software CD in<strong>to</strong> <strong>the</strong> CD-ROM drive.<br />
Double click <strong>the</strong> HL2100 CD icon on <strong>the</strong> desk<strong>to</strong>p. Double<br />
click on Start Here.<br />
The opening screen will appear au<strong>to</strong>matically. Choose your<br />
<strong>print</strong>er model.<br />
Page 5 of 10
2. Select your language (English).<br />
3. Click Install Printer Driver (for USA/Canada/Latin America).<br />
4. Click Wireless Network Users.<br />
5. Select Driver Install Only and click Next.<br />
6. Click Continue on <strong>the</strong> welcome window.<br />
7. Read <strong>the</strong> license agreement. If you accept <strong>the</strong> license<br />
agreement, click Continue.<br />
Page 6 of 10
8. Click Agree <strong>to</strong> accept <strong>the</strong> License Agreement.<br />
NOTE: In Mac OS® X 10.4.x: Select <strong>the</strong> destination volume <strong>to</strong><br />
install <strong>the</strong> driver.<br />
9. Click Install <strong>to</strong> continue with <strong>the</strong> standard installation.<br />
NOTE: In Mac OS® X 10.4.x, click Upgrade.<br />
10. You will be prompted <strong>to</strong> enter your password. Enter your<br />
Macin<strong>to</strong>sh password and click OK.<br />
11. You will be informed that <strong>the</strong> computer will need <strong>to</strong> restart<br />
once <strong>the</strong> installation has completed. Click Continue<br />
Installation.<br />
12. You will receive a message that <strong>the</strong> install has succeeded.<br />
Click Restart <strong>to</strong> complete <strong>the</strong> installation.<br />
13. Once <strong>the</strong> computer is restarted, a window appears<br />
informing Setup is now complete. Click OK.<br />
Page 7 of 10
14. You will need <strong>to</strong> add <strong>the</strong> <strong>print</strong>er. Click <strong>the</strong> Blue Apple icon<br />
and select System Preferences and select Print & Fax.<br />
15. Click <strong>the</strong> Plus (+) sign.<br />
16. In Default view, select Bro<strong>the</strong>r HL-2170W series. Next <strong>to</strong><br />
Print Using, <strong>the</strong> CUPS driver should be listed. Click Add.<br />
17. The Bro<strong>the</strong>r <strong>HL2170W</strong> series <strong>print</strong>er icon now appears in<br />
<strong>the</strong> Print & Fax window.<br />
Setup is now complete. You do not need <strong>to</strong> perform STEP VI.<br />
If you wish <strong>to</strong> install <strong>the</strong> <strong>print</strong>er driver on a different computer,<br />
please follow <strong>the</strong>se <strong>print</strong>er driver installation steps again (STEP<br />
V).<br />
STEP VI: Install <strong>the</strong> <strong>print</strong>er driver From <strong>the</strong> Web<br />
The <strong>print</strong>er driver is available for free download from <strong>the</strong> Bro<strong>the</strong>r<br />
web site.<br />
<strong>How</strong> <strong>to</strong> install <strong>the</strong> downloaded driver:<br />
1. Download and save <strong>the</strong> Macin<strong>to</strong>sh <strong>print</strong>er driver <strong>to</strong> your<br />
desk<strong>to</strong>p.<br />
2. Once downloading is complete, you may need <strong>to</strong> doubleclick<br />
<strong>the</strong> file on <strong>the</strong> desk<strong>to</strong>p.<br />
3. Click Continue on <strong>the</strong> welcome window.<br />
Page 8 of 10
4. Read <strong>the</strong> license agreement. If you accept <strong>the</strong> license<br />
agreement, click Continue.<br />
5. Click Agree <strong>to</strong> accept <strong>the</strong> License Agreement.<br />
NOTE: In Mac OS® X 10.4.x: Select <strong>the</strong> destination volume <strong>to</strong><br />
install <strong>the</strong> driver.<br />
6. Click Install <strong>to</strong> continue with <strong>the</strong> standard installation.<br />
NOTE: In Mac OS® X 10.4.x, click Upgrade.<br />
7. You will be prompted <strong>to</strong> enter your password. Enter your<br />
Macin<strong>to</strong>sh password and click OK.<br />
8. You will be informed that <strong>the</strong> Mac will need <strong>to</strong> restart once<br />
<strong>the</strong> installation has completed. Click Continue Installation <strong>to</strong><br />
continue.<br />
Page 9 of 10
9. You will receive a message that <strong>the</strong> install has succeeded.<br />
Click Restart <strong>to</strong> complete <strong>the</strong> installation.<br />
10. Once <strong>the</strong> computer is restarted, you will need <strong>to</strong> add <strong>the</strong><br />
<strong>print</strong>er. Click <strong>the</strong> Blue Apple icon and select System<br />
Preferences and select Print & Fax.<br />
11. Click <strong>the</strong> Plus (+) sign.<br />
12. In Default view, select Bro<strong>the</strong>r HL-2170W series. Next <strong>to</strong><br />
Print Using, <strong>the</strong> CUPS driver should be listed. Click Add.<br />
13. The Bro<strong>the</strong>r <strong>HL2170W</strong> series <strong>print</strong>er icon now appears in<br />
<strong>the</strong> Print & Fax window.<br />
Setup is now complete.<br />
If you wish <strong>to</strong> install <strong>the</strong> <strong>print</strong>er driver on a different computer,<br />
please follow <strong>the</strong>se <strong>print</strong>er driver installation steps again (STEP<br />
VII).<br />
Page 10 of 10


