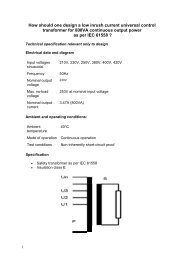
How do we design a small transformer? Concerning the mouse and ...
How do we design a small transformer? Concerning the mouse and ...
How do we design a small transformer? Concerning the mouse and ...

Create successful ePaper yourself
Turn your PDF publications into a flip-book with our unique Google optimized e-Paper software.
<strong>How</strong> <strong>do</strong> <strong>we</strong> <strong>design</strong><br />
a <strong>small</strong> <strong>transformer</strong>?<br />
<strong>Concerning</strong> <strong>the</strong> <strong>mouse</strong> <strong>and</strong> <strong>the</strong> control<br />
buttons<br />
You can use <strong>the</strong> <strong>mouse</strong> for everything.<br />
The menu control can also be activated by means of <strong>the</strong> Alt key <strong>and</strong> <strong>the</strong><br />
control letter for <strong>the</strong> menu option (after pressing <strong>the</strong> Alt key, it is normally<br />
visible in a different color). Some important menu options can be activated<br />
by means of <strong>the</strong> F keys.<br />
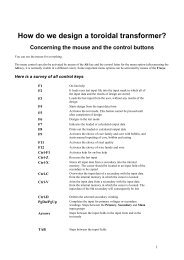
Here is a survey of all control keys:<br />
F 1 On-line help<br />
F 2 It loads your last input file into <strong>the</strong> input mask in which<br />
all of <strong>the</strong> input data <strong>and</strong> <strong>the</strong> results of <strong>design</strong> are<br />
stored<br />
F 3 Loads <strong>the</strong> st<strong>and</strong>ard input from <strong>the</strong> user (Reset)<br />
F 4 Starts <strong>design</strong> from <strong>the</strong> input data form<br />
F 5 Activates <strong>the</strong> test mode. This button cannot be<br />
pressed until after completion of <strong>design</strong><br />
F 6 Designs in <strong>the</strong> test mode<br />
F 7 Indicates <strong>the</strong> loaded or calculated output data<br />
F 8 Prints out <strong>the</strong> loaded or calculated output data<br />
F 9 Activates <strong>the</strong> choice of core family <strong>and</strong> core with<br />
bobbin, <strong>and</strong> starts manual inputting of core, bobbin<br />
<strong>and</strong> casing<br />
F 11 Activates <strong>the</strong> choice of steel quality<br />
F 12 Activates <strong>the</strong> choice of wire family <strong>and</strong> wire<br />
Ctrl-F1 Activates help for on-line help<br />
Ctrl-Z Reverses <strong>the</strong> last input<br />
Ctrl-X Stores all input data from a secondary into <strong>the</strong> internal<br />
memory. The cursor should be located in an input field<br />
of <strong>the</strong> secondary to be copied<br />
Ctrl-C Overwrites <strong>the</strong> input data of a secondary with <strong>the</strong> input<br />
data from <strong>the</strong> internal memory in which <strong>the</strong> cursor is<br />
located<br />
Ctrl-V Joins <strong>the</strong> input data from a secondary with <strong>the</strong> input<br />
data from <strong>the</strong> internal memory in which <strong>the</strong> cursor is<br />
located. The input data of <strong>the</strong> 8th secondary will<br />
consequently be lost<br />
Ctrl-D Deletes <strong>the</strong> selected secondary winding<br />
Arrows Steps bet<strong>we</strong>en <strong>the</strong> input fields in <strong>the</strong> input form <strong>and</strong> in<br />
<strong>the</strong> test mode<br />
TAB Steps bet<strong>we</strong>en <strong>the</strong> input fields
Run RALE DESIGN System for <strong>small</strong><br />
<strong>transformer</strong>s<br />
After installation of <strong>the</strong> RALE Design System , you see <strong>the</strong> Rale Design<br />
System program group on-screen.<br />
Click on <strong>the</strong> Small Transformers bottom<br />
After clicking on <strong>the</strong> Small Transformers bottom, <strong>the</strong> main menu for <strong>the</strong><br />
Small Transformesr Program will appear on-screen.<br />
Click on <strong>the</strong> icon /Small Transformers or press Enter.<br />
This is follo<strong>we</strong>d by <strong>the</strong> input mask on screen with your input data
Input mask<br />
(Numerical Characters =>Inputting), (Arrow, PgUp, PgDn, Mouse =>Move)<br />
Your last input file will be loaded into <strong>the</strong> input mask. Here, you can create<br />
your input or incorporate <strong>the</strong> input data from an input data file <strong>and</strong> thus<br />
achieve drastic acceleration in <strong>the</strong> procedure for filling-in of <strong>the</strong> input mask.
(TAB=>Steps), (Click=>Marks), (Double click=>Selects)<br />
In <strong>the</strong> installation of <strong>the</strong> Rale Design System, a RALE library of input data<br />
files has also been installed..
Input<br />
The input mask consists of 5 areas:<br />
1. Menu bar.<br />
2. Input form for primary data.<br />
3. Input form for secondary data.<br />
4. Input form for general technological parameters.<br />
5. Status line<br />
The 6 fields of <strong>the</strong> status line indicate, in sequence, <strong>the</strong> core family, <strong>the</strong><br />
core, <strong>the</strong> iron quality family, iron quality, <strong>and</strong> <strong>the</strong> minimum <strong>and</strong> maximum<br />
values of <strong>the</strong> current input.<br />
The input process for primary voltages <strong>and</strong> <strong>the</strong> secondary windings is<br />
concluded by means of <strong>the</strong> PgUp or PgDn keys
On-line Help<br />
Key F1 plays an important part at this point, because each input field has a<br />
help text. Use ESC to quit on-line help.<br />
(Mouse, PgDn, PgUp, Arrow =>Move), (ESC=>Exit)<br />
The input fields which are marked * are values with a unit of quantity (V, A,<br />
Hz,...) or multiplication factors. The input fields with - are code values. These<br />
can be entered or selected via <strong>the</strong> Options<br />
(ESC=>Exit)
Wires <strong>and</strong> steel<br />
The input fields for Wire type (not wire size) <strong>and</strong> Steel are a minor exception<br />
in this instance <strong>and</strong> can be selected in addition to manual input via <strong>the</strong><br />
Material/Wires/Fe menu or selected by means of keys F11<strong>and</strong> F12.<br />
(Alt-M <strong>and</strong> F or F11only =>Fe-Quality), (Alt-M <strong>and</strong> W or F12 only =>Wires)<br />
(TAB=>Move), (Click=>Mark), (Double click=>Select)
)<br />
(TAB=>Move), (Click=>Mark), (Double click=>Select
Core <strong>and</strong> bobbin unit<br />
Using <strong>the</strong> menu option of Material/Cores or key F9, you can select a core<br />
with a given bobbin or set up your own preferred combination.<br />
The distinction is drawn bet<strong>we</strong>en 4 different approaches for selection of <strong>the</strong><br />
core <strong>and</strong> of <strong>the</strong> bobbin:<br />
Automatic selection<br />
(Selection = 0)<br />
In this mode, you just know <strong>the</strong> core family for <strong>the</strong> core <strong>and</strong> <strong>the</strong> bobbin from<br />
which you have to choose. But you <strong>do</strong>n’t know which core is suitable for<br />
your application.<br />
Enter a 0 in <strong>the</strong> Selection input field.<br />
The core name in <strong>the</strong> status line must be AUTO.<br />
Core <strong>and</strong> bobbins are selected<br />
(Selection = 1)<br />
You wish to produce your application with a given core <strong>and</strong> a given bobbin<br />
from a given core family.<br />
(Alt-M <strong>and</strong> C or just F9 =>Cores <strong>and</strong> Bobbins)
(TAB=>Move), (Click=>Mar), (Double click=>Select)<br />
Select <strong>the</strong> Material/Cores menu option or press key F9.<br />
Select a core family.<br />
Use <strong>the</strong> <strong>mouse</strong> to click on <strong>the</strong> core you prefer.<br />
Click on <strong>the</strong> OK button. The Selection input field has automatically<br />
acquired <strong>the</strong> value of 1.<br />
Core <strong>and</strong> bobbin are incorporated from a single input data file<br />
(Selection = 2)<br />
We have already selected an input data file before accessing <strong>the</strong> input<br />
mask, or <strong>we</strong> have loaded an input data file from <strong>the</strong> input mask via <strong>the</strong><br />
Input/Open menu option. In this instance, <strong>we</strong> incorporated <strong>the</strong> core <strong>and</strong><br />
bobbin stored in this input data file. The input field for Selection has a value<br />
of 2. Using this procedure, <strong>we</strong> have no fur<strong>the</strong>r work to <strong>do</strong> with regard to core<br />
selection on-line.
(TAB=>Move), (Click=>Mark), (Double click=>Select)<br />
The core <strong>and</strong> bobbin are manually entered<br />
(Selection = 3)<br />
You wish to achieve your application with a given core <strong>and</strong> a given bobbin,<br />
but <strong>the</strong> core <strong>do</strong>es not exist in any core family.<br />
(Numerical =>Input), (TAB, Mouse =>Move)
(Numerical=>Input), (TAB, Mouse=>Move)<br />
Select <strong>the</strong> Material/Cores menu option or press key F9.<br />
Select a core family which could include your core.<br />
Use <strong>the</strong> <strong>mouse</strong> to click on a core which is similar to yours.<br />
Use <strong>the</strong> <strong>mouse</strong> to click on <strong>the</strong> Copy button <strong>and</strong> <strong>the</strong>n Yes.<br />
Change <strong>the</strong> core, <strong>the</strong> bobbi<strong>and</strong>/or<strong>the</strong> case.<br />
Click on <strong>the</strong> OK button. The Selection input field has automatically<br />
acquired <strong>the</strong> value of 3.<br />
Under this procedure, <strong>we</strong> have no fur<strong>the</strong>r work to <strong>do</strong> on-line with regard to<br />
core selection.
Saving <strong>the</strong> input data file<br />
Your input is COMPLETE! It is recommended that you save your input data<br />
into an input file.<br />
(Alt-I <strong>and</strong> S)<br />
(TAB => Move), (Click => Mark), (Double click => Select)<br />
Select <strong>the</strong> Input/Save menu option<br />
Enter <strong>the</strong> name of your input data file (max.of 8 characters, <strong>and</strong> <strong>the</strong><br />
extension .TK1 cannot be modified).<br />
Click on <strong>the</strong> OK button.
Run <strong>design</strong>ing<br />
Design is started via <strong>the</strong> Run/Start menu option or with key F4.<br />
(Alt-R <strong>and</strong> S or just F4)<br />
If you have not already selected a core, <strong>the</strong> program starts automatic search<br />
in accordance with one of your requirements from <strong>the</strong> core size as per your<br />
inputting, from <strong>the</strong> selected core data file.<br />
The program starts searching at <strong>the</strong> first core of <strong>the</strong> core family <strong>and</strong> passes<br />
through to <strong>the</strong> last core in <strong>the</strong> family in sequence. You are invited to approve<br />
<strong>the</strong> first core which is adequately large for your application.
This is follo<strong>we</strong>d by <strong>the</strong> <strong>design</strong> operation. Note that <strong>the</strong>re are 2 criteria of <strong>the</strong><br />
optimizing: dT => temperature rise or dU => Regulation
Data page for winding<br />
After <strong>the</strong> <strong>design</strong> procedure, a summary of <strong>the</strong> main results will appear onscreen.<br />
(Mouse, control bar, Arrows, PgUp, PgDn=>Move)<br />
The continuation of <strong>the</strong> above screen illustrates <strong>the</strong> extensive display of <strong>the</strong><br />
<strong>design</strong> results. Each <strong>design</strong>ed value is allocated with an appropriate<br />
explanatory text.<br />
If you should need fur<strong>the</strong>r information, please locate <strong>the</strong> cursor on <strong>the</strong> size<br />
value <strong>and</strong> press key F1. This activates on-line help.<br />
(Mouse, PgDn, PgUp, Arrows=>Move), (ESC=>Exit)
Press Key "2" to jump to this screen<br />
Press Key "3" to jamp to this screen
.<br />
Press key "4" to jump to this screen<br />
.
Press key "5" to jump to this screen<br />
Press key "6" to jump to this screen.
Press key "7" to jump to this screen.<br />
Press key "8" to jump to this screen.<br />
.
Press key "9" to jump to this screen<br />
If you are not satisfied with <strong>the</strong> results of <strong>design</strong>, you can :<br />
Return to <strong>the</strong> input form via <strong>the</strong> Input/Current menu option or by means of<br />
key F2, <strong>and</strong> reconfigure <strong>the</strong> input data on-line<br />
Or pass to <strong>the</strong> test mode via <strong>the</strong> Input/Test menu option or with key F5.<br />
Activate <strong>the</strong> Input/Test menu option or press key F5
Test mode<br />
(Alt-I <strong>and</strong> T or F5 only)<br />
In <strong>the</strong> test mode you can test a <strong>design</strong>ed <strong>transformer</strong> <strong>and</strong> manually change<br />
its parameters.<br />
(Numerical =>Input), (TAB, Arrows, PgUp, PgDn, Mouse=>Moved)
The input fields with <strong>the</strong> white background can be modified. For instance, if<br />
you want to change <strong>the</strong> wire size you have to move <strong>the</strong> cursor to <strong>the</strong> wire<br />
number:<br />
Click <strong>the</strong> menu option Material/Wires or press F12 to open <strong>the</strong> list with <strong>the</strong><br />
wires.
This <strong>the</strong> current wire size<br />
Select <strong>the</strong> wire size which you want <strong>and</strong> pres Alt-O or click OK
Re-<strong>design</strong> in <strong>the</strong> test mode is activated via <strong>the</strong> Run/Test menu option or by<br />
means of key F6.<br />
(Alt-R <strong>and</strong> Tor F6 only)
Here is <strong>the</strong> result after <strong>the</strong> re-<strong>design</strong>.
Help in test mode<br />
In order to get on-line help in <strong>the</strong> test mode place <strong>the</strong> cursor where you need<br />
help <strong>and</strong> press F1<br />
Printing<br />
The printing is performed via <strong>the</strong> Output/Print menu option or by means of<br />
key F8. After activation of <strong>the</strong> print process, <strong>the</strong> data, totalling approx 16kB<br />
(3 pages), is printed on your printer. You can too save <strong>the</strong> results of <strong>design</strong><br />
on your PC <strong>and</strong> load <strong>the</strong>m <strong>and</strong> print out later. The procedure for saving of<br />
<strong>the</strong> <strong>design</strong>ed data looks like this:<br />
.
Saving of results of <strong>design</strong><br />
Saving of <strong>the</strong> <strong>design</strong>ed data which you can load <strong>and</strong> print out later on <strong>the</strong><br />
data page for <strong>the</strong> winding, is activated via <strong>the</strong> Output/Save menu option.<br />
(Alt-A <strong>and</strong> S)<br />
Enter a name for <strong>the</strong> output file in which <strong>the</strong> <strong>design</strong>ed data is to be saved.<br />
(TAB=>Move), (Click=>Mark), (Double click=>Select)<br />
This completes your <strong>design</strong>.
Quitting your RALE Design System for <strong>small</strong><br />
<strong>transformer</strong>s<br />
Select <strong>the</strong> Input/exit menu option or press key Crtl-F12 <strong>and</strong> <strong>the</strong>n click on<br />
<strong>the</strong> Yes button.<br />
Important note:<br />
In this context, <strong>we</strong> have just discussed <strong>the</strong> procedure for <strong>design</strong> of <strong>the</strong> <strong>small</strong><br />
<strong>transformer</strong>. There is extensive coverage of <strong>the</strong> technical aspect of <strong>design</strong>,<br />
within <strong>the</strong> <strong>design</strong> examples.