AUTO BAKERY - Palsonic
AUTO BAKERY - Palsonic
AUTO BAKERY - Palsonic

You also want an ePaper? Increase the reach of your titles
YUMPU automatically turns print PDFs into web optimized ePapers that Google loves.
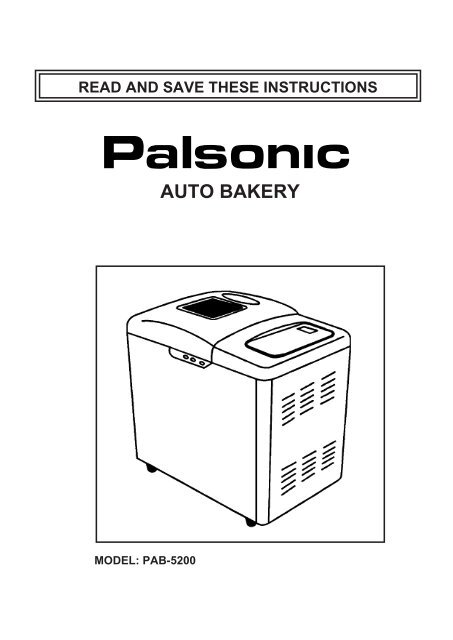
READ AND SAVE THESE INSTRUCTIONS<br />
MODEL: PAB-5200<br />
<strong>AUTO</strong> <strong>BAKERY</strong>
WHEN USING ELECTRICAL APPLIANCES, BASIC SAFETY PRECAUTIONS SHOULD<br />
ALWAYS BE FOLLOWED, INCLUDING THE FOLLOWING:<br />
1.<br />
2.<br />
3.<br />
4.<br />
5.<br />
6.<br />
7.<br />
8.<br />
9.<br />
10.<br />
11.<br />
12.<br />
13.<br />
14.<br />
15.<br />
16.<br />
17.<br />
18.<br />
19.<br />
20.<br />
IMPORTANT SAFEGUARDS<br />
Read all instructions carefully.<br />
Do not touch hot surfaces. Use handles or knobs and a potholder.<br />
Do not close or clog the steam vent openings under any circumstances.<br />
To protect against electrical shock, do not immerse cord, plug, or any other part of this Breadmaker, in water<br />
or other liquid.<br />
Close supervision is necessary when any appliance is used by or near children.<br />
Unplug the power supply cord when the appliance is not in use, or before cleaning.<br />
Allow to cool before putting on or taking off any parts, and before cleaning the appliance.<br />
Do not use or operate the appliance with a damaged cord or plug, or after the appliance malfunctions or has<br />
been damaged in any manner.<br />
The use of accessory attachments not recommended or sold by PALSONIC may cause injuries.<br />
Do not use outdoors.<br />
Do not let the power supply cord hang over the edge of table or counter, or touch hot surfaces.<br />
Do not place the appliance on or near heat sources such as gas or electric stove ovens, or burners.<br />
Extreme caution must be given when moving an appliances containing hot contents or liquids.<br />
To disconnect, press STOP, then remove plug from wall outlet. Grip plug and pull from wall outlet.<br />
Never pull on the cord.<br />
Do not use the Breadmaker for other than intended use.<br />
Avoid contact with moving parts.<br />
Do not pour any ingredients directly into the Breadmaker- only into the baking pan.<br />
The baking pan must be in place to avoid electric shock.<br />
Do not operate this appliance in the presence of explosive and / or flammable fumes.<br />
This appliance is intended for household use only and not for commercial or industrial use.<br />
To avoid damaging the machine, do not place the Baking Pan or any object on top of the unit.<br />
Do not clean with scouring pads. The baking pan and kneading blade have a non-stick coating.<br />
Refer to "Cleaning" section of this book.<br />
Do not use Breadmaker for storage purposes nor insert any utensils, as they may create a fire or electric<br />
shock.<br />
SPECIFICATIONS<br />
Model: PAB-5200<br />
Power Requirement:<br />
Power Consumption:<br />
Made in China<br />
SAVE THESE INSTRUCTIONS<br />
230V- 240V AC, 50Hz<br />
500 Watts<br />
PALSONIC CORPORATION PTY. LTD.<br />
1 Joynton Avenue,<br />
WATERLOO NSW 2017<br />
TEL: (02) 9313 7111<br />
FAX: (02) 9313 7555<br />
1
-<br />
-<br />
-<br />
-<br />
-<br />
-<br />
-<br />
-<br />
THINGS YOU SHOULD KNOW ABOUT YOUR BREADMAKER<br />
Your bread maker makes REGULAR (1 lb.), LARGE (1 1/2 lb.) and EXTRA LARGE (2 lb.)<br />
Loaves of breads.<br />
There are 11 settings, including one for dough.<br />
A "Keep Warm" function prevents the bread from getting soggy by keeping finished bread<br />
warm up to an hour after the baking is completed. This function stops when the unit is<br />
turned OFF / STOP or unplugged<br />
An "add-ingredient" function signals with an audible tone when it is time to add ingredients<br />
such as fruits or nuts to recipes used with the Basic Breads (2-3) and Sweet (8) settings.<br />
The signal tone comes on 32 minutes into the cycle (after initial kneading) so that your fruit<br />
or nuts will remain whole rather than be chopped up by the Kneading Blade. If you use the<br />
TIMER to delay baking, you may add all ingredients at once and bypass this function;<br />
however, your fruit or nuts may get somewhat "chopped".<br />
Do not cover the bread maker with towels or other material that may prevent steam from<br />
escaping. Some steaming from vents is normal.<br />
Do not place any objects on top of the bread maker.<br />
Unplug the unit and wait until it cools, then remove any food substances from inside the<br />
inner case of the Breadmaker by wiping with a damp sponge or cloth. See "Care and<br />
Cleaning", page 11 for full cleaning details.<br />
IMPORTANT:<br />
Always add ingredients in the order they are specified in the recipe.<br />
For best results, accurate measuring of ingredients is very important.<br />
Do not put larger quantities than recommended into the Baking Pan as it may produce poor<br />
results and may damage the bread maker.<br />
If you have any problems with the unit, contact the<br />
CUSTOMER SATISFACTION CENTRE<br />
for assistance<br />
Australia: 1300-657-888<br />
New Zealand: 0800-438-847<br />
Please read operating instructions before using this product.<br />
2
BEFORE FIRST USE<br />
Enjoy using your PALSONIC Auto Bakery. Before first use, please take a few minutes to read this Operating<br />
Instruction / Cookbook and to find a place to keep it handy for reference. Pay particular attention to the safety<br />
instructions we have provided for your protection. Carefully unpack the Breadmaker and remove all packaging<br />
materials. To remove any dust that may have accumulated during packing, wipe the Baking Pan, Kneading Blade<br />
and outside surface of the Breadmaker with a clean, damp cloth. Do not use scouring pads or any abrasives on<br />
any part of the Breadmaker.<br />
TABLE OF CONTENTS<br />
OPERATING INSTRUCTION SECTION<br />
Important Safeguards<br />
Specifications<br />
Things You Should Know About You<br />
Breadmaker<br />
Customer Satisfaction Centre<br />
Before First Use<br />
Names Of Parts<br />
Control Panel Settings & Functions<br />
Setting Descriptions<br />
How To Use Your Breadmaker<br />
Bread And Dough Settings<br />
Using The Timer For Delayed Completion<br />
Slicing And Storing Bread<br />
Care And Cleaning<br />
COOKBOOK SECTION<br />
Tips On Using Your Breadmaker<br />
Knowing Your Ingredients<br />
Measuring Your Ingredients<br />
Ingredient Temperatures<br />
Creating Your Own Yeast Breads<br />
Other Tips<br />
Special Glazes For Yeast Breads<br />
RECIPE SECTION<br />
Yeast Breads<br />
Basic White Bread<br />
100% Whole Wheat Bread<br />
Pumpernickel Bread<br />
Potato Bread<br />
Caraway Rye Bread<br />
Cracked Wheat Bread<br />
Seven Grain Bread<br />
Italian Herb Bread<br />
Corn Bread<br />
Cheese And Onion Bread<br />
Sour Cream Bread<br />
Pesto Bread<br />
Beer Bread<br />
Dark Rye Bread<br />
Sauerkraut Rye Bread<br />
Irish Soda Bread<br />
French Bread<br />
1<br />
1<br />
2<br />
2<br />
3<br />
4<br />
5<br />
6<br />
7-10<br />
7-9<br />
10<br />
10<br />
11-12<br />
13-17<br />
13-16<br />
16<br />
17<br />
17<br />
17<br />
17<br />
18<br />
18<br />
18<br />
18<br />
18<br />
19<br />
19<br />
19<br />
19<br />
19<br />
19<br />
20<br />
20<br />
20<br />
20<br />
20<br />
20<br />
3<br />
Cottage Dill Bread<br />
Yogurt Bread<br />
Honey Granola Bread<br />
Chunky Nut Bread<br />
Sunny Orange Bread<br />
Raisin Bread<br />
Mixed Fruit Bread<br />
Peanut Butter Bread<br />
Cranberry Nut Bread<br />
Chocolate Bread<br />
Banana Nut Bread<br />
Russian Kulich<br />
Dough Recipes<br />
Sour Dough Starter<br />
Sour Dough French<br />
Bagels<br />
Croissants<br />
Pizza Dough<br />
Layered Pizza Loaf<br />
White Rolls<br />
Wheat Rolls<br />
Pumpernickel Rolls<br />
Pretzels<br />
Raspberry Braid<br />
Hot Cross Buns<br />
Jewish Challah Loaf<br />
English Muffins<br />
Raisin Kolacky<br />
Doughnuts<br />
Cake<br />
Beat 2 Egg Cake<br />
Cake / Quick Bread<br />
Jam<br />
Baking Cycling Time<br />
Need Help? (Questions & Answers)<br />
Baking Tips Guide Introduction<br />
Baking Tips For Yeast Breads<br />
Troubleshooting<br />
21<br />
21<br />
21<br />
21<br />
21<br />
21<br />
22<br />
22<br />
22<br />
22<br />
22<br />
22<br />
23<br />
23<br />
23<br />
24<br />
24<br />
25<br />
25<br />
25<br />
25<br />
25<br />
26<br />
26<br />
26<br />
26<br />
27<br />
27<br />
27<br />
27<br />
27-28<br />
28<br />
29<br />
30-32<br />
32<br />
33-34<br />
35
NAMES OF PARTS<br />
Lid<br />
Lid Handle<br />
Viewing Window<br />
Vent<br />
Baking Pan (Installed in case)<br />
Inner Case<br />
Control Panel<br />
Main Body<br />
Back Vents<br />
(Not visible here<br />
Side Vents<br />
(On both sides)<br />
Power Supply<br />
Attachment<br />
Plug<br />
4<br />
Kneading Blade<br />
Wire Handle<br />
Baking Pan<br />
Rotating Shaft
CONTROL PANEL SETTINGS & FUNCTIONS<br />
NOTE: When using the touch pad controls, be sure to press the pad until you hear a beep.<br />
1 DISPLAY<br />
WINDOW<br />
2 TIMER<br />
SET<br />
3 SELECT<br />
4 START<br />
5 STOP<br />
- Shows one digit for the Setting Number (One of the numbers 1 to 11, depending on<br />
the setting you choose for a particular recipe).<br />
- Shows minute-by-minute baking time countdown.<br />
Use when setting the TIMER to delay baking.<br />
- Shows and Arrows.<br />
- Arrows will move time up or down in 10-minute increment.<br />
- Hold down the button for speedier results.<br />
- Press to select the setting of your choice (number 1 thru 11 - "1" for REGULAR, "2" for<br />
LARGE, "3" for EXTRA LARGE, "4" for REGULAR whole wheat bread, "5" for LARGE<br />
and EXTRA LARGE Whole Wheat Bread, etc. The selected setting automatically<br />
assigns the time needed to complete the process.<br />
- Press to start operation or begin Timer countdown for delayed completion.<br />
- Press and hold until you hear a beep to stop operation or cancel a Timer setting.<br />
(Note: Do not press "STOP" when you are just checking the progress of your bread.)<br />
5
SETTING DESCRIPTIONS<br />
NOTE: The number in parentheses following each setting description represents the total baking time.<br />
BASIC BREADS<br />
These settings are used for breads which primarily use white flour; though some recipes may include small amounts<br />
of whole wheat flour as well. These settings have the minimum number of rising cycles and the shortest overall times<br />
until baking is completed. Therefore, loaves will be slightly denser than French or Sweet breads.<br />
SETTING 1 - Regular (2 hours 45 minutes)<br />
Setting #1 is for smaller loaves and takes less time than Setting #2 and #3.<br />
SETTING 2 - Large (2 hours 50 minutes)<br />
Setting #2 and #3 are for large loaves. Most recipes use Setting #2. Use Setting #2 or #3 if you are adding ingredients<br />
such as cheese, nuts, or cornmeal as they tend to brown easily.<br />
SETTING 3 - Extra Large (3 hours 10 minutes)<br />
Setting #3 has a longer baking time and will produce a loaf with a darker crust.<br />
WHOLE WHEAT/MULTI GRAIN<br />
These settings are used for recipes with significant amounts of whole wheat or rye flour, oats, or bran. They begin<br />
with a delay period of 32 minutes during which the flours or grains soak in the liquid ingredients.<br />
Soaking causes the flour or grain to soften and helps ingredients to combine well. These settings also have an extra<br />
rise cycle to allow heavy wheat/grains to expand, Generally, whole wheat/multi grain breads are shorter and denser<br />
than Basic, French, or Sweet breads.<br />
SETTING 4 - Regular (4 hours 20 minutes)<br />
SETTING 5 - Large/Extra Large (4 hours 30 minutes)<br />
Setting #5 has a slightly longer bake time than #4 and loaves will have a darker crust. Use #4 to obtain a lighter<br />
crust or for recipes with added ingredients (bran, raisins, dried fruit, fruit juice) which may brown easily.<br />
SETTING 6 - Large/Rapid (3 hours 20 minutes)<br />
SPECIALTY<br />
SETTING 7 - French (3 hours 30 minutes)<br />
Traditionally French bread has a crispier crust and lighter inside texture than basic breads. Recipes usually do not<br />
include butter, margarine, or milk.<br />
SETTING 8 - Sweet (3 hours 25 minutes)<br />
Use this setting for recipes that use fruit juice, additional sugar, or added sweet ingredients such as coconut flakes,<br />
raisins, dried fruit, or chocolate. Baking temperature is reduced to prevent burning and the extra rise cycle gives<br />
the loaves a light, airy texture.<br />
SETTING 9 - Dough (1 hour 30 minutes)<br />
This setting makes dough only and will not bake the final bread. Dough can be shaped to make pizza, rolls, pretzels,<br />
doughnuts and round or braided breads that must then be baked in an oven or fried in a deep fryer (ie. doughnuts).<br />
Follow dough recipes for specific directions.<br />
SETTING 10 - Cake/Quick Bread (1 hour 40 minutes)<br />
SETTING 11 - Jam (1 hour)<br />
6
HOW TO USE YOUR BREADMAKER<br />
The 8 bread settings in this unit will combine ingredients, knead, and make bread from start to finish automatically.<br />
The DOUGH setting makes dough for a variety of recipes but you must shape and bake the dough yourself in an<br />
oven. To delay completion, the automatic TIMER may be programmed to make bread or dough while you are at<br />
work or asleep. (See "Using The Timer For Delayed Completion" page 10)<br />
To Obtain the best results when using ready made pre-mix select settings 1, 2 or 3.<br />
FOR ALL SETTINGS (#1 THRU 11) FOLLOW THESE INSTRUCTIONS:<br />
1<br />
2<br />
3<br />
Open lid and remove the Baking Pan by pulling<br />
straight up on the handle. It is important to remove<br />
the Baking Pan from the unit rather than putting<br />
ingredient into the Pan while it is in place to avoid<br />
accidentally spilling ingredients into the inner<br />
case.<br />
Attach the Kneading Blade onto the shaft inside the Baking Pan by lining<br />
up the flat side or the blade with the flat side on the shaft. Push the<br />
blade firmly onto the shaft.<br />
Select a recipe from the Cookbook section of this booklet, when<br />
following the recipes:<br />
Measure ingredients carefully and accurately. To measure liquids,<br />
use a see-through liquid measuring cup and check the measurement at<br />
eye level. When measuring dry ingredients, use a standard dry<br />
measuring cup and level the ingredients with a straight edge knife.<br />
Inaccurate measurement, even if only slightly off, can make a<br />
difference in results. Use standard measuring spoons and level off with<br />
a straightedge knife. (See "Measuring Your Ingredients" page 16)<br />
Always add ingredients into the Baking Pan in the order they are listed.<br />
Yeast is always added last. Be sure that the yeast does not touch the<br />
liquid ingredients.<br />
Liquids Dry Ingredients<br />
(ie. flour)<br />
7<br />
Yeast<br />
Warning:<br />
Place your Automatic Breadmaker<br />
where it is level, stable<br />
and secure.<br />
Be sure to set the kneading<br />
blade firmly into place otherwise<br />
the blade may come off during<br />
operation, which may affect the<br />
kneading or mixing.<br />
Be sure the shaft is clean of any<br />
residue (i.e. dough). This will<br />
ensure the kneading blade will<br />
fully seat into place.<br />
Be careful not to mix the yeast<br />
with any of the wet ingredients<br />
especially when using the<br />
delayed timer feature, otherwise<br />
the bread may not rise properly.
HOW TO USE YOUR BREADMAKER<br />
4<br />
5<br />
6<br />
7<br />
Place the Baking Pan back into the<br />
unit with the word FRONT on the<br />
upper rim of the Pan facing toward the<br />
front of the Breadmaker. Push down<br />
on the Pan until you hear it click firmly<br />
into place. Fold the handle down.<br />
Close the lid and connect the plug to<br />
an outlet. You will hear a beep sound<br />
and the display window is empty.<br />
Select the appropriate setting for your<br />
recipe (#1 thru 11) by pressing the<br />
SELECT button on the pad. Each time<br />
SELECT is pressed, the number in the<br />
display window will advance to the<br />
next setting.<br />
Press the START pad. The Baking<br />
time in hours and minutes will appear<br />
in the display. For example, if you<br />
choose a recipe using the Basic Bread<br />
setting (#1) for Regular the display will<br />
show 2:45. It will count down the<br />
remaining bake time in one-minute<br />
decrements (2:44, 2:43, etc) until the<br />
bread is done. When the baking time<br />
is completed, a signal tone will sound<br />
three times and the display window will<br />
flash "END".<br />
8<br />
Special Note:<br />
If the baking pan is not installed<br />
in the proper orientation or firmly<br />
clicked into place the kneading<br />
blade will fail to operate The<br />
baking pan can only be installed<br />
in one position as indicated.<br />
Warning:<br />
Do not place the baking pan or<br />
any other object on the top of<br />
the unit. To avoid damaging the<br />
bread maker’s surface, do not<br />
put any object or the hot baking<br />
pan on top of the unit.
HOW TO USE YOUR BREADMAKER<br />
8<br />
9<br />
10<br />
This Bread maker is designed with a "Keep Warm" function that<br />
automatically begins when the BAKE time is completed. At the end of<br />
the BAKE cycle "END" will appear (in the display window) up to 60<br />
minutes after baking is complete and will keep the bread warm during<br />
that time. You may remove the Baking Pan at any time during the "Keep<br />
Warm" cycle. To turn off the "Keep Warm" feature before the 60<br />
minutes are up, simply press the STOP button and hold it for 3<br />
seconds until you hear a "beep". END will disappear and the display<br />
window will now be empty. UNPLUG THE UNIT WHEN FINISHED.<br />
Never leave the unit plugged in when not in use. The "Keep Warm"<br />
feature is not provided for in the DOUGH setting. If you leave finished<br />
dough in the Bread maker over a period of time, it may over-rise and<br />
produce poor results. For best results, remove dough at the end of the<br />
cycle and follow the recipe directions for shaping, resting and baking.<br />
This Breadmaker has a convenient Viewing Window so that you may<br />
watch the progress of the bread as it is mixed, kneaded, and baked.<br />
Occasionally, some moisture may be formed in the window during<br />
processing. If moisture forms, you may lift the lid to look inside during<br />
the mixing and kneading stages, however, DO NOT OPEN THE LID<br />
DURING THE BAKING CYCLE (approximately the last hour or so) as<br />
this may cause the bread to collapse.<br />
To remove the bread from the Baking Pan, use pot holders or oven mitts<br />
and pull straight up on the Baking Pan handle. Turn the pan upside<br />
down and shake the bread out onto a wire cooling rack. The Baking Pan<br />
has a non-stick coated finish so that the bread should come out easily.<br />
Do not use metal utensils to remove bread as they may scratch the nonstick<br />
coating. If you have difficulty removing bread from the Baking Pan,<br />
slide a flat rubber or plastic spatula along the sides of the pan to loosen<br />
the loaf. Turn the pan over and shake the loaf out. Allow the bread to<br />
cool before slicing (See "Slicing and Storing Bread" page. 10). If the<br />
Kneading Paddle remains in the bottom<br />
of the Baking Pan, it may be<br />
necessary to fill the baking pan with<br />
warm water in order to loosen the<br />
Kneading Paddle from the shaft. If the<br />
Kneading Paddle remains in the bottom<br />
of the loaf of bread, use the end of<br />
a plastic spoon or other non-metal<br />
utensil to remove. Do not use a knife or<br />
any other sharp metal object as it will<br />
scratch the non-stick coating on Kneading<br />
Blade.<br />
9<br />
Note:<br />
There is no "Keep Warm"<br />
feature on dough setting #9.<br />
Do not open the lid during the<br />
baking cycle (approximately the<br />
last hour or so in each<br />
breadmaking program) as this<br />
may cause the bread to<br />
collapse.<br />
Always check to see where the<br />
kneading blade is when removing<br />
a baked leaf of bread. If it<br />
remains stuck in the bread you<br />
may accidentally damage it by<br />
cutting into it while slicing.
HOW TO USE YOUR BREADMAKER<br />
USING THE TIMER FOR DELAYED COMPLETION<br />
Use the TIMER when you would like to delay the completion of your bread. This feature allows you to delay<br />
the bake time for up to 12 hours. For example, it lets you set the TIMER at 8 p.m. one evening so that you<br />
can wake to fresh bread by 8 a.m. the following morning.<br />
TO SET THE TIMER, FOLLOW THESE INSTRUCTIONS:<br />
1<br />
2<br />
3<br />
4<br />
NOTE:<br />
Be sure you have followed the "How to Use Your Breadmaker" steps 1-6 in preparing the ingredients<br />
in the Baking Pan. It is not recommended that you use the "Delayed Completion" function and TIMER<br />
with recipes that call for fresh ingredients which might be spoiled such as eggs, fresh milk, sour cream,<br />
or cheese.<br />
To set the TIMER, determine when you would like your bread to be finished. For example, if it is 8 p.m.<br />
when you place all your ingredients in the Baking Pan and you would like to wake up to the aroma of<br />
fresh-baked bread at 8 a.m., you will want a total of 12 hours before your bread is complete. Once you<br />
have chosen the appropriate setting for your recipe (for example, if you are doing a Sweet bread, you<br />
will push SELECT until #8 is showing in the display), you simply set the TIMER to bring it up to your total<br />
hours - in this case 12 hours.<br />
Press the A arrow on the control panel and 3:25 - the time for setting #8 - will automatically come up in<br />
the display window. Continue to Press until the display reads 12:00 (or is as close to this as possible,<br />
since your timer moves in 10 minute increments, your actual reading for this setting will be 11:55 or 12:05).<br />
You do not need to mathematically calculate the difference between the setting time (3:25) and the total<br />
hours you want (12:00). The machine will automatically adjust to include the setting time. Simply set the<br />
TIMER for your total hours (12). If you pass the desired time, simply press to go back.<br />
Once you have set the time, press START. The colon (:) in the display will flash to indicate that the TIMER<br />
has been set and the countdown will begin. The TIMER will count down in one-minute increments. When<br />
the display reaches END, your bread is complete and the beeper will sound.<br />
If you make a mistake while setting the TIMER, press and hold the STOP button until it beeps. This will<br />
clear the display and you can set the TIMER again.<br />
SLICING AND STORING BREAD<br />
For best results place bread on a wire rack and allow to cool 15 to 30 minutes before slicing. You may use an electric<br />
knife for even slices. Otherwise, use a sharp knife with a serrated blade. For square slices, place the loaf on its<br />
side and slice across.<br />
Store unused bread tightly covered (zip-lock style bags or plastic containers work well) at room temperature up to<br />
three days. If weather is hot and humid, store in the refrigerator overnight. For longer storage (up to one month),<br />
place bread in a tightly covered container in the freezer. If you store the bread in the refrigerator, leave it out to<br />
bring it to room temperature before serving. Since homemade bread has no preservatives it tends to dry out and<br />
become stale faster than commercially made bread.<br />
Leftover slightly hardened bread may be cut into 1.3 cm (1/2 inch) or 2.5 cm (1 inch) cubes and used in favourite<br />
recipes to make croutons, bread pudding, or stuffing.<br />
10
CAUTION<br />
To prevent electrical shock, unplug the unit before cleaning. Wait until the Breadmaker has cooled prior to cleaning.<br />
Do not immerse or splash either the body or lid in any liquid as this may cause damage and/or electric shock.<br />
For best performance and maintenance, it is recommended to clean the Breadmaker after each use as<br />
follows:<br />
Outer Body, Lid, and Inner Case:<br />
Wipe the lid and outer body of the unit with a damp cloth or slightly dampened<br />
sponge. Use a damp sponge or cloth to wipe out any flour, crumbs, or other<br />
materials from the inner case.<br />
Baking Pan and Kneading Blade<br />
Both the Baking Pan and Kneading Blade have a non-stick coated surface. Do not use any harsh cleansers, abrasive<br />
materials or utensils on these parts that may scratch their surfaces. Over time, the non-stick surface may change<br />
in appearance due to moisture and steam. This is normal and has no effect on its use or quality.<br />
Remove the Baking Pan and Kneading Blade from the inner case before cleaning. Wipe the outside of the Baking<br />
Pan with a damp cloth. NEVER SUBMERGE THE BAKING PAN in water. You may hand wash the inside of the<br />
Baking Pan with soapy water. If the Kneading Blade gets stuck on its shaft, fill the Baking Pan with hot water and<br />
soak it for about 30 minutes or until it loosens and can be removed easily. If the hole in the Kneading Blade becomes<br />
clogged, carefully clean it out with a wooden or plastic toothpick.<br />
-<br />
-<br />
-<br />
-<br />
-<br />
-<br />
-<br />
-<br />
CARE AND CLEANING<br />
Paint Thinner<br />
Benzine<br />
Steel Wool<br />
Pads<br />
Polishing<br />
Powders<br />
Chemicals<br />
Dust cloth<br />
CAUTION:<br />
None of the Breadmaker parts are dishwasher safe. DO NOT place the Baking Pan or Kneading Blade in the<br />
dishwasher.<br />
Special care for the non-stick finish.<br />
Avoid damaging the coating. Do not use metal utensils such as spatulas, knives or forks. The<br />
coating may change colour after long use; this is only caused by moisture and steam and will<br />
not affect the performance of the unit or quality of your bread.<br />
11
CARE AND CLEANING<br />
STORING THE UNIT<br />
Be sure to dry all parts before storing including wiping any moisture from the Viewing Window. Close the Lid and<br />
do not store anything on top of the Lid.<br />
TIPS ABOUT THE ELECTRICAL CORD<br />
The cord length of this appliance has been selected to reduce the possibility of tangling or tripping over a longer<br />
cord. If additional cord length is needed, an extension cord may be used. If using an extension, be sure to arrange<br />
it so that it cannot be pulled or tripped on.<br />
TROUBLE-SHOOTING<br />
Specific questions about the Breadmaker functions and problems with ingredients or recipes are addressed in the<br />
"Need Help?" section on pages 30-32. For better performance, if you want to continue a second loaf of bread after<br />
the first one, allow the unit to cool sufficiently. It can be done by opening the lid, removing the Baking Pan and<br />
allowing the inner side of the unit to cool.<br />
12
TIPS ON USING YOUR BREADMAKER<br />
INTRODUCTION<br />
Waking to the smell of homemade bread baking in the kitchen is one of the most comforting memories of childhood<br />
Can you remember rushing downstairs to taste the bread, hot out of the oven, with butter melting on top? What.<br />
a great way to start the morning! The Automatic Breadmaker by PALSONIC can create that same experience every<br />
morning.<br />
There’s very little effort on the part of the baker, because this Automatic Breadmaker is a sophisticated counter-top<br />
appliance with a computer memory that does all the work for you. Just follow the recipe instructions, and wake<br />
up to the old-fashioned smell of fresh bread baking in your Automatic Breadmaker. But don’t stop at baking bread<br />
in this appliance. Besides being able to do all kinds of specialty breads, including 100% whole wheat, you can also<br />
prepare doughs for croissants, bagels, doughnuts, pizzas and more. Everything is easy and tastes homemade,<br />
because it is.<br />
Bake some bread and make some memories, for yourself, and the people you love.<br />
KNOWING YOUR INGREDIENTS<br />
It is often said that cooking is an art relying on the creativity of the chef while baking bread is much more of a science.<br />
This means that the process of combining flour, water and yeast results in a chemical reaction that produces bread.<br />
You have to remember that when the ingredients combine with each other they produce a specific result. Read<br />
the following information carefully to gain a better understanding of the importance each ingredient plays in the<br />
bread making process.<br />
1 ALL PURPOSE FLOUR<br />
All-Purpose Flour is a blend of refined hard and soft wheat flours especially suitable for making breads. Most popular<br />
brands have been tested in the Bread maker with excellent results.<br />
2 BREAD FLOUR<br />
Bread Flour is a high gluten/protein flour that has been treated with conditioners that give dough a greater tolerance<br />
during kneading. Bread Flour typically has a higher gluten concentration than All Purpose Flour; however, depending<br />
on different milling practices this may vary. It is not necessary to use Bread Flour with your Breadmaker, as most<br />
All Purpose Flours will produce loaves with good volume and structure.<br />
3 WHOLE WHEAT FLOUR<br />
Whole Wheat Flour is milled from the entire wheat kernel which contains the bran and germ and makes it heavier<br />
and richer in nutrients than All Purpose Flour. Breads made with this flour are usually smaller and heavier than white<br />
loaves. To overcome this Whole Wheat Flour is usually mixed with All Purpose Flour, Bread Flour, or Gluten Flour<br />
to produce a high light textured bread.<br />
4 RYE FLOUR<br />
Rye Flour is a high fibre flour similar to Whole Wheat Flour, also called Graham Flour. Rye Flour must always be<br />
mixed with a high proportion of All Purpose Flour, Bread Flour, or Gluten Flour, as it does not contain enough gluten<br />
to develop the structure for a high even-grained loaf.<br />
13
TIPS ON USING YOUR BREADMAKER<br />
5 GLUTEN FLOUR<br />
Gluten Flour is Wheat Flour that has been treated to remove nearly all the starch, which leaves a very high gluten<br />
content. (Gluten is the protein in the wheat that makes the dough elastic). This flour is usually available at most<br />
health food stores and is sometimes used in small portions with dense low gluten flours such as whole wheat to<br />
increase volume and lighten texture.<br />
6 CAKE FLOUR<br />
Cake Flour is made from softer or lower protein wheats and is specially designed for use in cake recipes.<br />
7 SELF-RAISING FLOUR<br />
Self Raising Flours contain unnecessary leavening ingredients that will interfere with bread and cake making. It is<br />
not recommended for use.<br />
IMPORTANT SPECIAL NOTE ON FLOURS<br />
Flours, while visibly similar, can be very different by virtue of how they were grown, milled, stored, etc. You may<br />
find that you will have to experiment with different brands of flour to help you make that perfect loaf. A Baking Tips<br />
Guide has been provided on pages 33 and 34 of this book to assist you with these experiments.<br />
Storage is also very important, as all flours should be kept in a secure, airtight container. Rye and Whole Wheat<br />
Flours should be maintained in a refrigerator, or a cool area to prevent them from becoming rancid.<br />
8 BRAN<br />
Bran (unprocessed) & Wheat Germ are the coarse outer portions of the wheat or rye grains separated from flour<br />
by sifting or bolting. They are often added in small quantities to bread for nutritional enrichment, heartiness and<br />
flavour. They are also used to enhance the texture of bread.<br />
9 CORNMEAL & OATMEAL<br />
Cornmeal & Oatmeal come from coarsely ground white or yellow corn and from rolled or steel-cut oats. They are<br />
used primarily to enhance the flavour and texture.<br />
10 CRACKED WHEAT<br />
Cracked Wheat is very coarse in texture. It comes from wheat kernels cut into angular fragments. It gives Whole<br />
Grain Breads a nutty flavour and crunchy texture.<br />
11 SEVEN GRAIN CEREAL BLEND<br />
Seven-Grain Cereal Blend is a blend of cracked wheat, oats, bran, rye, corn meal, flax seeds, and hulled millet.<br />
14
TIPS ON USING YOUR BREADMAKER<br />
12 YEASTS<br />
ACTIVE DRY YEAST<br />
Yeast through a fermentation process produces gas (carbon dioxide) necessary to make the bread rise. Yeast must<br />
be able to feed on sugar and flour carbohydrates in order to produce this gas. Active dry granular yeast is used<br />
in all recipes that call for yeast. There are basically three different types of yeast available, fresh, dry and instant<br />
quick rising. It is recommended that traditional dry yeast be used, however, instant quick rising can also be used<br />
in lesser amounts. (Note: The recipes in this cookbook were developed using traditional dry yeast), Fresh or<br />
compressed cake yeast is not recommended as they will produce poor results. Yeast must always be stored in a<br />
refrigerator to keep it fresh. Too much heat will kill it. Ensure your yeast is fresh by checking its expiration date.<br />
Once a package or can of yeast is opened it is important that the remaining contents be immediately resealed and<br />
refrigerated as soon as possible for future use. Often bread or dough, which fails to rise, is due to stale yeast being<br />
used. The following test can be used to determine whether your yeast is stale and inactive:<br />
A) Place l/2 cup of lukewarm water into a small bowl or cup.<br />
B) Stir 1 tsp. of sugar into the water then sprinkle 2 tsp. of yeast over the surface.<br />
C) Place bowl or cup in a warm area and allow to sit for 10 minutes undisturbed.<br />
D) The mixture should foam and produce a strong yeast aroma.<br />
If this does not occur, fresh yeast should be purchased.<br />
CONVERSION CHART FOR FAST-RISING YEAST<br />
1 1/2 Teaspoons active dry yeast = 1 teaspoon fast-rising yeast<br />
2 1/2 Teaspoons active dry yeast = 1 l/2 teaspoon fast-rising yeast<br />
3 Teaspoons active dry yeast = 1 3/4 teaspoon fast-rising yeast<br />
Note: 1. 1 Teaspoon equivalent to 5ml.<br />
2. 1 Tablespoon equivalent to 15ml.<br />
13 SUGAR<br />
Sugar is important for the colour and flavour of breads. It is also food for the yeast as it supports the fermentation<br />
process. Recipes in this cook book that call for sugar require granulated sugar. Do not substitute powdered sugar<br />
or brown sugar unless indicated. Artificial sweeteners cannot be used as a substitute for sugar as the yeast<br />
will not react properly with them.<br />
14 SALT<br />
Salt is necessary to balance the flavour of breads and cakes, as well as for the crust colour that develops during<br />
baking. Salt also limits the growth of yeast so the amounts shown in the recipes should not be increased. For dietary<br />
reasons it may even be eliminated entirely, however, your bread may over-proof and rise higher than normal.<br />
15 LIQUIDS<br />
Liquids such as milk (l%, 2%, whole & skim) or a combination of powdered milk and water, can be used when<br />
making bread. Milk will improve flavour, provide a velvety texture and soften the crust, while water alone will produce<br />
a crispier crust, Some liquids call for juice (orange, apple, etc.) to be added as a flavour enhancer.<br />
16 EGGS<br />
Eggs add richness and a velvety texture to bread doughs and cakes. Use large-size eggs in these recipes.<br />
17 SHORTENING, BUTTER & MARGARINE<br />
Shortening, Butter and Margarine "shortens" or tenderises the texture of yeast breads. French Bread gets its unique<br />
crust and texture from the lack of butter added. However, breads that call for butter stay fresh longer. If butter or<br />
margarine is used direct from the refrigerator, it should be cut into small pieces for easier blending during the<br />
kneading cycle. Oil should not be used as a substitute for butter, margarine or shortening.<br />
15
TIPS ON USING YOUR BREADMAKER<br />
18 BAKING POWDER<br />
Baking Powder is a leavening agent used in quick breads and cakes. This type of leavening agent does not require<br />
rising time before baking as the chemical reaction works when liquid ingredients are added.<br />
19 BAKING SODA<br />
Baking Soda is another leavening agent not to be confused or substituted for baking powder. It also does not require<br />
rising time before baking as the chemical reaction works during baking process.<br />
MEASURING YOUR INGREDIENTS<br />
The key and most important step when using your Breadmaker is measuring your ingredients precisely and<br />
accurately. It is extremely important to measure each liquid and dry ingredient properly or it could result in a poor<br />
or unacceptable baking result. The ingredients must also be added into the baking pan in the order in which they<br />
are given in each recipe. Liquid and dry measurements are done somewhat differently and are as follows:<br />
Liquid Measurements<br />
Either plastic or glass transparent liquid measuring cups must be used<br />
to measure all liquids such as water or milk. When reading amounts, the<br />
measuring cup must be placed on a horizontal flat surface and viewed<br />
at eye level (not on an angle). The liquid level line must be aligned to<br />
the mark of measurements, as just a guess is not good enough as it<br />
could throw out the critical balance of the recipe.<br />
Dry Measurements<br />
Dry measurements (especially flours) must be done using standard size dry measuring cups. These cups are<br />
available in various size graduations. Dry measuring must be done by gently spooning ingredients into the<br />
measuring cup and then once filled, levelling off with a knife (See Fig. 1 and 2 below). Scooping or tapping a<br />
measuring cup will pack the ingredients and you will end up with more than is required. This extra amount could<br />
affect the balance of the recipe. Do not sift the flour.<br />
When measuring small amounts of dry or liquid ingredients (ie. Yeast, Sugar, Salt, Powdered Milk, Honey, Molasses)<br />
a standard measuring spoon must be used. Measurements must be level, not heaping as this small difference could<br />
throw out the critical balance of the recipe.<br />
Your Bread maker produces delicious baked goods with ease. This marvellous machine asks only that you carefully<br />
follow the recipe instructions. In basic cooking, normally "a pinch of this and a dash of that" is fine, but not for<br />
automatic Bread makers. Using an automatic Bread maker requires you accurately measure each ingredient<br />
(especially yeast and water) for best results. For best results, have your ingredients at room temperature unless<br />
otherwise specified.<br />
Fig 1<br />
16<br />
Fig 2
INGREDIENT TEMPERATURES<br />
All ingredients, especially liquids (water or milk), should be warmed to room temperature 21°C (70°F). If ingredients<br />
are too cold, below 10°C (50°F), they will not activate the yeast. Extremely hot liquids, above 40°C (104°F) may<br />
kill the yeast.<br />
CREATING YOUR OWN YEAST BREADS<br />
With the Automatic Breadmaker, even the most inexperienced baker can achieve the satisfying experience of baking<br />
a loaf of bread. All of the mystery and hard work is gone. Inside this talented machine with a computer brain, the<br />
dough is mixed, kneaded, proofed, and baked without you being present. The Automatic Breadmaker can also just<br />
prepare the dough, and when it’s ready, you shape and bake in a conventional oven. The recipes on the following<br />
pages are tailored for this PALSONIC Breadmaker. Each recipe features ingredients that best compliment a<br />
particular loaf of bread, and each was tested in our machines. It is extremely important not to exceed the amounts<br />
of flour specified in each of the recipes or else it could result in unsatisfactory baking performance. When creating<br />
your own yeast bread recipes or baking an old favourite, use the recipes in this cookbook as a guide for converting<br />
portions from your recipe to your Breadmaker.<br />
OTHER TIPS<br />
-<br />
-<br />
-<br />
-<br />
-<br />
-<br />
-<br />
-<br />
-<br />
TIPS ON USING YOUR BREADMAKER<br />
Place all recipe ingredients into the baking pan so that yeast is not touching any liquid.<br />
Use Bread Flour when a recipe calls for white flour, because our testing has shown that it consistently provides<br />
the best quality bread.<br />
After completing the process of making Dough in your Bread maker, typically when letting dough rise outside<br />
the Bread machine, allow 30 minutes or until dough doubles in size. Dough should be lightly greased and<br />
covered with waxed paper and a dry towel. It should be placed in a warm area free from drafts,<br />
Humidity makes dough more moist, therefore humidity and high altitudes require adjustments.<br />
For humidity, add an extra tablespoon of flour if consistency isn’t right. For high altitudes, decrease yeast<br />
amount approximately 1/4 teaspoon, and decrease sugar and/or water or milk slightly.<br />
(See "Baking Tips Guide" pages 33 & 34).<br />
The DOUGH setting is great for mixing, kneading, and proofing (allowing dough to rise) richer dough like<br />
croissant doughs. Use the Automatic Breadmaker to prepare this dough so all you need to do is shape and<br />
bake it according to your recipe.<br />
When recipes call for a lightly floured surface, use about 1 to 2 tablespoons of flour on the surface.<br />
You may want to lightly flour your fingers or rolling pin for easy dough manipulation.<br />
When you let dough rest and rise” according to a recipe, place it in a warm, draft-free area. If the dough<br />
doesn’t double in size, it may not produce a tender product. Dough is ready when an indentation remains<br />
when it is touched.<br />
If the dough you are rolling shrinks back, let it rest covered for a few minutes before rolling again.<br />
Dough may be wrapped in plastic and stored in a freezer for later use. Bring the dough to room temperature<br />
before using.<br />
SPECIAL GLAZES FOR YEAST BREADS<br />
Give your just baked bread a professional finish. Select one of the following special glazes to enhance your bread.<br />
Egg Glaze:<br />
Beat 1 large egg and 1 tablespoon of water together, brush generously (Note: apply only to doughs before baking).<br />
Melted Butter Crust:<br />
Brush melted butter over just baked bread for a softer, tender crust.<br />
Milk Glaze:<br />
For a softer, shiny crust, brush just baked bread with milk or cream.<br />
Sweet Icing Glaze:<br />
Mix 1 cup sifted icing sugar with 1 to 2 tablespoons of milk to make a consistent glaze, drizzle over Raisin Bread<br />
or Sweet Breads.<br />
Poppy/Sesame/Caraway Seed/Cornmeal/DatmeaI: Sprinkle your choice of these seeds generously over just<br />
glazed bread.<br />
17
RECIPES<br />
BASIC WHITE BREAD 100% WHOLE WHEAT BREAD PUMPERNICKEL BREAD<br />
Ingredient<br />
Water<br />
Skim Milk Powder<br />
Shortening<br />
Sugar<br />
Salt<br />
White Flour<br />
(1) Yeast<br />
Use Setting<br />
POTATO BREAD<br />
Extra Large<br />
1 2/3 cups<br />
2 tbsp.<br />
2 tbsp.<br />
2 tbsp.<br />
1 tsp.<br />
4 1/3 cups<br />
1 1/2 tsp.<br />
3<br />
METHOD<br />
1 Measure ingredients into baking pan.<br />
2 Insert baking pan securely into unit, close lid<br />
3 Select appropriate bread setting<br />
4 Push start button.<br />
5 The Breadmaker will beep 3 times & the display<br />
will flash "END" when bread is done.<br />
6 Using oven mitts, remove pan from unit.<br />
7 Remove bread from baking pan.<br />
(and kneading blade from bread if required)<br />
8 Allow to cool before slicing.<br />
Yield: Makes 1 loaf<br />
Ingredient<br />
Water<br />
Skim Milk Powder<br />
Shortening<br />
Sugar<br />
Salt<br />
Dry Potato Flakes<br />
White Flour<br />
(1) Yeast<br />
Use Setting<br />
METHOD<br />
1 Measure ingredients into baking pan.<br />
2 Insert baking pan securely into unit, close lid<br />
3 Select appropriate bread setting<br />
4 Push start button.<br />
5 The Breadmaker will beep 3 times & the display<br />
will flash "END" when bread is done.<br />
6 Using oven mitts, remove pan from unit.<br />
7 Remove bread from baking pan.<br />
(and kneading blade from bread if required)<br />
8 Allow to cool before slicing.<br />
Yield: Makes 1 loaf<br />
Regular<br />
1 cup<br />
1 tbsp.<br />
2 tbsp.<br />
2 tbsp.<br />
1 tsp.<br />
2 2/3 cups<br />
1 tsp.<br />
1<br />
Regular<br />
1 cup<br />
1 tbsp.<br />
1 tbsp.<br />
1 tbsp.<br />
1 1/2 tsp.<br />
1/3 cup<br />
2 1/2 cups<br />
1 1/2 tsp.<br />
1<br />
Large<br />
1 1/4 cups<br />
1 tbsp.<br />
2 tbsp.<br />
2 tbsp.<br />
1 tsp.<br />
3 3/8 cups<br />
1 1/2 tsp.<br />
2<br />
Large<br />
1 1/3 cup<br />
2 tbsp.<br />
2 tbsp.<br />
2 tbsp.<br />
1 1/2 tsp.<br />
1/3 cup<br />
3 1/2 cups<br />
1 1/2 tsp.<br />
2<br />
Extra Large<br />
1 2/3 cup<br />
3 tbsp.<br />
3 tbsp.<br />
3 tbsp.<br />
2 tsp.<br />
1/2 cup<br />
4 1/4 cups<br />
2 tsp.<br />
3<br />
(1) See page 15 for additional Dry Yeast Information.<br />
* All of the recipes in this book have been tested with<br />
your Breadmaker. If the result IS not satisfied,<br />
ingredients adjustment may be needed (particularly<br />
yeast & water). For details, please refer to the "Baking<br />
Tips for Yeast Bread" on page 33-34.<br />
Ingredient<br />
Water<br />
Skim Milk Powder<br />
Shortening<br />
Honey<br />
Molasses<br />
Salt<br />
METHOD<br />
1 Measure ingredients into baking pan.<br />
2 Insert baking pan securely into unit, close lid<br />
3 Select appropriate bread setting<br />
4 Push start button.<br />
5 The Breadmaker will beep 3 times & the display<br />
will flash "END" when bread is done.<br />
6 Using oven mitts, remove pan from unit.<br />
7 Remove bread from baking pan.<br />
(and kneading blade from bread if required)<br />
8 Allow to cool before slicing.<br />
Yield: Makes 1 loaf<br />
Regular<br />
1 cup<br />
1 tbsp.<br />
1 tbsp.<br />
1 tbsp.<br />
1 tbsp.<br />
1 tsp.<br />
Whole Wheat Flour 2 1/2 cups<br />
(1) Yeast 1 1/4 tsp.<br />
Use Setting 4<br />
EQUIVALENT CHART<br />
Regular = 1 lb. Bread<br />
Large = 1 l/2 lb. Bread<br />
Extra Large = 2 lb. Bread<br />
18<br />
Large Extra Large<br />
1 1/4 cups 1 1/2 cups<br />
2 tbsp. 3 tbsp.<br />
2 tbsp. 3 tbsp.<br />
2 tbsp. 2 tbsp.<br />
1 tbsp. 2 tbsp.<br />
1 1/2 tsp. 2 tsp.<br />
3 1/4 cups<br />
1 1/2 tsp.<br />
5, 6<br />
4 cups<br />
1 1/2 tsp.<br />
5, 6<br />
Ingredient<br />
Water<br />
Skim Milk Powder<br />
Shortening<br />
Sugar<br />
Molasses<br />
Salt<br />
White Flour<br />
Whole Wheat Flour<br />
Rye Flour<br />
Cocoa<br />
Instant Coffee<br />
(1) Yeast<br />
Use Setting<br />
METHOD<br />
1 Measure ingredients into baking pan.<br />
2 Insert baking pan securely into unit, close lid<br />
3 Select appropriate bread setting<br />
4 Push start button.<br />
5 The Breadmaker will beep 3 times & the display<br />
will flash "END" when bread is done.<br />
6 Using oven mitts, remove pan from unit.<br />
7 Remove bread from baking pan.<br />
(and kneading blade from bread if required)<br />
8 Allow to cool before slicing.<br />
Yield: Makes 1 loaf<br />
CARAWAY RYE BREAD<br />
Ingredient<br />
Water<br />
Skim Milk Powder<br />
Shortening<br />
Brown Sugar<br />
Molasses<br />
Salt<br />
Caraway Seeds<br />
White Flour<br />
Rye Flour<br />
Whole Wheat Flour<br />
(1) Yeast<br />
Use Setting<br />
METHOD<br />
1 Measure ingredients into baking pan.<br />
2 Insert baking pan securely into unit, close lid<br />
3 Select appropriate bread setting<br />
4 Push start button.<br />
5 The Breadmaker will beep 3 times & the display<br />
will flash "END" when bread is done.<br />
6 Using oven mitts, remove pan from unit.<br />
7 Remove bread from baking pan.<br />
(and kneading blade from bread if required)<br />
8 Allow to cool before slicing.<br />
Yield: Makes 1 loaf<br />
Regular<br />
1 cup<br />
1 tbsp.<br />
1 tbsp.<br />
1 tbsp.<br />
1 tbsp.<br />
1 tsp.<br />
1 1/3 cups<br />
3/4 cup<br />
1/4 cup<br />
1 tbsp.<br />
1 tsp.<br />
1 1/2 tsp.<br />
1<br />
Regular<br />
1 cup<br />
1 tbsp.<br />
1 tbsp.<br />
2 tbsp.<br />
1 tbsp.<br />
1 tsp.<br />
1 1/2 tsp.<br />
1 1/2 cups<br />
1 1/2 cups<br />
3/4 cup<br />
1 1/2 tsp.<br />
1<br />
Large<br />
1 1/4 cups<br />
2 tbsp.<br />
1 tbsp.<br />
2 tbsp.<br />
2 tbsp.<br />
1 1/2 tsp.<br />
1 3/4 cups<br />
1 cup<br />
1/2 cup<br />
2 tbsp.<br />
1 1/2 tsp.<br />
1 1/2 tsp.<br />
2, 3<br />
Large<br />
Extra Large<br />
1 2/3 cups<br />
3 tbsp.<br />
2 tbsp.<br />
2 tbsp.<br />
3 tbsp.<br />
2 tsp.<br />
2 1/3 cups<br />
1 cup<br />
3/4 cup<br />
3 tbsp.<br />
2 tsp.<br />
2 tsp.<br />
3<br />
Extra Large<br />
1 1/4 cups 1 2/3 cups<br />
2 tbsp. 3 tbsp.<br />
2 tbsp. 2 tbsp.<br />
2 tbsp. 2 tbsp.<br />
1 tbsp. 2 tbsp.<br />
1 1/2 tsp. 2 tsp.<br />
2 tsp. 2 tsp.<br />
1 3/4 cups 2 1/2 cups<br />
1 3/4 cups 2 1/2 cups<br />
3/4 cup 1 cup<br />
1 1/2 tsp. 1 1/2 tsp.<br />
2, 3 3
RECIPES<br />
CRACKED WHEAT BREAD SEVEN GRAIN BREAD ITALIAN HERB BREAD<br />
Ingredient<br />
Water<br />
Skim Milk Powder<br />
Shortening<br />
Honey<br />
Salt<br />
White Flour<br />
Whole Wheat Flour<br />
Cracked Wheat Flour<br />
(1) Yeast<br />
Use Setting<br />
METHOD<br />
1 Measure ingredients into baking pan.<br />
2 Insert baking pan securely into unit, close lid<br />
3 Select appropriate bread setting<br />
4 Push start button.<br />
5 The Breadmaker will beep 3 times & the display<br />
will flash "END" when bread is done.<br />
6 Using oven mitts, remove pan from unit.<br />
7 Remove bread from baking pan.<br />
(and kneading blade from bread if required)<br />
8 Allow to cool before slicing.<br />
Yield: Makes 1 loaf<br />
Ingredient<br />
Water +<br />
1 Egg (beaten)<br />
Powdered Milk<br />
Shortening<br />
Honey<br />
Salt<br />
White Flour<br />
Cornmeal<br />
(1) Yeast<br />
Use Setting<br />
Regular<br />
1 cup<br />
1 tbsp.<br />
2 tbsp.<br />
2 tbsp.<br />
1 tsp.<br />
2 cups<br />
1/3 cup<br />
1 1/2 tsp.<br />
1<br />
Large Extra Large<br />
1 1/4 cups 1 2/3 cups<br />
2 tbsp.<br />
2 tbsp.<br />
3 tbsp.<br />
1 1/2 tsp.<br />
3 cups<br />
1/3 cup<br />
1 3/4 tsp.<br />
2<br />
2 tbsp.<br />
1/4 cup<br />
1/4 cup.<br />
2 tsp.<br />
4 cups<br />
1/2 cup<br />
2 tsp.<br />
3<br />
Ingredient<br />
Water<br />
Skim Milk Powder<br />
Shortening<br />
Sugar<br />
Salt<br />
Dried Marjoram<br />
Dried Basil<br />
Dried Thyme<br />
White Flour<br />
(1) Yeast<br />
Use Setting<br />
Ingredient<br />
Water<br />
Sour Cream<br />
Honey<br />
Salt<br />
White Flour<br />
(1) Yeast<br />
Use Setting<br />
Regular<br />
1 cup<br />
1 tbsp.<br />
1 tbsp.<br />
2 tbsp.<br />
1 tsp.<br />
1/2 tsp.<br />
1/2 tsp.<br />
1/2 tsp.<br />
2 1/3 cups<br />
1 tsp.<br />
7<br />
CORN BREAD CHEESE AND ONION BREAD SOUR CREAM BREAD<br />
METHOD<br />
1 Measure ingredients into baking pan.<br />
2 Insert baking pan securely into unit, close lid<br />
3 Select appropriate bread setting<br />
4 Push start button.<br />
5 The Breadmaker will beep 3 times & the display<br />
will flash "END" when bread is done.<br />
6 Using oven mitts, remove pan from unit.<br />
7 Remove bread from baking pan.<br />
(and kneading blade from bread if required)<br />
8 Allow to cool before slicing.<br />
Yield: Makes 1 loaf<br />
Regular<br />
1 cup<br />
1 tbsp.<br />
1 tbsp.<br />
1 tbsp.<br />
1 1/4 tsp.<br />
1 2/3 cups<br />
2/3 cup<br />
2/3 cup<br />
1 1/4 tsp.<br />
7<br />
Large<br />
1 1/4 cups<br />
2 tbsp.<br />
2 tbsp.<br />
2 tbsp.<br />
1 1/2 tsp.<br />
2 1/4 cups<br />
1 cup<br />
3/4 cup<br />
1 1/2 tsp.<br />
2, 3<br />
Extra Large<br />
1 2/3 cup<br />
3 tbsp.<br />
2 tbsp.<br />
2 tbsp.<br />
2 tsp.<br />
2 1/4 cups<br />
1 1/4 cups<br />
1 cup<br />
1 3/4 tsp.<br />
3<br />
(1) See page 15 for additional Dry Yeast Information.<br />
* All of the recipes in this book have been tested with<br />
your Breadmaker. If the result IS not satisfied,<br />
ingredients adjustment may be needed (particularly<br />
yeast & water). For details, please refer to the "Baking<br />
Tips for Yeast Bread" on page 33-34.<br />
Ingredient<br />
Water<br />
Skim Milk Powder<br />
Shortening<br />
Honey<br />
Salt<br />
White Flour<br />
Whole Wheat Flour<br />
Seven Grain Cereal<br />
(1) Yeast<br />
Use Setting<br />
METHOD<br />
1 Measure ingredients into baking pan.<br />
2 Insert baking pan securely into unit, close lid<br />
3 Select appropriate bread setting<br />
4 Push start button.<br />
5 The Breadmaker will beep 3 times & the display<br />
will flash "END" when bread is done.<br />
6 Using oven mitts, remove pan from unit.<br />
7 Remove bread from baking pan.<br />
(and kneading blade from bread if required)<br />
8 Allow to cool before slicing.<br />
Yield: Makes 1 loaf<br />
Ingredient<br />
Water<br />
Skim Milk Powder<br />
Sugar<br />
Salt<br />
Dried Onion<br />
* Old cheddar<br />
cheese (grated)<br />
White Flour<br />
(1) Yeast<br />
Use Setting<br />
Regular<br />
1 cup<br />
1 tbsp.<br />
1 tbsp.<br />
3/4 tsp.<br />
2 tsp.<br />
1/3 cup<br />
2 2/3 cups<br />
1 tsp.<br />
2<br />
Large Extra Large<br />
1 1/3 cups 1 2/3 cups<br />
2 tbsp. 3 tbsp.<br />
2 tbsp. 3 tbsp.<br />
1 tsp. 1 1/2 tsp.<br />
1 tbsp. 4 tsp.<br />
1 cup<br />
4 1/2 cups<br />
2 tsp.<br />
3<br />
* NOTE:<br />
Using cheese with a high fat high moisture content<br />
may result in a slightly collapsed loaf.<br />
METHOD<br />
1 Measure ingredients into baking pan.<br />
2 Insert baking pan securely into unit, close lid<br />
3 Select appropriate bread setting<br />
4 Push start button.<br />
5 The Breadmaker will beep 3 times & the display<br />
will flash "END" when bread is done.<br />
6 Using oven mitts, remove pan from unit.<br />
7 Remove bread from baking pan.<br />
(and kneading blade from bread if required)<br />
8 Allow to cool before slicing.<br />
Yield: Makes 1 loaf<br />
Regular<br />
1 cup<br />
1 tbsp.<br />
1 tbsp.<br />
1 tbsp.<br />
1 1/4 tsp.<br />
1 1/3 cups<br />
2/3 cup<br />
1/2 cup<br />
1 1/2 tsp.<br />
1<br />
19<br />
Large<br />
1 1/4 cup<br />
2 tbsp.<br />
2 tbsp.<br />
2 tbsp.<br />
1 1/2 tsp.<br />
2 1/4 cups<br />
1 cup<br />
1/2 cup<br />
1 3/4 tsp.<br />
2, 3<br />
3/4 cup<br />
3 1/4 cups<br />
1 1/2 tsp<br />
2<br />
Extra Large<br />
1 2/3 cup<br />
3 tbsp.<br />
2 tbsp.<br />
2 tbsp.<br />
2 tsp.<br />
2 1/2 cups<br />
1 1/4 cups<br />
3/4 cup<br />
2 tsp.<br />
3<br />
Extra Large<br />
1 1/2 cups<br />
3 tbsp.<br />
2 tbsp.<br />
2 tbsp.<br />
1 1/2 tsp.<br />
1 1/2 tsp.<br />
1 1/2 tsp.<br />
1 1/2 tsp.<br />
4 cups<br />
1 1/2 tsp.<br />
7<br />
METHOD<br />
1 Measure ingredients into baking pan.<br />
2 Insert baking pan securely into unit, close lid<br />
3 Select appropriate bread setting<br />
4 Push start button.<br />
5 The Breadmaker will beep 3 times & the display<br />
will flash "END" when bread is done.<br />
6 Using oven mitts, remove pan from unit.<br />
7 Remove bread from baking pan.<br />
(and kneading blade from bread if required)<br />
8 Allow to cool before slicing.<br />
Yield: Makes 1 loaf<br />
Large<br />
3/4 cup<br />
3/4 cup<br />
2 tbsp.<br />
1 tsp.<br />
3 1/4 cups<br />
1 1/2 tsp.<br />
7<br />
Large<br />
1 1/3 cups<br />
2 tbsp<br />
2 tbsp.<br />
1 tbsp.<br />
1 tsp.<br />
1 tsp.<br />
1 tsp.<br />
1 tsp.<br />
3 1/4 cups<br />
1 1/2 tsp.<br />
7
RECIPES<br />
PESTO BREAD BEER BREAD DARK RYE BREAD<br />
Ingredient Large Extra Large<br />
Water<br />
1 cup 1 1/4 cups<br />
Sugar<br />
1 tbsp. 2 tbsp.<br />
Salt<br />
1 tsp. 1 1/2 tsp.<br />
Pesto<br />
1/3 cup 1/2 cup<br />
White Flour 1 2/3 cups 2 cups<br />
Whole Wheat Flour 1 2/3 cups 2 cups<br />
(1) Yeast<br />
1 tsp. 1 1/2 tsp.<br />
Use Setting 2 2<br />
METHOD<br />
1 Measure ingredients into baking pan.<br />
2 Insert baking pan securely into unit, close lid<br />
3 Select appropriate bread setting<br />
4 Push start button.<br />
5 The Breadmaker will beep 3 times & the display<br />
will flash "END" when bread is done.<br />
6 Using oven mitts, remove pan from unit.<br />
7 Remove bread from baking pan.<br />
(and kneading blade from bread if required)<br />
8 Allow to cool before slicing.<br />
Yield: Makes 1 loaf<br />
SAUERKRAUT RYE BREAD<br />
Ingredient<br />
Water<br />
Shortening<br />
Brown Sugar<br />
Molasses<br />
Salt<br />
* Sauerkraut<br />
Caraway Seeds<br />
White Flour<br />
Rye Flour<br />
(1) Dry Yeast<br />
Use Setting<br />
* NOTE:<br />
Sauerkraut must be well drained and have the<br />
moisture squeezed out.<br />
METHOD<br />
1 Measure ingredients into baking pan.<br />
2 Insert baking pan securely into unit, close lid<br />
3 Select appropriate bread setting<br />
4 Push start button.<br />
5 The Breadmaker will beep 3 times & the display<br />
will flash "END" when bread is done.<br />
6 Using oven mitts, remove pan from unit.<br />
7 Remove bread from baking pan.<br />
(and kneading blade from bread if required)<br />
8 Allow to cool before slicing.<br />
Yield: Makes 1 loaf<br />
Large<br />
1 cup<br />
1 tbsp.<br />
1 tbsp.<br />
1 tbsp.<br />
1 tsp.<br />
1 cup<br />
1 tbsp.<br />
2 2/3 cups<br />
1 cup<br />
1 1/2 tsp.<br />
1<br />
Extra Large<br />
1 cup<br />
2 tbsp.<br />
2 tbsp.<br />
2 tbsp.<br />
1 1/2 tsp.<br />
1 1/4 cup<br />
1 tbsp.<br />
3 cups<br />
1 cup<br />
1 1/2 tsp.<br />
2<br />
(1) See page 15 for additional Dry Yeast Information.<br />
* All of the recipes in this book have been tested with<br />
your Breadmaker. If the result IS not satisfied,<br />
ingredients adjustment may be needed (particularly<br />
yeast & water). For details, please refer to the "Baking<br />
Tips for Yeast Bread" on page 33-34.<br />
Ingredient<br />
Beer (flat)<br />
Shortening<br />
Sugar<br />
Salt<br />
White Flour<br />
Whole Wheat Flour<br />
Cornmeal<br />
All Bran Meal<br />
(1) Yeast<br />
Use Setting<br />
METHOD<br />
1 Measure ingredients into baking pan.<br />
2 Insert baking pan securely into unit, close lid<br />
3 Select appropriate bread setting<br />
4 Push start button.<br />
5 The Breadmaker will beep 3 times & the display<br />
will flash "END" when bread is done.<br />
6 Using oven mitts, remove pan from unit.<br />
7 Remove bread from baking pan.<br />
(and kneading blade from bread if required)<br />
8 Allow to cool before slicing.<br />
Yield: Makes 1 loaf<br />
IRISH SODA BREAD FRENCH BREAD<br />
Ingredient<br />
Buttermilk<br />
Shortening<br />
Honey<br />
Baking Soda<br />
Raisins<br />
Rolled Oats<br />
White Flour<br />
(1) Yeast<br />
Use Setting<br />
METHOD<br />
1 Measure ingredients into baking pan.<br />
2 Insert baking pan securely into unit, close lid<br />
3 Select appropriate bread setting<br />
4 Push start button.<br />
5 The Breadmaker will beep 3 times & the display<br />
will flash "END" when bread is done.<br />
6 Using oven mitts, remove pan from unit.<br />
7 Remove bread from baking pan.<br />
(and kneading blade from bread if required)<br />
8 Allow to cool before slicing.<br />
Yield: Makes 1 loaf<br />
Regular<br />
1 1/4 cup<br />
1 tbsp.<br />
2 tbsp.<br />
1 tsp.<br />
1 1/4 cups<br />
3/4 cup<br />
1/4 cup<br />
1/4 cup<br />
2 tsp.<br />
2<br />
Regular<br />
1 cup<br />
1 tbsp.<br />
1 tbsp.<br />
1/4 tsp.<br />
3 tbsp.<br />
1/4 cup<br />
2 1/4 cups<br />
1 tsp.<br />
1<br />
20<br />
Large<br />
1 1/3 cup<br />
2 tbsp.<br />
3 tbsp.<br />
1 1/2 tsp.<br />
2 1/4 cups<br />
1 cup<br />
1/3 cup<br />
1/3 cup<br />
2 tsp.<br />
2<br />
Large<br />
1 1/3 cup<br />
2 tbsp.<br />
2 tbsp.<br />
1/2 tsp.<br />
1/4 cup<br />
1/2 cup<br />
3 cups<br />
1 1/2 tsp.<br />
2<br />
Extra Large<br />
1 2/3 cup<br />
3 tbsp.<br />
3 tbsp.<br />
2 tsp.<br />
3 cups<br />
1 1/4 cups<br />
1/2 cup<br />
1/2 cup<br />
2 tsp.<br />
2<br />
Extra Large<br />
1 2/3 cup<br />
3 tbsp.<br />
3 tbsp.<br />
3/4 tsp.<br />
1/3 cup<br />
1/2 cup<br />
3 1/2 cups<br />
1 1/2 tsp.<br />
3<br />
Ingredient<br />
Cold Black Coffee<br />
Shortening<br />
Molasses<br />
Brown Sugar<br />
Salt<br />
White Flour<br />
Dark Rye Flour<br />
(1) Yeast<br />
Use Setting<br />
Extra Large<br />
1 1/2 cups<br />
3 tbsp.<br />
3 tbsp.<br />
2 tbsp.<br />
2 tsp.<br />
2 1/2 cups<br />
1 1/4 cups<br />
1 1/2 tsp.<br />
3<br />
METHOD<br />
1 Measure ingredients into baking pan.<br />
2 Insert baking pan securely into unit, close lid<br />
3 Select appropriate bread setting<br />
4 Push start button.<br />
5 The Breadmaker will beep 3 times & the display<br />
will flash "END" when bread is done.<br />
6 Using oven mitts, remove pan from unit.<br />
7 Remove bread from baking pan.<br />
(and kneading blade from bread if required)<br />
8 Allow to cool before slicing.<br />
Yield: Makes 1 loaf<br />
Ingredient<br />
Water<br />
Shortening<br />
Sugar<br />
Salt<br />
White Flour<br />
(1) Yeast<br />
Use Setting<br />
METHOD<br />
1 Measure ingredients into baking pan.<br />
2 Insert baking pan securely into unit, close lid<br />
3 Select appropriate bread setting<br />
4 Push start button.<br />
5 The Breadmaker will beep 3 times & the display<br />
will flash "END" when bread is done.<br />
6 Using oven mitts, remove pan from unit.<br />
7 Remove bread from baking pan.<br />
(and kneading blade from bread if required)<br />
8 Allow to cool before slicing.<br />
Yield: Makes 1 loaf<br />
Regular<br />
1 cup<br />
1 tbsp.<br />
1 tbsp.<br />
1 tbsp.<br />
1 tsp.<br />
1 3/4 cup<br />
3/4 cup<br />
1 tsp.<br />
1<br />
Large<br />
1 1/4 cups<br />
2 tbsp.<br />
2 tbsp.<br />
2 tbsp.<br />
1 1/2 tsp.<br />
2 1/2 cups<br />
1 cup<br />
1 1/4 tsp.<br />
2, 3<br />
Regular Large Extra Large<br />
1 cup 1 1/4 cups 1 1/2 cups<br />
2 tsp. 1 tbsp. 2 tbsp.<br />
2 tsp. 1 tbsp. 2 tbsp.<br />
1 tsp. 1 1/4 tsp. 1 1/2 tsp.<br />
2 1/4 cups 3 1/2 cups 4 cups<br />
1 1/4 tsp. 1 1/2 tsp. 1 3/4 tsp.<br />
7 7 7
RECIPES<br />
COTTAGE DILL BREAD YOGURT BREAD<br />
Ingredient<br />
Water<br />
Skim Milk Powder<br />
Shortening<br />
Sugar<br />
Salt<br />
Cottage Cheese<br />
Dried Onion<br />
Dill Seeds<br />
White Flour<br />
(1) Yeast<br />
Use Setting<br />
METHOD<br />
1 Measure ingredients into baking pan.<br />
2 Insert baking pan securely into unit, close lid.<br />
3 Select appropriate bread setting.<br />
4 Push start button.<br />
5 The Breadmaker will beep 3 times & the display<br />
will flash "END" when bread is done.<br />
6 Using oven mitts, remove pan from unit.<br />
7 Remove bread from baking pan.<br />
(and kneading blade from bread if required)<br />
8 Allow to cool before slicing.<br />
Yield: Makes 1 loaf<br />
CHUNKY NUT BREAD<br />
Ingredient<br />
Water<br />
Olive Oil<br />
Honey<br />
Salt<br />
Sunflower Seeds<br />
Chopped Walnuts<br />
White Flour<br />
(1) Yeast<br />
Use Setting<br />
METHOD<br />
1 Measure ingredients into baking pan.<br />
2 Insert baking pan securely into unit, close lid.<br />
3 Select appropriate bread setting.<br />
4 Push start button.<br />
5 The Breadmaker will beep 3 times & the display<br />
will flash "END" when bread is done.<br />
6 Using oven mitts, remove pan from unit.<br />
7 Remove bread from baking pan.<br />
(and kneading blade from bread if required)<br />
8 Allow to cool before slicing.<br />
Yield: Makes 1 loaf<br />
Regular<br />
1/2 cup<br />
1 tbsp.<br />
1 tbsp.<br />
1 tbsp.<br />
1 tsp.<br />
2/3 cup<br />
2 tsp.<br />
1 tsp.<br />
2 1/2 cups<br />
1 tsp.<br />
2<br />
Regular<br />
1 cup<br />
2 tbsp.<br />
2 tbsp.<br />
1 tsp.<br />
1/4 cup<br />
1/4 cup<br />
3 cups<br />
1 1/2 tsp.<br />
8<br />
Large<br />
2/3 cup<br />
1 tbsp.<br />
1 tbsp.<br />
4 tsp.<br />
1 tsp.<br />
3/4 cup<br />
1 tbsp.<br />
2 tsp.<br />
2 3/4 cups<br />
1 1/4 tsp.<br />
2<br />
Large<br />
1 1/4 cups<br />
2 tbsp.<br />
2 tbsp.<br />
1 1/2 tsp.<br />
1/4 cup<br />
1/4 cup<br />
3 1/4 cups<br />
1 1/2 tsp.<br />
8<br />
Extra Large<br />
3/4 cup<br />
2 tbsp.<br />
2 tbsp.<br />
2 tbsp.<br />
1 1/2 tsp.<br />
1 cup<br />
2 tbsp.<br />
1 tbsp.<br />
3 1/4 cups<br />
1 1/2 tsp.<br />
2<br />
Extra Large<br />
1 1/3 cups<br />
3 tbsp.<br />
3 tbsp.<br />
2 tsp.<br />
1/3 cup<br />
1/3 cup<br />
3 1/2 cups<br />
2 tsp.<br />
8<br />
(1) See page 15 for additional Dry Yeast Information.<br />
* All of the recipes in this book have been tested with<br />
your Breadmaker. If the result IS not satisfied,<br />
ingredients adjustment may be needed (particularly<br />
yeast & water). For details, please refer to the "Baking<br />
Tips for Yeast Bread" on page 33-34.<br />
Ingredient<br />
Yogurt<br />
Brown Sugar<br />
Salt<br />
White Flour<br />
(1) Yeast<br />
Use Setting<br />
METHOD<br />
1 Measure ingredients into baking pan.<br />
2 Insert baking pan securely into unit, close lid.<br />
3 Select appropriate bread setting.<br />
4 Push start button.<br />
5 The Breadmaker will beep 3 times & the display<br />
will flash "END" when bread is done.<br />
6 Using oven mitts, remove pan from unit.<br />
7 Remove bread from baking pan.<br />
(and kneading blade from bread if required)<br />
8 Allow to cool before slicing.<br />
Yield: Makes 1 loaf<br />
HONEY GRANOLA BREAD<br />
METHOD<br />
1 Measure ingredients into baking pan.<br />
2 Insert baking pan securely into unit, close lid.<br />
3 Select appropriate bread setting.<br />
4 Push start button.<br />
5 The Breadmaker will beep 3 times & the display<br />
will flash "END" when bread is done.<br />
6 Using oven mitts, remove pan from unit.<br />
7 Remove bread from baking pan.<br />
(and kneading blade from bread if required)<br />
8 Allow to cool before slicing.<br />
Yield: Makes 1 loaf<br />
SUNNY ORANGE BREAD RAISIN BREAD<br />
Ingredient<br />
Orange Juice<br />
Water<br />
Shortening<br />
Honey<br />
Salt<br />
White Flour<br />
Sunflower Seeds<br />
Orange Rind<br />
(grated)<br />
(1) Yeast<br />
Use Setting<br />
Large<br />
1/2 cup<br />
3/4 cup<br />
1 tbsp.<br />
2 tbsp.<br />
1 tsp.<br />
3 1/4 cups<br />
2 tbsp.<br />
1 tsp.<br />
1 1/2 tsp.<br />
3<br />
METHOD<br />
1 Measure ingredients into baking pan.<br />
2 Insert baking pan securely into unit, close lid.<br />
3 Select appropriate bread setting.<br />
4 Push start button.<br />
5 The Breadmaker will beep 3 times & the display<br />
will flash "END" when bread is done.<br />
6 Using oven mitts, remove pan from unit.<br />
7 Remove bread from baking pan.<br />
(and kneading blade from bread if required)<br />
8 Allow to cool before slicing.<br />
Yield: Makes 1 loaf<br />
Large<br />
1 1/3 cups<br />
1 tbsp.<br />
1 tsp.<br />
3 1/4 cups<br />
1 1/2 tsp.<br />
7<br />
21<br />
Extra Large<br />
1 3/4 cups<br />
2 tbsp.<br />
1 1/2 tsp.<br />
3 3/4 cups<br />
1 3/4 tsp.<br />
7<br />
Ingredient<br />
Water<br />
Skim Milk Powder<br />
Shortening<br />
Honey<br />
Salt<br />
Granola<br />
White Flour<br />
Raisins<br />
(1) Yeast<br />
Use Setting<br />
Ingredient<br />
Water<br />
Skim Milk Powder<br />
Shortening<br />
Sugar<br />
Salt<br />
Raisins<br />
Cinnamon<br />
White Flour<br />
(1) Yeast<br />
Use Setting<br />
METHOD<br />
1 Measure ingredients into baking pan.<br />
2 Insert baking pan securely into unit, close lid<br />
3 Select appropriate bread setting<br />
4 Push start button.<br />
5 The Breadmaker will beep 3 times & the display<br />
will flash "END" when bread is done.<br />
6 Using oven mitts, remove pan from unit.<br />
7 Remove bread from baking pan.<br />
(and kneading blade from bread if required)<br />
8 Allow to cool before slicing.<br />
Yield: Makes 1 loaf<br />
Regular<br />
1 cup<br />
1 tbsp.<br />
1 tbsp.<br />
1 tbsp.<br />
1 tsp.<br />
1/3 cup<br />
2 1/4 cups<br />
2 tbsp.<br />
1 tsp.<br />
1<br />
Regular<br />
1 cup<br />
1 tbsp.<br />
2 tbsp.<br />
2 tbsp.<br />
1 tsp.<br />
3 tbsp.<br />
1/4 tsp.<br />
2 2/3 cups<br />
1 tsp.<br />
1<br />
Large<br />
1 1/3 cups<br />
2 tbsp.<br />
2 tbsp.<br />
2 tbsp.<br />
1 1/2 tsp.<br />
1/2 cup<br />
3 cups<br />
1/4 cup.<br />
1 1/2 tsp.<br />
3<br />
Large<br />
1 1/4 cups<br />
1 tbsp.<br />
2 tbsp.<br />
2 tbsp.<br />
1 1/2 tsp.<br />
1/4 cup<br />
1/2 tsp.<br />
3 1/4 cups<br />
1 1/2 tsp.<br />
2, 3<br />
Extra Large<br />
1 1/2 cups<br />
3 tbsp.<br />
2 tbsp.<br />
2 tbsp.<br />
1 1/2 tsp.<br />
2/3 cup<br />
3 1/2 cups<br />
1/4 cup.<br />
1 3/4 tsp.<br />
3<br />
Extra Large<br />
1 2/3 cups<br />
2 tbsp.<br />
2 tbsp<br />
3 tbsp.<br />
1 1/2 tsp.<br />
1/3 cup<br />
1 tsp.<br />
4 1/4 cups<br />
1 1/2 tsp.<br />
3
RECIPES<br />
MIXED FRUIT BREAD PEANUT BUTTER BREAD<br />
Ingredient<br />
Water<br />
Skim Milk Powder<br />
Shortening<br />
Salt<br />
White Flour<br />
Candied Mixed Fruit<br />
Nutmeg<br />
(1) Dry Yeast<br />
Use Setting<br />
METHOD<br />
1 Measure ingredients into baking pan.<br />
2 Insert baking pan securely into unit, close lid.<br />
3 Select appropriate bread setting.<br />
4 Push start button.<br />
5 The Breadmaker will beep 3 times & the display<br />
will flesh "END" when bread is done.<br />
6 Using oven mitts, remove pan from unit.<br />
7 Remove bread from baking pan.<br />
(and kneading blade from bread if required)<br />
8 Allow to cool before slicing.<br />
Yield: Makes 1 loaf<br />
Large<br />
1 1/3 cups<br />
1/4 cup<br />
1 tsp.<br />
1/2 cup<br />
3 1/4 cups.<br />
1 1/2 tsp.<br />
1<br />
METHOD<br />
1 Measure ingredients into baking pan.<br />
2 Insert baking pan securely into unit, close lid.<br />
3 Select appropriate bread setting.<br />
4 Push start button.<br />
5 The Breadmaker will beep 3 times & the display<br />
will flesh "END" when bread is done.<br />
6 Using oven mitts, remove pan from unit.<br />
7 Remove bread from baking pan.<br />
(and kneading blade from bread if required)<br />
8 Allow to cool before slicing.<br />
Yield: Makes 1 loaf<br />
CHOCOLATE BREAD BANANA NUT BREAD<br />
Ingredient<br />
Water +<br />
1 Egg (beaten)<br />
Skim Milk Powder<br />
Shortening<br />
Sugar<br />
Salt<br />
Chocolate Chips<br />
Walnuts (Chopped)<br />
White Flour<br />
(1) Dry Yeast<br />
Use Setting<br />
METHOD<br />
1 Measure ingredients into baking pan.<br />
2 Insert baking pan securely into unit, close lid.<br />
3 Select appropriate bread setting.<br />
4 Push start button.<br />
5 The Breadmaker will beep 3 times & the display<br />
will flash "END" when bread is done.<br />
6 Using oven mitts, remove pan from unit.<br />
7 Remove bread from baking pan.<br />
(and kneading blade from bread if required)<br />
8 Allow to cool before slicing.<br />
Yield: Makes 1 loaf<br />
Large<br />
1 cup<br />
1 tbsp.<br />
1 tbsp<br />
1 tbsp.<br />
1/2 tsp.<br />
1/3 cup<br />
1/4 cup<br />
2 2/3 cups<br />
1 tsp.<br />
8<br />
Large<br />
1 1/4 cups<br />
1 tbsp.<br />
2 tbsp.<br />
1 tsp.<br />
3 1/4 cups<br />
1/4 cup<br />
1/4 tsp.<br />
1 1/2 tsp.<br />
3<br />
Extra Large<br />
1 1/3 cup<br />
2 tbsp.<br />
2 tbsp<br />
2 tbsp.<br />
1 tsp.<br />
2/3 cup<br />
1/3 cup<br />
3 1/2 cups<br />
1 tsp.<br />
8<br />
(1) See page 15 for additional Dry Yeast Information.<br />
* All of the recipes in this book have been tested with<br />
your Breadmaker. If the result IS not satisfied,<br />
ingredients adjustment may be needed (particularly<br />
yeast & water). For details, please refer to the "Baking<br />
Tips for Yeast Bread" on page 33-34.<br />
Ingredient<br />
Water<br />
Brown Sugar<br />
Salt<br />
Peanut Butter<br />
White Flour<br />
(1) Dry Yeast<br />
Use Setting<br />
Ingredient<br />
Water<br />
Skim Milk Powder<br />
Shortening<br />
Honey<br />
Salt<br />
White Flour<br />
Banana (mashed)<br />
Walnuts (chopped)<br />
Lemon<br />
(1) Dry Yeast<br />
Use Setting<br />
METHOD<br />
1 Measure ingredients into baking pan.<br />
2 Insert baking pan securely into unit, close lid.<br />
3 Select appropriate bread setting.<br />
4 Push start button.<br />
5 The Breadmaker will beep 3 times & the display<br />
will flash "END" when bread is done.<br />
6 Using oven mitts, remove pan from unit.<br />
7 Remove bread from baking pan.<br />
(and kneading blade from bread if required)<br />
8 Allow to cool before slicing.<br />
Yield: Makes 1 loaf<br />
22<br />
Large/Extra Large<br />
1 cup<br />
2 tbsp.<br />
2 tbsp.<br />
2 tbsp<br />
1 1/2 tsp.<br />
3 1/2 cups<br />
1/2 cup<br />
1/4 cup<br />
1 tsp.<br />
1 1/2 tsp.<br />
2, 3<br />
CRANBERRY NUT BREAD<br />
Ingredient<br />
Cranberry Juice<br />
Water<br />
Shortening<br />
Honey<br />
Salt<br />
Cranberries<br />
White Flour<br />
Lemon Juice<br />
Walnuts (chopped)<br />
(1) Yeast<br />
Use Setting<br />
METHOD<br />
1 Measure ingredients into baking pan.<br />
2 insert baking pan securely into unit, close lid.<br />
3 Select appropriate bread setting.<br />
4 Push start button.<br />
5 The Breadmaker will beep 3 times & the display<br />
will flash "END" when bread is done.<br />
6 Using oven mitts, remove pan from unit.<br />
7 Remove bread from baking pan.<br />
(and kneading blade from bread if required)<br />
8 Allow to cool before slicing.<br />
Yield: Makes 1 loaf<br />
RUSSIAN KULICH<br />
Ingredient<br />
Water<br />
Skim Milk Powder<br />
Eggs (beaten)<br />
Butter<br />
Salt<br />
White Flour<br />
Sliced Almonds<br />
Raisins<br />
Mixed Candied Fruit<br />
(1) Dry Yeast<br />
Use Setting<br />
METHOD<br />
1 Measure ingredients into baking pan.<br />
2 Insert baking pan securely into unit, close lid.<br />
3 Select appropriate bread setting.<br />
4 Push start button.<br />
5 The Breadmaker will beep 3 times & the display<br />
will flash "END" when bread is done.<br />
6 Using oven mitts, remove pan from unit.<br />
7 Remove bread from baking pan.<br />
(and kneading blade from bread If required)<br />
8 Allow to cool before slicing.<br />
Yield: Makes 1 loaf<br />
Large<br />
1/2 cup<br />
1/2 cup<br />
2 tbsp<br />
2 tbsp.<br />
1 tsp.<br />
1/2 cup<br />
3 1/4 cups<br />
1 tsp.<br />
1/4 cup<br />
1 1/2 tsp.<br />
3<br />
Large<br />
1 cup<br />
3 tbsp.<br />
2<br />
1/4 cup<br />
1 1/2 tsp.<br />
3 1/4 cups<br />
2 tbsp.<br />
1/4 cup<br />
1/3 cup<br />
1 1/2 tsp.<br />
3<br />
Extra Large<br />
2/3 cup<br />
2/3 cup<br />
2 tbsp.<br />
3 tbsp<br />
1 1/2 tsp.<br />
2/3 cup<br />
3 1/2 cups<br />
1 1/4 tsp.<br />
1/3 cup<br />
1 1/2 tsp<br />
3
RECIPES<br />
SOUR DOUGH STARTER<br />
Ingredient<br />
Skim Milk<br />
Plain Yogurt<br />
White Flour<br />
(1) 1-1/2 qt. Ceramic or glass container<br />
(with tight fitting lid)<br />
To Prepare:<br />
1 Heat skim milk to 90°F (32°C) to 100°F (38°C)<br />
2 Remove from heat and stir in yogurt.<br />
3 Let mixture stand at room temperature 18-24 hours<br />
or until a curd forms. Stir once or twice with a<br />
wooden spoon, to keep liquid mixed in.<br />
4 Stir in flour gradually, mixing well.<br />
5 Let stand 2-5 days until bubbly & spongy-looking<br />
with a good sour aroma.<br />
6 Refrigerate.<br />
To use:<br />
1 Bring to room temperature and allow to bubble.<br />
2 Use amount recommended in recipe.<br />
3 After each use replenish starter.<br />
To replenish:<br />
1 If 1 1/2 cups starter was used, add 3/4 cup flour<br />
and 3/4 cup skim milk to remaining starter.<br />
Note: total volume must remain same.<br />
2 Allow mixture to stand at room temperature for<br />
18-24 hours.<br />
3 Refrigerate until needed.<br />
BAGELS<br />
Ingredient<br />
Water<br />
Sugar<br />
Salt<br />
White Flour<br />
(1) Dry Yeast<br />
Use Setting<br />
METHOD<br />
1 Measure water, sugar, salt, flour, and yeast into<br />
baking pan.<br />
2 Insert baking pan securely into unit, close lid.<br />
3 Select appropriate bread setting & push start<br />
button.<br />
4 When dough is ready, remove from pan and turn<br />
dough out onto a lightly-floured surface.<br />
5 Divide into 10 equal portions.<br />
Roll into smooth balls.<br />
Use thumbs to make a 1-1/2 inch hole in the centre<br />
of each ball.<br />
6 Place on a greased baking sheet.<br />
7 Grease top of each bagel with soft shortening.<br />
Cover with wax paper and dry towel.<br />
Place in a warm area free of drafts and allow to rise<br />
for 30 minutes.<br />
8 Meanwhile, bring 3 quarts of water & 1 tablespoon<br />
sugar to boil.<br />
9 Simmer 3 to 4 bagels at a time in water for 5 to 6<br />
minutes per side.<br />
10 Turn once or twice. Remove with slotted spoon.<br />
Drain on paper towels. Place on greased baking<br />
sheet dusted with cornmeal.<br />
11 Brush lightly with egg yolk and water mixture.<br />
12 Sprinkle with poppy or sesame seeds, diced onion,<br />
garlic chips, or shredded cheddar cheese,<br />
if desired.<br />
13 Bake at 400°F (200°C) 25 to 30 minutes.<br />
Yield: Makes 10 bagels<br />
Recipe<br />
1 cup<br />
3 tbsp.<br />
1 cup<br />
Large<br />
1 cup<br />
1 1/2 tsp.<br />
1 tsp.<br />
3 cups<br />
1 tsp.<br />
9<br />
SOUR DOUGH FRENCH<br />
Ingredient<br />
Sour Dough Starter<br />
Water<br />
Sugar<br />
Salt<br />
White Flour<br />
(1) Dry Yeast<br />
Cornmeal<br />
Cornstarch<br />
Water<br />
Use Setting<br />
Large<br />
1 1/2 cups<br />
1/2 cup<br />
1 1/2 tsp.<br />
1 1/2 tsp.<br />
3 1/2 cups<br />
3 tsp.<br />
1/4 cup<br />
1 tsp.<br />
1/2 cup<br />
9<br />
METHOD<br />
1 Measure sour dough starter, water, sugar, salt,<br />
flour, and yeast into pan.<br />
2 Insert baking pan securely into unit, close lid.<br />
3 Select appropriate bread setting.<br />
4 Push start button.<br />
5 When dough is ready remove from pan, and divide<br />
dough in half. Roll dough back and forth, elongating<br />
it into a 14-inch log.<br />
6 Place each loaf on a stiff piece of cardboard.<br />
Sprinkle with 1/4 cup cornmeal. Cover lightly with<br />
plastic wrap or damp cloth. Allow to rise in a warm<br />
place free from drafts until putty or double in size<br />
(about 45 minutes to 1 hour).<br />
7 Adjust oven rack to the lowest position.<br />
Place a 12 x 15-inch baking pan without sides on<br />
top rack as oven is preheating to 400°F (200°C)<br />
Then place a baking pan with sides on the bottom<br />
rack. Add 1/4-inch boiling water.<br />
8 Combine cornstarch and water.<br />
Heat to boiling while stirring, allow to cool.<br />
9 With very sharp knife, cut four, 1/2-inch deep<br />
diagonal slashes on top of loaves.<br />
Brush the entire surface of each loaf with<br />
cornstarch mixture.<br />
10 Slide each loaf off cardboard onto top baking sheet<br />
in oven.<br />
11 Bake at 400°F (200°C) for 25 minutes or until bread<br />
sounds hollow when tapped. Brush every 5 to 7<br />
minutes with cornstarch mixture.<br />
Yield: Makes 2 loaves<br />
(1) See page 15 for additional Dry Yeast Information.<br />
* All of the recipes in this book have been tested with<br />
your Breadmaker. If the result IS not satisfied,<br />
ingredients adjustment may be needed (particularly<br />
yeast & water). For details, please refer to the "Baking<br />
Tips for Yeast Bread" on page 33-34.<br />
23<br />
1. Divide dough into 10 equal place<br />
2. Hold ball with both hands, use thumbs to make a<br />
hole in the centre of each ball. Continue to work with<br />
dough until hole is about 1 1/2 inches and ball is<br />
shaped like a doughnut.<br />
3. With a metal spatula, place bagels into boiling water<br />
and cook 5 to 6 minutes per side, turning once or<br />
twice. (This helps to develop a chewy crust.) Remove<br />
from water and drain on paper towels.<br />
4. Place bagels on greased baking sheet dusted with<br />
cornmeal. Brush lightly with mixture of water and egg<br />
yolk. Sprinkle with your choice of seeds or salt.
RECIPES<br />
CROISSANTS<br />
Ingredient<br />
Water<br />
Skim Milk Powder<br />
Sugar<br />
Salt<br />
Butter<br />
White Flour<br />
(1) Dry Yeast<br />
Butter Chilled<br />
and Sliced<br />
Egg<br />
Use Setting<br />
Large<br />
3/4 cup<br />
2 tbsp.<br />
1 tbsp<br />
1 tsp.<br />
1 tbsp.<br />
2 cups<br />
3 tsp.<br />
METHOD<br />
1 Measure water, dry milk, sugar, salt, butter, flour,<br />
into baking pan. Sprinkle yeast into centre of flour.<br />
2 Insert baking pan securely into unit, close lid.<br />
3 Select dough setting and push start button.<br />
4 Meanwhile, roll 1/2 cup of chilled butter slices<br />
between two sheets of waxed paper into a<br />
10 x 7-inch rectangle. Chill at least 1 hour.<br />
5 The Breadmaker will beep 3 times & the display<br />
will fresh "END" when dough is ready.<br />
6 Remove dough from pan & roll dough out to 1/4<br />
inch thickness on a lightly-floured surface into a<br />
12-inch square.<br />
7 Place chilled butter on centre third of dough.<br />
Fold each side over the buttered side.<br />
Roll dough to 20 x 14-inch rectangle.<br />
8 Fold dough into thirds, seal edges.<br />
Roll into a 20 x 14-inch rectangle.<br />
Fold and roll twice more.<br />
Cover securely with plastic wrap.<br />
Chill in freezer for 20 minutes.<br />
Repeal folding and rolling 3 times.<br />
9 Roll dough to 1/8" thickness into a 10" x l5-inch<br />
rectangle. Cut into 6 squares.<br />
Cut each square in half to form 12 triangles.<br />
10 Roll each triangle loosely, starting from the wide<br />
end. Place seam side down on greased baking pan.<br />
11 Curve ends, Sprinkle water on top, Cover lightly<br />
with damp cloth and allow to rise in a warm area<br />
free from drafts 45 to 50 minutes or until doubled<br />
in size.<br />
12 Brush lightly with beaten egg and water.<br />
13 Bake at 375°F (190°C), 10 to 15 minutes, or until<br />
golden brown and flaky.<br />
Yield: Makes 12 croissants<br />
1/2 cup<br />
1 Large (whisked together<br />
with 1 tbsp. of cold water)<br />
9<br />
(1) See page 15 for additional Dry Yeast Information.<br />
* All of the recipes in this book have been tested with<br />
your Breadmaker. If the result IS not satisfied,<br />
ingredients adjustment may be needed (particularly<br />
yeast & water). For details, please refer to the "Baking<br />
Tips for Yeast Bread" on page 33-34.<br />
1. For flaky croissants, place chilled dough on a<br />
cool surface such as marble. Place chilled butter<br />
in centre third of dough square. Fold each side<br />
over buttered side.<br />
2. Roll dough out again into a 3/8-inch-thick or<br />
20 x 14-inch rectangle. Turn over, occasionally<br />
flouring surface lightly to prevent sticking.<br />
3. Fold dough in thirds to make a rectangle again.<br />
Roll and fold dough this way twice.<br />
4. Roll dough into a rectangle about 1/8-inch thick<br />
or 10 x 15-inch rectangle. Cut into 6 squares. Cut<br />
each square in half to from a total of 12 triangles.<br />
5. Roll up each triangle, starting from the wide<br />
end. Place seam-side down on greased baking pan.<br />
24<br />
PIZZA DOUGH<br />
Ingredient<br />
* Beer<br />
Butter<br />
Sugar<br />
Salt<br />
White Flour<br />
(1) Dry Yeast<br />
Use Setting<br />
Large<br />
1 cup<br />
1 tbsp.<br />
2 tbsp<br />
1 tsp.<br />
2 3/4 cups<br />
1 tbsp.<br />
9<br />
* NOTE: Water can be substituted for beer in this<br />
recipe resulting in a crisper crust.<br />
METHOD<br />
1 Place beer, butter, sugar and salt into baking pan.<br />
2 Add flour. Sprinkle yeast into centre of flour.<br />
3 Insert pan securely into baking unit, close lid.<br />
4 Select dough setting and push start button.<br />
5 The Breadmaker will beep 3 times & the display<br />
will fresh "END" when dough is ready.<br />
6 Preheat your oven to 400°F (200°C).<br />
7 Remove dough from pan and press dough into a<br />
lightly greased 12" pizza pan.<br />
Brush lightly with vegetable oil.<br />
Cover dough and allow to stand 15 minutes in a<br />
warm draft free area.<br />
8 Spoon tomato or pizza sauce over dough, top with<br />
your favourite ingredients & grated mozzarella<br />
cheese.<br />
9 Bake at 400°F (200°C) 25-30 minutes or until crust<br />
is golden brown and cheese is bubbly.<br />
NOTE:<br />
For a thinner crust pizza, divide dough in half and<br />
press into 2-12" pans.<br />
Yield: Makes one thick pizza crust.
RECIPES<br />
LAYERED PIZZA LOAF WHITE ROLLS<br />
Ingredient<br />
* Beer<br />
Butter<br />
Sugar<br />
Salt<br />
White Flour<br />
(1) Dry Yeast<br />
Use Setting<br />
* NOTE: Water can be substituted for beer in this<br />
recipe resulting in a crispier crust.<br />
METHOD<br />
1 Place beer, butter, sugar and salt into baking pan.<br />
2 Add four, Sprinkle yeast into centre of flour.<br />
3 Insert pan securely into baking unit, close lid.<br />
4 Select dough setting and push start button.<br />
5 The Breadmaker will beep 3 times and the display<br />
will fresh "END" when dough is ready.<br />
6 Prepare filling ingredients during final half hour<br />
dough is rising. All ingredients should be at room<br />
temperature.<br />
7 Thaw spinach and squeeze dry.<br />
Add egg, Parmesan cheese & basil. Set aside.<br />
8 Cook, crumble and drain Italian sausage, set aside.<br />
9 Slice mushrooms, onion and green pepper.<br />
10 Shred mozzarella cheese.<br />
11 Set aside 1/4 dough.<br />
12 Roll remaining dough into a 18" x 12" rectangle.<br />
Lightly press into a greased 10" x 5" loaf pan,<br />
allowing dough to hang 1/2" over on all sides.<br />
13 Sprinkle one half of cheese onto bottom of dough.<br />
14 Layer in remaining ingredients in the order listed<br />
in the filling recipe.<br />
15 Top with remaining cheese.<br />
16 Roll remaining dough into a 10" x 5" rectangle.<br />
17 Fold over and seal edges.<br />
18 Cut 3 steam slits in dough.<br />
19 Bake at 375°C (190°C) for 30-40 minutes until<br />
allow sounding.<br />
20 Allow to cool in pan for 15 minutes before removing.<br />
Filling Ingredients:<br />
Frozen spinach<br />
Grated Parmesan<br />
Egg<br />
Basil<br />
Mozzarella<br />
Italian sausage<br />
Pizza sauce<br />
Green peppers<br />
Mushrooms<br />
Chopped onion<br />
Yield: Makes 1 loaf.<br />
Large<br />
1 cup<br />
1 tbsp.<br />
2 tbsp<br />
1 tsp.<br />
2 3/4 cups<br />
1 tsp.<br />
9<br />
(300 g) 10 oz.<br />
1/3 cup<br />
1<br />
1 tsp.<br />
(300 g) 10 oz.<br />
(300 g) 10 oz.<br />
1 1/4 cups<br />
1/3 cup<br />
1/3 cup<br />
1/3 cup<br />
(1) See page 15 for additional Dry Yeast Information.<br />
* All of the recipes in this book have been tested with<br />
your Breadmaker. If the result IS not satisfied,<br />
ingredients adjustment may be needed (particularly<br />
yeast & water). For details, please refer to the "Baking<br />
Tips for Yeast Bread" on page 33-34.<br />
Ingredient<br />
Water<br />
Skim Milk Powder<br />
Shortening<br />
Sugar<br />
Salt<br />
Whole Wheat Flour<br />
(1) Yeast<br />
Use Setting<br />
METHOD<br />
1 Measure ingredients into baking pan.<br />
2 Insert baking pan securely into unit, close lid.<br />
3 Select appropriate bread setting.<br />
4 Push start button.<br />
5 The Breadmaker will beep 3 times & the display<br />
will fresh "END" when dough is ready.<br />
6 Remove dough from pan and turn dough out onto<br />
a lightly floured surface.<br />
7 Divide into 12 equal pieces.<br />
8 Shape each into a ball.<br />
9 Place in greased muffin tins.<br />
10 Brush lightly with melted butter.<br />
11 Let stand, covered for 20-25 minutes.<br />
12 Bake at 375°C (190°C) for 15-20 minutes.<br />
Yield: Makes 12 rolls<br />
PUMPERNICKEL ROLLS<br />
Ingredient<br />
Water<br />
Skim Milk Powder<br />
Shortening<br />
Sugar<br />
Molasses<br />
Salt<br />
White Flour<br />
Whole Wheat Flour<br />
Rye Flour<br />
Cocoa<br />
Instant Coffee<br />
(1) Yeast<br />
Use Setting<br />
METHOD<br />
1 Measure ingredients into baking pan.<br />
2 Insert baking pan securely into unit, close lid.<br />
3 Select appropriate bread setting.<br />
4 Push start button.<br />
5 The Breadmaker will beep 3 times & the display<br />
will fresh "END" when dough is ready.<br />
6 Remove dough from pan & turn dough out onto<br />
a lightly floured surface.<br />
7 Divide into 12 equal pieces.<br />
8 Shape each into a ball.<br />
9 Place in greased muffin tins.<br />
10 Brush lightly with melted butter.<br />
11 Let stand, covered for 20-25 minutes.<br />
12 Bake at 375°C (190°C) for 15-20 minutes.<br />
Yield: Makes 12 rolls<br />
25<br />
Large<br />
1 1/4 cups<br />
1 tbsp.<br />
2 tbsp<br />
2 tbsp.<br />
1 1/2 tsp.<br />
3 1/4 cups<br />
1 1/2 tsp.<br />
9<br />
Large<br />
1 1/4 cups<br />
2 tbsp.<br />
1 tbsp<br />
2 tbsp.<br />
2 tbsp.<br />
1 1/2 tsp.<br />
1 3/4 cups<br />
1 cup<br />
1/2 cup<br />
2 tbsp.<br />
1 1/2 tsp.<br />
1 1/2 tsp.<br />
9<br />
WHEAT ROLLS<br />
Ingredient<br />
Water<br />
Skim Milk Powder<br />
Shortening<br />
Honey<br />
Molasses<br />
Salt<br />
Whole Wheat Flour<br />
(1) Yeast<br />
Use Setting<br />
METHOD<br />
1 Measure ingredients into baking pan.<br />
2 Insert baking pan securely into unit, close lid.<br />
3 Select appropriate bread setting.<br />
4 Push start button.<br />
5 The Breadmaker will beep 3 times & the display<br />
will fresh "END" when dough is ready.<br />
6 Remove dough from pan and turn dough out onto<br />
a lightly floured surface.<br />
7 Divide into 12 equal pieces.<br />
8 Shape each into a ball.<br />
9 Place in greased muffin tins.<br />
10 Brush lightly with melted butter.<br />
11 Let stand, covered for 20-25 minutes.<br />
12 Bake at 375°C (190°C) for 15-20 minutes.<br />
Yield: Makes 12 rolls<br />
PRETZELS<br />
Ingredient<br />
* Beer<br />
Butter<br />
Sugar<br />
Salt<br />
White Flour<br />
(1) Dry Yeast<br />
Use Setting<br />
* NOTE: Water can be substituted for beer in this<br />
recipes resulting in a crispier crust.<br />
METHOD<br />
1 Place beer, butter, sugar and salt into baking pan.<br />
2 Add flour. Sprinkle yeast into centre of flour.<br />
3 Insert pan securely into baking unit, close lid.<br />
4 Select dough setting.<br />
5 The Breadmaker will beep 3 times & the display<br />
will fresh "END" when dough is ready.<br />
6 Remove dough from pan & turn dough onto lightly<br />
floured board divide into 4 equal portions.<br />
7 Cut each quarter into 4 equal portions.<br />
Roll each piece of dough into a thin rope about<br />
12 inches long.<br />
8 To shape into pretzel, pick up ends of rope in each<br />
hand & curve into a circle, crossing ends at top.<br />
9 Twist ends once and lay down over bottom of circle.<br />
10 Invert pretzels so ends are underneath, place about<br />
1 inch a part on well-greased baking sheets. Then<br />
brush with beaten egg and sprinkle lightly with<br />
coarse salt, poppy seeds, or sesame seeds.<br />
11 Bake at 400°C (200°C) 10 to 12 minutes.<br />
12 For crispy, dry crunchy pretzels, place cooked<br />
pretzels in cool oven, on an ungreased baking<br />
sheet. Allow to stand 3 hours or overnight. This<br />
process allows pretzels to become dry & crunchy.<br />
13 For soft & chewy pretzels, serve warm with<br />
mustard.<br />
Yield: Makes 16 pretzels<br />
Large<br />
1 cup<br />
1 tbsp.<br />
2 tbsp<br />
1 tsp.<br />
2 3/4 cups<br />
1 tsp.<br />
9<br />
Large<br />
1 1/4 cups<br />
2 tbsp.<br />
2 tbsp<br />
2 tbsp.<br />
1 tbsp.<br />
1 1/2 tsp.<br />
3 1/4 cups<br />
1 1/2 tsp.<br />
9
RECIPES<br />
RASPBERRY BRAID<br />
Ingredient<br />
Water<br />
Egg (beaten)<br />
Butter<br />
Sugar<br />
Salt<br />
White Flour<br />
(1) Dry Yeast<br />
Use Setting<br />
METHOD<br />
1 Measure ingredients into baking pan.<br />
2 Insert baking pan securely into unit, close lid.<br />
3 Select dough setting.<br />
4 Push start button.<br />
5 The Breadmaker will beep 3 times & the display<br />
will fresh "END" when dough is ready.<br />
6 Remove dough from pan & on a lightly floured<br />
surface, divide dough in half.<br />
7 Roll each half into a 14" x 8" rectangle.<br />
8 Spread 1/4 cup raspberry jam down (lengthwise)<br />
centre third of each rectangle.<br />
9 Make diagonal cuts from the outer edges one inch<br />
apart and three inches long. (See fig. 1)<br />
11 Fold alternate strips of dough over filling.<br />
(See fig. 2)<br />
11 Place on greased baking sheets.<br />
12 Brush with melted and cooled butter.<br />
13 Let rise 30 minutes.<br />
14 Brush with an egg yolk and 1 tbsp. water mixture.<br />
15 Combine until crumbly:<br />
2 tbsp. soft butter<br />
2 tbsp. brown sugar<br />
1/3 cup flour<br />
1/4 tsp. Nutmeg<br />
16 Sprinkle half over each dough.<br />
17 Sake at 350°F (175°C) for 30-35 minutes<br />
Yield: Makes 2 braids.<br />
Fig. 1<br />
Fig. 2<br />
Large<br />
1 1/4 cups<br />
1<br />
2 tbsp<br />
1/4 cup<br />
3/4 tsp.<br />
3 2/3 cups<br />
2 tsp.<br />
9<br />
(1) See page 15 for additional Dry Yeast Information.<br />
* All of the recipes in this book have been tested with<br />
your Breadmaker. If the result IS not satisfied,<br />
ingredients adjustment may be needed (particularly<br />
yeast & water). For details, please refer to the "Baking<br />
Tips for Yeast Bread" on page 33-34.<br />
HOT CROSS BUNS<br />
Ingredient<br />
Milk<br />
Butter<br />
Sugar<br />
Egg (beaten)<br />
Salt<br />
White Flour<br />
Cinnamon<br />
Ground Cloves<br />
Nutmeg<br />
Raisins<br />
(1) Dry Yeast<br />
Use Setting<br />
METHOD<br />
1 Measure ingredients into baking pan.<br />
2 Insert baking pan securely into unit, close lid.<br />
3 Select dough setting.<br />
4 Push start button.<br />
5 The Breadmaker will beep 3 times & the display<br />
will fresh "END" when dough is ready.<br />
6 Remove dough from pan and divide into 12 pieces.<br />
7 Shape into round, slightly flattened buns.<br />
8 Place 2" apart on greased baking sheets.<br />
9 Cover and let rise 30 minutes or until double.<br />
10 Combine (and brush on buns) 1 slightly beaten egg<br />
with 1 tbsp, water.<br />
11 Slash top of bun to form a cross.<br />
12 Bake at 375°C (190°C) for 16 -18 minutes.<br />
13 Drizzle "cross" while hot, with icing sugar glaze<br />
consisting of:<br />
3/4 cup sifted icing sugar.<br />
1 tbsp. milk<br />
2 drops almond flavouring.<br />
Yield: Makes 12 buns<br />
Large<br />
1 1/4 cups<br />
1/4 cup<br />
1/3 cup<br />
1 Large<br />
1 tsp.<br />
3 1/2 cups<br />
1 tsp.<br />
1/2 tsp.<br />
1/4 tsp.<br />
1 cup<br />
3 tsp.<br />
9<br />
26<br />
JEWISH CHALLAH LOAF<br />
Ingredient<br />
Water<br />
Skim Milk Powder<br />
Butter<br />
Sugar<br />
Salt<br />
Eggs (beaten)<br />
White Flour<br />
(1) Dry Yeast<br />
Use Setting<br />
METHOD<br />
1 Measure ingredients into baking pan.<br />
2 Insert baking pan securely into unit, close lid.<br />
3 Select appropriate bread setting.<br />
4 Push start button.<br />
5 The Breadmaker will beep 3 times &the display<br />
will fresh "END" when dough is ready.<br />
6 Remove dough from pan and divide dough into 6<br />
equal portions.<br />
7 Roll, with palm of hands into long smooth strips.<br />
The pieces should be thick in the middle and<br />
gradually tapered towards the ends.<br />
8 Braid the 6 dough strips.<br />
9 Place on a lightly greased baking sheet.<br />
10 Cover and let rise 30 minutes.<br />
11 Brush with egg yolk.<br />
12 Bake at 375°C (190°C) for 30-35 minutes<br />
Yield: Makes 1 loaf.<br />
ENGLISH MUFFINS<br />
Ingredient<br />
Milk<br />
Egg (beaten)<br />
Shortening<br />
Sugar<br />
Salt<br />
White Flour<br />
(1) Dry Yeast<br />
Use Setting<br />
METHOD<br />
1 Measure ingredients into baking pan.<br />
2 Insert baking pan securely into unit, close lid.<br />
3 Select dough setting.<br />
4 Push start button.<br />
5 The Breadmaker will beep 3 times & the display<br />
will fresh "END" when dough is ready.<br />
6 Remove dough from pan and roll to 1/4" thick.<br />
7 Cut into 3" circles.<br />
8 Place on cornmeal sprinkled baking sheets.<br />
9 Brush with water and sprinkle with corn meal.<br />
10 Cover and let rise 30 minutes.<br />
11 Preheat an ungreased grill to 350°F (175°C).<br />
12 Grill 6-7 minutes on each side or until golden brown.<br />
Yield: Makes 20 muffins.<br />
Large<br />
1 cup<br />
3 tbsp.<br />
1/4 cup<br />
1/4 cup<br />
1 1/2 tsp.<br />
2<br />
3 1/2 cups<br />
1 1/2 tsp.<br />
9<br />
Large<br />
1 cup<br />
2<br />
2 tbsp.<br />
2 tbsp.<br />
1 tsp.<br />
3 cups<br />
2 tsp.<br />
9
RECIPES<br />
RAISIN KOLACKY DOUGHNUTS<br />
Ingredient<br />
Water<br />
Skim Milk Powder<br />
Sugar<br />
Butter<br />
Egg<br />
Salt<br />
White Flour<br />
(1) Dry Yeast<br />
Use Setting<br />
METHOD<br />
1 Measure ingredients into baking pan.<br />
2 Insert baking pan securely into unit, close lid.<br />
3 Select dough setting.<br />
4 Push start button.<br />
5 The Breadmaker will beep 3 times & the display<br />
will fresh "END" when dough is ready.<br />
6 Remove dough from pan.<br />
7 Roll dough out to 1/2" thick.<br />
8 Cut with a 2 1/2" biscuit cutter.<br />
9 Place 2" apart on greased baking sheets.<br />
10 Cover and let rise 30 minutes or until double in size.<br />
11 Press an indent in the centre of each bun,<br />
leaving a 1/4" rim around the edge.<br />
12 Fill with raisin filling.<br />
13 Bake at 400°F (200°C) for 10 minutes.<br />
Raisin filling Combine:<br />
2 cups seedless raisins<br />
1 cup brown sugar<br />
1 tsp. cinnamon<br />
1/2 tsp allspice<br />
1 1/3 cup water<br />
Bring to a boll stirring constantly.<br />
Cook 1 minute longer.<br />
Remove from heat and cool.<br />
Yield: Makes 18-20 buns<br />
Large<br />
1 cup<br />
1 tbsp.<br />
1/4 cup<br />
2 tbsp<br />
1 large (beaten)<br />
3/4 tsp<br />
3-1/2 cups<br />
1 tbsp.<br />
9<br />
(1) See page 15 for additional Dry Yeast Information.<br />
* All of the recipes in this book have been tested with<br />
your Breadmaker. If the result is not satisfied,<br />
ingredients adjustment may be needed (particularly<br />
yeast & water). For details, please refer to the "Baking<br />
Tips for Yeast Bread" on page 33-34.<br />
Ingredient<br />
Milk<br />
Egg (beaten)<br />
Shortening<br />
Sugar<br />
Salt<br />
White Flour<br />
(1) Dry Yeast<br />
Use Setting<br />
Large<br />
1 1/4 cups<br />
1<br />
1/4 cup<br />
1/4 cup<br />
1 tsp.<br />
3 1/2 cups<br />
1 1/2 tsp.<br />
9<br />
METHOD<br />
1 Measure ingredients into baking pan.<br />
2 Insert baking pan securely into unit, close lid.<br />
3 Select dough setting.<br />
4 Push start button.<br />
5 The Breadmaker will beep 3 times & the display<br />
will fresh "END" when dough is ready.<br />
6 Roll dough to 1/2" thick.<br />
7 Cut with a 2 1/2" doughnut cutter.<br />
8 Let rise, covered, 30 minutes or until double in size.<br />
9 Deep fat fry at 375°F (190°C).<br />
10 Turn doughnuts as they rise to the surface.<br />
Fry until brown on both sides.<br />
11 Drain on absorbent paper.<br />
Yield: Makes 2 dozen doughnuts.<br />
27<br />
CAKE<br />
Pre-measure ingredient groups (sift together ingredient<br />
Group 2). Place in bowls near Bread Machine. All<br />
ingredients must be at room temperature.<br />
Ingredient<br />
Vegetable Oil<br />
Water<br />
Egg Whites<br />
* Super Moist Cake Mix<br />
*Super Moist is a registered Trade Mark of General<br />
Mills, Inc.<br />
METHOD<br />
1 Measure water, oil & egg whites & place in baking<br />
pan.<br />
2 Add Contents from box Cake Mix to baking pan.<br />
3 Select #10<br />
4 Push Start Button.<br />
5 The Bread Make will beep 3 times & the display<br />
will fresh "END" when cake is done.<br />
6 Push & hold down stop button until buzzer sounds.<br />
7 Unplug Bread Maker.<br />
8 Using oven mitts, remove pan from unit & allow to<br />
cool.<br />
9 Carefully remove cake from pan.<br />
Note:<br />
Sugar is not listed in ingredients as sugar is included<br />
in super moist cake mix.<br />
BEST 2 EGG CAKE<br />
Regular<br />
1/4 cups<br />
3/4 cup<br />
3<br />
1 Box (517g)<br />
Pre-measure ingredient groups (sift together ingredient<br />
Group 2). Place in bowls near Bread Machine. All<br />
ingredients must be at room temperature.<br />
(1) Ingredient<br />
Shortening<br />
Milk<br />
Vanilla<br />
Eggs<br />
(2) Ingredient<br />
Sifted Cake Flour<br />
Baking Powder<br />
Salt<br />
Regular<br />
1/3 cups<br />
3/4 cup<br />
1 tsp.<br />
2<br />
Regular<br />
2 1/4 cups<br />
2 1/2 tsp.<br />
1 tsp.<br />
METHOD<br />
1 Measure and place ingredients from group 1 in<br />
bread machine bucket.<br />
2 Measure and sift together ingredients in group 2.<br />
Then place in bread machine pan.<br />
3 Select #10 setting.<br />
4 Push Start Button.<br />
5 The Bread Maker will beep 3 times 8 the display<br />
will fresh "END" when cake is done.<br />
6 Push &hold down stop button until buzzer sounds.<br />
7 Unplug Bread Maker.<br />
8 Using oven mitts, remove pan from unit and allow<br />
to cool.<br />
9 Carefully remove cake from pan.
RECIPES / QUICK BREADS<br />
BANANA NUT BREAD CORN BREAD<br />
We’ve seen many an eye light up at the mention of<br />
Banana Nut Bread. It has to be one of the most<br />
popular quick breads around.<br />
Pre-measure ingredient groups (sift together ingredients<br />
Group 2). Place in bowls near Bread Machine.<br />
All ingredients must be at room temperature.<br />
(1) Ingredient<br />
Butter / Oil<br />
Milk<br />
Mashed Ripe Banana<br />
Eggs<br />
Walnuts<br />
(2) Ingredient<br />
Unbleached<br />
All-Purpose Flour<br />
Baking Soda<br />
Salt<br />
Dark Brown Sugar,<br />
Packed<br />
Granulated Sugar<br />
Regular<br />
2 1/2 tbsp.<br />
1/2 cup<br />
1 cup<br />
2 Large Eggs<br />
1/2 cup<br />
METHOD<br />
1 Measure and place ingredients from group 1 in<br />
bread machine baking pan.<br />
2 Measure and sift together ingredients in group 2.<br />
Then place in bread machine baking pan.<br />
3 Press select to #10 for quick bread.<br />
4 Press start.<br />
Bread Machine will mix &bake bread automatically.<br />
5 When display reads "END" the baking is complete.<br />
6 Press & hold stop button until buzzer sounds.<br />
Display is Blank.<br />
7 Unplug bread maker.<br />
8 Using oven mitts, Take pan out of bread machine<br />
& let cool before removing Banana Nut Loaf.<br />
IRISH SODA BREAD<br />
You won’t want to wait for St. Paddy’s Day to enjoy<br />
this raisin-studded, buttery bread.<br />
Pre-measure ingredient groups (sift together ingredients<br />
Group 2). Place in bowls near Bread Machine. All<br />
ingredients must be at room temperature.<br />
(1) Ingredient<br />
Butter Milk<br />
Egg<br />
Raisins<br />
(2) Ingredient<br />
Unbleached<br />
All-Purpose Flour<br />
Baking Soda<br />
Salt<br />
Granulated Sugar<br />
Regular<br />
1 1/2 cups<br />
1 tsp.<br />
1 tsp<br />
1/4 cup<br />
1/4 cup<br />
Regular<br />
3/4 cup<br />
1 Large Egg<br />
1/2 cup<br />
Regular<br />
2 cups<br />
1 1/2 tsp.<br />
1/4 tsp.<br />
1/4 cup<br />
METHOD<br />
1 Measure and place ingredients from group 1 in<br />
bread machine baking pan.<br />
2 Measure and sift together Ingredients in group 2.<br />
Then place in bread machine baking pan.<br />
3 Press select to #10 for quick bread.<br />
4 Press start.<br />
Bread Machine will mix & bake bread automatically.<br />
5 When display reads "END" the baking is complete.<br />
6 Press and hold stop button until buzzer sounds,<br />
Display is Blank.<br />
7 Unplug bread maker.<br />
8 Using oven mitts, Take pan out of bread machine<br />
& let cool before removing Irish Soda Bread.<br />
Have you ever noticed how most quick breads<br />
resemble cake? Well, corn bread is one quick bread<br />
that can be described as savoury rather than sweet.<br />
Pre-measure ingredient groups (sift together ingredients<br />
Group 2). Place in bowls near Bread Machine.<br />
All ingredients must be at room temperature.<br />
(1) Ingredient<br />
Butter / Oil<br />
Milk<br />
Eggs<br />
(2) Ingredient<br />
Unbleached<br />
All-Purpose Flour<br />
Baking Powder<br />
Cornmeal<br />
Granulated Sugar<br />
METHOD<br />
1 Measure and place ingredients from group 1 in<br />
bread machine baking pan.<br />
2 Measure and sift together ingredients in group 2.<br />
Then place in bread machine baking pan.<br />
3 Press select to #10 for quick bread.<br />
4 Press start.<br />
Bread Machine will mix & bake bread<br />
automatically.<br />
5 When display reads "END" the baking is complete.<br />
6 Press & hold stop button until buzzer sounds.<br />
Display is Blank.<br />
7 Unplug bread maker.<br />
8 Using oven mitts, Take pan out of bread machine<br />
& let cool before removing Corn Bread.<br />
JAMS<br />
(1) Ingredient<br />
Crushed Fresh Strawberries<br />
or Other Types of Fruit<br />
Sugar<br />
Lemon Juice<br />
Powered Pectin<br />
Use Setting<br />
Regular<br />
3 cups<br />
1 cup.<br />
2 tbsp<br />
1 pack (50g or 3 Fl. oz.)<br />
11.<br />
FOR OTHER JAMS, FOLLOW THE SAME BASIC<br />
RECIPE, ONLY SUBSTITUTE THE DESIRED FRESH<br />
FRUIT INGREDIENT.<br />
METHOD<br />
1 Measure the ingredients into baking pan.<br />
2 Insert the baking pan securely into unit, close lid.<br />
3 Select #11<br />
4 Push start button.<br />
5 The Breadmaker will beep 3 times &the display<br />
will flash "END" when the jam is done.<br />
6 Using oven mitts, remove pan from unit,<br />
(1) See page 15 for additional Dry Yeast Information.<br />
* All of the recipes in this book have been tested with<br />
your Breadmaker. If the result is not satisfied,<br />
ingredients adjustment may be needed (particularly<br />
yeast &water). For details, please refer to the "Baking<br />
Tips for Yeast Bread" on page 33-34.<br />
28<br />
Regular<br />
3 tbsp.<br />
1/2 cup<br />
2 Large Eggs<br />
Regular<br />
1 1/3 cups<br />
2 1/2 tsp<br />
1/2 cup<br />
2 tbsp.<br />
APPLE WALNUT LOAF<br />
The glorious aroma of baking apples, cinnamon and<br />
nutmeg is this recipe’s hallmark.<br />
Pre-measure ingredient groups (sift together ingredients<br />
Group 2). Place in bowls near Bread Machine.<br />
All ingredients must be at room temperature.<br />
(1) Ingredient<br />
Butter / Oil<br />
Milk<br />
Grated Peeled,<br />
Granny Smith Apple<br />
Eggs<br />
Chopped Walnuts<br />
(2) Ingredient<br />
Unbleached<br />
All-Purpose Flour<br />
Baking Soda<br />
Baking Powder<br />
Granulated Sugar<br />
Salt<br />
Ground Cinnamon<br />
Ground Nutmeg<br />
Regular<br />
2 tbsp.<br />
1 tbsp.<br />
1 cup<br />
1 Large Eggs<br />
1/2 cup<br />
Regular<br />
1 1/2 cups<br />
1/2 tsp.<br />
1/4 tsp<br />
1/2 cup<br />
1/4 tsp.<br />
1/4 tsp.<br />
1/4 tsp.<br />
METHOD<br />
1 Measure and place ingredients from group 1 in<br />
bread machine baking pan.<br />
2 Measure and sift together ingredients in group 2.<br />
Then place in bread machine baking pan.<br />
3 Press select to #10 for quick bread.<br />
4 Press start.<br />
Bread Machine will mix & bake bread<br />
automatically.<br />
5 When display reads "END" the baking is complete.<br />
6 Press and hold stop button until buzzer sounds.<br />
Display is Blank.<br />
7 Unplug bread maker.<br />
8 Using oven mitts, Take pan out of bread machine<br />
& let cool before removing Apple Walnut Loaf.
BAKING CYCLE TIME PAB-5200<br />
2 LB. BREADMAKER - BAKING CYCLE TIME PAB-5200<br />
SELECTIONS<br />
COURSE<br />
PHASE<br />
Rest<br />
Knead 1<br />
Knead 2<br />
Rise 1<br />
Punch 1<br />
Punch 2<br />
Punch 3<br />
Rest<br />
Shape 1<br />
Shape 2<br />
Shape 3<br />
Rise 2<br />
Bake<br />
Total Cycle<br />
Time<br />
Keep Warm<br />
1 2 3<br />
BASIC<br />
REGULAR<br />
6 min.<br />
27 min.<br />
23 min.<br />
-<br />
-<br />
-<br />
-<br />
5 sec.<br />
10 sec.<br />
5 sec.<br />
64 min.<br />
45 min.<br />
2:45<br />
60 min.<br />
BASIC<br />
LARGE<br />
6 min.<br />
31 min.<br />
29 min.<br />
-<br />
-<br />
-<br />
-<br />
5 sec.<br />
10 sec.<br />
5 sec.<br />
54 min.<br />
50 min.<br />
2:50<br />
60 min.<br />
* Knead and Keep Warm Cycle<br />
BASIC<br />
EXTRA<br />
LARGE<br />
6 min.<br />
31 min.<br />
29 min.<br />
-<br />
-<br />
-<br />
-<br />
5 sec.<br />
10 sec.<br />
5 sec.<br />
54 min.<br />
70 min.<br />
3:10<br />
60 min.<br />
4<br />
WHOLE<br />
WHEAT<br />
REGULAR<br />
30 min.<br />
6 min.<br />
18 min.<br />
76 min.<br />
10 sec.<br />
-<br />
-<br />
30 min.<br />
3 sec.<br />
-<br />
-<br />
55 min.<br />
45 min.<br />
4:20<br />
60 min.<br />
5<br />
WHOLE<br />
WHEAT<br />
LARGE/<br />
EXTRA<br />
LARGE<br />
30 min.<br />
6 min.<br />
25 min.<br />
79 min.<br />
15 sec.<br />
-<br />
-<br />
30 min.<br />
-<br />
-<br />
45 min.<br />
55 min.<br />
4:30<br />
60 min.<br />
6<br />
LARGE/<br />
EXTRA<br />
LARGE<br />
15 min.<br />
6 min.<br />
25 min.<br />
39 min.<br />
15 sec.<br />
-<br />
-<br />
15 min.<br />
3 sec.<br />
3 sec.<br />
29<br />
-<br />
-<br />
45 min.<br />
56 min.<br />
3:20<br />
60 min.<br />
7<br />
FRENCH<br />
6 min.<br />
22 min.<br />
34 min.<br />
5 sec.<br />
10 sec.<br />
5 sec.<br />
29 min.<br />
5 sec.<br />
10 sec.<br />
5 sec.<br />
54 min.<br />
65 min.<br />
3:30<br />
60 min.<br />
8<br />
SWEET<br />
6 min.<br />
31 min.<br />
40 min.<br />
5 sec.<br />
10 sec.<br />
5 sec.<br />
29 min.<br />
5 sec.<br />
10 sec.<br />
5 sec.<br />
49 min.<br />
50 min.<br />
3:25<br />
60 min.<br />
9 10<br />
DOUGH CAKE /<br />
QUICK<br />
BREAD<br />
6 min.<br />
24 min.<br />
60 min.<br />
-<br />
-<br />
-<br />
---<br />
-<br />
-<br />
-<br />
-<br />
-<br />
1:30<br />
-<br />
6 min.<br />
14 min.<br />
-<br />
-<br />
-<br />
-<br />
-<br />
-<br />
-<br />
-<br />
-<br />
90 min.<br />
1:40<br />
60 min.<br />
11<br />
JAM<br />
*45 min.<br />
15 min.<br />
-<br />
-<br />
-<br />
-<br />
-<br />
-<br />
-<br />
-<br />
-<br />
-<br />
1:00<br />
-
NEED HELP?<br />
QUESTIONS ABOUT GENERAL PERFORMANCE AND OPERATION<br />
Q1<br />
Q2<br />
Q3<br />
Q4<br />
How do I make doughnuts with my Breadmaker?<br />
How does it make the hole?<br />
What should I do if the kneading blade comes out<br />
with the bread?<br />
Why does my bread sometimes have some flour<br />
on the side crust?<br />
Why isn’t the dough mixing - I can hear the motor<br />
running.<br />
A1<br />
A2<br />
A3<br />
A4<br />
Q5 How long does it take to make bread? A5<br />
Q6<br />
Q7<br />
Q8<br />
Q9<br />
Q10<br />
Q11<br />
Why can’t I use the timer when baking with fresh<br />
milk?<br />
If the power goes out in the middle of processing,<br />
will my Breadmaker finish baking bread or making<br />
dough?<br />
Why do I have to add the ingredients in a certain<br />
order?<br />
When setting the timer for morning, why does the<br />
machine make sounds late at night?<br />
What size loaf does the Breadmaker make?<br />
The kneading blade is stuck in the bread pan.<br />
After baking how do I get it out?<br />
30<br />
A6<br />
A7<br />
A8<br />
A9<br />
A10<br />
A11<br />
The Breadmaker only makes the dough for the<br />
doughnuts. You must form and fry the doughnuts<br />
in a conventional deep fryer.<br />
Remove it with a pair of plastic tongs before slicing<br />
the bread. Since the blade can be disconnected<br />
from the pan, it is not a malfunction if it comes out<br />
in your bread.<br />
In some cases, the flour mix may remain on the<br />
corners of the baking pan. When this happens, it<br />
usually can be eaten or simply trim off that portion<br />
of the outer crust with a sharp knife.<br />
The Kneading Blade or baking pan may not be<br />
inserted properly. Make sure the pan is facing the<br />
right way and that it has "clicked" and seated into<br />
the bottom of the Breadmaker.<br />
Timing for each setting is outlined on page 6.<br />
The milk will spoil if left sitting in the machine too<br />
long. Fresh ingredients such as eggs and milk<br />
should never be used with the delayed timer<br />
feature.<br />
No. The unfinished bread or dough should be<br />
discarded and the process started from the<br />
beginning.<br />
This allows for the Breadmaker to mix the ingredients<br />
in the most efficient manner possible. It also<br />
serves to keep the yeast from combining with the<br />
liquid before the dough is mixed.<br />
The machine must start operation several hours<br />
before the bread will be ready. These sounds are<br />
made by the motor when kneading the dough. It is<br />
a normal operation, not a malfunction.<br />
Your Bread maker makes REGULAR (1 lb.),<br />
LARGE (1 1/2 lb.) and EXTRA LARGE (2 lb.)<br />
Loaves of breads.<br />
The kneading blade may "stick" in place after<br />
baking. Running warm or hot water over the blade<br />
should loosen it enough to be removed. If still<br />
stuck, soak in lukewarm water for about 30<br />
minutes.
NEED HELP?<br />
QUESTIONS ABOUT GENERAL PERFORMANCE AND OPERATION<br />
Q12 How many watts is my Breadmaker? A12<br />
Q13<br />
Q14<br />
Q15<br />
Q16<br />
Q17<br />
Can I wash the baking pan in the dishwasher?<br />
What will happen if I leave the finished bread in<br />
the baking pan?<br />
Why did the dough only partially mix? Why<br />
didn’t it mix completely?<br />
Why didn’t the bread rise?<br />
Why can’t the delayed finish be set for more<br />
than 12 hour? What is the minimum time a<br />
cycle may be delayed?<br />
QUESTIONS ABOUT INGREDIENTS/RECIPES<br />
Q18<br />
Q19<br />
How do I know when to add raisins, nuts, etc.<br />
to the bread?<br />
How come my bread comes out too moist?<br />
What can I do?<br />
31<br />
A13<br />
A14<br />
A15<br />
A16<br />
A17<br />
A18<br />
A19<br />
430 watts during the baking cycle. Very little power<br />
is consumed during the kneading and rising<br />
cycles.<br />
No. The baking pan and kneading blade must be<br />
washed by hand.<br />
It may result in a "Soggy" loaf of bread as excess<br />
steam (moisture) would not be able to escape,<br />
Allow to cool on a wire rack after baking to prevent<br />
this.<br />
The batter may be too heavy or dry. Also, the<br />
kneading blade or baking pan may not be inserted<br />
properly. Ingredients may have been added in the<br />
wrong order. (See Baking Tips Guide on page 33<br />
and 34).<br />
The yeast could be bad, expired or possibly no<br />
yeast was added at all. Also, if the mixing was no<br />
complete, rising problems could develop. Gluten<br />
free flour will also affect the amount of rising<br />
There are numerous reasons for this problem and<br />
are outlined in the Baking Tips Guide on page 33<br />
and 34.<br />
The maximum length of delay is 12 hours including<br />
the particular cycle time. For example, setting 8<br />
has a cycle that takes 3:25 hours, so it may be<br />
delayed up to 8 l/2 hours. The delay cannot<br />
exceed 12 hours since the yeast and ingredients<br />
may not work well. The minimum length of delay<br />
for each setting is 30 minutes, as the delay clock<br />
increase in 30 minute increments.<br />
On setting 2 thru 3 and 8, there is beeper tone to<br />
signal that you may add raisins, nuts, etc. after the<br />
initial kneading cycle is complete. (NOTE: The<br />
beeper sounds after 32 minutes.)<br />
However, in most cases, the added ingredients are<br />
broken apart during the initial kneading cycle. So,<br />
if it is more convenient for you to add them at the<br />
start, results will be fine.<br />
Humidity may affect the dough. Add an extra<br />
tablespoon of flour. Also, high altitude may have<br />
the same effect. Decrease the amount of yeast by<br />
l/4 teaspoon and decrease the sugar and/or<br />
water/milk slightly. (See Baking Tips Guide on<br />
page 33 & 34).
NEED HELP?<br />
QUESTIONS ABOUT INGREDIENTS / RECIPES<br />
Q20<br />
Q21<br />
Q22<br />
Q23<br />
Q24<br />
Q25<br />
Why do I get air bubbles at the top of the bread?<br />
When using raisins, the Breadmaker crushes<br />
them. How can I avoid this?<br />
Why does my bread rise and then collapse or<br />
crater?<br />
Can I use my favourite bread recipes (traditional<br />
yeast bread) in my bread machine?<br />
Is it important for ingredients to be at room<br />
temperature before adding them to the Baking<br />
Pan?<br />
Why do the loaves vary in height and weight?<br />
The whole wheat and multi-grain breads are<br />
always shorter. Am I doing some thing wrong?<br />
This can be caused by using too much yeast.<br />
Ingredients such as raisins, nuts etc. should be<br />
added when the signal time comes on<br />
approximately 32 minutes into the cycle (after<br />
initial kneading) to prevent this from occurring<br />
(See page 2).<br />
The bread may be rising too fast. To reduce the<br />
rate of rising, reduce the amount of water and/or<br />
increase the amount of salt and/or decrease the<br />
amount of yeast. (See Baking Tips Guide on page<br />
33 & 34).<br />
Yes, but you will need to experiment to get the<br />
right proportion of ingredients. Become familiar<br />
with the unit and make several loaves of bread<br />
before you begin experimenting. Never exceed a<br />
total amount of 4 2/3 cups dry ingredients (that<br />
includes flours, oats, cornmeal, bran, cereal,<br />
cracked wheat, etc.). Use the recipes in this book<br />
to help determine the ratio of dry ingredients to<br />
liquid and amounts of yeast, sugar, salt, and<br />
butter/margarine to use.<br />
No, as long as ingredients are not extremely cold<br />
or hot, Milk, eggs, butter/margarine, and yeast can<br />
be added directly from the refrigerator with good<br />
results.<br />
No, it is normal for Whole Wheat and Multi-Grain<br />
breads to be shorter and denser than Basic or<br />
French breads. Whole Wheat and Rye flours are<br />
heavier than while bread flour, therefore they don’t<br />
rise as much during the bread making process.<br />
They also typically have added ingredients, such<br />
as oats, bran, nuts and raisins, which contribute to<br />
the shorter height and denser texture.<br />
BAKING TIPS GUIDE INTRODUCTION<br />
When the PALSONIC Cookbook was developed, hundreds of loaves of bread were baked using popular brands of<br />
flours and yeasts available. Adjustments were made to the recipes based on ingredients from popular brands. For<br />
example, if you use flour processed by a local mill it may have different characteristics and produce different results<br />
than some of the more popular national brands. If you followed the recipe in the cookbook exactly and feel the results<br />
should be better than what you are currently achieving, use the BAKING TIPS GUIDE on following pages 33 & 34<br />
to help you produce a loaf of bread to suit your personal tastes. There are usually several possible solutions to<br />
improve each result. You can make adjustments one at a time, or you can try a combination of them all at once.<br />
We suggest you keep track of your "Baking experiments" so you can determine what adjustments were made to<br />
create your perfect loaf.<br />
32<br />
A20<br />
A21<br />
A22<br />
A23<br />
A24<br />
A25
INGREDIENT MEASUREMENT<br />
OTHER CAUSES<br />
BAKING TIPS FOR YEAST BREADS<br />
Water<br />
or Milk<br />
Salt<br />
Sugar<br />
or Honey<br />
Flour<br />
Yeast<br />
Water<br />
or Milk<br />
Flour<br />
Yeast<br />
Salt<br />
RESULTS<br />
POSSIBLE<br />
SOLUTIONS<br />
Increase +<br />
Decrease -<br />
Increase +<br />
Decrease -<br />
Increase +<br />
Decrease -<br />
Increase +<br />
Decrease -<br />
Increase +<br />
Decrease -<br />
Not enough<br />
water or milk<br />
Liquid too hot<br />
or too cold<br />
Too old<br />
Low in gluten<br />
content<br />
Too fine<br />
None was added<br />
Out of date code<br />
Loaf Rises<br />
Then Falls<br />
"Cratered-<br />
Loaf"<br />
not teaspoons (too much)<br />
Ingredients not<br />
See P.16<br />
measured properly<br />
Breadmaker unplugged<br />
or power interruption<br />
Ingredients spilled inside bread<br />
maker &/or heating element<br />
Bread "mushroomed": oven edge<br />
of bread pan, crust burned<br />
Baking pan not properly<br />
seated inside breadmaker<br />
Kneading blade not<br />
installed correctly<br />
Incorrect bread setting<br />
was used<br />
Bread not removed from baking<br />
pan soon after baking<br />
Breadmaker<br />
malfunctioning<br />
Loaf Sides<br />
Caved In<br />
Loaf Rises<br />
Too High<br />
"Mushroom<br />
Loaf"<br />
1 Tbsp. 1 Tbsp. 1 Tbsp.<br />
1/4 tsp.<br />
1/8-1/4 tsp.<br />
See P.13,14<br />
Used wrong type (fresh)<br />
instead of dry granular<br />
Forgotten<br />
Accidentally measured in tablespoons<br />
1/4 tsp.<br />
1/8-1/4 tsp.<br />
1/4 tsp.<br />
1/2 Tbsp.<br />
1 Tbsp.<br />
1/8-1/4 tsp.<br />
See P.15<br />
33<br />
Loaf Does<br />
Not Rise<br />
Enough<br />
1 Tbsp.<br />
1/4 tsp.<br />
1/2 Tbsp.<br />
1/8-1/4 tsp.<br />
See P.13,14<br />
See P.13,14<br />
See P.15<br />
Flat Loaf<br />
No Rising<br />
Short &<br />
Heavy<br />
See P.17<br />
See P.13,14<br />
See P.15<br />
See P.15<br />
Crust Too<br />
Dark<br />
1/2 Tbsp.<br />
Crust Too<br />
Light<br />
1/2 Tbsp.<br />
See P.16 See P.16 See P.16 See P.16 See P.16 See P.16<br />
Uncooked<br />
Or Partially<br />
Cooked<br />
2 Tbsp.
BAKING TIPS FOR YEAST BREADS<br />
Overcooked Not Mixed<br />
or Partially<br />
Mixed Soggy<br />
1/2 Tbsp.<br />
See P.13,14<br />
Loaf is Gnarly<br />
Knotted<br />
Top<br />
1 Tbsp.<br />
Loaf Core<br />
Texture<br />
Open, Coarse<br />
or Uneven<br />
1/4 tsp.<br />
Loaf Core<br />
Texture<br />
Heavy &<br />
Dense<br />
1 Tbsp. 1 Tbsp.<br />
1/8-1/4 tsp.<br />
1/2 Tbsp.<br />
1/8-1/4 tsp.<br />
See P.15<br />
See P.16 See P.16 See P.16 See P.16<br />
34<br />
Burning<br />
Odour<br />
During<br />
Operation<br />
High<br />
Altitude<br />
Adjustment<br />
2 Tbsp.<br />
1/2 Tbsp.<br />
1/8-1/4 tsp.<br />
See "Mushroom Loaf"<br />
solution column<br />
Breadmaker<br />
Cannot be<br />
Programmed<br />
or Started<br />
Loaf Burned<br />
Completely
TROUBLESHOOTING<br />
CRATERED BREAD<br />
If the top caves in, there is probably too much moisture inside the bread. This could be caused by using canned<br />
fruit or vegetables. It is better to drain well and blow them dry first or reduce water by 1 tablespoon. Cratered bread<br />
can also occur with cheese bread, depending on the moisture content of the particular cheese. Soggy sides and<br />
peculiar shapes can occur when a loaf is left in the baking pan after baking is completed.<br />
"MUSHROOM" BREAD<br />
There may be too much yeast, causing the top to mushroom. Yeast must be measured in teaspoons and active<br />
dry yeast must not be mixed with fast rise yeast in the same loaf. There may also be too much sugar, or ingredients<br />
containing sugar such as dried fruit, honey etc. Decrease sugar accordingly. Another possibility may be too much<br />
water. Try decreasing it by 1/8 cup at a time. If the loaf still mushrooms, try to replace 1/4 of the total flour with<br />
whole wheat flour.<br />
GNARLY LOAVES<br />
Your dough probably needs more moisture. It is suggested to reduce flour 1 tablespoon at a time or to increase<br />
liquids 1 tablespoon at a time until you reach the right balance for your machine.<br />
HIGHER ALTITUDE<br />
The low air pressure in higher altitudes means that less resistance is exerted on yeast, so your bread may rise faster.<br />
Also try to decrease the amount of yeast by 1/4 tablespoon at a time to slow the rising. Also try to decrease water<br />
by no more than 1/8 cup. Climate can also change the results of your bread due to different temperature and humidity<br />
of different locations in the world.<br />
CAKE STICKING AT THE BOTTOM OF BUCKET<br />
This may be due to too much liquid. We did an experiment to reduce the amount of water to 3/4 cup from 1 l/4<br />
cup and the amount of vegetable oil to l/4 cup from l/3 cup in the Betty Crocker SuperMoist Cake Mix recipe, and<br />
the cake came out perfectly.<br />
JAM<br />
If you find that your jam is not thick enough, you may restart this particular Jam cycle again.<br />
Most recipes contain sugar in some form for sweetness as well as to start the yeast and promote browning. Salt,<br />
on the other hand, inhibits the yeast, but is needed for flavour. Thus you can control the balance of the chemical<br />
reaction between flour, yeast, water, sugar and salt to make a good loaf of bread according to your desired fluffiness,<br />
weight, and browning.<br />
"ERR" DISPLAYS WHEN START BUTTON IS PRESSED<br />
The breadmaker is too hot to make another loaf. Unplug the machine to clear the display, open the lid, remove the<br />
baking pan and allow the inside of the unit to cool sufficiently. Restart the breadmaker again.<br />
FOR CUSTOMER ASSISTANCE PLEASE CALL:<br />
<strong>Palsonic</strong> Customer Service<br />
Australia: 1300 657 888<br />
New Zealand: 0800 438 847<br />
35<br />
PAB5200 1B 9197<br />
1PAIB / 701A