Using the QT4D Plugins Page 1 Using Hardin Lab QuickTime and ...
Using the QT4D Plugins Page 1 Using Hardin Lab QuickTime and ...
Using the QT4D Plugins Page 1 Using Hardin Lab QuickTime and ...

Create successful ePaper yourself
Turn your PDF publications into a flip-book with our unique Google optimized e-Paper software.
<strong>Using</strong> <strong>the</strong> <strong>QT4D</strong> <strong>Plugins</strong> <strong>Page</strong> 1<br />
<strong>Using</strong> <strong>Hardin</strong> <strong>Lab</strong> <strong>QuickTime</strong> <strong>and</strong> 4d <strong>Plugins</strong> – Fall, 2007<br />
Jeff <strong>Hardin</strong> – Department of Zoology, University of Wisconsin-Madison<br />
jdhardin@wisc.edu<br />
1) Accessing <strong>the</strong> plugins:<br />
The plugins can be accessed in one of two basic ways:<br />
(a) Through <strong>the</strong> ImageJ plugins menu:<br />
Figure 1 – Selecting <strong>QuickTime</strong> plugins using <strong>the</strong> ImageJ <strong>Plugins</strong> menu<br />
If <strong>the</strong> plugins are installed manually, <strong>the</strong>y can be accessed via <strong>the</strong> "<strong>Plugins</strong>" menu in<br />
ImageJ [note: most screen shots show ImageJ running under Mac OS X, but <strong>the</strong> interface<br />
is essentially identical under Windows, <strong>and</strong>, with limitations, under Mac OS 9].<br />
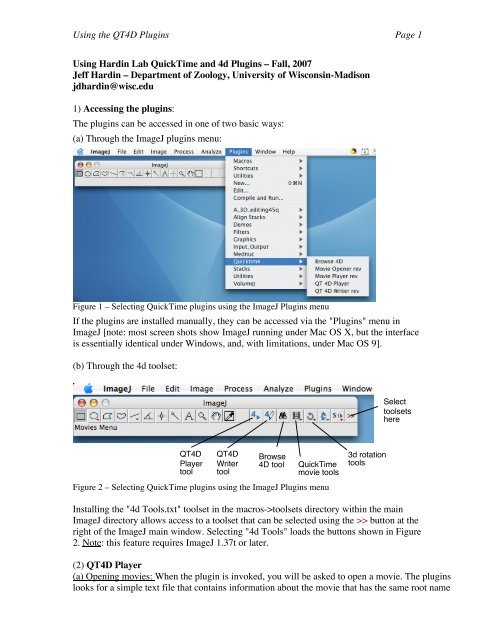
(b) Through <strong>the</strong> 4d toolset:<br />
<strong>QT4D</strong><br />
Player<br />
tool<br />
<strong>QT4D</strong><br />
Writer<br />
tool<br />
Browse<br />
4D tool<br />
<strong>QuickTime</strong><br />
movie tools<br />
Figure 2 – Selecting <strong>QuickTime</strong> plugins using <strong>the</strong> ImageJ <strong>Plugins</strong> menu<br />
3d rotation<br />
tools<br />
Select<br />
toolsets<br />
here<br />
Installing <strong>the</strong> "4d Tools.txt" toolset in <strong>the</strong> macros->toolsets directory within <strong>the</strong> main<br />
ImageJ directory allows access to a toolset that can be selected using <strong>the</strong> >> button at <strong>the</strong><br />
right of <strong>the</strong> ImageJ main window. Selecting "4d Tools" loads <strong>the</strong> buttons shown in Figure<br />
2. Note: this feature requires ImageJ 1.37t or later.<br />
(2) <strong>QT4D</strong> Player<br />
(a) Opening movies: When <strong>the</strong> plugin is invoked, you will be asked to open a movie. The plugins<br />
looks for a simple text file that contains information about <strong>the</strong> movie that has <strong>the</strong> same root name
<strong>Using</strong> <strong>the</strong> <strong>QT4D</strong> <strong>Plugins</strong> <strong>Page</strong> 2<br />
as <strong>the</strong> movie itself (e.g., if <strong>the</strong> movie is called "foo.mov", <strong>the</strong>n it will look for a file called<br />
"foo.mov.info" or "foo.mov.txt"). If it cannot find one, <strong>the</strong>n it will ask you for <strong>the</strong> number of<br />
focal planes in <strong>the</strong> movie.<br />
Advanced tip: The data structure of <strong>the</strong> info file is very simple. It is a text file with <strong>the</strong> following lines,<br />
separated by carriage returns:<br />
Line 1: A text string with basic information about <strong>the</strong> movie<br />
Line 2: The number of focal planes in <strong>the</strong> movie as an integer<br />
Line 3: The spacing (assumed to be in microns) between focal planes<br />
Line 4: The time interval between acquisition of Z series<br />
Line 5: Blank [this deals with a quirk in <strong>the</strong> way Java under Mac OS 9 h<strong>and</strong>led text files]<br />
You can easily recreate an info file using your favorite vanilla text editor using this basic<br />
structure.<br />
(b) Navigating through a movie: You can navigate through movies in several ways:<br />
(i) Arrow keys: The arrows keys on <strong>the</strong> keyboard can be used to navigate up <strong>and</strong> down <strong>and</strong><br />
backwards <strong>and</strong> forwards through a movie. Frames in <strong>the</strong> movie will be skipped based on <strong>the</strong><br />
information in <strong>the</strong> associated info file, or based on <strong>the</strong> number of focal planes you entered when<br />
asked.<br />
Figure 3 – The main <strong>QT4D</strong> Player window<br />
Edges allow<br />
navigation<br />
Use <strong>the</strong><br />
slider to<br />
navigate<br />
through time<br />
Hold down<br />
buttons to move<br />
through space<br />
or time
<strong>Using</strong> <strong>the</strong> <strong>QT4D</strong> <strong>Plugins</strong> <strong>Page</strong> 3<br />
ii) Buttons: Holding down <strong>the</strong> mouse on <strong>the</strong> stepper buttons (except under Mac OS 9)<br />
allows repeated steps forward, back, up, or down.<br />
(iii) Mouse-based 4d navigation: At <strong>the</strong> edges of <strong>the</strong> movie window, <strong>the</strong> cursor will<br />
change to a forward/back symbol or up/symbol. In <strong>the</strong>se regions of <strong>the</strong> movie, holding<br />
down <strong>the</strong> mouse will likewise step in <strong>the</strong> appropriate directions (left edge = back; right<br />
edge = forward; top edge = up; bottom edge = down).<br />
Figure 4 – Contextual menu options<br />
(c) O<strong>the</strong>r features of <strong>the</strong> main <strong>QT4D</strong><br />
player window: There are several<br />
convenient – but non-obvious –<br />
features in <strong>the</strong> main movie player<br />
window. Right-clicking<br />
(Windows)/Clicking with <strong>the</strong> Control<br />
key pressed (Mac OS X): In addition,<br />
control-clicking (or right clicking) on<br />
<strong>the</strong> movie window brings up several<br />
options, including copying <strong>the</strong> data to<br />
st<strong>and</strong>ard ImageJ objects in various<br />
ways, getting information about <strong>the</strong><br />
movie sequences from its info file, etc. If <strong>the</strong> movie has been zoomed, <strong>the</strong> "Reset<br />
Window to Original Size" comm<strong>and</strong> allows reversion to <strong>the</strong> original movie/window<br />
dimensions.<br />
(i) "Get info…": When this option ius selected, information about <strong>the</strong> movie will be<br />
displayed:<br />
Figure 5 – The movie information window<br />
(ii) Show/Hide Controls: When this option is selected, <strong>the</strong> visibility of <strong>the</strong> buttons at <strong>the</strong><br />
bottom of <strong>the</strong> movie window will be toggled.
<strong>Using</strong> <strong>the</strong> <strong>QT4D</strong> <strong>Plugins</strong> <strong>Page</strong> 4<br />
(iii) Apply Filter… : Experimental support is provided for applying temporary filters to a<br />
movie. This can be useful for applying brightness/contrast changes, sharpening filters,<br />
etc. This feature uses <strong>QuickTime</strong> filtering to add a temporary, non-destructive filter to a<br />
movie.<br />
Figure 6 – Selecting <strong>the</strong> "Apply filter" option<br />
When this option is selected, a list of filters provided by <strong>QuickTime</strong> will appear:<br />
Figure 7 – Selecting a <strong>QuickTime</strong> filter
<strong>Using</strong> <strong>the</strong> <strong>QT4D</strong> <strong>Plugins</strong> <strong>Page</strong> 5<br />
The contextual menu contains a "Revert to original…" option to remove <strong>the</strong> filter.<br />
(4) <strong>QT4D</strong> Writer: This plugin is used to convert folders of single images arranged as<br />
captured in a 4d dataset into a <strong>QuickTime</strong> movie.<br />
Running <strong>the</strong> plugin causes a file dialog to appear asking for <strong>the</strong> location of <strong>the</strong> raw files.<br />
Select <strong>the</strong> folder, <strong>and</strong> <strong>the</strong>n one of <strong>the</strong> images:<br />
Figure 8 – Specifying a directory with images for <strong>QT4D</strong> Writer<br />
Next, if <strong>the</strong>re is no information file, you will be asked to supply information regarding<br />
<strong>the</strong> number of focal planes (important; 33 in this case) <strong>and</strong> o<strong>the</strong>r information in a series of<br />
dialogs:<br />
Figure 9 – Specifying <strong>the</strong> number of focal planes<br />
Next, you will be presented with a st<strong>and</strong>ard compression dialog box [Note: due to a bug<br />
under OS X/1.4.1+ VM, <strong>the</strong> frame rate options <strong>and</strong> key frames will be in a separate<br />
dialog. Under o<strong>the</strong>r operating systems, <strong>the</strong>y will appear as shown]:
<strong>Using</strong> <strong>the</strong> <strong>QT4D</strong> <strong>Plugins</strong> <strong>Page</strong> 6<br />
Figure 10 – Selecting compression parameters for <strong>the</strong> movie<br />
Finally, you will be asked where to save <strong>the</strong> movie. After clicking "OK" to proceed, a<br />
progress indicator will appear during compression, which also allows cancellation of <strong>the</strong><br />
compression:<br />
Figure 11 – The progress dialog during compression<br />
(4) Browse4D: This plugin is used for browsing through a folder of single images that<br />
comprise a 4d dataset. The window behaves like a st<strong>and</strong>ard ImageJ image window in<br />
terms of edit comm<strong>and</strong>s, etc., but has an interface that is essentially identical to that of<br />
<strong>the</strong> <strong>QT4D</strong> Player plugin. It has an advantage over o<strong>the</strong>r plugins, such as <strong>the</strong> Image5D<br />
plugin, in that it does not load image data into RAM. This makes it less intensive in terms<br />
of computing resources, but slower for moving rap[idly through a large number of large<br />
images.
<strong>Using</strong> <strong>the</strong> <strong>QT4D</strong> <strong>Plugins</strong> <strong>Page</strong> 7<br />
Figure 12 –The Browse4D window<br />
Step back Step forward Step up Step down<br />
First time pt Play<br />
Last time pt<br />
(5) Acquire 4D: This plugin is used in <strong>the</strong> <strong>Hardin</strong> <strong>Lab</strong> to acquire Nomarski 4D datasets<br />
using video cameras <strong>and</strong> Scion AG-5 framegrabbers. Although this digitization<br />
technology is old, <strong>the</strong> rest of <strong>the</strong> code could serves as a basis for using more modern<br />
Firewire cameras for data acquisition.<br />
Invoking <strong>the</strong> plugin brings up a dialog in which parameters for <strong>the</strong> movie are entered:<br />
Figure 13 – Specifying parameters for a 4d movie
<strong>Using</strong> <strong>the</strong> <strong>QT4D</strong> <strong>Plugins</strong> <strong>Page</strong> 8<br />
The "use shutter" option allows use of a shutter during acquisition. The root name for<br />
files is <strong>the</strong> basic name for files, to which numbers are appended. If <strong>the</strong> root name is "foo",<br />
files will be named "foo0001.tif", "foo0002.tif", etc.<br />
Once parameters are entered, a confirmation dialog will appear:<br />
Figure 14 –Reviewing parameters<br />
If you click "OK", an ImageJ window will open, <strong>the</strong> shutter will open (if this option was<br />
selected), <strong>and</strong> a st<strong>and</strong>ard "Save As…" dialog will appear asking where you wish to save<br />
<strong>the</strong> image files for <strong>the</strong> movie. Once you specify where files will be saved, <strong>the</strong> first Z<br />
series will be acquired, <strong>the</strong> shutter will close, <strong>and</strong> <strong>the</strong> st<strong>and</strong>ard control window will<br />
appear:<br />
Figure 15 – The main 4D Capture windows
<strong>Using</strong> <strong>the</strong> <strong>QT4D</strong> <strong>Plugins</strong> <strong>Page</strong> 9<br />
The "Stop capture" button does what is says. Live preview <strong>and</strong> cessation of live previewing are<br />
accomplished using <strong>the</strong> "Live preview" <strong>and</strong> "Stop preview" buttons. Clicking <strong>the</strong> "Live preview"<br />
button bring up a modified Scion live preview window:<br />
Figure 16 –The Live Preview window<br />
Clicking <strong>the</strong> "Stop preview" button will stop <strong>the</strong> preview <strong>and</strong> hid <strong>the</strong> Preview window.<br />
Clicking its close box hides <strong>the</strong> window as well. A few seconds before a Z-series is<br />
acquired, if a Live Preview window is open, acquisition will stop to give processor time<br />
to <strong>the</strong> Z series being acquired. Once <strong>the</strong> Z series is acquired, live previewing resumes.<br />
The "Down" <strong>and</strong> "Up" buttons will adjust <strong>the</strong> focal plane during acquisition.<br />
Once a 4d dataset has been acquired, it can be viewed as raw images using <strong>the</strong> Browse4D<br />
plugin, compiled using <strong>the</strong> <strong>QT4D</strong> Writer plugin, <strong>and</strong> viewed using <strong>the</strong> <strong>QT4D</strong> Player<br />
plugin.<br />
Good luck <strong>and</strong> happy 4d navigating!