Expert Adolescent Lateral Femoral Nail. - Synthes
Expert Adolescent Lateral Femoral Nail. - Synthes
Expert Adolescent Lateral Femoral Nail. - Synthes

Create successful ePaper yourself
Turn your PDF publications into a flip-book with our unique Google optimized e-Paper software.
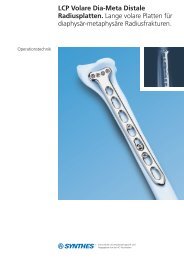
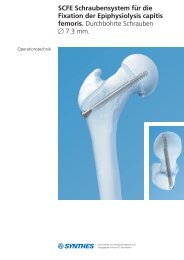
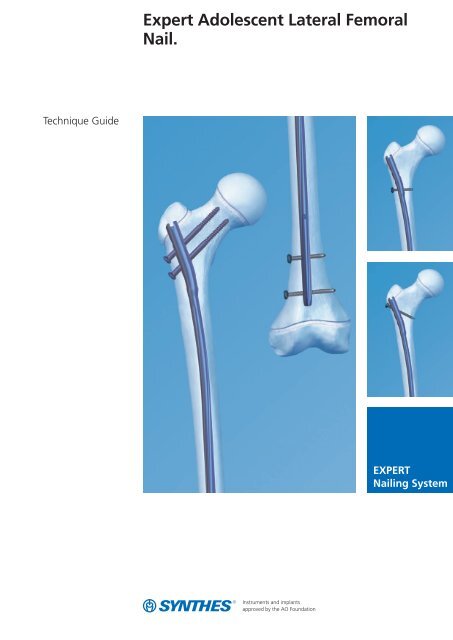
Technique Guide<br />
<strong>Expert</strong> <strong>Adolescent</strong> <strong>Lateral</strong> <strong>Femoral</strong><br />
<strong>Nail</strong>.<br />
EXPERT<br />
<strong>Nail</strong>ing System
Image intensifier control<br />
Warning<br />
This description alone does not provide sufficient background for direct use of<br />
the product. Instruction by a surgeon experienced in handling this product is<br />
highly recommended.<br />
Reprocessing, Care and Maintenance of<br />
<strong>Synthes</strong> Instruments<br />
For general guidelines, function control and dismantling of multi-part instruments,<br />
please refer to: www.synthes.com/reprocessing
Table of Contents<br />
Introduction<br />
Surgical Technique<br />
Product Information<br />
<strong>Expert</strong> <strong>Adolescent</strong> <strong>Lateral</strong> <strong>Femoral</strong> <strong>Nail</strong> System 2<br />
AO Principles 4<br />
Indications 5<br />
Clinical Cases 6<br />
Preoperative Planning 10<br />
Opening the Femur 13<br />
Inserting the <strong>Nail</strong> 21<br />
Locking Options 26<br />
Proximal Locking – Standard 28<br />
Proximal Locking – Recon 32<br />
Distal Locking 37<br />
End Cap Insertion 42<br />
Implant Removal 44<br />
Implants 46<br />
Instruments 50<br />
Set Lists 56<br />
<strong>Expert</strong> <strong>Adolescent</strong> <strong>Lateral</strong> <strong>Femoral</strong> <strong>Nail</strong> Technique Guide <strong>Synthes</strong> 1
<strong>Expert</strong> <strong>Adolescent</strong> <strong>Lateral</strong> <strong>Femoral</strong><br />
<strong>Nail</strong> System<br />
<strong>Nail</strong> features<br />
– Design accommodates a lateral entry site through the<br />
greater trochanter<br />
– Anatomic nail design based on a femoral canal study 1<br />
– Titanium cannulated nail for reamed or unreamed techniques<br />
– Lengths from 240 mm to 400 mm, in 20 mm increments<br />
– Designed for use in patients where Titanium Elastic <strong>Nail</strong>s<br />
are not large enough and the <strong>Expert</strong> <strong>Lateral</strong> <strong>Femoral</strong> <strong>Nail</strong><br />
for adults is too large<br />
– 8.2 mm, 9 mm, and 10 mm diameter nails with 11 mm<br />
diameter proximal ends<br />
End caps<br />
– Prevent ingrowth of tissue and facilitate nail extraction<br />
– Self-retaining, T40 Stardrive recess for easy pickup and<br />
insertion of the end cap<br />
– Cannulated for insertion over a guide wire<br />
– 0 mm end cap sits flush with the nail<br />
– 5 mm, 10 mm, and 15 mm end caps extend nail height<br />
if the nail is overinserted<br />
1 Ehmke L, Polzin B, Roth C, Bottlang M (2006) <strong>Femoral</strong> <strong>Nail</strong>ing Through the<br />
Trochanter: The Reamer Pathway Indicates A Helical Shape. Journal of<br />
Orthopedic Trauma Vol. 20 (Number 10): 668 – 674<br />
2 <strong>Synthes</strong> <strong>Expert</strong> <strong>Adolescent</strong> <strong>Lateral</strong> <strong>Femoral</strong> <strong>Nail</strong> Technique Guide<br />
Improved instrumentation<br />
– Easy-to-use instrumentation facilitates the surgical<br />
procedure<br />
– Ball-tip reaming rod can be removed through the nail and<br />
the insertion instruments, eliminating the need for an<br />
exchange tube<br />
– Tailored to the needs of clinic (available as upgrade set for<br />
adolescents to <strong>Expert</strong> <strong>Lateral</strong> <strong>Femoral</strong> System for adults<br />
or Standard Instrument Set for <strong>Expert</strong> <strong>Adolescent</strong> <strong>Lateral</strong><br />
<strong>Femoral</strong> <strong>Nail</strong>)
Standard locking screws<br />
– Double-lead thread for ease of insertion<br />
– Thread closer to screw head provides better bone<br />
purchase in the near cortex and improved stability<br />
– Titanium alloy* for improved mechanical and fatigue<br />
properties<br />
– Self-tapping blunt tip<br />
– Self-retaining T25 Stardrive recess allows improved torque<br />
transmission, increased resistance to stripping relative to<br />
a hex recess, and secure locking screw pickup<br />
– 4.0 mm diameter<br />
5.0 mm hip screws<br />
– Lengths from 50 mm to 125 mm in 5 mm increments<br />
– Self-retaining T25 Stardrive recess<br />
– Titanium alloy*<br />
*Titanium-6% aluminum-7% niobium alloy<br />
<strong>Expert</strong> <strong>Adolescent</strong> <strong>Lateral</strong> <strong>Femoral</strong> <strong>Nail</strong> Technique Guide <strong>Synthes</strong> 3
AO Principles<br />
In 1958, the AO formulated four basic principles, which have<br />
become the guidelines for internal fixation in general, and<br />
intramedullary nailing in particular. 2<br />
Anatomic reduction<br />
The <strong>Expert</strong> <strong>Adolescent</strong> <strong>Lateral</strong> <strong>Femoral</strong> <strong>Nail</strong> in titanium is<br />
cannulated as well as designed to fit anatomically in the<br />
medullary canal and allows indirect reduction.<br />
Stable fixation<br />
The intramedullary nail acts as an internal splint that controls<br />
but does not prevent micromovements of the fragments. It<br />
provides relative stability that leads to an indirect healing<br />
through callus formation.<br />
Preservation of blood supply<br />
The instruments and implants in the <strong>Expert</strong> <strong>Adolescent</strong><br />
<strong>Lateral</strong> <strong>Femoral</strong> System permit a minimally invasive technique<br />
and less tissue stripping than other treatment methods.<br />
An intramedullary approach results in decreased blood loss<br />
compared to plate fixation.<br />
Early, active mobilization<br />
The titanium cannulated <strong>Expert</strong> <strong>Adolescent</strong> <strong>Lateral</strong> <strong>Expert</strong><br />
<strong>Femoral</strong> <strong>Nail</strong> provides secure fixation which permits<br />
controlled, early, active rehabilitation conducive to optimal<br />
recovery.<br />
2 Müller ME, Allgöwer M, Schneider R, Willenegger H (1991) AO Manual of<br />
Internal Fixation, 3rd Edition. Berlin: Springer-Verlag<br />
4 <strong>Synthes</strong> <strong>Expert</strong> <strong>Adolescent</strong> <strong>Lateral</strong> <strong>Femoral</strong> <strong>Nail</strong> Technique Guide
Indications<br />
The <strong>Expert</strong> <strong>Adolescent</strong> <strong>Lateral</strong> <strong>Femoral</strong> <strong>Nail</strong> is indicated for<br />
use in adolescent and small-stature adult patients to stabilize:<br />
– Fractures of the femoral shaft<br />
– Subtrochanteric fractures<br />
– Ipsilateral neck / shaft fractures<br />
– Impending pathologic fractures<br />
– Nonunions and malunions<br />
Note: ASLS, the Angular Stable Locking System, is indicated<br />
in cases where increased stability is needed in fractures closer<br />
to the metaphyseal area or in poor quality bone. For more<br />
details regarding the intramedullary fixator principle, please<br />
consult the ASLS technique guide (036.000.708) and concept<br />
flyer (036.001.017).<br />
<strong>Expert</strong> <strong>Adolescent</strong> <strong>Lateral</strong> <strong>Femoral</strong> <strong>Nail</strong> Technique Guide <strong>Synthes</strong> 5
Clinical Cases<br />
Case 1 – standard transverse locking<br />
– 16-year-old female, 45 kg<br />
– Isolated transverse femoral shaft fracture<br />
Case 2 – antegrade locking<br />
– 15-year-old male, 55 kg<br />
– Oblique midshaft femoral shaft fracture<br />
6 <strong>Synthes</strong> <strong>Expert</strong> <strong>Adolescent</strong> <strong>Lateral</strong> <strong>Femoral</strong> <strong>Nail</strong> Technique Guide<br />
Preoperative<br />
Preoperative
Intraoperative<br />
Postoperative<br />
Follow-up (6 weeks after surgery)<br />
Follow-up (4 months after surgery)<br />
<strong>Expert</strong> <strong>Adolescent</strong> <strong>Lateral</strong> <strong>Femoral</strong> <strong>Nail</strong> Technique Guide <strong>Synthes</strong> 7
Clinical Cases<br />
Case 3 – recon locking<br />
– 12-year-old male, 43 kg<br />
– Pathologic proximal femoral shaft fracture<br />
Case 4 – distal locking<br />
– 12-year-old male, 30 kg<br />
– Oblique distal third femoral shaft fracture<br />
8 <strong>Synthes</strong> <strong>Expert</strong> <strong>Adolescent</strong> <strong>Lateral</strong> <strong>Femoral</strong> <strong>Nail</strong> Technique Guide<br />
Preoperative<br />
Preoperative
Postoperative<br />
Postoperative<br />
Follow-up (3 weeks after surgery)<br />
Follow-up (1 month after surgery)<br />
<strong>Expert</strong> <strong>Adolescent</strong> <strong>Lateral</strong> <strong>Femoral</strong> <strong>Nail</strong> Technique Guide <strong>Synthes</strong> 9
Preoperative Planning<br />
Use the AO preoperative planner templates for the <strong>Expert</strong><br />
<strong>Adolescent</strong> <strong>Lateral</strong> <strong>Femoral</strong> <strong>Nail</strong> (034.000.600/605) to estimate<br />
nail length and medullary canal diameter.<br />
To estimate medullary canal diameter, place the template on<br />
the AP or lateral x-ray of the femur and measure the dia -<br />
meter of the medullary canal at the narrowest part that will<br />
contain the nail.<br />
To estimate nail length, place the template on the AP x-ray of<br />
the uninjured femur and select the appropriate nail length<br />
based on patient anatomy. When selecting nail size, consider<br />
canal diameter, fracture pattern, patient anatomy and postoperative<br />
protocol.<br />
Note: Templates are available in two sizes: actual size and<br />
115% magnification in which the image is enlarged 15% to<br />
correspond to typical radiographic magnification; however,<br />
variations in magnification levels are common.<br />
1<br />
Position patient<br />
Position the patient in the lateral decubitus or supine position<br />
on a fracture table or radiolucent operating table.<br />
Position the C-arm to allow visualization of the proximal<br />
femur in both the AP and lateral planes.<br />
To facilitate access to the medullary canal, abduct the upper<br />
part of the body approximately 10°–15° to the contralateral<br />
side and adduct the affected limb by 10°–15°.<br />
10 <strong>Synthes</strong> <strong>Expert</strong> <strong>Adolescent</strong> <strong>Lateral</strong> <strong>Femoral</strong> <strong>Nail</strong> Technique Guide<br />
<strong>Expert</strong> <strong>Adolescent</strong> <strong>Lateral</strong> Entry <strong>Femoral</strong> <strong>Nail</strong> for Right Femur<br />
8.2 mm, 9 mm and 10 mm diameter 240 mm to 400 mm lengths<br />
15 mm<br />
10 mm<br />
5 mm<br />
0 mm<br />
15 mm<br />
End Caps<br />
10 mm<br />
5 mm<br />
0 mm<br />
A-P View<br />
<strong>Lateral</strong> View<br />
Locking Screw Stardrive 4.0 mm, TAN [04.005.408 – 04.005.470]<br />
Hip Screw Stardrive 5.0 mm, TAN [04.031.020 – 04.031.035]<br />
1.0 Magnification<br />
0 10 20 30 40 50 60 70 80 90 100mm<br />
For use only with the Original AO System of<br />
Instruments and Implants<br />
Affected leg<br />
10º–15º adduction<br />
8.2 mm<br />
9 mm<br />
10 mm<br />
<strong>Synthes</strong> GmbH<br />
Eimattstrasse 3<br />
CH-4436 Oberdorf<br />
www.synthes.com<br />
8.2 mm<br />
9 mm<br />
10 mm<br />
240 mm<br />
240 mm<br />
260 mm<br />
260 mm<br />
280 mm<br />
280 mm<br />
300 mm<br />
300 mm<br />
320 mm<br />
320 mm<br />
340 mm<br />
340 mm<br />
360 mm<br />
360 mm<br />
380 mm<br />
380 mm<br />
<strong>Expert</strong> <strong>Adolescent</strong><br />
<strong>Lateral</strong> Entry <strong>Femoral</strong> <strong>Nail</strong><br />
for Right Femur<br />
400 mm<br />
400 mm
2<br />
Reduce fracture<br />
Instrument<br />
394.350 Large Distractor*<br />
Perform closed reduction manually by axial traction under<br />
image intensifier control. The use of the large distractor may<br />
be appropriate in certain circumstances.<br />
3<br />
Confirm nail length<br />
Instrument<br />
03.010.020 Radiographic Ruler for <strong>Expert</strong> <strong>Femoral</strong> <strong>Nail</strong>s<br />
The required nail length must be determined after reduction<br />
of the femoral fracture.<br />
Position the C-arm for an AP view of the proximal femur.<br />
With long forceps, hold the ruler alongside the lateral thigh,<br />
parallel to and at the same level as the femur. Adjust the<br />
ruler until the proximal end is at the desired nail insertion<br />
depth. Mark the skin at the proximal end of the ruler.<br />
*Additional available<br />
<strong>Expert</strong> <strong>Adolescent</strong> <strong>Lateral</strong> <strong>Femoral</strong> <strong>Nail</strong> Technique Guide <strong>Synthes</strong> 11
Preoperative Planning<br />
Move the C-arm to the distal femur. Verify fracture reduction.<br />
Align the proximal end of the radiographic ruler to the skin<br />
mark, and take an AP image of the distal femur.<br />
Read nail length directly from the ruler image, selecting the<br />
measurement proximal to the epiphysis, or at the chosen<br />
insertion depth.<br />
Note: It is recommended to treat the fracture with the<br />
longest nail possible without crossing the physis, taking into<br />
account patient anatomy or a previous implant. The distal<br />
end of the nail should be 15 mm from the physis.<br />
Back-hammering or dynamization to close a fracture gap<br />
must be taken into account when determining the nail<br />
length. A shorter nail should be chosen when back-hammering<br />
or dynamization is planned. The dynamic slot allows<br />
7 mm of movement.<br />
4<br />
Confirm canal diameter<br />
Instrument<br />
03.010.023 Radiographic Ruler for <strong>Nail</strong> Diameters for<br />
<strong>Expert</strong> <strong>Femoral</strong> <strong>Nail</strong>s<br />
Position the C-arm for an AP or lateral view of the femur at<br />
the level of the isthmus. Hold the radiographic canal width<br />
estimator over the femur with the diameter gauge centered<br />
over the narrowest part of the medullary canal. Read the<br />
estimated diameter measurement on the circular indicator<br />
that fills the canal.<br />
Note: If the reamed technique is used, the diameter of the<br />
largest medullary reamer must be at least 1.0 mm greater<br />
than the nail diameter.<br />
12 <strong>Synthes</strong> <strong>Expert</strong> <strong>Adolescent</strong> <strong>Lateral</strong> <strong>Femoral</strong> <strong>Nail</strong> Technique Guide
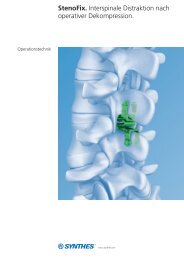
Opening the Femur<br />
1<br />
Approach<br />
Palpate the posterior edge of the greater trochanter.<br />
Make a 3 cm incision in line with the central axis of the<br />
intramedullary canal in the lateral view, and depending on<br />
the anatomy of the patient, 2– 5 cm proximal to the tip<br />
of the greater trochanter.<br />
2<br />
Determine entry point<br />
The insertion point is 12° lateral to the greater trochanter, as<br />
measured from a point 20 mm distal to the lesser trochanter.<br />
The entry point can also be described as lateral to the greater<br />
trochanter at the same level as the superior aspect of the<br />
base of the femoral neck (just above the piriformis fossa).<br />
This point can be found by extending a line horizontally from<br />
the base of the femoral neck to the lateral side of the femur.<br />
12°<br />
20 mm<br />
<strong>Expert</strong> <strong>Adolescent</strong> <strong>Lateral</strong> <strong>Femoral</strong> <strong>Nail</strong> Technique Guide <strong>Synthes</strong> 13
Opening the Femur<br />
3<br />
Insert guide wire<br />
Instruments<br />
03.010.031 Drill Sleeve 13.0/3.2 for antegrade<br />
approach<br />
03.010.229 Protection Sleeve 15.5 mm/13.7 mm,<br />
length 122.5 mm<br />
357.393 Trocar 3.2 mm, length 172 mm, for<br />
No. 357.392<br />
357.399 Guide Wire 3.2 mm, length 400 mm<br />
Insert the protection sleeve, wire guide and trocar assembly<br />
into the incision site and to the bone.<br />
Remove the trocar. Insert the guide wire through the wire<br />
guide.<br />
The guide wire must be inserted laterally at an angle of 12°<br />
to the center of the medullary canal. The tip of the guide<br />
wire should be centered in the medullary canal 20 mm distal<br />
to the lesser trochanter.<br />
Verify that the guide wire position allows adequate clearance<br />
on the lateral side of the femur for the opening drill bit.<br />
The guide wire is inserted with it centered in the lateral view.<br />
14 <strong>Synthes</strong> <strong>Expert</strong> <strong>Adolescent</strong> <strong>Lateral</strong> <strong>Femoral</strong> <strong>Nail</strong> Technique Guide
4<br />
Open proximal femur to medullary canal<br />
Required set<br />
189.060 SynReam Intramedullary Reaming System<br />
in Vario Case<br />
Instruments<br />
03.010.229 Protection Sleeve 15.5 mm/13.7 mm,<br />
length 122.5 mm<br />
351.270 Drill Bit 13.0 mm, cannulated,<br />
length 290 mm, 3-flute, for<br />
Quick Coupling No. 511.760<br />
351.706S Reaming Rod 2.5 mm, length 950 mm,<br />
with Olive, sterile<br />
351.707S Reaming Rod 2.5 mm, length 950 mm,<br />
with Olive and extension, sterile<br />
or<br />
352.032 SynReam Reaming Rod 2.5 mm. short,<br />
length 950 mm<br />
352.033 SynReam Reaming Rod 2.5 mm, long,<br />
length 1150 mm<br />
Drill to open cortex<br />
Drill through the protection sleeve. Drill the cortex until the<br />
drill bit stops in the sleeve.<br />
Remove the guide wire, drill bit and protection sleeve.<br />
Note: Dispose of the guide wire. Do not reuse.<br />
If reaming the medullary canal, proceed to page 17.<br />
Ream to open proximal femur<br />
Insert the 2.5 mm reaming rod. Using the flexible reamers,<br />
open the proximal femur to a depth of approximately<br />
75 mm, starting with an 8.5 mm reamer and ending with<br />
a 13.0 mm reamer.<br />
75 mm<br />
<strong>Expert</strong> <strong>Adolescent</strong> <strong>Lateral</strong> <strong>Femoral</strong> <strong>Nail</strong> Technique Guide <strong>Synthes</strong> 15
Opening the Femur<br />
Alternative technique (with awl)<br />
Alternative instruments<br />
03.010.041 Awl 14.0/3.2 mm, cannulated<br />
357.399 Guide Wire 3.2 mm, length 400 mm<br />
Place the cannulated awl over the guide wire and open the<br />
medullary canal. Use a twisting motion to advance the awl to<br />
a depth of approximately 75 mm.<br />
Remove the guide wire and awl.<br />
Note: After opening the proximal femur, dispose of the<br />
guide wire. Do not reuse.<br />
16 <strong>Synthes</strong> <strong>Expert</strong> <strong>Adolescent</strong> <strong>Lateral</strong> <strong>Femoral</strong> <strong>Nail</strong> Technique Guide
5<br />
Ream medullary canal (optional)<br />
Required set<br />
189.060 SynReam Intramedullary Reaming System<br />
in Vario Case<br />
Instruments<br />
03.010.093 Rod Pusher for Reaming Rod with<br />
Hexagonal Screwdriver 8.0 mm<br />
351.706S Reaming Rod 2.5 mm, length 950 mm,<br />
with Olive, sterile<br />
351.707S Reaming Rod 2.5 mm, length 950 mm,<br />
with Olive and extension, sterile<br />
or<br />
352.032 SynReam Reaming Rod 2.5 mm. short,<br />
length 950 mm<br />
352.033 SynReam Reaming Rod 2.5 mm, long,<br />
length 1150 mm<br />
351.782 Holding Forceps for SynReam Reaming Rod<br />
2.5 mm<br />
03.010.369 Reduction Instrument for<br />
Medullary <strong>Nail</strong>s<br />
393.105 Universal Chuck, small, with T-Handle<br />
If necessary, enlarge the femoral canal with the medullary<br />
reamer. The largest medullary reamer must be at least<br />
1.0 mm greater than the nail diameter.<br />
Check fracture reduction under image intensifier. Use the reduction<br />
instrument for medullary nails to facilitate reduction.<br />
<strong>Expert</strong> <strong>Adolescent</strong> <strong>Lateral</strong> <strong>Femoral</strong> <strong>Nail</strong> Technique Guide <strong>Synthes</strong> 17
Opening the Femur<br />
Insert reaming rod<br />
Using the T-handle chuck or holding device, insert the reaming<br />
rod with ball tip into the medullary canal to the desired<br />
depth.<br />
18 <strong>Synthes</strong> <strong>Expert</strong> <strong>Adolescent</strong> <strong>Lateral</strong> <strong>Femoral</strong> <strong>Nail</strong> Technique Guide
Beginning with the 8.5 mm diameter reaming head, ream to<br />
a diameter of at least 1.0 mm greater than the nail diameter.<br />
Ream in 0.5 mm increments and advance the reamer with<br />
steady, moderate pressure. Do not force the reamer. Partially<br />
retract the reamer often to clear debris from the medullary<br />
canal.<br />
The holding forceps can be used to control the rotation of<br />
the reaming rod.<br />
Note: The reaming rod with ball tip can be removed through<br />
the cannulated adolescent lateral femoral nails. Reaming rod<br />
exchange is not required.<br />
<strong>Expert</strong> <strong>Adolescent</strong> <strong>Lateral</strong> <strong>Femoral</strong> <strong>Nail</strong> Technique Guide <strong>Synthes</strong> 19
Opening the Femur<br />
Option<br />
Use the reaming rod push rod to help retain the reaming rod<br />
during reamer extraction.<br />
20 <strong>Synthes</strong> <strong>Expert</strong> <strong>Adolescent</strong> <strong>Lateral</strong> <strong>Femoral</strong> <strong>Nail</strong> Technique Guide
Inserting the <strong>Nail</strong><br />
1<br />
Assemble insertion instruments<br />
Instruments<br />
03.010.044 Connecting Screw, cannulated, for <strong>Expert</strong><br />
Tibial and <strong>Femoral</strong> <strong>Nail</strong>s, for<br />
No. 03.010.045<br />
03.010.093 Rod Pusher for Reaming Rod with<br />
Hexagonal Screwdriver 8.0 mm<br />
03.010.226 Insertion Handle for <strong>Expert</strong> <strong>Adolescent</strong><br />
<strong>Lateral</strong> <strong>Femoral</strong> <strong>Nail</strong><br />
03.010.092 Screwdriver, hexagonal with spherical head<br />
8.0 mm<br />
Match the tangs on the handle to the notches in the <strong>Expert</strong><br />
<strong>Adolescent</strong> <strong>Lateral</strong> <strong>Femoral</strong> <strong>Nail</strong>.<br />
Place the connecting screw into the insertion handle and<br />
thread it into the proximal nail end, using the 8 mm<br />
hexa gonal screwdriver with spherical head.<br />
The <strong>Expert</strong> <strong>Adolescent</strong> <strong>Lateral</strong> <strong>Femoral</strong> <strong>Nail</strong>s are labeled left<br />
or right on the proximal nail end.<br />
<strong>Expert</strong> <strong>Adolescent</strong> <strong>Lateral</strong> <strong>Femoral</strong> <strong>Nail</strong> Technique Guide <strong>Synthes</strong> 21
Inserting the <strong>Nail</strong><br />
Slide the connecting screw onto the reaming rod push rod.<br />
Slide the assembly through the insertion handle and match<br />
the tangs on the handle to the nail. Tighten using the hex on<br />
the reaming rod push rod.<br />
Secure the assembly using the 8 mm hexagonal screwdriver<br />
with spherical head.<br />
22 <strong>Synthes</strong> <strong>Expert</strong> <strong>Adolescent</strong> <strong>Lateral</strong> <strong>Femoral</strong> <strong>Nail</strong> Technique Guide
2<br />
Insert nail<br />
Instruments<br />
03.010.047 Connector, for Insertion Handle<br />
03.010.056 Combined Hammer 700 g, can be<br />
mounted, for No. 357.220<br />
03.010.092 Screwdriver, hexagonal with spherical head<br />
8.0 mm<br />
321.170 Pin Wrench 4.5 mm, length 120 mm<br />
321.160 Combination Wrench 11.0 mm<br />
357.220 Hammer Guide, for No. 357.250<br />
357.398 Shaft, hexagonal, 8.0 mm, cannulated,<br />
short, length 125 mm<br />
Slide the connector into the groove on the insertion handle<br />
and secure it using the 11 mm ratchet wrench. If patient<br />
anatomy allows, attach the driving cap in the medial position.<br />
Orient the insertion handle in an anterior position. Use the<br />
C-arm to verify fracture reduction. Insert the nail as far as<br />
possible.<br />
The nail rotates approximately 90° during insertion. The insertion<br />
handle rotates from an anterior to a lateral position<br />
during insertion of the last one-third of the nail length. If the<br />
nail does not rotate to the lateral position, remove the nail<br />
and reinsert it with the handle slightly lateral to the sagittal<br />
plane.<br />
Monitor nail passage across the fracture, and control in two<br />
planes to avoid malalignment.<br />
<strong>Expert</strong> <strong>Adolescent</strong> <strong>Lateral</strong> <strong>Femoral</strong> <strong>Nail</strong> Technique Guide <strong>Synthes</strong> 23
Inserting the <strong>Nail</strong><br />
If desired, insert the nail using light hammer blows.<br />
Lock the head of the hammer in place by tightening the nut<br />
onto the threads located below the hammer head. Use the<br />
pin wrench if necessary. Strike the driving cap directly.<br />
Optionally, the hammer guide can be threaded onto the driving<br />
cap and the hammer can be used as a slide hammer.<br />
Loosen the nut from the threads located below the hammer<br />
head and secure the nut onto the threads located above<br />
the handle.<br />
Note: Do not mount the aiming arm until the nail has been<br />
completely inserted.<br />
24 <strong>Synthes</strong> <strong>Expert</strong> <strong>Adolescent</strong> <strong>Lateral</strong> <strong>Femoral</strong> <strong>Nail</strong> Technique Guide
3<br />
Check proximal nail position<br />
Insert the nail until it is at or below the femoral opening.<br />
Check final nail position under image intensification in AP<br />
and lateral views.<br />
If primary compression or secondary dynamization is planned,<br />
it is recommended to overinsert the nail by more than 7 mm,<br />
which corresponds to the maximum distance between the<br />
positions in static and dynamic modes.<br />
Note: The distance between the markings on the insertion<br />
handle is 5 mm and corresponds to the extensions of the<br />
end caps. This feature can be used for overinsertion of the<br />
nail.<br />
4<br />
Check distal nail location<br />
Use image intensification to ensure the nail is centered in<br />
both AP and lateral views. Verify fracture alignment.<br />
Remove the reaming rod.<br />
<strong>Expert</strong> <strong>Adolescent</strong> <strong>Lateral</strong> <strong>Femoral</strong> <strong>Nail</strong> Technique Guide <strong>Synthes</strong> 25
Locking Options<br />
130°<br />
CCD<br />
26 <strong>Synthes</strong> <strong>Expert</strong> <strong>Adolescent</strong> <strong>Lateral</strong> <strong>Femoral</strong> <strong>Nail</strong> Technique Guide<br />
120°<br />
Proximal locking with recon locking Proximal locking with 120° locking screw
Proximal locking with dynamization Proximal locking with static transverse locking screw<br />
<strong>Expert</strong> <strong>Adolescent</strong> <strong>Lateral</strong> <strong>Femoral</strong> <strong>Nail</strong> Technique Guide <strong>Synthes</strong> 27
Proximal Locking – Standard<br />
1<br />
Choose locking option<br />
For standard locking, three targeted proximal locking options<br />
are possible:<br />
1 120° antegrade locking<br />
2 Dynamic locking (LM)<br />
3 Static locking (LM)<br />
For immediate dynamization, insert one proximal locking<br />
screw through the dynamic slot. If dynamization may be<br />
required in the future, use the dynamic locking option with<br />
the 120° antegrade locking hole.<br />
2<br />
Mount aiming arm<br />
Instruments<br />
03.010.092 Screwdriver, hexagonal with spherical head<br />
8.0 mm<br />
03.010.227 Aiming Arm for <strong>Expert</strong> <strong>Adolescent</strong> <strong>Lateral</strong><br />
<strong>Femoral</strong> <strong>Nail</strong><br />
Confirm that the nail is securely connected to the insertion<br />
handle using the 8 mm ball hex screwdriver. Mount the aiming<br />
arm to the insertion handle.<br />
28 <strong>Synthes</strong> <strong>Expert</strong> <strong>Adolescent</strong> <strong>Lateral</strong> <strong>Femoral</strong> <strong>Nail</strong> Technique Guide<br />
1<br />
2<br />
3
3<br />
Insert trocar assembly<br />
Instruments<br />
03.010.063 Protection Sleeve 12.0/8.0, length 188 mm<br />
03.010.064 Drill Sleeve 8.0/3.2, for No. 03.010.063<br />
03.010.069 Trocar 3.2 mm, for No. 03.010.064<br />
Insert the three-part trocar assembly (protection sleeve, drill<br />
sleeve and trocar) through the desired hole in the aiming arm,<br />
make a stab incision and insert the trocar to the bone. Remove<br />
the trocar.<br />
If using the 120° antegrade locking option, insert the trocar<br />
assembly through the hole labeled 120° on the insertion<br />
handle.<br />
Note: Do not exert forces on the aiming arm, protection<br />
sleeve, drill sleeves or drill bits. Such force may prevent accurate<br />
targeting through the proximal locking holes and damage<br />
the drill bits.<br />
<strong>Expert</strong> <strong>Adolescent</strong> <strong>Lateral</strong> <strong>Femoral</strong> <strong>Nail</strong> Technique Guide <strong>Synthes</strong> 29
Proximal Locking – Standard<br />
4<br />
Drill and determine locking screw length<br />
Instrument<br />
03.010.060 Drill Bit 3.2 mm, calibrated,<br />
length 340 mm, 3-flute, for Quick<br />
Coupling, for No. 03.010.064<br />
Ensure that the drill sleeve is pressed firmly to the lateral<br />
cortex. Drill through both cortices until the tip of the drill bit<br />
just penetrates the far cortex.<br />
Confirm drill bit position.<br />
Ensure that the drill sleeve is pressed firmly to the lateral<br />
cortex and read the measurement from the calibrated drill bit<br />
at the back of the drill sleeve. This measurement corresponds<br />
to the appropriate length locking screw. Remove the drill bit<br />
and drill sleeve.<br />
Alternative instrument<br />
03.010.072 Depth Gauge for Locking Screws,<br />
measuring range up to 110 mm,<br />
for No. 03.010.063<br />
After drilling both cortices, remove the drill bit and drill<br />
sleeve.<br />
Disassemble the depth gauge into two parts: the outer<br />
sleeve and the measuring device with hook. Insert the measuring<br />
device into the protection sleeve. Make sure that the<br />
hook grasps the far cortex.<br />
Ensure that the protection sleeve is firmly pressed against the<br />
lateral cortex.<br />
Read the measurement from the back of the protection<br />
sleeve, which indicates the appropriate length locking screw.<br />
30 <strong>Synthes</strong> <strong>Expert</strong> <strong>Adolescent</strong> <strong>Lateral</strong> <strong>Femoral</strong> <strong>Nail</strong> Technique Guide
Option: Locking with ASLS<br />
ASLS, the Angular Stable Locking System, can be used as an<br />
alternative to standard locking screws in any round hole of a<br />
<strong>Synthes</strong> cannulated titanium nail. For more details regarding<br />
the intramedullary fixator principle please consult the ASLS<br />
surgical technique (036.000.708) and concept flyer<br />
(036.001.017). Please note that for the use of ASLS special<br />
instruments are required.<br />
5<br />
Insert locking screw<br />
Instrument<br />
03.010.107 Screwdriver Stardrive, T25, length 330 mm<br />
Insert the appropriate length locking screw through the protection<br />
sleeve using the Stardrive screwdriver. Verify locking<br />
screw length under image intensification.<br />
The tip of the locking screw should not project more than<br />
2 mm to 4 mm beyond the far cortex.<br />
Note: A groove on the screwdriver provides a rough indication<br />
that the locking screw is fully inserted through the<br />
sleeve.<br />
Repeat for a second proximal locking screw if desired.<br />
<strong>Expert</strong> <strong>Adolescent</strong> <strong>Lateral</strong> <strong>Femoral</strong> <strong>Nail</strong> Technique Guide <strong>Synthes</strong> 31
Proximal Locking – Recon<br />
1<br />
Confirm nail position<br />
In the AP view, adjust the nail insertion depth to ensure that<br />
the two hip screws can be placed into the femoral head.<br />
Adjust nail position for correct anteversion.<br />
2<br />
Mount aiming arm<br />
Instruments<br />
03.010.092 Screwdriver, hexagonal with spherical head<br />
8.0 mm<br />
03.010.227 Aiming Arm for <strong>Expert</strong> <strong>Adolescent</strong> <strong>Lateral</strong><br />
<strong>Femoral</strong> <strong>Nail</strong><br />
Confirm that the nail is securely connected to the insertion<br />
handle using the screwdriver, hexagonal with spherical head<br />
8.0 mm. Mount the aiming arm to the insertion handle.<br />
32 <strong>Synthes</strong> <strong>Expert</strong> <strong>Adolescent</strong> <strong>Lateral</strong> <strong>Femoral</strong> <strong>Nail</strong> Technique Guide
3<br />
Insert guide wires for hip screws<br />
Instruments<br />
03.010.075 Protection Sleeve 11.5/8.5, for LFN<br />
Reconstruction Locking<br />
03.010.076 Drill Sleeve 8.5/3.2, for No. 03.010.075<br />
03.010.077 Trocar 3.2 mm, for No. 03.010.076<br />
357.399 Guide Wire 3.2 mm, length 400 mm<br />
Insert both three-part trocar combinations (protection sleeve,<br />
drill sleeve, and trocar) through the aiming arm. Make a stab<br />
incision and insert the trocars to the bone.<br />
Following the arrows on the aiming arm, rotate the cams so<br />
that the protection sleeves are locked in the aiming arm. This<br />
will ensure proper measurement for the hip screws.<br />
Remove the inferior trocar.<br />
<strong>Expert</strong> <strong>Adolescent</strong> <strong>Lateral</strong> <strong>Femoral</strong> <strong>Nail</strong> Technique Guide <strong>Synthes</strong> 33
Proximal Locking – Recon<br />
In case of an arrested or closed physis, insert a guide wire<br />
into the femoral head, stopping approximately 5 mm from<br />
the subchondral bone.<br />
If the physis in the femoral head is not fully arrested, stop<br />
the wire short of the physis. Check the guide wire placement<br />
radiographically in both planes.<br />
Remove the superior trocar and repeat steps for second<br />
guide wire.<br />
Note: Do not exert force on the aiming arm, protection<br />
sleeves, or drill sleeves. Such force may prevent accurate<br />
targeting through the locking holes.<br />
34 <strong>Synthes</strong> <strong>Expert</strong> <strong>Adolescent</strong> <strong>Lateral</strong> <strong>Femoral</strong> <strong>Nail</strong> Technique Guide
4<br />
Determine length and drill for inferior hip screw<br />
Instruments<br />
03.010.079 Fixation Sleeve, for No. 03.010.078<br />
03.010.085 Direct Measuring Device for Guide Wires<br />
3.2 mm, length 400 mm<br />
03.010.228 Drill Bit 3.2 mm, calibrated, length<br />
474 mm, 3-flute, for Mini Quick Coupling,<br />
for Hip Screw Stardrive 5.0 mm<br />
Measure for the inferior screw.<br />
Ensure the protection sleeve is pressed firmly to the lateral<br />
cortex. Remove the wire guide and insert the specialty measuring<br />
device over the guide wire, into the protection sleeve,<br />
and to the bone. Read the length of the required hip screw<br />
directly on the measuring device.<br />
Remove the measuring device and the inferior guide wire.<br />
Attach the fixation sleeve to the stepped drill bit for the<br />
appropriate length screw.<br />
Guide the stepped drill bit through the protection sleeve to<br />
the bone. Drill to the stop.<br />
<strong>Expert</strong> <strong>Adolescent</strong> <strong>Lateral</strong> <strong>Femoral</strong> <strong>Nail</strong> Technique Guide <strong>Synthes</strong> 35
Proximal Locking – Recon<br />
5<br />
Insert inferior hip screw<br />
Instrument<br />
03.010.108 Screwdriver Stardrive, T25, length 330 mm<br />
Insert the appropriate hip screw through the protection<br />
sleeve into the femoral neck using the long T25 Stardrive<br />
screwdriver. Verify the position of the locking screw under<br />
image intensification in both planes.<br />
A groove on the screwdriver indicates when the locking<br />
screw is fully inserted.<br />
6<br />
Insert superior hip screw<br />
Repeat steps 3 through 5 for the superior hip screw.<br />
36 <strong>Synthes</strong> <strong>Expert</strong> <strong>Adolescent</strong> <strong>Lateral</strong> <strong>Femoral</strong> <strong>Nail</strong> Technique Guide
Distal Locking<br />
1<br />
Distal locking<br />
There are two transverse distal locking holes.<br />
2<br />
Align image<br />
Check the reduction and correct alignment of the fragments<br />
and leg length before locking the nail.<br />
Align the C-arm with the hole in the nail closest to the fracture<br />
until a perfect circle is visible in the center of the screen.<br />
3<br />
Determine incision point<br />
Place a Kirschner wire on the skin over the center of the hole<br />
to mark the incision point and make a stab incision.<br />
<strong>Expert</strong> <strong>Adolescent</strong> <strong>Lateral</strong> <strong>Femoral</strong> <strong>Nail</strong> Technique Guide <strong>Synthes</strong> 37
Distal Locking<br />
4<br />
Drill<br />
Standard locking with locking screws<br />
Instrument<br />
03.010.103 Drill Bit 3.2 mm, calibrated, length<br />
145 mm, 3-flute, for Quick Coupling<br />
If using the standard freehand technique, insert the tip of the<br />
drill bit through the incision and down to the bone.<br />
Incline the drive so that the tip of the drill bit is centered over<br />
the locking hole. Hold the drill bit in this position and drill<br />
through both cortices.<br />
Technique tip: For greater drill bit control, discontinue drill<br />
power after perforating the near cortex. Manually guide the<br />
drill bit through the nail before resuming power to drill the<br />
far cortex.<br />
38 <strong>Synthes</strong> <strong>Expert</strong> <strong>Adolescent</strong> <strong>Lateral</strong> <strong>Femoral</strong> <strong>Nail</strong> Technique Guide
Alternative instrument<br />
03.010.100 Drill Bit 3.2 mm, calibrated, length<br />
145 mm, 3-flute, with Coupling for RDL<br />
Using the radiolucent drive under image intensification, insert<br />
the tip of the drill bit through the incision and down to<br />
the bone.<br />
Incline the drive so that the tip of the drill bit is centered over<br />
the locking hole. The drill bit should almost completely fill<br />
the circle of the locking hole. Hold the drill bit in this position<br />
and drill through both cortices.<br />
Option: Locking with ASLS<br />
ASLS, the Angular Stable Locking System, can be used as an<br />
alternative to standard locking screws in any round hole of a<br />
<strong>Synthes</strong> cannulated titanium nail. For more details regarding<br />
the intramedullary fixator principle please consult the ASLS<br />
surgical technique (036.000.708) and concept flyer<br />
(036.001.017). Please note that for the use of ASLS special<br />
instruments are required.<br />
<strong>Expert</strong> <strong>Adolescent</strong> <strong>Lateral</strong> <strong>Femoral</strong> <strong>Nail</strong> Technique Guide <strong>Synthes</strong> 39
Distal Locking<br />
5<br />
Determine locking screw length<br />
Instruments<br />
03.010.100 Drill Bit 3.2 mm, calibrated, length<br />
145 mm, 3-flute, with Coupling for RDL<br />
03.010.103 Drill Bit 3.2 mm, calibrated, length<br />
145 mm, 3-flute, for Quick Coupling<br />
03.010.106 Direct Measuring Device for Drill Bits of<br />
length 145 mm, for Nos. 03.010.100 to<br />
03.010.105<br />
Stop drilling immediately after penetrating the far cortex.<br />
Disassemble the power drive or radiolucent drive from the<br />
drill bit.<br />
Ensure the correct position of the drill bit in regard to the far<br />
cortex of the femur.<br />
Place the direct measuring device onto the drill bit. Read the<br />
graduation on the measuring device at the end of the drill bit.<br />
This corresponds to the appropriate locking screw length.<br />
Note: Drill bit location with respect to the far cortex is critical<br />
for measuring the appropriate locking screw length.<br />
Alternative instrument<br />
03.010.072 Depth Gauge for Locking Screws,<br />
measuring range up to 110 mm, for<br />
No. 03.010.063<br />
Measure the locking screw length using the depth gauge for<br />
locking screws. Ensure the outer sleeve is in contact with the<br />
bone and the hook grasps the far cortex.<br />
Read the locking screw length directly from the depth gauge<br />
at the back of the outer sleeve.<br />
40 <strong>Synthes</strong> <strong>Expert</strong> <strong>Adolescent</strong> <strong>Lateral</strong> <strong>Femoral</strong> <strong>Nail</strong> Technique Guide
6<br />
Insert locking screw<br />
Instruments<br />
03.010.107 Screwdriver Stardrive, T25, length 330 mm<br />
03.010.112 Holding Sleeve, with Locking Device<br />
Insert the locking screw using the screwdriver, and the<br />
holding sleeve with locking device; if desired.<br />
Verify locking screw length under image intensification. The<br />
screw tip should be about 2 mm beyond the far cortex. If<br />
needed, a second locking screw may be inserted using the<br />
same technique.<br />
Use the holding sleeve as described below: Insert the holding<br />
sleeve onto the shaft of the screwdriver and place the tip of<br />
the screwdriver in the recess of the locking screw (Figure 1).<br />
Push the holding sleeve in the direction of the locking screw.<br />
The sleeve now holds the locking screw.<br />
Lock the holding sleeve by tightening it counterclockwise<br />
(Figure 2). After insertion of the locking screw, release the<br />
holding sleeve by loosening it clockwise and pulling it back<br />
(Figure 3).<br />
Figure 1<br />
Figure 2<br />
Figure 3<br />
<strong>Expert</strong> <strong>Adolescent</strong> <strong>Lateral</strong> <strong>Femoral</strong> <strong>Nail</strong> Technique Guide <strong>Synthes</strong> 41
End Cap Insertion<br />
1<br />
Insert end cap<br />
Instruments<br />
03.010.110 Screwdriver Stardrive, T40, cannulated<br />
length 300 mm<br />
357.399 Guide Wire 3.2 mm, length 400 mm<br />
Choose an end cap with the appropriate extension; 0 mm if<br />
the nail is not overinserted, 5 mm, 10 mm or 15 mm if the<br />
nail is overinserted.<br />
The end caps are cannulated for use over a guide wire, if<br />
necessary.<br />
Remove the nail insertion instruments.<br />
Optionally, for insertion of the 0 mm end cap, remove the<br />
connecting screw only. The insertion handle can remain to<br />
help align the end cap to the top of the nail. The 0 mm end<br />
cap fits through the barrel of the insertion handle.<br />
Insert the guide wire into the proximal end of the nail.<br />
Engage the end cap with the cannulated screwdriver by exerting<br />
axial pressure. To prevent cross-threading, align the<br />
end cap with the nail axis and turn the end cap counterclockwise,<br />
until the thread of the end cap aligns with that of<br />
the nail.<br />
Turn the end cap clockwise to thread the end cap into the<br />
nail.<br />
Remove the guide wire and screwdriver.<br />
42 <strong>Synthes</strong> <strong>Expert</strong> <strong>Adolescent</strong> <strong>Lateral</strong> <strong>Femoral</strong> <strong>Nail</strong> Technique Guide
Alternative instruments<br />
03.010.111 Screwdriver Stardrive, T40, cannulated,<br />
length 190 mm, with Lever Arm<br />
321.160 Combination Wrench 11.0 mm<br />
The cannulated Stardrive, screwdriver, T40, with lever handle,<br />
may be used with the 11 mm combination wrench to insert<br />
the end cap.<br />
<strong>Expert</strong> <strong>Adolescent</strong> <strong>Lateral</strong> <strong>Femoral</strong> <strong>Nail</strong> Technique Guide <strong>Synthes</strong> 43
Implant Removal<br />
1<br />
Remove end cap and locking screws<br />
Instruments<br />
03.010.107 Screwdriver Stardrive, T25, length 330 mm<br />
03.010.110 Screwdriver Stardrive, T40, cannulated,<br />
length 300 mm<br />
03.010.112 Holding Sleeve, with Locking Device<br />
357.399 Guide Wire 3.2 mm, length 400 mm<br />
Implant removal is an optional procedure.<br />
Clear the Stardrive recess of the end cap and the locking<br />
implants of any ingrown tissue. Insert the guide wire for easy<br />
alignment of the screwdriver in the cannulated end cap.<br />
Remove the end cap using the T40 screwdriver.<br />
Remove all locking screws except one proximal locking screw.<br />
2<br />
Attach extraction screw and hammer guide<br />
Instruments<br />
03.010.107 Screwdriver Stardrive, T25, length 330 mm<br />
357.133 Extraction Screw for AFN/DFN<br />
357.220 Hammer Guide, for No. 359.250<br />
Before removing the final locking screw, screw the extraction<br />
screw into the nail and tighten it. The locking screw will<br />
prevent nail rotation as the extraction screw is tightened.<br />
Attach the hammer guide to the extraction screw.<br />
Remove the remaining locking screw with the screwdriver.<br />
44 <strong>Synthes</strong> <strong>Expert</strong> <strong>Adolescent</strong> <strong>Lateral</strong> <strong>Femoral</strong> <strong>Nail</strong> Technique Guide
3<br />
Remove nail<br />
Instrument<br />
03.010.056 Combined Hammer 700 g,<br />
can be mounted, for No. 357.220<br />
Extract the nail by applying gentle blows with the hammer.<br />
Note: The nail will rotate about 90°, similar to the movement<br />
during the insertion.<br />
<strong>Expert</strong> <strong>Adolescent</strong> <strong>Lateral</strong> <strong>Femoral</strong> <strong>Nail</strong> Technique Guide <strong>Synthes</strong> 45
Implants<br />
<strong>Expert</strong> <strong>Adolescent</strong> <strong>Lateral</strong> <strong>Femoral</strong> <strong>Nail</strong><br />
– Available for left or right femur<br />
– Anatomic nail design based on a femoral canal tracing<br />
study 3<br />
Material<br />
– Titanium-6% aluminum-7% niobium alloy<br />
Diameters<br />
– 8.2 mm, cannulated<br />
– 9.0 mm, cannulated<br />
– 10.0 mm, cannulated<br />
Lengths<br />
– 240 mm through 400 mm in 20 mm increments<br />
Cross Section<br />
– Helical fluted<br />
Proximal locking<br />
– Dynamization slot (LM)<br />
– Static transverse locking hole (LM)<br />
– 120° antegrade locking<br />
– Two recon locking holes<br />
Distal locking<br />
– Two transverse locking holes (LM)<br />
3 L. Ehmke, et al.<br />
46 <strong>Synthes</strong> <strong>Expert</strong> <strong>Adolescent</strong> <strong>Lateral</strong> <strong>Femoral</strong> <strong>Nail</strong> Technique Guide<br />
120° antegrade<br />
Recon locking<br />
Dynamic transverse<br />
Static transverse<br />
LM<br />
LM<br />
20.6 mm<br />
36.25 mm<br />
50 mm<br />
12.5 mm<br />
12 mm<br />
7 mm<br />
42 mm
<strong>Expert</strong> <strong>Adolescent</strong> <strong>Lateral</strong> <strong>Femoral</strong> <strong>Nail</strong>, sterile<br />
Length (mm) mm Right Left<br />
240 8.2 04.031.924S 04.031.925S<br />
260 8.2 04.031.926S 04.031.927S<br />
280 8.2 04.031.928S 04.031.929S<br />
300 8.2 04.031.930S 04.031.931S<br />
320 8.2 04.031.932S 04.031.933S<br />
340 8.2 04.031.934S 04.031.935S<br />
360 8.2 04.031.936S 04.031.937S<br />
380 8.2 04.031.938S 04.031.939S<br />
400 8.2 04.031.940S 04.031.941S<br />
Length (mm) mm Right Left<br />
240 9 04.031.944S 04.031.945S<br />
260 9 04.031.946S 04.031.947S<br />
280 9 04.031.948S 04.031.949S<br />
300 9 04.031.950S 04.031.951S<br />
320 9 04.031.952S 04.031.953S<br />
340 9 04.031.954S 04.031.955S<br />
360 9 04.031.956S 04.031.957S<br />
380 9 04.031.958S 04.031.959S<br />
400 9 04.031.960S 04.031.961S<br />
Length (mm) mm Right Left<br />
240 10 04.031.964S 04.031.965S<br />
260 10 04.031.966S 04.031.967S<br />
280 10 04.031.968S 04.031.969S<br />
300 10 04.031.970S 04.031.971S<br />
320 10 04.031.972S 04.031.973S<br />
340 10 04.031.974S 04.031.975S<br />
360 10 04.031.976S 04.031.977S<br />
380 10 04.031.978S 04.031.979S<br />
400 10 04.031.980S 04.031.981S<br />
<strong>Expert</strong> <strong>Adolescent</strong> <strong>Lateral</strong> <strong>Femoral</strong> <strong>Nail</strong> Technique Guide <strong>Synthes</strong> 47
Implants<br />
<strong>Expert</strong> End Cap for <strong>Adolescent</strong> <strong>Lateral</strong> <strong>Femoral</strong> <strong>Nail</strong><br />
8.2 mm, Titanium Alloy (TAN), (dark purple)*<br />
– Titanium alloy**<br />
– Protect nail threads from tissue ingrowth<br />
– Cannulated to allow insertion over a guide wire<br />
– T40 Stardrive recess<br />
0 mm: Sits flush with end of nail<br />
5 mm, 10 mm and 15 mm extensions: Extend nail height<br />
if nail is overinserted<br />
Extension (mm)<br />
04.031.000 0<br />
04.031.001 5<br />
04.031.002 10<br />
04.031.003 15<br />
Hip Screw Stardrive 5.0 mm, self-tapping, Titanium<br />
Alloy (TAN), (dark purple)*<br />
– Titanium alloy**<br />
– Lengths: 50 mm – 125 mm (5 mm increments)<br />
– 3.2 mm core diameter<br />
– Partially threaded<br />
– Self-tapping, blunt tip<br />
– T25 Stardrive recess for improved torque transmission<br />
and self-retention on screwdriver<br />
04.031.020 50<br />
04.031.021 55<br />
04.031.022 60<br />
04.031.023 65<br />
04.031.024 70<br />
04.031.025 75<br />
04.031.026 80<br />
04.031.027 85<br />
Length (mm)<br />
04.031.028 90<br />
04.031.029 95<br />
04.031.030 100<br />
04.031.031 105<br />
04.031.032 110<br />
04.031.033 115<br />
04.031.034 120<br />
04.031.035 125<br />
**Available nonsterile or sterile-packed. Add “S” to catalog number<br />
to order sterile product.<br />
**Titanium-6% aluminum-7% niobium alloy<br />
Length (mm)<br />
48 <strong>Synthes</strong> <strong>Expert</strong> <strong>Adolescent</strong> <strong>Lateral</strong> <strong>Femoral</strong> <strong>Nail</strong> Technique Guide
Locking Screw Stardrive 4.0 mm, for Medullary <strong>Nail</strong>s,<br />
Titanium Alloy (TAN), (dark blue)*<br />
– Titanium alloy**<br />
– Lengths: 18 mm – 80 mm (2 mm increments)<br />
– 3.3 mm core diameter<br />
– Fully threaded<br />
– Self-tapping, blunt tip<br />
– T25 Stardrive recess for improved torque transmission<br />
and self-retention on screwdriver<br />
04.005.408 18<br />
04.005.410 20<br />
04.005.412 22<br />
04.005.414 24<br />
04.005.416 26<br />
04.005.418 28<br />
04.005.420 30<br />
04.005.422 32<br />
04.005.424 34<br />
04.005.426 36<br />
04.005.428 38<br />
04.005.430 40<br />
04.005.432 42<br />
04.005.434 44<br />
04.005.436 46<br />
04.005.438 48<br />
Length (mm)<br />
04.005.440 50<br />
04.005.442 52<br />
04.005.444 54<br />
04.005.446 56<br />
04.005.448 58<br />
04.005.450 60<br />
04.005.452 62<br />
04.005.454 64<br />
04.005.456 66<br />
04.005.458 68<br />
04.005.460 70<br />
04.005.462 72<br />
04.005.464 74<br />
04.005.466 76<br />
04.005.468 78<br />
04.005.470 80<br />
**Available nonsterile or sterile-packed. Add “S” to catalog number<br />
to order sterile product.<br />
**Titanium-6% aluminum-7% niobium alloy<br />
Length (mm)<br />
<strong>Expert</strong> <strong>Adolescent</strong> <strong>Lateral</strong> <strong>Femoral</strong> <strong>Nail</strong> Technique Guide <strong>Synthes</strong> 49
Instruments<br />
03.010.020 Radiographic Ruler for <strong>Expert</strong> <strong>Femoral</strong> <strong>Nail</strong>s,<br />
length 475 mm<br />
03.010.023 Radiographic Ruler for <strong>Nail</strong> Diameters<br />
for <strong>Expert</strong> <strong>Femoral</strong> <strong>Nail</strong>s, length 365 mm<br />
03.010.031 Drill Sleeve 13.0/3.2 for antegrade<br />
approach, for No. 03.010.030<br />
03.010.044 Connecting Screw, cannulated,<br />
for <strong>Expert</strong> Tibial and <strong>Femoral</strong> <strong>Nail</strong>s,<br />
for No. 03.010.045<br />
03.010.047 Connector, for Insertion Handle<br />
03.010.056 Combined Hammer 700 g,<br />
can be mounted, for No. 357.220<br />
50 <strong>Synthes</strong> <strong>Expert</strong> <strong>Adolescent</strong> <strong>Lateral</strong> <strong>Femoral</strong> <strong>Nail</strong> Technique Guide
03.010.060* Drill Bit 3.2 mm, calibrated,<br />
length 340 mm, 3-flute,<br />
for Quick Coupling, for No. 03.010.064<br />
03.010.063 Protection Sleeve 12.0/8.0, length 188 mm<br />
03.010.064 Drill Sleeve 8.0/3.2, for No. 03.010.063<br />
03.010.069 Trocar 3.2 mm, for No. 03.010.064<br />
03.010.072 Depth Gauge for Locking Screws,<br />
measuring range up to 110 mm,<br />
for No. 03.010.063<br />
03.010.075 Protection Sleeve 11.5/8.5,<br />
for LFN Reconstruction Locking<br />
03.010.076 Drill Sleeve 8.5/3.2, for No. 03.010.075<br />
* Available nonsterile or sterile-packed. Add «S» to catalog number to order sterile<br />
product.<br />
<strong>Expert</strong> <strong>Adolescent</strong> <strong>Lateral</strong> <strong>Femoral</strong> <strong>Nail</strong> Technique Guide <strong>Synthes</strong> 51
Instruments<br />
03.010.077 Trocar 3.2 mm, for No. 03.010.076<br />
03.010.079 Fixation Sleeve, for No. 03.010.078<br />
03.010.085 Direct Measuring Device for Guide Wires<br />
3.2 mm, length 400 mm<br />
03.010.092 Screwdriver, hexagonal with spherical head<br />
8.0 mm<br />
03.010.093 Rod Pusher for Reaming Rod<br />
with Hexagonal Screwdriver 8.0 mm<br />
03.010.100 Drill Bit 3.2 mm, calibrated,<br />
length 145 mm, 3-flute,<br />
with Coupling for RDL<br />
03.010.103* Drill Bit 3.2 mm, calibrated,<br />
length 145 mm, 3-flute,<br />
for Quick Coupling<br />
* Available nonsterile or sterile-packed. Add «S» to catalog number to order sterile<br />
product.<br />
52 <strong>Synthes</strong> <strong>Expert</strong> <strong>Adolescent</strong> <strong>Lateral</strong> <strong>Femoral</strong> <strong>Nail</strong> Technique Guide
03.010.106 Direct Measuring Device for Drill Bits<br />
of length 145 mm, for Nos. 03.010.100<br />
to 03.010.105<br />
03.010.107 Screwdriver Stardrive, T25, length 330 mm<br />
03.010.108 Screwdriver Stardrive, T25, length<br />
330 mm, long<br />
03.010.110 Screwdriver Stardrive, T40, cannulated,<br />
length 300 mm<br />
03.010.111 Screwdriver Stardrive, T40, cannulated,<br />
length 190 mm, with Lever Arm<br />
03.010.112 Holding Sleeve, with Locking Device<br />
03.010.226 Insertion Handle for <strong>Expert</strong> <strong>Adolescent</strong><br />
<strong>Lateral</strong> <strong>Femoral</strong> <strong>Nail</strong><br />
03.010.227 Aiming Arm for <strong>Expert</strong> <strong>Adolescent</strong> <strong>Lateral</strong><br />
<strong>Femoral</strong> <strong>Nail</strong><br />
<strong>Expert</strong> <strong>Adolescent</strong> <strong>Lateral</strong> <strong>Femoral</strong> <strong>Nail</strong> Technique Guide <strong>Synthes</strong> 53
Instruments<br />
03.010.228 Drill Bit 3.2 mm, calibrated, length<br />
474 mm, 3-flute, for Mini Quick Coupling,<br />
for Hip Screw Stardrive 5.0 mm<br />
03.010.229 Protection Sleeve 15.5 mm / 13.7 mm,<br />
length 122.5 mm<br />
319.970 Screw Forceps, self-holding, length 85 mm<br />
321.160 Combination Wrench 11.0 mm<br />
321.170 Pin Wrench 4.5 mm, length 120 mm<br />
351.270 Drill Bit 13.0 mm, cannulated,<br />
length 290 mm, 3-flute,<br />
for Quick Coupling No. 511.760<br />
54 <strong>Synthes</strong> <strong>Expert</strong> <strong>Adolescent</strong> <strong>Lateral</strong> <strong>Femoral</strong> <strong>Nail</strong> Technique Guide
357.133 Extraction Screw for AFN/DFN<br />
357.220 Hammer Guide, for No. 357.250<br />
357.393 Trocar 3.2 mm, length 172 mm,<br />
for No. 357.392<br />
357.399 Guide Wire 3.2 mm, length 400 mm<br />
393.105 Universal Chuck, small, with T-Handle<br />
Optional Instruments<br />
351.050 Tissue Protector<br />
03.010.041 Awl 14.0/3.2 mm, cannulated<br />
<strong>Expert</strong> <strong>Adolescent</strong> <strong>Lateral</strong> <strong>Femoral</strong> <strong>Nail</strong> Technique Guide <strong>Synthes</strong> 55
<strong>Expert</strong> <strong>Adolescent</strong> <strong>Lateral</strong> <strong>Femoral</strong><br />
<strong>Nail</strong> Instrument Set<br />
01.031.004 <strong>Expert</strong> <strong>Adolescent</strong> <strong>Lateral</strong> <strong>Femoral</strong> <strong>Nail</strong> Instrument Set<br />
in Vario Case<br />
68.031.004 Vario Case for Standard Instrument Set for <strong>Expert</strong> <strong>Adolescent</strong><br />
<strong>Lateral</strong> <strong>Femoral</strong> <strong>Nail</strong>, without Lid, without Contents<br />
351.270 Drill Bit 13.0 mm, cannulated, length 290 mm, 3-flute,<br />
for Quick Coupling No. 511.760 1<br />
321.160 Combination Wrench 11.0 mm 1<br />
321.170 Pin Wrench 4.5 mm, length 120 mm 1<br />
357.133 Extraction Screw for AFN/DFN 1<br />
357.220 Hammer Guide, for No. 357.250 1<br />
357.393 Trocar 3.2 mm, length 172 mm, for No. 357.392 1<br />
357.399 Guide Wire 3.2 mm, length 400 mm 10<br />
393.105 Universal Chuck, small, with T-Handle 1<br />
03.010.020 Radiographic Ruler for <strong>Expert</strong> <strong>Femoral</strong> <strong>Nail</strong>s, length 475 mm 1<br />
03.010.023 Radiographic Ruler for <strong>Nail</strong> Diameters for <strong>Expert</strong> <strong>Femoral</strong> <strong>Nail</strong>s,<br />
length 365 mm 1<br />
03.010.031 Drill Sleeve 13.0/3.2, for antegrade approach 1<br />
03.010.044 Connecting Screw, cannulated, for <strong>Expert</strong> Tibial and <strong>Femoral</strong> <strong>Nail</strong>s,<br />
for No. 03.010.045 2<br />
03.010.047 Connector, for Insertion Handle 1<br />
03.010.056 Combined Hammer 700 g, can be mounted, for No. 357.220 1<br />
03.010.060* Drill Bit 3.2 mm, calibrated, length 340 mm, 3-flute, for Quick<br />
Coupling, for No. 03.010.064 2<br />
03.010.063 Protection Sleeve 12.0/8.0, lenght 188 mm 1<br />
03.010.064 Drill Sleeve 8.0/3.2, for No. 03.010.063 1<br />
03.010.069 Trocar 3.2 mm, for No. 03.010.064 1<br />
03.010.072 Depth Gauge for Locking Screws, measuring range up to 110 mm,<br />
for No. 03.010.063 1<br />
03.010.075 Protection Sleeve 11.5/8.5, for LFN Reconstruction Locking 2<br />
03.010.076 Drill Sleeve 8.5/3.2, for No. 03.010.075 2<br />
03.010.077 Trocar 3.2 mm, for No. 03.010.076 2<br />
03.010.079 Fixation Sleeve, for No. 03.010.078 1<br />
03.010.085 Direct Measuring Device for Guide Wires 3.2 mm,<br />
length 400 mm 1<br />
03.010.092 Screwdriver, hexagonal with spherical head 8.0 mm 1<br />
03.010.093 Rod Pusher for Reaming Rod with Hexagonal Screwdriver<br />
8.0 mm 1<br />
03.010.100 Drill Bit 3.2 mm, calibrated, length 145 mm, 3-flute,<br />
with Coupling for RDL 1<br />
03.010.103* Drill Bit 3.2 mm, calibrated, length 145 mm, 3-flute,<br />
for Quick Coupling 1<br />
03.010.106 Direct Measuring Device for Drill Bits of length 145 mm,<br />
for Nos. 03.010.100 to 03.010.105 1<br />
03.010.107 Screwdriver Stardrive, T25, length 330 mm 1<br />
03.010.108 Screwdriver Stardrive, T25, length 330 mm, long 1<br />
03.010.110 Screwdriver Stardrive, T40, cannulated, length 300 mm 1<br />
03.010.111 Screwdriver Stardrive, T40, cannulated, length 190 mm,<br />
with Lever Arm 1<br />
03.010.112 Holding Sleeve, with Locking Device 1<br />
03.010.226 Insertion Handle for <strong>Expert</strong> <strong>Adolescent</strong> <strong>Lateral</strong> <strong>Femoral</strong> <strong>Nail</strong> 1<br />
03.010.227 Aiming Arm for <strong>Expert</strong> <strong>Adolescent</strong> <strong>Lateral</strong> <strong>Femoral</strong> <strong>Nail</strong> 1<br />
03.010.228 Drill Bit 3.2 mm, calibrated, length 474 mm, 3-flute,<br />
for Quick Coupling, for Hip Screw Stardrive 5.0 mm 1<br />
03.010.229 Protection Sleeve 15.5 mm/ 13.7 mm, length 122.5 mm 1<br />
56 <strong>Synthes</strong> <strong>Expert</strong> <strong>Adolescent</strong> <strong>Lateral</strong> <strong>Femoral</strong> <strong>Nail</strong> Technique Guide<br />
*Available nonsterile or sterile-packed. Add «S» to catalog number<br />
to order sterile product.<br />
Note: For additional information, please refer to package insert.
<strong>Expert</strong> <strong>Adolescent</strong> <strong>Lateral</strong> <strong>Femoral</strong><br />
<strong>Nail</strong> Instrument Set<br />
01.031.005 <strong>Expert</strong> <strong>Adolescent</strong> <strong>Lateral</strong> <strong>Femoral</strong> <strong>Nail</strong> Upgrade<br />
for LFN Instrument Set<br />
68.031.005 Vario Case for <strong>Expert</strong> <strong>Adolescent</strong> <strong>Lateral</strong> <strong>Femoral</strong> <strong>Nail</strong>, Upgrade<br />
Instruments to <strong>Expert</strong> LFN, without Lid, without Content 1<br />
351.270 Drill Bit 13.0 mm, cannulated, length 290 mm, 3-flute,<br />
for Quick Coupling No. 511.760 1<br />
357.133 Extraction Screw for AFN/DFN 1<br />
357.393 Trocar 3.2 mm, length 172 mm, for No. 357.410 1<br />
03.010.031 Drill Sleeve 13.0/3.2 for antegrade approach 1<br />
03.010.060 Drill Bit 3.2 mm, calibrated, length 340 mm, 3-flute,<br />
for Quick Coupling, for No. 03.010.064 2<br />
03.010.063 Protection Sleeve 12.0//8.0, length 188 mm 1<br />
03.010.064 Drill Sleeve 8.0/3.2, for No. 03.010.063 1<br />
03.010.069 Trocar 3.2 mm, for No. 03.010.064 1<br />
03.010.093 Rod Pusher for Reaming Rod with Hexagonal Screwdriver<br />
8.0 mm 1<br />
03.010.100 Drill Bit 3.2 mm, calibrated, length 145 mm, 3-flute,<br />
with Coupling for RDL 2<br />
03.010.103 145 mm, 3-flute, with Coupling for RDL 1<br />
03.010.111 Screwdriver Stardrive, T40, cannulated, length 190 mm,<br />
with Lever Arm 1<br />
03.010.226 Insertion Handle for <strong>Expert</strong> <strong>Adolescent</strong> <strong>Lateral</strong> <strong>Femoral</strong> <strong>Nail</strong> 1<br />
03.010.227 Aiming Arm for <strong>Expert</strong> <strong>Adolescent</strong> <strong>Lateral</strong> <strong>Femoral</strong> <strong>Nail</strong> 1<br />
03.010.228 Drill Bit 3.2 mm, calibrated, length 474 mm, 3-flute,<br />
for Quick Coupling, for Hip Screw Stardrive 5.0 mm 1<br />
03.010.229 Protection Sleeve 15.5 mm/ 13.7 mm, length 122.5 mm 1<br />
01.031.004 <strong>Expert</strong> <strong>Adolescent</strong> <strong>Lateral</strong> <strong>Femoral</strong> <strong>Nail</strong> Instrument Set<br />
in Vario Case<br />
01.031.005 <strong>Expert</strong> <strong>Adolescent</strong> <strong>Lateral</strong> <strong>Femoral</strong> <strong>Nail</strong> Upgrade for<br />
LFN Instrument Set<br />
Optionally available<br />
351.050 Soft Tissue Protector<br />
03.010.041 Awl 14.0/3.2 mm, cannulated<br />
Additionally available<br />
321.200 Ratchet Wrench 11.0 mm<br />
351.707S Reaming Rod 2.5 mm, length 950 mm, with Olive & extension,<br />
sterile<br />
351.706S Reaming Rod 2.5 mm, length 950 mm, with Olive, sterile<br />
03.010.124 Combined Hammer 500 g, can be mounted, for No. 357.117<br />
393.100 Universal Chuck with T-Handle<br />
03.010.369 Reduction Instrument for Medullary <strong>Nail</strong>s<br />
357.398 Shaft, hexagonal, 8.0 mm, cannulated, short, length 125 mm<br />
357.117 Hammer Guide for DFN, for no. 357.026<br />
352.033 SynReam Reaming Rod 2.5 mm, long, length 1150 mm<br />
352.032 SynReam Reaming Rod 2.5 mm, short, length 950 mm<br />
189.060 SynReam Intramedullary Reaming System in Vario Case<br />
394.350 Large Distractor<br />
<strong>Expert</strong> <strong>Adolescent</strong> <strong>Lateral</strong> <strong>Femoral</strong> <strong>Nail</strong> Technique Guide <strong>Synthes</strong> 57
Option: Modular Aiming Device ModAD<br />
Option for C-arm independent distal locking<br />
of nails for femur, tibia and humerus<br />
When using the ModAD for the interlocking of intra -<br />
medullary nails, no image intensifier control is required. The<br />
system is especially suitable when no C-arm is available.<br />
01.101.309 ModAD for <strong>Expert</strong> LFN und HN<br />
68.010.035 Sliding Carriage for <strong>Expert</strong> Tibial <strong>Nail</strong>s,<br />
for Calibration Block No. 312.952<br />
The ModAD for <strong>Expert</strong> LFN has to be used with the Sliding<br />
Carriage for <strong>Expert</strong> Tibial <strong>Nail</strong>s. Distal locking is performed<br />
using the sliding carriage.<br />
58 <strong>Synthes</strong> <strong>Expert</strong> <strong>Adolescent</strong> <strong>Lateral</strong> <strong>Femoral</strong> <strong>Nail</strong> Technique Guide
<strong>Expert</strong> <strong>Adolescent</strong> <strong>Lateral</strong> <strong>Femoral</strong><br />
<strong>Nail</strong> Implant Set<br />
01.031.003 Implant Set for <strong>Expert</strong> <strong>Adolescent</strong> <strong>Lateral</strong> <strong>Femoral</strong> <strong>Nail</strong><br />
68.031.002 Screw Rack, 1/4, for Locking Screw Stardrive 4.0 mm and Hip<br />
Screw Stardrive 5.0 mm, including Module and Lid,<br />
without content<br />
Instrument<br />
319.970 Screw Forceps<br />
Implants<br />
Locking Screw Stardrive 4.0 mm, for Medullary <strong>Nail</strong>s, Titanium Alloy (TAN),<br />
dark blue, 2 each*<br />
04.005.416 26<br />
04.005.418 28<br />
04.005.420 30<br />
04.005.422 32<br />
04.005.424 34<br />
04.005.426 36<br />
04.005.428 38<br />
04.005.430 40<br />
04.005.432 42<br />
04.005.434 44<br />
04.005.436 46<br />
04.005.438 48<br />
04.005.440 50<br />
04.005.442 52<br />
04.005.440 50<br />
Hip Screw Stardrive 5.0 mm, self-tapping, Titanium Alloy (TAN),<br />
dark purple, for <strong>Expert</strong> <strong>Adolescent</strong> <strong>Lateral</strong> <strong>Femoral</strong> <strong>Nail</strong>, 4 each<br />
5.0 mm Titanium Recon Screws*, with T25 StarDrive recess, for IM <strong>Nail</strong>s, 4 ea.<br />
04.031.022 60<br />
04.031.023 65<br />
04.031.024 70<br />
04.031.025 75<br />
04.031.026 80<br />
04.031.027 85<br />
04.031.028 90<br />
Length (mm)<br />
Length (mm)<br />
<strong>Expert</strong> End Cap for <strong>Adolescent</strong> <strong>Lateral</strong> <strong>Femoral</strong> <strong>Nail</strong> 8.2 mm,Titanium<br />
Alloy (TAN), dark purple*<br />
Extension (mm)<br />
04.031.000 0 2 each<br />
04.031.001 5 1<br />
04.031.002 10 1<br />
04.031.003 15 1<br />
04.005.442 52<br />
04.005.444 54<br />
04.005.446 56<br />
04.005.448 58<br />
04.005.450 60<br />
04.005.452 62<br />
04.005.454 64<br />
04.005.456 66<br />
04.005.458 68<br />
04.005.460 70<br />
04.005.462 72<br />
04.005.464 74<br />
04.005.466 76<br />
04.005.468 78<br />
04.005.470 80<br />
04.031.029 95<br />
04.031.030 100<br />
04.031.031 105<br />
04.031.032 110<br />
04.031.033 115<br />
04.031.034 120<br />
Length (mm)<br />
Length (mm)<br />
Optionally available<br />
Hip Screws<br />
04.031.020 Hip Screw Stardrive 5.0 mm, self-tapping, length 50 mm,<br />
Titanium Alloy (TAN), dark purple, for<br />
<strong>Expert</strong> <strong>Adolescent</strong> <strong>Lateral</strong> <strong>Femoral</strong> <strong>Nail</strong><br />
04.031.021 Hip Screw Stardrive 5.0 mm, self-tapping, length 55 mm,<br />
Titanium Alloy (TAN), dark purple, for<br />
<strong>Expert</strong> <strong>Adolescent</strong> <strong>Lateral</strong> <strong>Femoral</strong> <strong>Nail</strong><br />
04.031.035 Hip Screw Stardrive 5.0 mm, self-tapping, length 125 mm,<br />
Titanium Alloy (TAN), dark purple, for<br />
<strong>Expert</strong> <strong>Adolescent</strong> <strong>Lateral</strong> <strong>Femoral</strong> <strong>Nail</strong><br />
Locking Screws<br />
04.005.408 Locking Screw Stardrive 4.0 mm, for Medullary <strong>Nail</strong>s,<br />
Titanium Alloy (TAN), length 18 mm, dark blue<br />
04.005.410 Locking Screw Stardrive 4.0 mm, for Medullary <strong>Nail</strong>s,<br />
Titanium Alloy (TAN), length 20 mm, dark blue<br />
04.005.412 Locking Screw Stardrive 4.0 mm, for Medullary <strong>Nail</strong>s,<br />
Titanium Alloy (TAN), length 22 mm, dark blue<br />
04.005.414 Locking Screw Stardrive 4.0 mm, for Medullary <strong>Nail</strong>s,<br />
Titanium Alloy (TAN), length 24 mm, dark blue<br />
*Available nonsterile or sterile-packed. Add “S” to catalog number<br />
to order sterile product.<br />
Note: For additional information, please refer to package insert.<br />
<strong>Expert</strong> <strong>Adolescent</strong> <strong>Lateral</strong> <strong>Femoral</strong> <strong>Nail</strong> Technique Guide <strong>Synthes</strong> 59
Optional: Angular Stable Locking System (ASLS)<br />
What is ASLS?<br />
The Angular Stable Locking System (ASLS) provides the ability<br />
to create a fixed-angle construct to an intrame dullary nail.<br />
Therefore, it combines the advantages of angular stability<br />
and a minimally invasive approach. ASLS together with an<br />
intra medullary nail form the principle of the Intramedullary<br />
Fixator.<br />
How does ASLS work?<br />
The system consists of a screw with three outer diameters<br />
and a resorbable sleeve.<br />
The resorbable sleeve is placed on the screw tip which has<br />
the smallest screw diameter and is pushed into the locking<br />
hole of the nail.<br />
During screw advancement, the resorbable sleeve is expanded<br />
by the larger middle diameter. Radial expansion of<br />
the sleeve and its fixation in the nail creates the angular<br />
stability.<br />
60 <strong>Synthes</strong> <strong>Expert</strong> <strong>Adolescent</strong> <strong>Lateral</strong> <strong>Femoral</strong> <strong>Nail</strong> Technique Guide
ASLS screws<br />
– Titanium alloy*<br />
– Screws ASLS4: Length 26 mm – 80 mm, are compatible<br />
with <strong>Expert</strong> <strong>Adolescent</strong> <strong>Lateral</strong> <strong>Femoral</strong> <strong>Nail</strong>s<br />
– Fully threaded shaft with 3 diameters<br />
– D1: Provides purchase in reamed near cortex<br />
– D2: Expands sleeve, providing angular stability<br />
– D3: Holds unexpanded sleeve for screw insertion,<br />
provides purchase in far cortex<br />
– T25 Stardrive recess<br />
– Sterile packaged<br />
ASLS sleeves<br />
– 70:30 poly (L-lactide-co-D,L-lactide)<br />
– Bioresorbable, provides 80% decreased<br />
fracture site motion during first 12 weeks of healing<br />
– Gradually degrades within 2 years (resorption rate varies<br />
per patient and implant site)<br />
– Inner thread for secure fit to screw<br />
– Expands in nail locking hole<br />
– Available in diameters of 4.0 mm (ASLS4), 5.0 mm<br />
(ASLS5) and 6.0 mm (ASLS6)<br />
– Sterile-packed<br />
Note: For more details regarding the intramedullary fixator<br />
principle please consult the ASLS surgical technique<br />
(036.000.708) and concept flyer (036.001.017).<br />
*Titanium-6% aluminum-7% niobium alloy<br />
D1<br />
D2<br />
D3<br />
<strong>Expert</strong> <strong>Adolescent</strong> <strong>Lateral</strong> <strong>Femoral</strong> <strong>Nail</strong> Technique Guide <strong>Synthes</strong> 61
All technique guides are available as PDF files at<br />
www.synthes.com/lit<br />
Ö036.000.648öAC‚ä<br />
© <strong>Synthes</strong>, Inc. or its affiliates Subject to modifications <strong>Synthes</strong>, <strong>Expert</strong>, Stardrive and Vario Case are trademarks of <strong>Synthes</strong>, Inc. or its affiliates<br />
0123 036.000.648 version AC 02/2012 30101140