

Portable Pocket hole jig with accessories - Harbor Freight Tools
Portable Pocket hole jig with accessories - Harbor Freight Tools
Portable Pocket hole jig with accessories - Harbor Freight Tools

You also want an ePaper? Increase the reach of your titles
YUMPU automatically turns print PDFs into web optimized ePapers that Google loves.
work. To reduce your exposure to these chemicals: work in a well ventilated area,<br />
and work <strong>with</strong> approved safety equipment, such as those dust masks that are specially<br />
designed to filter out microscopic particles. (California Health & Safety Code<br />
§ 25249.5, et seq.)<br />
unPacking<br />
When unpacking, check to make sure that the item is intact and undamaged. If any<br />
parts are missing or broken, please call <strong>Harbor</strong> <strong>Freight</strong> <strong>Tools</strong> at the number shown on the<br />
cover of this manual as soon as possible.<br />
asseMbly/oPeration instructions<br />
Note: For additional information regarding the parts listed in the following pages,<br />
refer to the Assembly Diagram near the end of this manual.<br />
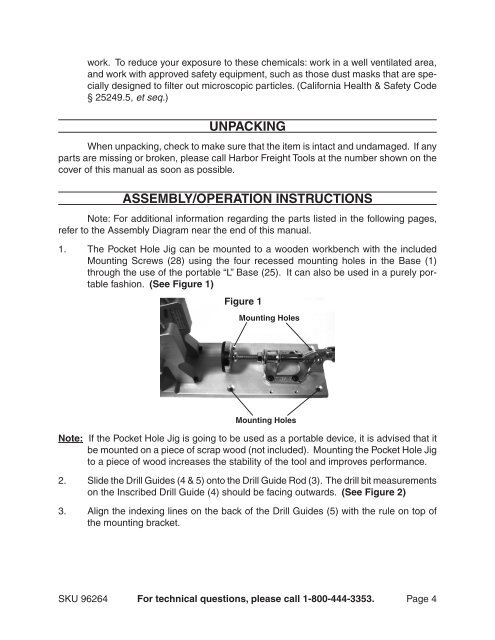
1.<br />
The <strong>Pocket</strong> Hole Jig can be mounted to a wooden workbench <strong>with</strong> the included<br />
Mounting Screws (28) using the four recessed mounting <strong>hole</strong>s in the Base (1)<br />
through the use of the portable “L” Base (25). It can also be used in a purely portable<br />
fashion. (see figure 1)<br />
figure 1<br />
Mounting <strong>hole</strong>s<br />
Mounting <strong>hole</strong>s<br />
note: If the <strong>Pocket</strong> Hole Jig is going to be used as a portable device, it is advised that it<br />
be mounted on a piece of scrap wood (not included). Mounting the <strong>Pocket</strong> Hole Jig<br />
to a piece of wood increases the stability of the tool and improves performance.<br />
2.<br />
3.<br />
Slide the Drill Guides (4 & 5) onto the Drill Guide Rod (3). The drill bit measurements<br />
on the Inscribed Drill Guide (4) should be facing outwards. (see figure 2)<br />
Align the indexing lines on the back of the Drill Guides (5) <strong>with</strong> the rule on top of<br />
the mounting bracket.<br />
SKU 96264 for technical questions, please call 1-800-444-3353.<br />
Page 4


