Portable Pocket hole jig with accessories - Harbor Freight Tools
Portable Pocket hole jig with accessories - Harbor Freight Tools
Portable Pocket hole jig with accessories - Harbor Freight Tools
You also want an ePaper? Increase the reach of your titles
YUMPU automatically turns print PDFs into web optimized ePapers that Google loves.
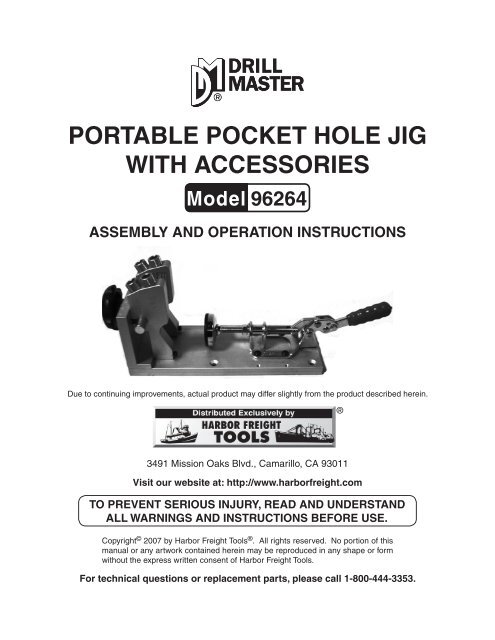
<strong>Portable</strong> <strong>Pocket</strong> <strong>hole</strong> <strong>jig</strong><br />
<strong>with</strong> <strong>accessories</strong><br />
Model 96264<br />
asseMbly and oPeration instructions<br />
Due to continuing improvements, actual product may differ slightly from the product described herein.<br />
3491 Mission Oaks Blvd., Camarillo, CA 93011<br />
Visit our website at: http://www.harborfreight.com<br />
to PreVent serious injury, read and understand<br />
all warnings and instructions before use.<br />
Copyright © 2007 by <strong>Harbor</strong> <strong>Freight</strong> <strong>Tools</strong> ® . All rights reserved. No portion of this<br />
manual or any artwork contained herein may be reproduced in any shape or form<br />
<strong>with</strong>out the express written consent of <strong>Harbor</strong> <strong>Freight</strong> <strong>Tools</strong>.<br />
for technical questions or replacement parts, please call 1-800-444-3353.<br />
®
Materials<br />
Accessories<br />
sPecifications<br />
Weight 4.45 Pounds<br />
Main Body: Anodized Aluminum<br />
Toggle Clamp: Zinc-plated Steel<br />
Thermoplastic knobs and grips<br />
2.5 & 3.0mm Hex Wrenches<br />
3/8” Wood Drill Bit<br />
1 Depth Collar<br />
25 5/8” Wood Screws<br />
25 1” Wood Screws<br />
25 1-1/4” Wood Screws<br />
25 1-1/2” Wood Screws<br />
4 Countersink Mounting Screws<br />
2 Adjusting Cap Screws<br />
save this Manual<br />
You will need this manual for the safety warnings and precautions, assembly, operating,<br />
inspection, maintenance and cleaning procedures, parts list and assembly diagram.<br />
Keep your invoice <strong>with</strong> this manual. Write the invoice number on the inside of the front<br />
cover. Write the product’s serial number in the back of the manual near the assembly diagram,<br />
or write month and year of purchase if product has no number. Keep this manual<br />
and invoice in a safe and dry place for future reference.<br />
1.<br />
2.<br />
3.<br />
general safety rules<br />
warning!<br />
read and understand all instructions<br />
failure to follow all instructions listed below may result in<br />
electric shock, fire, and/or serious injury.<br />
saVe these instructions<br />
work area<br />
keep your work area clean and well lit. Cluttered benches and dark areas invite<br />
accidents.<br />
keep bystanders and children away while operating a this tool. Distractions<br />
can cause you to lose control. Protect others in the work area from debris such as<br />
chips and sparks. Provide barriers or shields as needed.<br />
stay alert. watch what you are doing, and use common sense when operating<br />
a this tool. do not use while tired or under the influence of drugs, alcohol,<br />
or medication. A moment of inattention while operating may result in serious<br />
personal injury.<br />
SKU 96264 for technical questions, please call 1-800-444-3353.<br />
Page 2
4.<br />
5.<br />
6.<br />
7.<br />
8.<br />
9.<br />
10.<br />
11.<br />
12.<br />
13.<br />
14.<br />
15.<br />
dress properly. do not wear loose clothing or jewelry. contain long hair.<br />
keep your hair, clothing, and gloves away from moving parts. Loose clothes,<br />
jewelry, or long hair can be caught in moving parts.<br />
do not overreach. keep proper footing and balance at all times. Proper footing<br />
and balance enables better control of the tool in unexpected situations.<br />
use safety equipment. always wear eye protection. Dust mask, nonskid safety<br />
shoes, hard hat, or hearing protection must be used for appropriate conditions. Always<br />
wear ANSI-approved safety goggles and a dust mask/respirator when using<br />
or performing maintenance on this tool.<br />
do not force the tool. use the correct tool for your application. The correct<br />
tool will do the job better and safer at the rate for which it is designed. Do not force<br />
the tool and do not use the tool for a purpose for which it is not intended.<br />
store idle tools out of reach of children and other untrained persons. <strong>Tools</strong><br />
are dangerous in the hands of untrained users. Never allow children to play <strong>with</strong><br />
the <strong>Pocket</strong> Hole Jig or any of the <strong>accessories</strong>.<br />
Maintain tool <strong>with</strong> care. keep drill bit sharp and clean. Properly maintained<br />
tools <strong>with</strong> a sharp cutting edge are less likely to bind and are easier to control. Do<br />
not use a damaged tool. Tag damaged tools “Do not use” until repaired.<br />
check for misalignment or binding of moving parts, breakage of parts, and any<br />
other condition that may affect the tool’s operation. if damaged, have the tool<br />
serviced before using. Many accidents are caused by poorly maintained tools.<br />
use only <strong>accessories</strong> that are recommended by the manufacturer for your<br />
model. Accessories that may be suitable for one tool may become hazardous<br />
when used on another tool.<br />
Maintain labels and nameplates on the tool. These carry important information.<br />
If unreadable or missing, contact <strong>Harbor</strong> <strong>Freight</strong> <strong>Tools</strong> for a replacement.<br />
Maintain a safe working environment. Make sure there is adequate surrounding<br />
workspace. Do not use this product in a damp or wet location.<br />
when using a handheld power tool, always maintain a firm grip on the tool<br />
<strong>with</strong> both hands to resist starting torque.<br />
warning: some dust created by power sanding, sawing, grinding, drilling,<br />
and other construction activities, contains chemicals known [to the state of<br />
california] to cause cancer, birth defects or other reproductive harm. Some<br />
examples of these chemicals are:<br />
Lead from lead-based paints<br />
Crystalline silica from bricks and cement or other masonry products<br />
Arsenic and chromium from chemically treated lumber<br />
Your risk from these exposures varies, depending on how often you do this type of<br />
SKU 96264 for technical questions, please call 1-800-444-3353.<br />
Page 3
work. To reduce your exposure to these chemicals: work in a well ventilated area,<br />
and work <strong>with</strong> approved safety equipment, such as those dust masks that are specially<br />
designed to filter out microscopic particles. (California Health & Safety Code<br />
§ 25249.5, et seq.)<br />
unPacking<br />
When unpacking, check to make sure that the item is intact and undamaged. If any<br />
parts are missing or broken, please call <strong>Harbor</strong> <strong>Freight</strong> <strong>Tools</strong> at the number shown on the<br />
cover of this manual as soon as possible.<br />
asseMbly/oPeration instructions<br />
Note: For additional information regarding the parts listed in the following pages,<br />
refer to the Assembly Diagram near the end of this manual.<br />
1.<br />
The <strong>Pocket</strong> Hole Jig can be mounted to a wooden workbench <strong>with</strong> the included<br />
Mounting Screws (28) using the four recessed mounting <strong>hole</strong>s in the Base (1)<br />
through the use of the portable “L” Base (25). It can also be used in a purely portable<br />
fashion. (see figure 1)<br />
figure 1<br />
Mounting <strong>hole</strong>s<br />
Mounting <strong>hole</strong>s<br />
note: If the <strong>Pocket</strong> Hole Jig is going to be used as a portable device, it is advised that it<br />
be mounted on a piece of scrap wood (not included). Mounting the <strong>Pocket</strong> Hole Jig<br />
to a piece of wood increases the stability of the tool and improves performance.<br />
2.<br />
3.<br />
Slide the Drill Guides (4 & 5) onto the Drill Guide Rod (3). The drill bit measurements<br />
on the Inscribed Drill Guide (4) should be facing outwards. (see figure 2)<br />
Align the indexing lines on the back of the Drill Guides (5) <strong>with</strong> the rule on top of<br />
the mounting bracket.<br />
SKU 96264 for technical questions, please call 1-800-444-3353.<br />
Page 4
4.<br />
5.<br />
knob (8)<br />
drill guide (5)<br />
drill guide<br />
rod (3)<br />
figure 2<br />
inscribed drill<br />
guide (4)<br />
Tighten the Knob (8) until the Drill Guides are held securely in the proper location<br />
for drilling.<br />
Square the two workpieces to be joined and mark the intended drilling area. Set<br />
one of the workpieces between the Drill Guides and the Toggle Clamp (13). Back<br />
off the nut in the Toggle Clamp screw and turn the screw all the way into the sleeve.<br />
Swing the Toggle Handle (12) alll the way forward. Unscrew the Toggle Clamp (13)<br />
until the soft face of the clamp rests against the workpiece. Ease back on the hand<br />
and back off the screw by one-eighth of a turn. Turn the locking nut and force it<br />
against the sleeve (finger tight). For increased clamping force, the screw length may<br />
further be extended by rotating it in or out of the sleeve. (see figure 3)<br />
drill guides (4,5)<br />
toggle<br />
clamp (13)<br />
clamp nut (14)<br />
1/2” adjusting screws<br />
(15) in storage area<br />
figure 3<br />
SKU 96264 for technical questions, please call 1-800-444-3353.<br />
toggle handle<br />
(12)<br />
Page 5
note: Secure workpiece only as tightly as needed to hold solidly. Overtightening the<br />
Toggle Clamp (13) can damage wood pieces, especially soft woods, such as pine,<br />
cedar etc.<br />
6.<br />
7.<br />
Choose the distance desired between the pocket <strong>hole</strong>s and use the ruler on top of<br />
the fixed L Base (2) to adjust the workpiece as needed in the <strong>Pocket</strong> Hole Jig.<br />
The Bushings (2) on the Drill Guides (4,5) are intended for different size materials.<br />
For materials 1-1/4” and 1-1/2” thick, use the Bushings closest to the Knob (8).<br />
For materials 1/2”, 3/4” or 1” thick use the Bushings that are nearest to the Toggle<br />
clamp (13).<br />
figure 4<br />
bushings (6)<br />
for drilling material<br />
1-1/4” to<br />
1-1/2” thick<br />
bushings (6)<br />
for drilling<br />
materials 1/2”,<br />
3/4” or 1” thick<br />
note: to drill 1/2” material only: In order to drill 1/2” material correctly, the two 1/2”<br />
Elevation Screws (15) need to be screwed<br />
into the lower face of the Drill Guides (4,5).<br />
drill guide (5)<br />
After the 1/2” Elevation Screws are in place,<br />
the workpiece must be rested on top of the<br />
1/2” Elevation Screws (15) before being<br />
secured by Toggle Clamp (13). If the 1/2”<br />
inscribed drill<br />
Elevation Screws (15) are not in place then<br />
guide (4)<br />
any <strong>hole</strong> drilled in 1/2” material will not be<br />
correct. (see figure 5)<br />
1/2” elevation<br />
note: When not required, keep the Elevation<br />
screws (15) in<br />
Screws in the <strong>hole</strong>s between the mounting<br />
place on drill<br />
<strong>hole</strong>s, as shown in figure 3.<br />
guides (4, 5)<br />
8.<br />
<strong>Pocket</strong> <strong>hole</strong>s do not go all the way through<br />
the piece of wood. To drill a proper pocket<br />
<strong>hole</strong>, the Depth Collar (23) is utilized. To limit<br />
the depth of the <strong>hole</strong> drilled, place the Depth<br />
figure 5<br />
SKU 96264 for technical questions, please call 1-800-444-3353.<br />
Page 6
9.<br />
10.<br />
Collar (23) on the Step Drill Bit (22). Drilling depth is adjusted by changing the position<br />
of the Depth Collar (23) on the shank of the Step Drill Bit (22). The “Step” of the<br />
Drill Bit is the area where the Drill Bit portion stops and the plain metal rod portion<br />
begins. Attaching the Depth Collar closer to the Step will render a shallower <strong>hole</strong>,<br />
attaching the Depth Collar further from the Step will make a deeper pocket <strong>hole</strong>.<br />
When the depth is decided, secure the Depth Collar (23) by tightening the Set Screw<br />
(24) on the side <strong>with</strong> the 2.5mm Hex Wrench (20). (see figure 6)<br />
set screw (24)<br />
step<br />
depth collar (23)<br />
figure 6<br />
Place the Step Drill Bit (22), <strong>with</strong> the Depth Collar (23) attached, into a drill (not<br />
included) and tighten the drill chuck firmly. Without turning the drill on, place about<br />
half the length of the bit into the Drill Guide <strong>hole</strong> that has been selected, but do not<br />
yet engage the workpiece. Power the drill up to full speed and then slowly drill into<br />
the workpiece until the Depth Collar (23) reaches the top of the Drill Guide (6). Remove<br />
the Step Drill Bit (22) and repeat the process to drill other <strong>hole</strong>s as needed.<br />
Once drilling is complete, release the clamp, remove the workpiece from the <strong>Pocket</strong><br />
Hole Jig, and clean away wood shavings.<br />
note: If using the included self-tapping screws (16-19) pocket <strong>hole</strong>s only need to be drilled<br />
into one of the workpieces. No pre-drilling is required on the second workpiece.<br />
11.<br />
1.<br />
2.<br />
Apply glue, (not included) if desired, to the ends being joined. Select the correct<br />
screw for the application and place it into the pocket <strong>hole</strong>. Screw into the second<br />
workpiece until the two pieces are tightly connected.<br />
<strong>Portable</strong> l base<br />
The <strong>Portable</strong> L Base (25) allows the Drill Guides to be utilized <strong>with</strong>out the entire<br />
<strong>Pocket</strong> Hole Jig being moved. Loosen the Knob (8) and remove both Drill Guides<br />
(4, 5) from the Drill Guide Rod.<br />
Attach the Drill Guides (4, 5) to the <strong>Portable</strong> L Base (25), using the Socket Head<br />
Cap Screws (26) and Washers (27). Using the 3mm Hex Wrench (21), attach the<br />
Inscribed Drill Guide (4) to the fixed mounting <strong>hole</strong> on the right side of the <strong>Portable</strong><br />
L Base. Attach the other Drill Guide (5) to the floating connection on the left side<br />
of the <strong>Portable</strong> L Base. (see figure 7)<br />
SKU 96264 for technical questions, please call 1-800-444-3353.<br />
Page 7
3.<br />
inscribed<br />
drill guide (4)<br />
<strong>Portable</strong> l<br />
base (25)<br />
figure 7<br />
head cap<br />
screws (26) &<br />
washers (27)<br />
The <strong>Portable</strong> L Base (25) can now be used to drill pocket <strong>hole</strong>s as described in the<br />
previous directions.<br />
insPection, Maintenance, and cleaning<br />
BEFORE EACH USE, inspect the general condition of the tool. Check for loose<br />
screws, misalignment or binding of moving parts, cracked or broken parts, and any other<br />
condition that may affect its safe operation. Do not use damaged equipment.<br />
THE MANUFACTURER AND/OR DISTRIBUTOR HAS PROvIDED THE PARTS LIST AND ASSEM-<br />
BLY DIAGRAM IN THIS MANUAL AS A REFERENCE TOOL ONLY. NEITHER THE MANUFACTURER<br />
OR DISTRIBUTOR MAKES ANY REPRESENTATION OR WARRANTY OF ANY KIND TO THE BUYER<br />
THAT HE OR SHE IS qUALIFIED TO MAKE ANY REPAIRS TO THE PRODUCT, OR THAT HE OR<br />
SHE IS qUALIFIED TO REPLACE ANY PARTS OF THE PRODUCT. IN FACT, THE MANUFACTURER<br />
AND/OR DISTRIBUTOR ExPRESSLY STATES THAT ALL REPAIRS AND PARTS REPLACEMENTS<br />
SHOULD BE UNDERTAKEN BY CERTIFIED AND LICENSED TECHNICIANS, AND NOT BY THE<br />
BUYER. THE BUYER ASSUMES ALL RISK AND LIABILITY ARISING OUT OF HIS OR HER REPAIRS<br />
TO THE ORIGINAL PRODUCT OR REPLACEMENT PARTS THERETO, OR ARISING OUT OF HIS<br />
OR HER INSTALLATION OF REPLACEMENT PARTS THERETO.<br />
SKU 96264 for technical questions, please call 1-800-444-3353.<br />
Page 8
8<br />
Parts list & asseMbly diagraM<br />
Part description Qty<br />
1 Base 1<br />
2 L Base (fixed) 1<br />
3 Drill Guide Rod 1<br />
4 Inscribed Drill Guide 1<br />
5 Drill Guide 1<br />
6 Bushings 4<br />
7 Washer 5/16” (not shown) 1<br />
8 Knob 1<br />
9 Countersink Head Cap Screw<br />
M5x20mm (not shown)<br />
10 Countersink Head Cap Screw<br />
M5x15mm (not shown)<br />
11 Socket Head Cap Screw M5x10mm 4<br />
12 Toggle Handle 1<br />
13 Toggle Clamp 1<br />
14 Clamp Nut 1<br />
3<br />
2<br />
6<br />
25<br />
record Product’s serial number here:<br />
5<br />
4<br />
26<br />
27<br />
Note: If product has no serial number, record month and year of purchase instead.<br />
13<br />
SKU 96264 for technical questions, please call 1-800-444-3353.<br />
2<br />
1<br />
1<br />
14<br />
Part description Qty<br />
15 1/2” Depth Elevation Screw<br />
M4x6mm<br />
16 5/8” self-tapping Screws 25<br />
17 1” self-tapping Screws 25<br />
18 1-1/4” self-tapping Screws 25<br />
19 1-1/2” self-tapping Screws 25<br />
20 2.5mm Hex Wrench 1<br />
21 3mm Hex Wrench 1<br />
22 3/8” Step Drill Bit 1<br />
23 Depth Collar 1<br />
24 2.5 mm Set Screw (not shown - in<br />
Depth Collar)<br />
25 <strong>Portable</strong> L Base 1<br />
26 Socket Head Cap Screws 2<br />
27 Washer 2<br />
28 Mounting Screws 4<br />
Note: Some parts are listed and shown for illustration purposes only, and are not available individually as replacement parts.<br />
28<br />
11<br />
20<br />
23<br />
21<br />
22<br />
15<br />
12<br />
2<br />
1<br />
Page 9


