Simkits Simulation Hardware - Avsim
Simkits Simulation Hardware - Avsim
Simkits Simulation Hardware - Avsim

Create successful ePaper yourself
Turn your PDF publications into a flip-book with our unique Google optimized e-Paper software.
AVSIM Online - Flight <strong>Simulation</strong>'s Number 1 Site!<br />
Publisher: N/A<br />
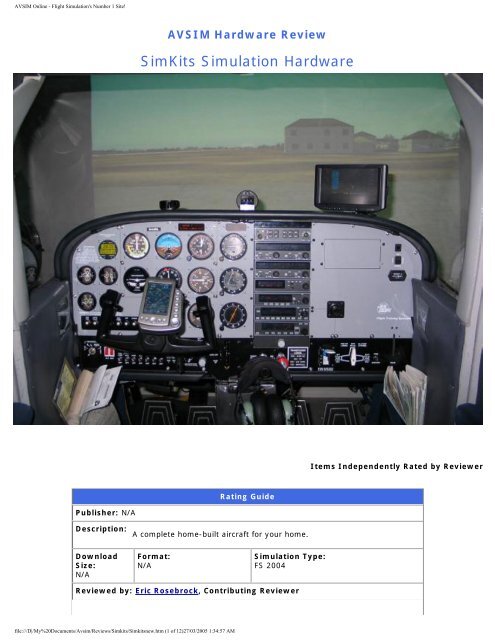
AVSIM <strong>Hardware</strong> Review<br />
SimKits <strong>Simulation</strong> <strong>Hardware</strong><br />
Rating Guide<br />
Description: A complete home-built aircraft for your home.<br />
Download<br />
Size:<br />
N/A<br />
Format:<br />
N/A<br />
<strong>Simulation</strong> Type:<br />
FS 2004<br />
Reviewed by: Eric Rosebrock, Contributing Reviewer<br />
file:///D|/My%20Documents/<strong>Avsim</strong>/Reviews/<strong>Simkits</strong>/<strong>Simkits</strong>new.htm (1 of 12)27/03/2005 1:34:57 AM<br />
Items Independently Rated by Reviewer
AVSIM Online - Flight <strong>Simulation</strong>'s Number 1 Site!<br />
Introduction<br />
The AVSIM Commercial Rating System: 1 Star to 5 Stars (with 5 stars being<br />
exceptional) Please see details of our review rating policy here .<br />
When you think of public Flight <strong>Simulation</strong> nowadays, you probably envision your favorite simulator, Fly!, XPlane, Microsoft<br />
Flight Simulator, on a desktop PC with possibly a joystick or a yoke / rudder pedal combination. This is the standard<br />
configuration for most end users. Now, a company called The Real Cockpit (SimKits) out of the Netherlands has taken an<br />
attempt to revolutionize the home simulator experience with their innovative products.<br />
SimKits has a wide range of products that target enthusiasts who desire to build their own home cockpits with moving<br />
instruments, switches, throttles, circuit breakers and more. Targeting the hardcore simulation lovers out there, they have<br />
come really close to pushing the edge with their technology.<br />
In the past, only large companies such as Frasca, military and commercial simulators have had the physical moving<br />
instruments available. This of course came with a price tag that was unreachable by many enthusiasts. SimKits has<br />
unleashed an entire new market which has allowed users such as me to take the dive and build their own dream cockpits.<br />
In this review, I will discuss my experiences with their products and company, both good and bad. In addition, I will<br />
provide you with insight to finding the resources you may need to accomplish your goal in building a cockpit solution that<br />
you can enjoy.<br />
Planning Your Cockpit<br />
Sold!<br />
When you plan your VFR cross-country flight to your favorite $100 hamburger joint, you take many things into<br />
consideration: weather, airspace, airports, your skills and etc. About the only difference in planning your home cockpit is<br />
that it may not be harmful, but it could cost you dearly if you make a mistake.<br />
You should carefully review all of the available options. There are many alternatives than going solely with one company,<br />
and I would like to emphasize that. You do not need to buy all of the parts you need from one place. There are many<br />
compatible parts that can save you a lot of money in the long run.<br />
When I planned my cockpit, I had researched for almost a year. After watching the SimKits website, and researching their<br />
forums, I decided to give their company a shot. I bought my fuselage from a local salvage company and then purchased<br />
the SimKits equipment I needed. This is an expensive hobby, so it must be taken very seriously before you purchase!<br />
There’s a lot of hidden things that I discovered at later stages of my building that created obstacles which I wish were<br />
avoided. However, the level of complexity allows for an interesting project; it could have been easier all along with proper<br />
guidance.<br />
file:///D|/My%20Documents/<strong>Avsim</strong>/Reviews/<strong>Simkits</strong>/<strong>Simkits</strong>new.htm (2 of 12)27/03/2005 1:34:57 AM
AVSIM Online - Flight <strong>Simulation</strong>'s Number 1 Site!<br />
Simkit Instruments<br />
From the left seat The whole console<br />
As innovating as they appear the SimKits instruments work fairly well. In this section, I will discuss each of the instruments<br />
and how they work for me. There are some problems I have with a few of them, but overall they work well. Keep in mind,<br />
these are my own opinions, and you or someone else may have an entirely different experience than I have.<br />
Attitude Indicator<br />
The attitude indicator is fairly nice. It indicates a maximum of 90 degrees bank on each side. If you roll the aircraft, the<br />
attitude indicator stops on one side. When you roll through the opposite bank angle, the indicator snaps to the other side.<br />
This is simply the way it was designed, and it’s not a flaw. You really shouldn’t be rolling a Cessna anyways.<br />
Assembly Note: I did not like the fact that I had to paint the aircraft reference indicator. Many other instruments I<br />
received from SimKits had painted needles; however this one required an orange paint which I had to put my instrument<br />
on hold to go find.<br />
When I received mine, it was missing the knob to adjust the aircraft reference indicator. This was later replaced by SimKits<br />
in a subsequent order.<br />
I give this instrument a 9/10 rating for operation.<br />
Altimeter<br />
The altimeter is the most dreaded instrument by many SimKits builders. I’ve read quite a few people discussing how<br />
complicated it was, so I waited until last to build this instrument. I wanted to hone my skills at building the other<br />
instruments before I took a shot at this one, however the story goes on.<br />
The attitude indicator is a very complex piece of equipment. A handful of gears, two servo motors, and a photo sensor go<br />
into it to make it all work. It is a masterful design; however it still needs some attention in my opinion.<br />
The altimeter is designed to automatically return to a Zero altitude during startup. To achieve this, SimKits uses a photo<br />
sensor to read the position of the altimeter. From my understanding of this mechanism, it aligns on the edge of a gear<br />
wheel. There’s a black sensor at the top and a white sensor at the bottom. As the gear spins around, the teeth in the gear<br />
create a strobe affect by momentarily blocking the view between the two sensors. A measurement is taken by the software<br />
to gain its bearings and determine where the actual gear should be positioned at Zero. This is supposed to ensure that the<br />
calibration works properly, however it has caused me many headaches.<br />
During my first assembly attempt, I noticed that the pressure scale was incorrect. It appeared that the Inches of Mercury<br />
(Hg) scale was printed upside down. After further inspecting it, I also noticed a misprint of the scale where the numbers<br />
were out of sequence. Even further investigating made me realize that the scale was not the same increments that most<br />
General Aviation aircraft use. The scale was of odd increments such as: 28.95, 29.09, 29.24 and etc. The actual altimeter<br />
in Flight Simulator 2004 corresponds with the real aircraft: 28.9, 29.0, 29.1, 29.2, etc. After reporting this to SimKits, they<br />
agreed to make a computer graphic available to me which I printed out and put on the pressure scale wheel. This fixed the<br />
incrementing issue, and I made a suggestion to enhance the calibration software to take finer measurements during<br />
calibration. Currently 30.18 on the pressure scale is 29.92 in the simulator. I simply resort to using the “B” key to auto set<br />
my altimeter until this fix arrives.<br />
file:///D|/My%20Documents/<strong>Avsim</strong>/Reviews/<strong>Simkits</strong>/<strong>Simkits</strong>new.htm (3 of 12)27/03/2005 1:34:57 AM
AVSIM Online - Flight <strong>Simulation</strong>'s Number 1 Site!<br />
The other problem I have with the Altimeter is that I cannot get it to stay calibrated very well. After taking it apart so many<br />
times, I managed to break the photo sensor and I ordered additional ones to have on hand in the event the replacement<br />
breaks again. The ten thousand foot indicator, which is the small inner wheel with the very small pointer, never points to<br />
the right altitude unless I’m at zero foot elevation. As you start to climb, the spread of the indicator becomes less accurate.<br />
When I’m at 4,000 ft MSL, the ten thousand foot indicator reads more like 8,000 ft MSL. I’ve calibrated this instrument<br />
over 15 times and I’ve just about given up on it. In the Cessna 172, you don’t go near 10,000 ft, so it’s not a major issue<br />
for me.<br />
Overall, when the Altimeter wants to work properly, it’s a good instrument!<br />
I give this instrument a 4/10 rating for operation.<br />
Heading Indicator<br />
I had quite a few problems building my heading indicator. Mostly, the compass card and the heading bug would get out of<br />
control and start spinning together. This is basically a one shot assembly, meaning that once you put it together, there’s<br />
not a whole lot you can do to fix it. You have to take a soldering iron and melt some plastic tabs down to secure the<br />
compass card to the gear wheel it mounts to. This also secures the heading bug, and in turn makes the assembly mated<br />
for life. If you take it apart, you’ll need new parts to fix it.<br />
After failing miserably at assembling the heading indicator, I ordered spare parts for it, and at the same time, I ordered an<br />
assembled heading indicator. The heading indicator I received assembled by SimKits works OK.<br />
One of the complaints I have about the heading indicator is the Push-to-Turn heading bug. The push-to-turn knobs on the<br />
real instruments require you to push in about ¼ inch to turn it. It’s almost not even noticeable that you have to push them.<br />
To set the heading bug on the SimKits altimeter, you have to push the knob about ½ to ¾ of an inch inwards against a<br />
spring. When the spring is compressed, the gearwheel on the knob makes contact with the heading bug wheel and then<br />
allows you to change heading bug. Many times while setting the heading bug, the compass card turns with it. When you<br />
have the bug set, the compass card sets back to the heading you’re on. This whole process puts a lot of effort into<br />
changing the heading bug and it also appears to put a lot of stress on the instrument.<br />
To change the SimKits Heading Indicator compass card (gyro drift) heading, you do not have to push the knob inwards to<br />
change the heading. The knob turns easily and freely and so does your compass card.<br />
I give this instrument a 7/10 rating for operation.<br />
VOR Indicators<br />
The VOR indicators work very well despite the sensitivity. When you are adjusting the compass card at a reasonable rate,<br />
the needle can swing through a radial rather quick due to the delay in receiving information from the simulator to the servo<br />
motor. You have to turn the knob extremely slow.<br />
The indicators have TO / FROM, Off Flag, Glide Slope indicators to make it a very realistic instrument.<br />
I give the VOR instruments a rating of 8/10 for operation.<br />
ADF Indicator<br />
The ADF Indicator has not been so friendly for me. There are a few things I would like to point out.<br />
First, I had to repaint the needle because you could see where the painting was not so good from the factory. I could see<br />
the black plastic through the yellow paint, so I had to touch it up.<br />
Second, you have to push-to-turn to change the compass card. I’ve still yet to find an aircraft ADF that does the same<br />
thing.<br />
Third, the needle turns the compass card with it. This is probably my fault somehow. I have to take it apart to try and fix it<br />
(again), but it’s almost the same setup as the Heading Indicator except there’s no heading bug.<br />
I give this instrument a rating of 3/10 until I can fix it.<br />
file:///D|/My%20Documents/<strong>Avsim</strong>/Reviews/<strong>Simkits</strong>/<strong>Simkits</strong>new.htm (4 of 12)27/03/2005 1:34:57 AM
AVSIM Online - Flight <strong>Simulation</strong>'s Number 1 Site!<br />
Turn Coordinator<br />
The turn coordinator is one of my favorite instruments produced by SimKits. Its brilliant design makes for flawless<br />
operation. There’s barely any lag that I could notice and both the needle and the ball work as intended. This is a sharp<br />
looking instrument!<br />
I give this instrument a rating of 10/10 for operation.<br />
General Instruments<br />
The General Instrument kit is very impressive. Basically, SimKits was brilliant enough to release an instrument with around<br />
20 different faceplates. You can have one as your Tachometer, another as your Vertical Speed and so on. There are<br />
faceplates for all types of variations of aircraft, including Cessna 172 / 182, Beechcraft and others. Each General<br />
instrument you buy comes with a complete set of faceplates, so if you don’t use them you can pin them on the wall or<br />
make coasters out of them! Dual purpose design!<br />
There are a few instruments that have lag in them. I feel this is due to Flight Simulator 2004 pushing the information to<br />
the screen. Somewhere I read that the instruments update at 3 frames per second, and that’s apparent in the VSI<br />
instrument in my SimKits panel. I am aware that the VSI is a lag instrument, but the effect I’m seeing is the jerky motion<br />
of the servo / needle.<br />
Some of this jerky motion has been attributed to using non-powered USB ports. I’ve tried 3 different powered USB 2.0<br />
hubs from CyberMedia, Dynex, Targus and even the direct connection to the computer. I have still not been able to<br />
overcome this.<br />
The assembly of the general instruments is very easy and you can’t really mess it up.<br />
I give these instruments a rating of 9/10 for operation.<br />
Small Instruments (Fuel, AMP, EGT)<br />
These small instruments have always worked flawlessly for me. Each instrument utilizes two servo motors to turn the<br />
needles. They are extremely straight forward and they calibrate very well.<br />
I give these instruments a 10/10 rating for operation.<br />
Overall Instrument Comments<br />
One of the things that bugs me the most about the instruments is the poor lighting. All of the instruments use 5v lamps<br />
and they are extremely dim. They create a “cone” spanning from the top of the instrument to the bottom, so you actually<br />
can only see about 60% of the instrument when lighted. In my simulator, I installed some Glare Shield lighting to help with<br />
this.<br />
Next, a big complaint other SimKits builders have made is the fact that you have to glue the instrument together. Now, this<br />
is in the process of being fixed. Some of my instruments VOR1, VOR2, ADF have a long screw and a nut that affixes the<br />
front plate to the lower housing and allows you to avoid the glue.<br />
Overall, I think SimKits is on the right track to creating some really cool products. I just wonder how long before the quirks<br />
are ironed out. The only way to truly find out is to see what someone else has to say at a later date.<br />
<strong>Simkits</strong> Other Parts:<br />
In addition to instruments, SimKits also has other parts you’ll need to build your cockpit. Let’s take a look at them now.<br />
file:///D|/My%20Documents/<strong>Avsim</strong>/Reviews/<strong>Simkits</strong>/<strong>Simkits</strong>new.htm (5 of 12)27/03/2005 1:34:57 AM
AVSIM Online - Flight <strong>Simulation</strong>'s Number 1 Site!<br />
Annunciator Panel<br />
The GPS<br />
SimKits has designed a great looking Annunciator Panel replica for the Cessna aircraft. This is a great addition to the<br />
simulator and it works as designed. Full Test mode lights up all of the segments. There’s also a dimmer so you can flip it to<br />
dim. I’ve had occasions where the annunciator panel lit for low fuel, low voltage and etc, and I find this to be very cool! It’s<br />
also a checklist item to test it!<br />
I give this panel a rating of 10/10 for operation.<br />
Digital Clock<br />
A replica of the Davtron 800 Electric clock, this SimKits clock is very neat. You can watch your outside air temperature,<br />
voltage (even drops when the alternator is turned off), flight time, local time, enroute time and etc. The clock has a timer<br />
and works just like the real thing!<br />
I give this clock a 10/10 for operation.<br />
Flap Handle / Indicator<br />
The flap handle and indicator are also one of my favorite toys from SimKits. They are replicas of the Cessna 172 indicators<br />
and they work like a dream. The flap handle requires you to push the handle out of the detent and then change the<br />
position. It uses spring loading to do this. The flap indicator is a needle/lever mounted onto a servo motor which allows<br />
positioning that corresponds with your flap settings. I am highly impressed with this setup!<br />
The flap handle receives a 10/10 rating for operation!<br />
Trim Wheel and Indicator<br />
The trim wheel is a fair piece of equipment. Its size is scaled down to fit into the TRC472 panel that SimKits sells. It’s about<br />
1/3 the size of the real trim wheel in the aircraft. The wheel has about 7 turns of rotation and it spins a potentiometer to<br />
send the signal to the computer.<br />
The trim wheel indicator is basically a mechanism that uses a pin guided by the position of the trim wheel. When I received<br />
my trim wheel, the pin was missing, and I had to fabricate something to fix it, instead of waiting around for a pin to come<br />
in. The indicator is also complicated to determine if it’s positioned in dead center. You have to make a marking on the<br />
panel because there is no center mark. I would recommend putting an arrow pointing to the pin so that you can find the<br />
center.<br />
I give the trim wheel an 8/10 rating for operation.<br />
Throttles / Mixture<br />
The throttles and mixture controls are as real as they get. They’re the real thing! SimKits took the real controls and cut the<br />
cable off at about 8-10 inches of forward travel. They devised a mechanism which connects the throttle cable to a sliding<br />
potentiometer.<br />
file:///D|/My%20Documents/<strong>Avsim</strong>/Reviews/<strong>Simkits</strong>/<strong>Simkits</strong>new.htm (6 of 12)27/03/2005 1:34:57 AM
AVSIM Online - Flight <strong>Simulation</strong>'s Number 1 Site!<br />
One problem I had with the throttles and mixture is the retaining “collars” that they used on the throttle cable to guide the<br />
slide potentiometer were too small. This allowed the potentiometer tab to slip out of place and the throttle position would<br />
not change the potentiometer. I found some larger “collars” from a local hobby shop and put a washer on the inside of<br />
each collar to prevent the potentiometer from slipping.<br />
I give the throttles / mixtures a rating of 10/10 for operation – after I fixed them.<br />
SimKits Yoke<br />
The yoke is interesting. The price is rather high too, considering you have to assemble it yourself and its not much more<br />
than a few pieces of tack welded metal and some bushings. The standalone yoke can be purchased for around $415 US.<br />
The one major advantage of this yoke is that it can do full 180 degree turn (90 left, 90 right), which most commercial flight<br />
simulator yokes only do around 90 degree turn at 45 left, 45 right. This is what makes all the difference in realism and feel.<br />
One complaint I do have is that the handle is extremely cheap quality. It’s made out of very light weight plastic and the<br />
yoke itself has no weight. It just doesn’t have the same feel as the real airplane, or even the competing yokes on the<br />
market in the same price range. The handle itself is barely the quality of a CH Yoke handle. The SimKits Yoke does work<br />
well, but overall I would say it’s satisfactory. You’ll also need some type of controller to run this yoke, so plan to spend<br />
money on the central control board as well. There is no USB or even serial connection; you must have an external<br />
controller. Gotcha!<br />
No buttons, no POV hat, nothing. It’s just a basic yoke handle. You can install your own, but then you’ll have a headache<br />
figuring out how to hook it up to something. You’ll need a Phidgets (http://www.phidgetsusa.com) card or an Epic card to<br />
get the buttons working.<br />
One more thing to note: there are no crossover connector mechanisms for two yokes. That is something that you’ll have to<br />
design on your own. I’m working on one right now and I’ll post how I did it on my website in the future.<br />
I give the yoke a rating of 6/10 for operation.<br />
SimKits Controller Boards:<br />
At the time that I write this review, there are three controller boards available. They are: Central Control Unit (CCU) Single<br />
Engine / Multi-Engine, Standby Avionics Controller and the Radio Stack Controller. I own the Single Engine CCU and the<br />
Radio Stack Controllers.<br />
The CCU is proprietary in my opinion. You can’t really do much outside the box with them. They are designed to work only<br />
with SimKits instruments and equipment. The software that drives these instruments is designed for the specific purpose.<br />
Unlike Epic Cards or Phidgets, you can’t program anything extra for them unless you understand how to use the SimKits<br />
Software Development Kit (SDK).<br />
SimKits has recently released an announcement containing information about input / output boards. From my<br />
understanding, these boards will allow you to map inputs to the simulator and use them for whatever you desire. Phidgets<br />
(http://www.phidgetsusa.com) also has the same thing, and for probably a lower price. At least we have options!<br />
file:///D|/My%20Documents/<strong>Avsim</strong>/Reviews/<strong>Simkits</strong>/<strong>Simkits</strong>new.htm (7 of 12)27/03/2005 1:34:57 AM<br />
Prepping for installation The "guts" are in
AVSIM Online - Flight <strong>Simulation</strong>'s Number 1 Site!<br />
Controller Board Problems<br />
When I first received my CCU, I received an older version (CCU1) which had been modified (by SimKits) to allow other<br />
instruments to function properly, such as the VOR and the Digital Clock. However, there was something wrong with my<br />
CCU and the digital clock and the VOR did not work properly, so I had to RMA it to SimKits. They sent me a new board and<br />
digital clock with an order that I placed and I returned the defective board and the other digital clock that was not defective<br />
back to them. The new CCU they sent me was the CCU2 and it worked just fine. I’m not sure how I ended up with the<br />
CCU1 in the first place, but overall, I’m up and running with the replacement board.<br />
Now, as described later in this article, my Radio Stack Controller is defunct and not working properly. I await an RMA to<br />
take place to get it fixed. See “Radio Stack Problems” later in this review.<br />
TRC472 Panel and Glare Shield<br />
The panel and glare shields are nice. You have an option to buy only half the panel, or the full panel. They also have wood<br />
or metal panels and panel enclosures. All the switches and instruments mounted without problem in the panels and the full<br />
size panel mounted in the actual aircraft like a champ!<br />
Even if you don’t plan to use SimKits, I think their panel and glare shield are a must have! You can always mount other<br />
things, or affix a monitor behind it.<br />
Just for your information, there is an alternative by FlightDeck Solutions. While it’s not as nice yet, it’s much less<br />
expensive.<br />
The Radio Stack:<br />
The radio stack is an impressive piece of equipment. There obviously was a lot of time, research and development that<br />
went into this Bendix King replica. Each radio is a separate unit which allows you to simply purchase only what you need.<br />
The dimensions, look and feel are the same as the real radios, making it an exceptional replica.<br />
You can purchase an entire tower enclosure for around $3600 USD if you want a desktop solution.<br />
The radios available are the following:<br />
KMA28 Audio Panel<br />
The Radio Stack<br />
The Audio Panel (COM Panel) is interesting. However, its quality is still to be desired. When you have a button depressed,<br />
such as NAV1, you can see the light glowing through the other buttons. I have discussed this with SimKits and they offered<br />
me a replacement when they get a better product made.<br />
The volume knobs do not work with FS2004, so they are really just eye candy, but that’s also understandable. You can<br />
change which radio you’re listening to by pressing the COM1, COM2 buttons, so that’s pretty nice to have when you’ve got<br />
4 frequencies setup for your airport departure / arrival.<br />
file:///D|/My%20Documents/<strong>Avsim</strong>/Reviews/<strong>Simkits</strong>/<strong>Simkits</strong>new.htm (8 of 12)27/03/2005 1:34:57 AM
AVSIM Online - Flight <strong>Simulation</strong>'s Number 1 Site!<br />
KX155A/165A NAV/COM<br />
The NAV/COM panels are the most used and they are very nice. I’ve yet to have a problem worth noting with them. They<br />
have standby frequencies on all stations, navigational operation modes (built-in CDI), frequency swap buttons, pull buttons<br />
for odd number frequencies, channels and much more. Very cool product!<br />
KN62A DME<br />
The DME is not really one of my favorites either. Its quality isn’t that great, however it works and that’s important. The<br />
slider switch is difficult to move because there’s not enough of it sticking out of the panel. You practically have to use your<br />
fingernail to switch the mode. This particular radio is also brighter than all of the others, so that is kind of annoying as well.<br />
KT76CT Transponder<br />
The Transponder is impressive. You have all of the modes of a normal transponder. In addition, you can see what flight<br />
level your transponder is squawking and you can also see a simulated radio sweep (the R) when the tower is painting you.<br />
One problem though. I’ve never been able to get my VFR button to switch to 1200. There is a CLR button there, and when<br />
I press that, it takes me to 1200. I think they may have cross wired or put something in the wrong place.<br />
KR87 ADF<br />
It’s an ADF! Since my ADF indicator doesn’t work well, I have not messed with this one that much. It does have a<br />
frequency swap and a standby frequency. SimKits is working on a new driver to handle the frequency changing a little<br />
better. Sometimes, you can skip numbers very easily, for example dialing 308 you can accidentally get 318 or 408 etc. It’s<br />
very sensitive to touch.<br />
KAP140 Autopilot<br />
The Autopilot module is also very nice. You have a complete range of functions. Altitude, Heading, Roll, Vertical Speed,<br />
NAV, APPR, and etc. It works very well and it’s a good module to have!<br />
Note: when using the Autopilot modules, you will have to center your trim wheel. There’s no interconnectivity between the<br />
two. The trim wheel has no inputs going to it to adjust the position based on what autopilot is doing. If you’re shooting an<br />
autopilot approach, and your aircraft is trimmed by autopilot, when you turn off the autopilot, you could get an adverse<br />
pitch in an instance.<br />
Radio Stack Problems<br />
I have personally had a few problems with my radio stack. For example, when I received the radios, the Autopilot<br />
segments would not light up. I decided to take it upon myself to investigate, so I took it apart and discovered that a 14 pin<br />
connector inside of it was misaligned and two pins were not inserted into the plug, while the other 12 pins were in the<br />
wrong slots. I was not very pleased with this because it obviously had not been tested before sent to me. To take the<br />
autopilot apart, I had to break apart a knob and then glue it back together.<br />
Next, I was overpowered by the brightness of the radio stack. The LCD screens were glowing so bright that I thought I was<br />
looking at the sun (mild exaggeration). After discussing it with SimKits support, I was advised to hook a potentiometer to a<br />
3 pin connector on the radio stack controller board to regulate the lighting. The board ships with a jumper across these<br />
three pins, grounding it out and making it full bright. After doing so, I was able to regulate the lighting down, but at the<br />
same time, I started losing the quality of the actual segments. I would still have this orange glow, although dim, it was still<br />
visible. The glow was the rectangular shape of the LCD. I am not pleased with the quality of the LCD segments and the<br />
ability to see the background. What is more displeasing, is the fact that the pictures on their website are 3d models and<br />
even their manual makes it look like a perfect product, when in reality, it’s of less quality. That’s one of the drawbacks of<br />
internet shopping.<br />
At one point, I had an RMA setup for my radio stack because the transponder stopped working properly and the audio<br />
panel stopped functioning. I fully tested everything out, disconnected and reconnected but no luck. After letting my<br />
simulator sit for a week without doing anything, it started working again. Luckily I was able to save myself an expensive<br />
shipping bill due to the issue magically sorting itself out.<br />
Dealing with the Company (Support, Sales, Customer Service)<br />
file:///D|/My%20Documents/<strong>Avsim</strong>/Reviews/<strong>Simkits</strong>/<strong>Simkits</strong>new.htm (9 of 12)27/03/2005 1:34:57 AM
AVSIM Online - Flight <strong>Simulation</strong>'s Number 1 Site!<br />
When building a project like I have done, you need close relations with the company who’s providing you with the product,<br />
especially if there are things that aren’t documented, or not easily found. Over the past 2 months, I have had good times<br />
and bad times when dealing with SimKits customer service / support. The bad times definitely could have been avoided, if<br />
they would have treated me with courtesy on those occasions they were annoyed at me for being so nit picky about the<br />
small details.<br />
Overall, the support staff answered my questions quickly, and most of the time gave me the answers I needed, even<br />
though there is a time difference of around 7 hours from East Coast USA to the Netherlands, and there’s also a language<br />
barrier. Overall, I think they’ve done a good job at answering straight forward questions. It’s the in-depth questions, or the<br />
problem reporting where the dark side shows.<br />
From my experience, they do not like you reporting (in private or not) defects or faults in their product (Altimeter, Radio<br />
Stack, etc) and things can get out of hand rather quickly. They appear to have a hard time accepting and end-user bringing<br />
light on a problem with their product. I have also had instances where attempts have been made to silence me on their<br />
forums and on my own personal website for discussing issues with the products in public. That is one thing that I do not<br />
respect in a company is when they try to censor people for discussing problems they’ve had, or discussing alternatives to<br />
their products.<br />
My Overall Recommendation<br />
Overall, I am very pleased with the end results of my simulator. It’s been a long road to getting here, and I can tell you<br />
that flying my simulator is a great experience. Sure, I’ve still got quirks to iron out, but that’s the name of the game.<br />
If you want to spend the money on something as elaborate as this, then go for it. I’d give my recommendation for SimKits.<br />
I’ve discussed the small problems I’ve had with their products and their support, but in the end, I know they’ll make things<br />
right with their product if they listen to the end-user and avoid showing resistance to change.<br />
If you don’t want to spend the money on the products, grab yourself an input / output card from somewhere for the<br />
switches, and then grab some wood and make a mask to place over a flat screen monitor. Make your own panels. It’s much<br />
cheaper and takes about the same effort for nearly the same result in the end.<br />
Be patient! Take your time. This is a product and a company that requires extreme patience to work with.<br />
Looking into the cabin while in flight The view from the "back seat" The view outside<br />
The Last Gotcha!<br />
The one shocking thing that I found out about SimKits is this disclaimer / “General Conditions” that is at the bottom of their<br />
manuals you download from their website (no, they do not ship you printed manuals).<br />
“SimKit products may only be used for personal entertainment and may not be resold or used to create Flight Simulators,<br />
PC ATD's or PC FTD's for resale as complete products. You must agree with the SimKits General Conditions before opening<br />
the plastic bags with parts. Opening the plastic bags means that you agree fully with the SImKit General Conditions. If you<br />
do not agree, you are entitled to send back the unopened kit for a full refund. No warranty applies to kits.”<br />
From my perspective, if I purchase a product, it becomes my property. I should be able to do whatever I want with it as<br />
long as I provide the proper liability for it. I own the property, and it should be my rights to resell it or do whatever I want.<br />
file:///D|/My%20Documents/<strong>Avsim</strong>/Reviews/<strong>Simkits</strong>/<strong>Simkits</strong>new.htm (10 of 12)27/03/2005 1:34:57 AM
AVSIM Online - Flight <strong>Simulation</strong>'s Number 1 Site!<br />
I would not expect SimKits to support someone I sold the product to, so I don’t see what the big problem is.<br />
This is almost like going to a lumber yard to buy wood for building a house. When you’re all loaded up and driving out of<br />
the parking lot, you see a sign facing you saying: “You cannot use this wood to build a house, and you cannot resell<br />
anything you make from the wood.”<br />
I can understand SimKits reasoning for the PCATD or PCFTD, because they probably do not want liability for any kind of<br />
accidents or false training someone may receive, however you can’t build a Flight Simulator? You can’t resell it when you<br />
get bored with it? That’s quite an expensive investment for something you may lose interest in, or want to get rid of at a<br />
later date.<br />
About The Author<br />
I have been an aviation enthusiast my entire life. At 28 years old, I’ve been working in the aviation industry for ten years. I<br />
started out as a C-130H Crew Chief for the United States Air Force, and then progressed into a C-130E Flight Engineer,<br />
where I finished my 10-year career in the US Air Force. I have been given the best aviation training possible, including<br />
advanced systems knowledge, performance data calculations, instrument training and more. I’ve logged nearly 1,000 hours<br />
as a Flight Engineer in the C-130 and I also flew quite a bit as a Crew Chief in my earlier days.<br />
Now, I am a private pilot and I enjoy flying Cessna 172 R / SP aircraft for fun. I am working on my instrument ratings and<br />
may go all the way towards the commercial ratings when time permits. As my personal project, I have built a Cessna 172<br />
R / SP replica using SimKits equipment and other fabricated parts that my friends and I have made. You may visit my<br />
project website to find out more information about my findings, experiences, and where to get things you need.<br />
I take aviation seriously, and with that in mind, I treat simulation no differently. I believe that simulation, when used<br />
properly, can aide and assist you in real world scenarios and also teaches you proper habits.<br />
Printing<br />
If you wish to print this review or read it offline at your leisure, right click<br />
on the link below, and select "save as"<br />
<strong>Simkits</strong> <strong>Simulation</strong> <strong>Hardware</strong><br />
(adobe acrobat required)<br />
Tell A Friend About this Review!<br />
Standard Disclaimer<br />
The review above is a subjective assessment of the product by the author. There is no<br />
connection between the producer and the reviewer, and we feel this review is<br />
unbiased and truly reflects the performance of the product in the simming<br />
environment. This disclaimer is posted here in order provide you with background<br />
information on the reviewer and connections that may exist between him/her and the<br />
contributing party.<br />
file:///D|/My%20Documents/<strong>Avsim</strong>/Reviews/<strong>Simkits</strong>/<strong>Simkits</strong>new.htm (11 of 12)27/03/2005 1:34:57 AM<br />
© 2005 - AVSIM Online<br />
All Rights Reserved<br />
Click below to add your<br />
comments!
AVSIM Online - Flight <strong>Simulation</strong>'s Number 1 Site!<br />
file:///D|/My%20Documents/<strong>Avsim</strong>/Reviews/<strong>Simkits</strong>/<strong>Simkits</strong>new.htm (12 of 12)27/03/2005 1:34:57 AM