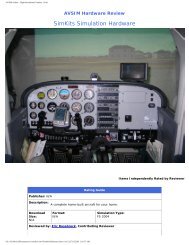
AVSIM Commercial Hardware Review Saitek - X52 Flight Control
AVSIM Commercial Hardware Review Saitek - X52 Flight Control
AVSIM Commercial Hardware Review Saitek - X52 Flight Control

Create successful ePaper yourself
Turn your PDF publications into a flip-book with our unique Google optimized e-Paper software.
<strong>AVSIM</strong> Online - <strong>Flight</strong> Simulation's Number 1 Site!<br />
<strong>AVSIM</strong> <strong>Commercial</strong> <strong>Hardware</strong> <strong>Review</strong><br />
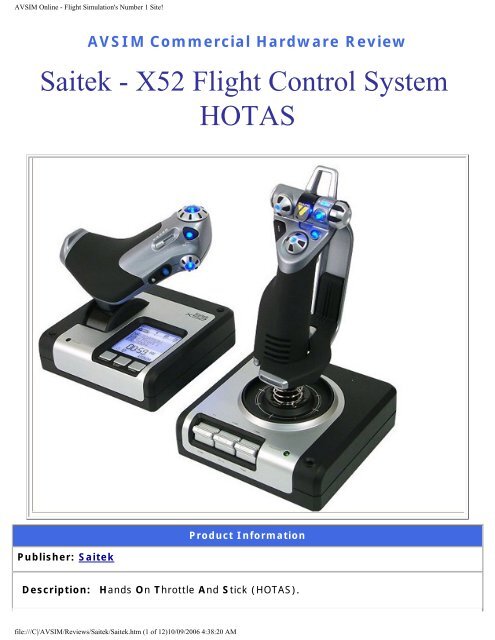
<strong>Saitek</strong> - <strong>X52</strong> <strong>Flight</strong> <strong>Control</strong> System<br />
Publisher: <strong>Saitek</strong><br />
HOTAS<br />
Product Information<br />
Description: Hands On Throttle And Stick (HOTAS).<br />
file:///C|/<strong>AVSIM</strong>/<strong>Review</strong>s/<strong>Saitek</strong>/<strong>Saitek</strong>.htm (1 of 12)10/09/2006 4:38:20 AM
<strong>AVSIM</strong> Online - <strong>Flight</strong> Simulation's Number 1 Site!<br />
<strong>Review</strong>ed by: Brian Fletcher <strong>AVSIM</strong> Sr Staff <strong>Review</strong>er - September 11, 2006<br />
Introduction<br />
Even though the vast majority of simmers use some type of joystick, if you do not have<br />
one of only a handful of Hands On Throttle And Stick (HOTAS) controllers that can operate<br />
all of the necessary functions in <strong>Flight</strong> Sim, then you need to pay close attention to this<br />
review.<br />
What separates the <strong>X52</strong> from most other HOTAS controllers is that it has the ability to<br />
control every function in every <strong>Flight</strong> Simulator that I tested it with, which completely<br />
eliminates the need to use the keyboard. Plus, the throttle portion of the <strong>X52</strong> has a mouse<br />
control feature which can be used in place of a normal mouse to move the cursor in any<br />
sim, and in fact, in most Windows programs and games.<br />
The <strong>X52</strong> is a two-piece HOTAS; one of which is the stick / joystick portion, and the other<br />
being the throttle. Combined, the two controllers provide the simmer with an enormous<br />
amount of functions and controls that can be tripled by use of the mode selector, which<br />
allows you to designated three different functions for each button and switch.<br />
One of the eye catching features of the <strong>X52</strong> is the LED display built into the base of the<br />
throttle controller. This provides the date, GMT, two additional time zones defined as you<br />
wish, mode selected, profile information, and has a chronometer of sorts. Also pleasing to<br />
the eye are the 11 lighted buttons, which can be adjusted to provide dim to bright blue<br />
backlighting, or no lighting at all if you so choose.<br />
But the biggest selling point for me is the comfort of the <strong>X52</strong>. Because this HOTAS is in<br />
two pieces, you can place the joystick and throttle wherever you wish, and the rubber<br />
grips and 5 position adjustable palm rest provide maximum comfort and minimal fatigue.<br />
And to top it all off, both of the <strong>X52</strong> controllers are constructed of part metal and part hard<br />
plastic, which combine to form an extremely resilient HOTAS.<br />
Of course, not every simmer will become as fond of the <strong>X52</strong> as I have, and after almost<br />
two decades of flight simming I can understand why. I have found that many sim<br />
enthusiasts grow attached to their joysticks, especially after modifying them to fit their<br />
needs. In fact, it took years of prodding from my fellow simmers before I entertained the<br />
idea of upgrading from my Microsoft Sidewinder to the <strong>Saitek</strong> X45, the predecessor of the<br />
<strong>X52</strong>.<br />
In this review I am going to show you what the <strong>Saitek</strong> <strong>X52</strong> has to offer, and why I was<br />
willing to give it a chance. You can then decide if it is something worth looking into, and<br />
you can also determine for yourself if the cost-value is suitable. To do this I am going to<br />
cover the controller and the SST Programming Software, which allows you to configure the<br />
<strong>X52</strong> to your liking and lets you save profiles for different Sims and users.<br />
We will begin this review by visiting <strong>Saitek</strong>’s website at http//:www.saitek.com, where the<br />
file:///C|/<strong>AVSIM</strong>/<strong>Review</strong>s/<strong>Saitek</strong>/<strong>Saitek</strong>.htm (2 of 12)10/09/2006 4:38:20 AM
<strong>AVSIM</strong> Online - <strong>Flight</strong> Simulation's Number 1 Site!<br />
<strong>X52</strong> can be purchased for $99.00, which is reasonably discounted from the $160.00 I had<br />
to pay at a leading US electronics store. While visiting the website I took notes of what<br />
features <strong>Saitek</strong> claims the <strong>X52</strong> to have and compared them to my findings. Now let’s go<br />
find out why this HOTAS is more than just another controller, but a real “<strong>Flight</strong> <strong>Control</strong><br />
System”.<br />
Installation<br />
The <strong>Saitek</strong> <strong>X52</strong> is accompanied by an installation<br />
CD including manuals, drivers, and the SST<br />
Programming Software. You can choose which of<br />
these items you wish to install, but the driver will<br />
be required in order for your controller to function<br />
properly. To do this, you will need to click on the<br />
box next to “Install drivers and SST Programming<br />
Software”, and then follow the onscreen<br />
instructions. During this process, Windows will<br />
detect the hardware and you follow the<br />
instructions given.<br />
After the driver is installed, you will be asked<br />
whether or not you wish to install the SST Software, which I highly recommend doing. This<br />
step will only take a brief moment and will place a shortcut to the program on your<br />
desktop. Though you do not need to install this program in order for the <strong>X52</strong> to function<br />
properly, it does provide a user-friendly interface for programming the <strong>X52</strong> to your liking.<br />
You may also use the installation CD to view the manual for the SST Software, which is a<br />
fairly inclusive walk-through of how to use the program.<br />
Even though the <strong>X52</strong> driver is included on the CD, you should visit the <strong>Saitek</strong> website on a<br />
regular basis to ensure that you always have the most recently updated drivers. The driver<br />
downloads are free and easy to install, plus they will keep your controller performing to its<br />
maximum potential. While at the website, you can also visit the FAQ page to answer any<br />
questions you may have about the <strong>X52</strong> and download SST profiles.<br />
The Joystick<br />
The joystick portion of the <strong>X52</strong> sits atop a part metal, part plastic base measuring<br />
approximately 7” wide, 7” deep and about 2” high. There is a 1 ¾” gap between the base<br />
and the bottom of the stick where the coil spring is located, which when combined with the<br />
7 ½” height of the stick itself, makes for an overall height of about 9 ¼” inches off the<br />
base and 11 ¼ inches off your desktop.<br />
The base can be mounted to your desktop by use of the two existing holes in the front<br />
right and rear left of the base, or by using the four supplied suction cups, but the weight of<br />
the base will keep it in place on just about any surface, keeping you from having to drill<br />
holes in your desk. However, if you would like to mount the base, but do not want to ruin<br />
your desk, you can use screw clamps (not included).<br />
file:///C|/<strong>AVSIM</strong>/<strong>Review</strong>s/<strong>Saitek</strong>/<strong>Saitek</strong>.htm (3 of 12)10/09/2006 4:38:20 AM
<strong>AVSIM</strong> Online - <strong>Flight</strong> Simulation's Number 1 Site!<br />
On the front of the base you will notice three<br />
spring loaded 2-way toggle switches. These<br />
switches are numbered T1 through T6, and all<br />
have a blue back light seen through the center<br />
handle of the switches. To the right of the<br />
switches is a green light that indicates the<br />
controller is plugged in and activated, just in case<br />
you have turned off the backlighting.<br />
Moving up on the joystick, you will come across a<br />
pull out lock for the rudder twist feature. When<br />
pushed in, the joystick will twist a little over an<br />
inch either direction to allow you to control the<br />
rudders, but when pulled out, this axis will not move. I should note however, that even<br />
with the rudder lock pulled out, it is possible to twist the joystick just enough to affect the<br />
rudder movement but this lock will keep you from accidentally twisting the joystick during<br />
forceful maneuvers.<br />
Next to the rudder axis lock is the palm rest, which can be relocated to one of five<br />
positions to fit any simmer's flying hand. To adjust the palm rest you will need to loosen<br />
the nut on the back of the joystick enough to pull the palm rest out of the inset, and<br />
simply reposition it and tighten the nut. Unfortunately for the south paws out there, the<br />
palm rest can only be positioned on the right side of the joystick, just as the throttle is<br />
designed to be used with the left hand.<br />
While you’re adjusting the joystick to your liking, you will notice two trigger buttons<br />
located on the backside of the stick. The lower trigger controls one function by a sliding<br />
movement, and the upper trigger has two stages to control two different functions. The<br />
first stage of the upper trigger is activated by depressing the trigger up to the half-way<br />
point, and the second stage is activated by continuing to depress the trigger further, which<br />
is indicated by a clicking sound.<br />
file:///C|/<strong>AVSIM</strong>/<strong>Review</strong>s/<strong>Saitek</strong>/<strong>Saitek</strong>.htm (4 of 12)10/09/2006 4:38:20 AM
<strong>AVSIM</strong> Online - <strong>Flight</strong> Simulation's Number 1 Site!<br />
On the top of the stick is where the bulk of the buttons are located, which include two 8way<br />
hat switches, two fire buttons, an additional button with a spring loaded safety cover,<br />
a flat button, and a three way rotary knob used to select one of three modes, or up to six<br />
when used in conjunction with the pinkie trigger. The mode you are in can be deciphered<br />
by the light to the left side of the rotary knob that changes from green to orange to pink.<br />
We will learn more about mode selection when we discuss the SST Programming Software.<br />
In addition to the aforementioned features, <strong>Saitek</strong> has also included what they call a<br />
precision centering mechanism that “…uses non contact technology on the X and Y axis<br />
and constant spring force to reduce free play and improve control and durability". What<br />
this means for the simmer is swift response, constant tension, and a long service life for<br />
your joystick.<br />
From any angle, the joystick portion of the <strong>X52</strong> is, in my opinion, just about as good as it<br />
gets. I have found it to be comfortable and I am pleased with the array of buttons,<br />
switches, and knobs which, as I will explain later, can be configured to function the<br />
controls however you want them to, in most <strong>Flight</strong> Simulators. But there is more to the<br />
<strong>X52</strong> than the joystick; let’s go take a look at the throttle.<br />
The Throttle<br />
The throttle portion of the <strong>X52</strong> is just as eventful, if not more so, than the joystick. This<br />
controller begins with a base similar in size to the joystick base that can be mounted in the<br />
same manner, but includes a built-in LED display to keep you informed of a number of<br />
things. The top line of the blue backlit display notifies you of what mode you are in from<br />
mode 1 to mode 3. This is changed by the rotary knob on the joystick. As you change the<br />
mode on the joystick, the number in the top left corner of the LED display will change<br />
file:///C|/<strong>AVSIM</strong>/<strong>Review</strong>s/<strong>Saitek</strong>/<strong>Saitek</strong>.htm (5 of 12)10/09/2006 4:38:20 AM
<strong>AVSIM</strong> Online - <strong>Flight</strong> Simulation's Number 1 Site!<br />
instantaneously.<br />
Also included in the display is the date, GMT, and<br />
two additional times as defined by the user. You<br />
can choose to set one of the digital clocks to the<br />
time zone of your departure and the other to your<br />
arrival area time zone, or perhaps you might set<br />
one to your home time and another to a fellow<br />
simmer's time zone. Also included in this display is<br />
a counter, which can be combined with the other<br />
features to make a decent digital chronometer of<br />
sorts.<br />
And finally, in the center of the display is my<br />
favorite feature; the profile name. This is where<br />
the title that you have given your selected profile<br />
will be displayed, which can be changed through<br />
the SST Programming Software. Below the display you will notice three buttons, one titled<br />
“function”, another labeled “start/stop” and the last titled “reset”. These buttons are used<br />
to change the time displayed, start and stop the digital counter, and reset the counter to<br />
zero.<br />
The throttle handle is positioned on the left side of the LED display behind a green on/off<br />
indicator light, and is rather large when compared to the throttles built in to most<br />
joysticks. The base of the throttle handle has markings indicating when the throttle is set<br />
to 0, 50, 100, and eight points in between. The accuracy of these markings all depends on<br />
how well you have the throttle controller calibrated.<br />
The left side of the throttle handle does not contain any buttons, but it does have a rubber<br />
grip designed to conform to your hand comfortably. There is one scroll wheel with a built<br />
in button that resides on the back of the throttle where your forefinger would rest, but the<br />
rest of the features are conveniently located to the right side of the throttle handle, which<br />
makes for easy access by your thumb.<br />
The buttons in this area include: two rotary controls, an 8-way hat switch, three fire type<br />
buttons, a slider, and a mouse controller that includes a 360 degree rotating lever and a<br />
metal button to act as the left click feature. This mouse feature can be used in place of<br />
your typical mouse, and can be used to make menu selections, move sub-panels, or<br />
anything else. The only downside to this mouse controller is that there is no button to act<br />
as a right click.<br />
file:///C|/<strong>AVSIM</strong>/<strong>Review</strong>s/<strong>Saitek</strong>/<strong>Saitek</strong>.htm (6 of 12)10/09/2006 4:38:20 AM
<strong>AVSIM</strong> Online - <strong>Flight</strong> Simulation's Number 1 Site!<br />
In addition to the previously mentioned functions of the throttle, there is another feature<br />
that I found to be helpful in many situations. I am referring to the two detents in the<br />
throttle axis that indicate when the throttle is set to idle, and when it reaches the<br />
afterburner level. Of course the actual idle and afterburner setting may be affected by the<br />
controller calibration and the sim aircraft itself.<br />
All in all, I found the throttle portion of the <strong>X52</strong> to be a perfect companion for the joystick.<br />
I like the tension in the throttle axis, which is not enough to force the base to move, but<br />
more than enough to prevent any accidental movement. And when you combine the<br />
buttons, knobs, slider, and rotaries with those on the joystick, you have all you need to fly<br />
without the mouse and keyboard. But in order to be able to chuck the keyboard for good,<br />
you will need to be able to triple the functions provided, so let’s go find out how to do that.<br />
SST Programming Software<br />
The <strong>Saitek</strong> Smart Technology (SST) Software is an easy to use program that allows you to<br />
assign functions to each of the buttons, knobs, switches, slider, and rotaries on the <strong>X52</strong>.<br />
You can use this program to make as many profiles as you want, which means that you<br />
can set up your <strong>X52</strong> for each simulator that you use. Since the SST overrides the in-game<br />
controller configuration settings, you will not have to reassign each function if you reinstall<br />
a Sim.<br />
The main page of this software is divided into three sections; the top menu bar, the left<br />
controller identification screen, and the button data menu on the right. The menu bar<br />
gives you the option to change to a full screen data view, save and load profiles, print the<br />
button assignments, and access the help menu. You can experiment with the menu option<br />
to configure the program to your liking, but I find it to be best as it is displayed by default.<br />
file:///C|/<strong>AVSIM</strong>/<strong>Review</strong>s/<strong>Saitek</strong>/<strong>Saitek</strong>.htm (7 of 12)10/09/2006 4:38:20 AM
<strong>AVSIM</strong> Online - <strong>Flight</strong> Simulation's Number 1 Site!<br />
The left side of the screen displays both the joystick and throttle portion of the <strong>X52</strong>, with<br />
one being front and center, and the other to the back left side of the screen. You can<br />
change which controller is closest by simply clicking on it. While selected, you can use the<br />
mouse to rotate the controller to any position you choose, which will allow you a clear view<br />
of the button you want to configure.<br />
To configure a button, you can left click on it which will highlight the applicable data field<br />
on the right side of the screen. In the data field you will need to use your keyboard to<br />
depress the key function that you want that button to operate. After doing this, you can<br />
then click on the top portion of that button's data field and enter a description of that<br />
function.<br />
For example, if I wanted to configure the “C” button on my joystick to extend and retract<br />
the spoilers, then I would start by left clicking on the button on the model of the <strong>X52</strong> on<br />
the left side of the screen. Then I would enter the keyboard command that operates the<br />
spoilers, in FS9 that would be the “ / ” (forward slash). Once assigned, I can then type in a<br />
reminder in the top portion of the “C” buttons data field. Perhaps something along the<br />
lines of “Spoilers extend / retract” or just “Spoilers” would be suitable.<br />
Using the mode selector you can also designate five additional key commands to that<br />
same button. You simply need to change the mode from the<br />
file:///C|/<strong>AVSIM</strong>/<strong>Review</strong>s/<strong>Saitek</strong>/<strong>Saitek</strong>.htm (8 of 12)10/09/2006 4:38:20 AM
<strong>AVSIM</strong> Online - <strong>Flight</strong> Simulation's Number 1 Site!<br />
drop down mode menu on the top of the screen and follow the above steps. While using<br />
<strong>Flight</strong> Sim you can change which mode you are in by rotating the rotary knob on the top<br />
right portion of the joystick, plus you can use the pinkie trigger in conjunction with the<br />
rotary knob to switch through three additional modes.<br />
You can also use the SST Software to program multiple and combination keystrokes. This<br />
will allow you to use the buttons to operate functions in the Sim that would normally<br />
require you to press two or more buttons simultaneously or repeatedly. A good example of<br />
this is the sub panels in FS9 that are opened by use of the “shift” plus applicable number<br />
key. Instead of having to use your keyboard to open and close these panels, you can<br />
simply assign a key in the same manner as above, but by adding the subsequent key<br />
command to the button data.<br />
In addition to assigning commands, you can also configure the hat switches and slider to<br />
your liking. There are a number of ways that you can alter their function and assign what<br />
and how they operate. This procedure takes a little time to master, but the SST Software<br />
manual will tell you all that you need to know to configure these, and in deed all, of the<br />
functions of the <strong>X52</strong>.<br />
Test System<br />
Compaq Presario SR1232<br />
AMD Athlon 2.2 GHz<br />
2 GB Ram<br />
NVIDIA Ge Force FX5500<br />
StarLogic 21” Flat Panel<br />
Monitor @ 1024 X 768<br />
CH USB <strong>Flight</strong> Yoke<br />
CH USB Rudder Pedals<br />
<strong>Saitek</strong> <strong>X52</strong> <strong>Flight</strong> <strong>Control</strong><br />
System<br />
FTP 290 Throttle Quadrant<br />
Bose 5:1 Surround Sound<br />
Laptop<br />
Toshiba Satellite<br />
1.6 GHz Intel Celeron M<br />
512 MB DDR2 SD Ram<br />
Intel Graphics Media<br />
Accelerator 900<br />
Flying Time:<br />
44 hours<br />
Conclusion<br />
file:///C|/<strong>AVSIM</strong>/<strong>Review</strong>s/<strong>Saitek</strong>/<strong>Saitek</strong>.htm (9 of 12)10/09/2006 4:38:20 AM<br />
Given the seemingly endless functions, the comfortable<br />
and authentic design, and the arguably reasonable price<br />
tag of $99.00 USD, I consider the <strong>Saitek</strong> <strong>X52</strong> to be one of<br />
the finest HOTAS controllers available. Some of the<br />
features, such as the separate throttle control, LED<br />
display, and adjustable button lighting add to my cosmetic<br />
likes of this controller. And other functions, such as the<br />
rudder twist, adjustable palm rest, conveniently placed<br />
buttons and switches, mouse controller, and mode<br />
selector, find my approval as well.<br />
There are two aspects of this HOTAS that have made it a<br />
must have in my home cockpit. The first being the ability<br />
to function all necessary <strong>Flight</strong> Sim controls without<br />
accessing my keyboard and mouse, and the second being<br />
the comfort. The latter feature is what has made it so<br />
difficult for me to upgrade joysticks throughout the years,<br />
but I have definitely found a keeper with the <strong>X52</strong>.<br />
Of course, I cannot possibly suggest that every simmer<br />
will feel the same way I do about the <strong>Saitek</strong> <strong>X52</strong> <strong>Flight</strong><br />
<strong>Control</strong> System, but I do think that if you were to give this<br />
HOTAS a chance, you will likely find it to grow on you.<br />
Perhaps the best way to determine if this controller is for<br />
you or not, is to visit your local retail electronics store<br />
where you can get an up close an personal look at the
<strong>AVSIM</strong> Online - <strong>Flight</strong> Simulation's Number 1 Site!<br />
display model. I employed that tactic myself before purchasing my <strong>X52</strong>.<br />
If the $99.00 price tag is a concern to you, then you might want to consider the fact that<br />
this HOTAS comes with one of the most important features of all…survivability. Not only is<br />
the <strong>X52</strong> constructed well, but given the trend of joysticks over the past decade, I don’t see<br />
it going out of style anytime soon. And with FS-X right around the corner, this might be<br />
the perfect time to get your home cockpit in order.<br />
So in case you haven’t noticed, I am definitely very fond of the <strong>X52</strong>, and I place my seal of<br />
approval all over it. I have not found any notable problems with either of the two units<br />
making up this HOTAS, and even though I have had a few problems trying to get certain<br />
features to function properly in different <strong>Flight</strong> Sims, I have managed to overcome those<br />
problems with help from the folks at <strong>Saitek</strong>.<br />
In conclusion, I can only say that I absolutely love my <strong>X52</strong> and couldn’t imagine having to<br />
fly HOTAS equipped sim aircraft without it. And even though I may not be willing to<br />
suggest that you hurry up and get one for yourself, I do highly recommend giving this<br />
product serious consideration. It is, after all, a great way to add that extra bit of frame<br />
rate friendly realism to <strong>Flight</strong> Sim.<br />
file:///C|/<strong>AVSIM</strong>/<strong>Review</strong>s/<strong>Saitek</strong>/<strong>Saitek</strong>.htm (10 of 12)10/09/2006 4:38:20 AM<br />
What I Like About The <strong>Saitek</strong> <strong>X52</strong>
<strong>AVSIM</strong> Online - <strong>Flight</strong> Simulation's Number 1 Site!<br />
● The cost-value seems very reasonable to me.<br />
● There are numerous buttons, switches, rotaries, etc.<br />
● The <strong>X52</strong> can eliminate the need to use the keyboard and<br />
mouse for simming.<br />
● I am more than satisfied with the comfort of each<br />
controller.<br />
● The adjustable blue backlighting of the buttons is a<br />
cosmetic plus.<br />
● Both the joystick and throttle are constructed to handle<br />
the most intense simmers aggression.<br />
● The weighted bases keep the controllers in place very<br />
well, or you can use the mounting options.<br />
What I Don't Like About The <strong>Saitek</strong> <strong>X52</strong><br />
● The throttle controller is designed to be used with the<br />
left hand, which may not accommodate all simmers.<br />
● Even though the twist action can be locked, the joystick<br />
can still be twisted slightly, allowing rudder movement.<br />
● The <strong>X52</strong> is not as compatible with some Sims as it is<br />
with the Microsoft series (FS and CFS).<br />
Printing<br />
If you wish to print this review or read it offline at your<br />
leisure, right click on the link below, and select "save<br />
as"<br />
file:///C|/<strong>AVSIM</strong>/<strong>Review</strong>s/<strong>Saitek</strong>/<strong>Saitek</strong>.htm (11 of 12)10/09/2006 4:38:20 AM<br />
FSC 7.7<br />
(adobe acrobat required)<br />
Comments?
<strong>AVSIM</strong> Online - <strong>Flight</strong> Simulation's Number 1 Site!<br />
Standard Disclaimer<br />
The review above is a subjective assessment of the product by<br />
the author. There is no connection between the producer and<br />
the reviewer, and we feel this review is unbiased and truly<br />
reflects the performance of the product in the simming<br />
environment. This disclaimer is posted here in order to provide<br />
you with background information on the reviewer and any<br />
connections that may exist between him/her and the<br />
contributing party.<br />
file:///C|/<strong>AVSIM</strong>/<strong>Review</strong>s/<strong>Saitek</strong>/<strong>Saitek</strong>.htm (12 of 12)10/09/2006 4:38:20 AM<br />
Tell A Friend About this <strong>Review</strong>!<br />
© 2006 - <strong>AVSIM</strong> Online<br />
All Rights Reserved