AVSIM Commercial Hardware Review Saitek - X52 Flight Control
AVSIM Commercial Hardware Review Saitek - X52 Flight Control
AVSIM Commercial Hardware Review Saitek - X52 Flight Control

You also want an ePaper? Increase the reach of your titles
YUMPU automatically turns print PDFs into web optimized ePapers that Google loves.
<strong>AVSIM</strong> Online - <strong>Flight</strong> Simulation's Number 1 Site!<br />
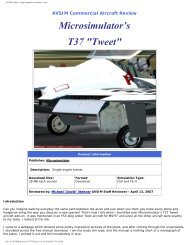
On the front of the base you will notice three<br />
spring loaded 2-way toggle switches. These<br />
switches are numbered T1 through T6, and all<br />
have a blue back light seen through the center<br />
handle of the switches. To the right of the<br />
switches is a green light that indicates the<br />
controller is plugged in and activated, just in case<br />
you have turned off the backlighting.<br />
Moving up on the joystick, you will come across a<br />
pull out lock for the rudder twist feature. When<br />
pushed in, the joystick will twist a little over an<br />
inch either direction to allow you to control the<br />
rudders, but when pulled out, this axis will not move. I should note however, that even<br />
with the rudder lock pulled out, it is possible to twist the joystick just enough to affect the<br />
rudder movement but this lock will keep you from accidentally twisting the joystick during<br />
forceful maneuvers.<br />
Next to the rudder axis lock is the palm rest, which can be relocated to one of five<br />
positions to fit any simmer's flying hand. To adjust the palm rest you will need to loosen<br />
the nut on the back of the joystick enough to pull the palm rest out of the inset, and<br />
simply reposition it and tighten the nut. Unfortunately for the south paws out there, the<br />
palm rest can only be positioned on the right side of the joystick, just as the throttle is<br />
designed to be used with the left hand.<br />
While you’re adjusting the joystick to your liking, you will notice two trigger buttons<br />
located on the backside of the stick. The lower trigger controls one function by a sliding<br />
movement, and the upper trigger has two stages to control two different functions. The<br />
first stage of the upper trigger is activated by depressing the trigger up to the half-way<br />
point, and the second stage is activated by continuing to depress the trigger further, which<br />
is indicated by a clicking sound.<br />
file:///C|/<strong>AVSIM</strong>/<strong>Review</strong>s/<strong>Saitek</strong>/<strong>Saitek</strong>.htm (4 of 12)10/09/2006 4:38:20 AM