CLASSIC SIX METRE NEWSLETTER
CLASSIC SIX METRE NEWSLETTER
CLASSIC SIX METRE NEWSLETTER

Create successful ePaper yourself
Turn your PDF publications into a flip-book with our unique Google optimized e-Paper software.
The first thing to bear in mind is that a reasonably sound hull is the only place to start. If the<br />
hull is old and tired, no amount of secondary reinforcement is likely to work. A well built<br />
wooden hull, with sound plank and hull fastenings and exhibiting no abnormal tendency to<br />
work or flex, is the only worthwhile starting point. The clearest indication of a wooden hull<br />
“working” is usually plank seams showing. On a well found hull it may be possible to stiffen<br />
the hull generally by the traditional method of splining the seams (inserting timber fillets,<br />
glued along both edges to the neighbouring planks). This helps prevent the differential<br />
movement along the plank edges. If that doesn’t work or isn’t an option, we need to go into<br />
more detail about the causes and potential solutions.<br />
Let’s start with the global loads. Almost all sailing boats are resisting loads which try to fold<br />
them up in the middle. The forestay and backstay / runners are all pulling upwards, whilst the<br />
mast pushes down. So we have to try and ensure the hull can resist that. All first-year naval<br />
architects are introduced to the concept of the “ship girder”; they are taught to treat the hull as<br />
a box; the deeper the box, and the stronger the bottom, the better it will be at resisting the<br />
long bending loads. Fortunately a 6M is usually quite a good shape box, being relatively<br />
deep; this is especially fortunate because adding material to resist these longitudinal loads is<br />
difficult once the boat has been built. In a wooden boat, it is usually impossible to effectively<br />
or efficiently add material low down where it is most helpful (near or under the wood keel or<br />
ballast keel), so we are normally looking for ways to support and brace the ends; pillars and<br />
braces for the overhangs, and reinforcing the stem to wood keel or counter to sternpost<br />
connections.<br />
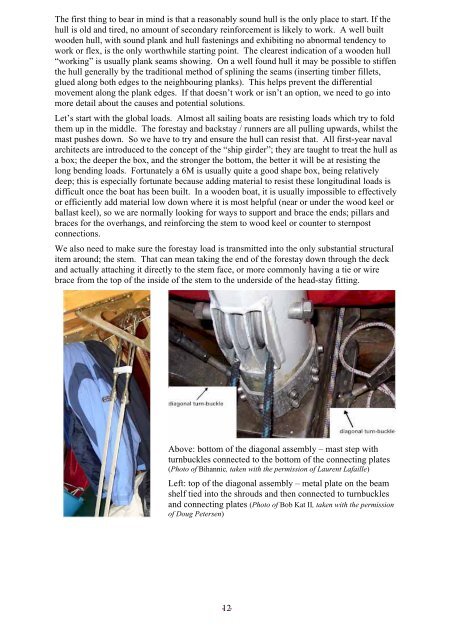
We also need to make sure the forestay load is transmitted into the only substantial structural<br />
item around; the stem. That can mean taking the end of the forestay down through the deck<br />
and actually attaching it directly to the stem face, or more commonly having a tie or wire<br />
brace from the top of the inside of the stem to the underside of the head-stay fitting.<br />
Above: bottom of the diagonal assembly – mast step with<br />
turnbuckles connected to the bottom of the connecting plates<br />
(Photo of Bihannic, taken with the permission of Laurent Lafaille)<br />
Left: top of the diagonal assembly – metal plate on the beam<br />
shelf tied into the shrouds and then connected to turnbuckles<br />
and connecting plates (Photo of Bob Kat II, taken with the permission<br />
of Doug Petersen)<br />
- 12-