DIGIPASS SSO Authentication for CITRIX SmartAccess end ... - Vasco
DIGIPASS SSO Authentication for CITRIX SmartAccess end ... - Vasco
DIGIPASS SSO Authentication for CITRIX SmartAccess end ... - Vasco

You also want an ePaper? Increase the reach of your titles
YUMPU automatically turns print PDFs into web optimized ePapers that Google loves.
<strong>DIGIPASS</strong> <strong>Authentication</strong> to Citrix<br />
XenDesktop with <strong>end</strong>point protection<br />
<strong>SmartAccess</strong> Configuration with Digipass<br />
INTEGRATION GUIDE
Disclaimer<br />
Disclaimer of Warranties and Limitation of Liabilities<br />
All in<strong>for</strong>mation contained in this document is provided 'as is'; VASCO Data Security assumes no<br />
responsibility <strong>for</strong> its accuracy and/or completeness.<br />
In no event will VASCO Data Security be liable <strong>for</strong> damages arising directly or indirectly from any<br />
use of the in<strong>for</strong>mation contained in this document.<br />
Copyright<br />
Copyright © 2010 VASCO Data Security, Inc, VASCO Data Security International GmbH. All<br />
rights reserved. VASCO ® , Vacman ® , IDENTIKEY ® , aXsGUARD, <strong>DIGIPASS</strong> ® and ® logo<br />
are registered or unregistered trademarks of VASCO Data Security, Inc. and/or VASCO Data<br />
Security International GmbH in the U.S. and other countries. VASCO Data Security, Inc.<br />
and/or VASCO Data Security International GmbH own or are licensed under all title, rights and<br />
interest in VASCO Products, updates and upgrades thereof, including copyrights, patent<br />
rights, trade secret rights, mask work rights, database rights and all other intellectual and<br />
industrial property rights in the U.S. and other countries. Microsoft and Windows are<br />
trademarks or registered trademarks of Microsoft Corporation. Other names may be<br />
trademarks of their respective owners.<br />
Integration Guidelines<br />
1 <strong>DIGIPASS</strong> <strong>SSO</strong> <strong>Authentication</strong> to Citrix XenDesktop in High Security Environments
Table of Contents<br />
Disclaimer ...................................................................................................................... 1<br />
Table of Contents ........................................................................................................... 2<br />
1 Abstract .................................................................................................................... 4<br />
2 Reader ...................................................................................................................... 4<br />
3 Overview................................................................................................................... 4<br />
How <strong>SmartAccess</strong> Works <strong>for</strong> XenApp and XenDesktop ................................................... 5<br />
4 Problem Description ................................................................................................. 6<br />
5 Solution .................................................................................................................... 6<br />
6 Technical Concept ..................................................................................................... 8<br />
6.1 General overview .................................................................................................. 8<br />
6.2 Citrix prerequisites ................................................................................................ 8<br />
6.3 IDENTIFIER prerequisites ....................................................................................... 8<br />
7 Citrix Configuration ................................................................................................... 9<br />
7.1 Netscaler <strong>Authentication</strong> configuration ..................................................................... 9<br />
7.2 Web Interface configuration .................................................................................. 10<br />
8 IDENTIFIER DMZ .................................................................................................... 10<br />
8.1 Policy configuration ............................................................................................. 10<br />
8.2 Client configuration ............................................................................................. 13<br />
8.3 LDAP Synchronization .......................................................................................... 14<br />
9 IDENTIFIER LAN .................................................................................................... 14<br />
9.1 Policy configuration ............................................................................................. 14<br />
9.2 Client configuration ............................................................................................. 17<br />
9.3 LDAP Synchronization .......................................................................................... 17<br />
10 <strong>DIGIPASS</strong> <strong>Authentication</strong> <strong>for</strong> IIS basic ................................................................ 18<br />
11 Citrix CAG login with <strong>DIGIPASS</strong> ........................................................................... 19<br />
11.1 Logon ................................................................................................................ 19<br />
2 <strong>DIGIPASS</strong> <strong>SSO</strong> <strong>Authentication</strong> to Citrix XenDesktop in High Security Environments
12 <strong>DIGIPASS</strong> and User Management ......................................................................... 20<br />
12.1 <strong>DIGIPASS</strong> ........................................................................................................... 20<br />
12.2 Users ................................................................................................................. 20<br />
13 Additional functionalities ..................................................................................... 20<br />
13.1 Password change policies ..................................................................................... 20<br />
13.2 <strong>DIGIPASS</strong> provisioning ......................................................................................... 20<br />
14 About VASCO Data Security .................................................................................. 20<br />
3 <strong>DIGIPASS</strong> <strong>SSO</strong> <strong>Authentication</strong> to Citrix XenDesktop in High Security Environments
1 Abstract<br />
<strong>SmartAccess</strong> allows to control the users system requesting access to available applications<br />
published with Citrix XenAPP through the use of Access Gateway Enterprise policies and filters.<br />
This permits the use of <strong>end</strong>point analysis as a condition <strong>for</strong> application access, along with other<br />
factors.<br />
This functionality is achieved by integrating Access Gateway Enterprise<br />
components with the Web Interface <strong>for</strong> Citrix XenApp Server, and Citrix<br />
XenApp Server. This provides advanced authentication and access control.<br />
To protect the user`s identity and the company`s network, the use of static password, the<br />
weakest link in security, should be eliminated and replaced by <strong>DIGIPASS</strong>. <strong>DIGIPASS</strong> by VASCO<br />
provides one-time passwords, which allows the user to logon with a unique time-based password<br />
which can only be used once, within a certain time frame. This one-time password replaces the<br />
static password stored in Active Directory or any other database. VASCO`s strong authentication<br />
<strong>DIGIPASS</strong> allows the use of <strong>DIGIPASS</strong> to log-on with a single one-time password to the multiple<br />
Citrix environments used in by the <strong>SmartAccess</strong> scenario.<br />
<strong>SmartAccess</strong> in combination with <strong>DIGIPASS</strong> offers:<br />
- Citrix Online Applications and Desktops provisioning<br />
- no user-controlled password<br />
- Single Sign On to all sessions<br />
- <strong>SmartAccess</strong> capability, i.e. the ability to influence application properties being connection<br />
properties / context<br />
2 Reader<br />
This document is a guideline <strong>for</strong> configuring a partner product with IDENTIFIER or IDENTIKEY<br />
Server. For details about the setup and configuration of IDENTIEKEY Server and IDENTIFIER, we<br />
refer to the installation and administration manuals of these products. IDENTIFIER is VASCO’s<br />
appliance which by default runs IDENTIKEY Server by default.<br />
Within this document, VASCO Data Security, provides the reader guidelines <strong>for</strong> the configuration<br />
of the partner product with its specific configuration in combination with VASCO Server solutions<br />
and <strong>DIGIPASS</strong>. Any change in the concept might require a change in the configuration of the<br />
VASCO Server products.<br />
The product name`IDENTIFIER`will be used throughout the document keeping in mind that it<br />
also applies to IDENTIKEY Server.<br />
3 Overview<br />
The purpose of this document is to demonstrate how to configure IDENTIFIER and configure<br />
<strong>DIGIPASS</strong> authentication on Citrix Web Interface in a <strong>SmartAccess</strong> configuration.<br />
4 <strong>DIGIPASS</strong> <strong>SSO</strong> <strong>Authentication</strong> to Citrix XenDesktop in High Security Environments
For the standard configuration of the <strong>SmartAccess</strong> configuration we refer to Citrix documentation.<br />
For the standard configuration of <strong>DIGIPASS</strong> integration with CAG/Netscaler/ Web Interface we<br />
refer to the <strong>DIGIPASS</strong> integration guide <strong>for</strong> Citrix CAG.<br />
How <strong>SmartAccess</strong> Works <strong>for</strong> XenApp and XenDesktop<br />
To configure <strong>SmartAccess</strong>, you need to configure the Access Gateway settings on the Web<br />
Interface and configure session policies on the Access Gateway. When you run the Published<br />
Applications Wizard, you can select the session policies you created <strong>for</strong> <strong>SmartAccess</strong>.<br />
When a user types the web address of a virtual server in a web browser, the configured preauthentication<br />
policies are downloaded on to the user’s device. The Access Gateway s<strong>end</strong>s the<br />
pre-authentication and session policy names to the Web interface as filters. If the policy condition<br />
is set to ‘true’, the policy is always sent as a filter name. If the policy condition is not met, the<br />
filter name is not set. This allows you to differentiate the list of published applications and<br />
desktops and the effective policies on a computer running XenApp or XenDesktop based on the<br />
results of the <strong>end</strong>point analysis.<br />
The Web interface contacts the XenApp or XenDesktop server and returns the published resource<br />
list to the user. Any resources that have filters applied to them do not appear in the user’s list<br />
unless the condition of the filter is met.<br />
Endpoint analysis can be configured on the Access Gateway. To configure <strong>end</strong>point analysis, you<br />
create a session policy that enables the ICA proxy setting and which configures a client security<br />
string. When the session policy is configured, you can link the policy to the entire user base or to<br />
users, groups, and virtual servers.<br />
When the user logs on, the <strong>end</strong>point analysis policy runs a security check of the client device<br />
using the client security strings configured on the Access Gateway.<br />
For example, if you want to check <strong>for</strong> a specific version of anti-virus. The client security string in<br />
the expression editor appears as follows:<br />
client.application.av.version == 10.0.2<br />
After the policy is configured, link it to a user, group, virtual server or the entire user base. When<br />
users log-on, the <strong>end</strong>point analyses policy check starts and verifies whether or not the client<br />
device has version 10.0.2 or higher of the installed antivirus installed.<br />
When the <strong>end</strong>point analysis check is successful, the Web Interface portal appears in case the user<br />
is running a clientless session; if not , the Access Interface will appear.<br />
When you are creating a session policy <strong>for</strong> <strong>end</strong>point analyses, the session profile does not have<br />
any pre-configured settings, creating a null profile. The Access Gateway uses the Web Interface<br />
URL configured globally <strong>for</strong> <strong>SmartAccess</strong>.<br />
5 <strong>DIGIPASS</strong> <strong>SSO</strong> <strong>Authentication</strong> to Citrix XenDesktop in High Security Environments
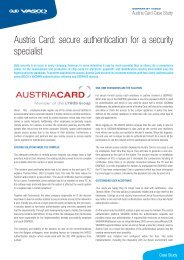
End Point Scenario’s<br />
Publiek Netwerk<br />
Internet<br />
Figure 1: Overview<br />
The basic configuration of Citrix in this <strong>SmartAccess</strong> configuration is based on authentication with<br />
static passwords using existing media (LDAP, RADIUS, local authentication …).<br />
VASCO <strong>DIGIPASS</strong> authentication is by default supported within a Citrix <strong>SmartAccess</strong><br />
configuration, where the one-time password in combination with the static password is verified<br />
(combination of RADIUS and LDAP authentication on Citrix Access Gateway, with <strong>SSO</strong> to<br />
Netscaler and WebInterface)<br />
4 Problem Description<br />
To increase the security at a level where it is `no longer allowed` to use any static<br />
password, does the standard configuration of Citrix and IDENTIFIER with RADIUS and LDAP<br />
verification, not offer the desired results. In this standard solution does the logon screen present<br />
3 fields (user name, static password, OTP).<br />
We are seeking <strong>for</strong> a solution where ONLY the OTP can be used. Working in a <strong>SmartAccess</strong><br />
configuration, also requires that an OTP is checked in each zone, keeping in mind that the user<br />
will enter the OTP only once at initial logon to the CAG and that it is not requesting a second or<br />
third logon when <strong>SSO</strong> authenticates the user on Web Interface.<br />
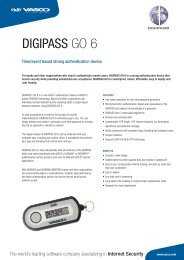
5 Solution<br />
DMZ2 DMZ1<br />
Citrix Access Gateway Citrix NetScaler<br />
After setting up and configuring the IDENTIFIER appliances within 2 of the 3 Citrix zones , the<br />
user only needs the PIN code of his <strong>DIGIPASS</strong> and the one-time password generated by the<br />
<strong>DIGIPASS</strong>. Additionally we install and configure an IIS agent to support <strong>SSO</strong> and password<br />
management.<br />
Resources<br />
Citrix XenApp Farm<br />
Microsoft Active<br />
Directory<br />
Services<br />
Web Interface Web Interface<br />
NetScaler – Network Load Balancing Virtual Server<br />
6 <strong>DIGIPASS</strong> <strong>SSO</strong> <strong>Authentication</strong> to Citrix XenDesktop in High Security Environments
Figure 2: Solution<br />
TCP 1812<br />
7 <strong>DIGIPASS</strong> <strong>SSO</strong> <strong>Authentication</strong> to Citrix XenDesktop in High Security Environments<br />
TCP ??? Get Credentials<br />
Get USR<br />
TCP 80/443<br />
TCP 445 NTLM
6 Technical Concept<br />
6.1 General overview<br />
The main goal of Citrix CAG is to per<strong>for</strong>m authentication in a secure way to set up a secure SSL<br />
VPN connection and retrieve a single sign on to connect to the Web Interface. The use of<br />
<strong>DIGIPASS</strong> , and <strong>DIGIPASS</strong> solely , makes the setup unique and is very different from the<br />
standard 2FA integrations.<br />
We describe the setup in separate chapters , describing the setup <strong>for</strong> each zone. The first zone,<br />
DMZ, will be authenticated by using RADIUS. The second zone containing the Citrix Netscaler<br />
<strong>for</strong>wards the credentials which use the Citrix standard configuration. The third zone, LAN, will use<br />
a <strong>DIGIPASS</strong> Pack <strong>for</strong> Citrix with enhanced functionality interacting with IIS running on the Citrix<br />
Web Interface.<br />
6.2 Citrix prerequisites<br />
Make sure you have an operational setup of the Citrix <strong>SmartAccess</strong> configuration using a static<br />
password(LDAP, eDir, AD,..). It is very important this is working correctly be<strong>for</strong>e you start<br />
implementing the VASCO part.<br />
Current configuration:<br />
• Windows/ Windows 2008R2<br />
• Citrix CAG 9.1<br />
• Citrix Netscaler 9.1<br />
• Citrix XenApp 6.0<br />
• Citrix Web Interface 5.3<br />
All support updates <strong>for</strong> future versions will be available in the <strong>DIGIPASS</strong> <strong>Authentication</strong> <strong>for</strong> Web<br />
Interface , downloadable from www.vasco.com<br />
6.3 IDENTIFIER prerequisites<br />
We assume, you already installed IDENTIFIER , a test user has been created , a domain has been<br />
created, LDAP sync has been configured, <strong>DIGIPASS</strong> is imported and tested locally within the web<br />
administration.<br />
Make sure you can synchronize the LDAP users from AD or any other repository. Check the<br />
manuals <strong>for</strong> configuring the LDAP synchronization in IDENTIFIER.<br />
The quick start guide of IDENTIFIER helps you to configure these basic features.<br />
Throughout this document, we will specify the differences between the IDENTIFIER in the DMZ<br />
zone and the IDENTIFIER in the LAN environment.<br />
8 <strong>DIGIPASS</strong> <strong>SSO</strong> <strong>Authentication</strong> to Citrix XenDesktop in High Security Environments
7 Citrix Configuration<br />
Configure CAG, Netscaler and Web Interface according to the standard procedure of Citrix.<br />
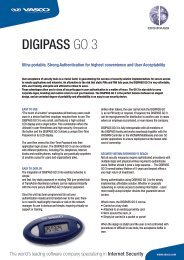
7.1 Netscaler <strong>Authentication</strong> configuration<br />
On the Netscaler in the DMZ you configure the authentication to use RADIUS. LDAP will no longer<br />
be used here. The <strong>DIGIPASS</strong> password will be verified locally against the IDENTIFIER in the DMZ.<br />
Configure the authentication server on the Netscaler with:<br />
• the IP address of the IDENTIFIER<br />
• the shared secret you configured <strong>for</strong> the client in IDENTIFIER<br />
Figure 3: RADIUS config Netscaler<br />
Configure the AG server on port 1080/443. On the first-hop appliance, you also need an AG<br />
server, an LDAP group extractor and a session policy pointing to the WI. You also need at least<br />
one STA bound to the CAG.<br />
To support you in this matter, we refer to the <strong>SmartAccess</strong> Deployment Guide<br />
http://www.jaytomlin.com/citrix/AG/AG-<br />
E%208.0%20<strong>SmartAccess</strong>%20Deployment%20Guide%20Dec%202007.pdf,<br />
9 <strong>DIGIPASS</strong> <strong>SSO</strong> <strong>Authentication</strong> to Citrix XenDesktop in High Security Environments
7.2 Web Interface configuration<br />
Within this <strong>SmartAccess</strong> configuration we configure the Citrix Web Interface being published by<br />
the CAG. Web Interface has to be of the `<strong>Authentication</strong> at Access Gateway` type in Gateway<br />
direct access mode.<br />
8 IDENTIFIER DMZ<br />
Go to the IDENTIFIER web administration page, and authenticate with the administrative account<br />
created during setup.<br />
8.1 Policy configuration<br />
To add a new policy, select PoliciesCreate.<br />
Figure 4: Policy configuration (1)<br />
There are some policies available by default. You can also create new policies to suit your needs.<br />
Those can be indep<strong>end</strong>ent policies or policies from which you inherit the settings by default or<br />
from other policies.<br />
We suggest to create a new policy, without inheritance and give it the name `DMZ`<br />
10 <strong>DIGIPASS</strong> <strong>SSO</strong> <strong>Authentication</strong> to Citrix XenDesktop in High Security Environments
Fill in a policy ID and description.<br />
Figure 5: Policy configuration (2)<br />
In the policy options configure it to use the right back-<strong>end</strong> server. This could be the local<br />
database, but also active directory or another RADIUS server.<br />
This is probably the same as in your default client authentication options be<strong>for</strong>e you changed<br />
them. Or you use the local database, Windows or you go on to another RADIUS server.<br />
In our example we select our newly made DMZ Policy and change it like this:<br />
Local auth.: <strong>DIGIPASS</strong>/Password<br />
Back-End Auth.: None (None)<br />
Back-End Protocol: None (None)<br />
Dynamic User Registration: No (No)<br />
Password Autolearn: No (No)<br />
Stored Password Proxy: No (No)<br />
Windows Group Check: No Check (No Check)<br />
After configuring this policy, the authentication will happen locally in the IDENTIFIER User<br />
credentials are passed on to the IDENTIFIER which will check these credentials against its local<br />
user database and will respond to the client with an Access-Accept or Access-Reject message.<br />
11 <strong>DIGIPASS</strong> <strong>SSO</strong> <strong>Authentication</strong> to Citrix XenDesktop in High Security Environments
In the Policy tab, click the Edit button, and change the Local <strong>Authentication</strong> to<br />
<strong>DIGIPASS</strong>/Password.<br />
Figure 6: Policy configuration (3)<br />
The user details can keep their default settings.<br />
12 <strong>DIGIPASS</strong> <strong>SSO</strong> <strong>Authentication</strong> to Citrix XenDesktop in High Security Environments
Figure 7: Policy configuration (4)<br />
8.2 Client configuration<br />
Now create a new component by right-clicking the Components and choose New Component.<br />
Figure 8: Client configuration (1)<br />
As component type you choose RADIUS Client. The location is the IP address of the client<br />
(Citrix Access Gateway). In the policy field you should find your newly created policy. Fill in the<br />
shared secret you entered in the client <strong>for</strong> the RADIUS options. In our example this was<br />
“VASCO”. Click Create.<br />
Figure 9: Client configuration (2)<br />
Now the client and the IDENTIFIER are set up. We will now see if the configuration is working.<br />
13 <strong>DIGIPASS</strong> <strong>SSO</strong> <strong>Authentication</strong> to Citrix XenDesktop in High Security Environments
8.3 LDAP Synchronization<br />
Configure the IDENTIFIER LDAP synchronization to retrieve user in<strong>for</strong>mation from the user<br />
repository. The Netscaler can re-route that in<strong>for</strong>mation towards the LDAP server.<br />
TIP: check the Administration guide of the IDENTIFIER.<br />
TIP: Logon to the configuration page of the IDENTIFIER to configure LDAP sync.<br />
9 IDENTIFIER LAN<br />
Go to the IDENTIFIER web administration page, and authenticate with the administrative account.<br />
9.1 Policy configuration<br />
To add a new policy, select PoliciesCreate.<br />
Figure 10: Policy configuration (1)<br />
There are some policies available by default. You can also create new policies which suit your<br />
needs. Those can be indep<strong>end</strong>ent policies or policies which inherit their settings by default or<br />
from other policies.<br />
To make things easier, create a new policy, without inheritance and use a practical name. In this<br />
configuration we called the policy `LAN`<br />
14 <strong>DIGIPASS</strong> <strong>SSO</strong> <strong>Authentication</strong> to Citrix XenDesktop in High Security Environments
Fill in a policy ID and description. Choose the option which is most suitable <strong>for</strong> your situation. If<br />
you want the policy to inherit setting from another policy, choose the right policy in the Inherits<br />
From list. Otherwise leave this field to None. In this example we chose not to inherit.<br />
Figure 11: Policy configuration (2)<br />
After configuring this policy, the authentication will happen locally in the IDENTIFIER and the<br />
user`s LDAP credentials will be verified against AD. User credentials are passed on to the<br />
IDENTIFIER, it will check these credentials against its local user database it also checks the AD<br />
password and will respond to the client with an Access-Accept or Access-Reject message. The<br />
client in the LAN will be the IIS on which we installed an agent. This agent is a type of<br />
middleware between IIS and IDENTIFIER.<br />
15 <strong>DIGIPASS</strong> <strong>SSO</strong> <strong>Authentication</strong> to Citrix XenDesktop in High Security Environments
In the Policy tab, click the Edit button, and change the settings to<br />
Local auth.: <strong>DIGIPASS</strong>/Password<br />
Back-End Auth.: If Needed<br />
Back-End Protocol: Mircrosoft AD(LDAP)<br />
Figure12: Policy configuration (3)<br />
In the User tab, click the Edit button, and change the settings to<br />
Dynamic User Registration: No<br />
Password Autolearn: Yes<br />
Stored Password Proxy: Yes<br />
Default Domain: enter the name of your domain<br />
Windows Group Check: No Check<br />
Figure13: Policy configuration (4)<br />
16 <strong>DIGIPASS</strong> <strong>SSO</strong> <strong>Authentication</strong> to Citrix XenDesktop in High Security Environments
9.2 Client configuration<br />
Create a new component by right-clicking the Components and choose New Component. During<br />
setup of the <strong>DIGIPASS</strong> Citrix Web Interface , an administration program, as client type is<br />
required to allow, the creation of an IIS Module client.<br />
Select <strong>for</strong><br />
• Client Type Administration Program<br />
• Location IP address of the IIS server running Web Interface<br />
• Policy ID IDENTIKEY Administration Logon<br />
• Protocol ID SEAL<br />
Figure14: Client Configuration<br />
During the setup of the <strong>DIGIPASS</strong> <strong>for</strong> Citrix Web Interface, allow the creation of the IIS Module<br />
component.<br />
9.3 LDAP Synchronization<br />
Configure the IDENTIFIER LDAP synchronization to retrieve user in<strong>for</strong>mation from the user<br />
repository. In this zone, we sync directly with AD whereas in the DMZ the Netscaler <strong>for</strong>warded<br />
the requests.<br />
TIP: check the Administration guide of the IDENTIFIER.<br />
TIP: Logon to the configuration page of the IDENTIFIER to configure LDAP sync.<br />
17 <strong>DIGIPASS</strong> <strong>SSO</strong> <strong>Authentication</strong> to Citrix XenDesktop in High Security Environments
10 <strong>DIGIPASS</strong> <strong>Authentication</strong> <strong>for</strong> IIS basic<br />
Check the <strong>DIGIPASS</strong> <strong>Authentication</strong> <strong>for</strong> IIS basic installation guide <strong>for</strong> installation instructions.<br />
This <strong>DIGIPASS</strong> installer has to be installed on the server running Citrix Web Interface.<br />
• Once the <strong>DIGIPASS</strong> <strong>Authentication</strong> <strong>for</strong> IIS Basic is installed, open via Start >All<br />
Programs>VASCO><strong>DIGIPASS</strong> <strong>Authentication</strong> <strong>for</strong> IIS basic><strong>DIGIPASS</strong> <strong>Authentication</strong> <strong>for</strong> IIS<br />
basic configuration<br />
• Select Tracing > select Full Tracing. The tracing might help you checking the log files.<br />
Figure15: <strong>DIGIPASS</strong> <strong>Authentication</strong> <strong>for</strong> IIS Basic Configuration<br />
18 <strong>DIGIPASS</strong> <strong>SSO</strong> <strong>Authentication</strong> to Citrix XenDesktop in High Security Environments
• Select Connections > the connections should have been configured already during the setup.<br />
The connection refers to the IP address of the authentication server being the IDENTIFIER. If<br />
set correctly, no changes required.<br />
• Select <strong>Authentication</strong> > Select HTTP Header Filtering<br />
• Check enabled<br />
• Base URL: Enter the path to the Citrix logon page being login.aspx<br />
• Select Header Fields > enter within the User Name field the value `user`, enter within the<br />
Password field the value `password`<br />
• Select Apply and accept to restart the IIS service<br />
The <strong>DIGIPASS</strong> IIS basic configuration is completed.<br />
11 Citrix CAG login with <strong>DIGIPASS</strong><br />
11.1 Logon<br />
For user and <strong>DIGIPASS</strong> assignment, check section 12 in this document.<br />
To start the test, browse to the public IP address or hostname of the CAG.<br />
In our example this is https://test.vasco.com Enter your Username and PIN and <strong>DIGIPASS</strong><br />
Password (one-time password) and click the Logon button.<br />
Figure 2: Response Only<br />
If all goes well, you will be authenticated and be directed to the Citrix Web Interface Portal<br />
publishing your resources.<br />
19 <strong>DIGIPASS</strong> <strong>SSO</strong> <strong>Authentication</strong> to Citrix XenDesktop in High Security Environments
12 <strong>DIGIPASS</strong> and User Management<br />
12.1 <strong>DIGIPASS</strong><br />
The <strong>DIGIPASS</strong> is delivered with a database file, DPX. This file protected by a transport key,<br />
should be loaded on to the IDENTIFIER in the DMZ and once more on to the IDENTIFIER<br />
in the LAN. Be sure that the time settings on both IDENTIFIER appliances is configured correctly.<br />
It is possible to configure the ntp server address.<br />
The <strong>DIGIPASS</strong> devices, represented by a serial number in the IDENTIFIER, can be assigned<br />
manually or automatically . The automated procedures allow user to self-assign a <strong>DIGIPASS</strong> to<br />
their account. It is also possible to automatically assign a <strong>DIGIPASS</strong> to a user without the need<br />
<strong>for</strong> registration. This auto-assignment is interesting <strong>for</strong> <strong>DIGIPASS</strong> Mobile.<br />
To provision the <strong>DIGIPASS</strong> Mobile, see section 13.<br />
12.2 Users<br />
Within this <strong>SmartAccess</strong> configuration, users will be synchronized automatically by means of<br />
LDAP sync.<br />
13 Additional functionalities<br />
13.1 Password change policies<br />
The VASCO server products (IDENTIFIER and IDENTIKEY server) provide the tools to update the<br />
local database with the password changes. These password updates can be treated at the<br />
moment the password is changed or at a later stage.<br />
The Password Sync Tool, providing this functionality is available on www.vasco.com.<br />
13.2 <strong>DIGIPASS</strong> provisioning<br />
VASCO provides a wide range of hardware and software <strong>DIGIPASS</strong> devices. The provisioning<br />
functionalities within VASCO`s server products, like IDENTIKEY and IDENTIFIER, offer the lowest<br />
TCO and a user fri<strong>end</strong>ly provisioning of software and hardware <strong>DIGIPASS</strong>. Check with your<br />
VASCO contact to discuss the possibilities.<br />
14 About VASCO Data Security<br />
VASCO is a leading supplier of strong authentication and e-signature solutions and services specializing in<br />
Internet Security applications and transactions. VASCO has positioned itself as global software company <strong>for</strong><br />
Internet Security serving customers in more than 100 countries, including several international financial<br />
institutions. VASCO’s prime markets are the financial sector, enterprise security, e-commerce and egovernment.<br />
20 <strong>DIGIPASS</strong> <strong>SSO</strong> <strong>Authentication</strong> to Citrix XenDesktop in High Security Environments


![KB [100006] - Vasco](https://img.yumpu.com/12539350/1/184x260/kb-100006-vasco.jpg?quality=85)