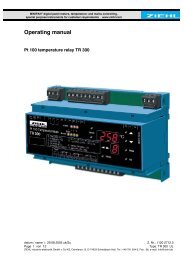
Operating instructions Wireless temperature relay type WR250
Operating instructions Wireless temperature relay type WR250
Operating instructions Wireless temperature relay type WR250

You also want an ePaper? Increase the reach of your titles
YUMPU automatically turns print PDFs into web optimized ePapers that Google loves.
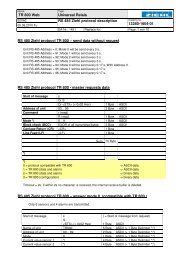
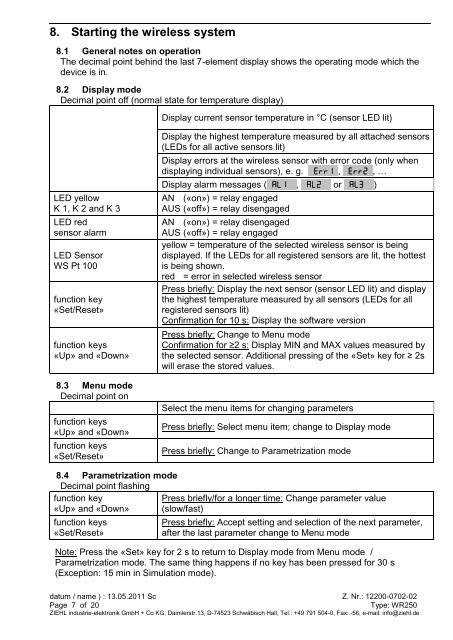
8. Starting the wireless system<br />
8.1 General notes on operation<br />
The decimal point behind the last 7-element display shows the operating mode which the<br />
device is in.<br />
8.2 Display mode<br />
Decimal point off (normal state for <strong>temperature</strong> display)<br />
LED yellow<br />
K 1, K 2 and K 3<br />
LED red<br />
sensor alarm<br />
LED Sensor<br />
WS Pt 100<br />
function key<br />
«Set/Reset»<br />
function keys<br />
«Up» and «Down»<br />
8.3 Menu mode<br />
Decimal point on<br />
function keys<br />
«Up» and «Down»<br />
function keys<br />
«Set/Reset»<br />
8.4 Parametrization mode<br />
Decimal point flashing<br />
function key<br />
«Up» and «Down»<br />
function keys<br />
«Set/Reset»<br />
Display current sensor <strong>temperature</strong> in °C (sensor LED lit)<br />
Display the highest <strong>temperature</strong> measured by all attached sensors<br />
(LEDs for all active sensors lit)<br />
Display errors at the wireless sensor with error code (only when<br />
displaying individual sensors), e. g. 8Err18, 8Err28, …<br />
Display alarm messages (8Al1 8, 8al2 8 or 8al3 8)<br />
AN («on») = <strong>relay</strong> engaged<br />
AUS («off») = <strong>relay</strong> disengaged<br />
AN («on») = <strong>relay</strong> disengaged<br />
AUS («off») = <strong>relay</strong> engaged<br />
yellow = <strong>temperature</strong> of the selected wireless sensor is being<br />
displayed. If the LEDs for all registered sensors are lit, the hottest<br />
is being shown.<br />
red = error in selected wireless sensor<br />
Press briefly: Display the next sensor (sensor LED lit) and display<br />
the highest <strong>temperature</strong> measured by all sensors (LEDs for all<br />
registered sensors lit)<br />
Confirmation for 10 s: Display the software version<br />
Press briefly: Change to Menu mode<br />
Confirmation for ≥2 s: Display MIN and MAX values measured by<br />
the selected sensor. Additional pressing of the «Set» key for ≥ 2s<br />
will erase the stored values.<br />
Select the menu items for changing parameters<br />
Press briefly: Select menu item; change to Display mode<br />
Press briefly: Change to Parametrization mode<br />
Press briefly/for a longer time: Change parameter value<br />
(slow/fast)<br />
Press briefly: Accept setting and selection of the next parameter,<br />
after the last parameter change to Menu mode<br />
Note: Press the «Set» key for 2 s to return to Display mode from Menu mode /<br />
Parametrization mode. The same thing happens if no key has been pressed for 30 s<br />
(Exception: 15 min in Simulation mode).<br />
datum / name ) : 13.05.2011 Sc Z. Nr.: 12200-0702-02<br />
Page 7 of 20 Type: <strong>WR250</strong><br />
ZIEHL industrie-elektronik GmbH + Co KG, Daimlerstr.13, D-74523 Schwäbisch Hall, Tel.: +49 791 504-0, Fax: -56, e-mail: info@ziehl.de