Instruction Manual - Rodney Hunt Company
Instruction Manual - Rodney Hunt Company
Instruction Manual - Rodney Hunt Company

Create successful ePaper yourself
Turn your PDF publications into a flip-book with our unique Google optimized e-Paper software.
Operating Mechanisms<br />
MANUALLY OPERATED FLOOR STANDS<br />
All floor stands and operating devices are identified by a<br />
tag showing the installation drawing number and should<br />
be used with the proper gate and stem.<br />
1. After the stem has been completely assembled and<br />
positioned in place, the manual operator can be lowered<br />
onto the stem and turned into position by operation of<br />
the handwheel or crank.<br />
2. Shims should be placed between the floor and the<br />
operator so that the operator is plumb and the base of<br />
the floor stand is approximately 1” above the operating<br />
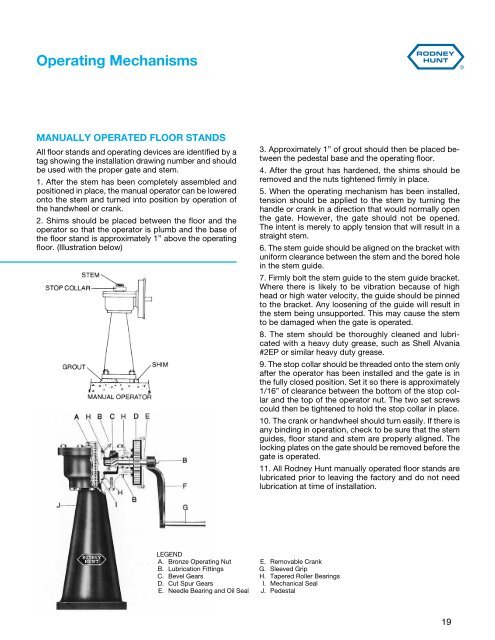
floor. (Illustration below)<br />
LEGEND<br />
A. Bronze Operating Nut<br />
B. Lubrication Fittings<br />
C. Bevel Gears<br />
D. Cut Spur Gears<br />
E. Needle Bearing and Oil Seal<br />
3. Approximately 1” of grout should then be placed between<br />
the pedestal base and the operating floor.<br />
4. After the grout has hardened, the shims should be<br />
removed and the nuts tightened firmly in place.<br />
5. When the operating mechanism has been installed,<br />
tension should be applied to the stem by turning the<br />
handle or crank in a direction that would normally open<br />
the gate. However, the gate should not be opened.<br />
The intent is merely to apply tension that will result in a<br />
straight stem.<br />
6. The stem guide should be aligned on the bracket with<br />
uniform clearance between the stem and the bored hole<br />
in the stem guide.<br />
7. Firmly bolt the stem guide to the stem guide bracket.<br />
Where there is likely to be vibration because of high<br />
head or high water velocity, the guide should be pinned<br />
to the bracket. Any loosening of the guide will result in<br />
the stem being unsupported. This may cause the stem<br />
to be damaged when the gate is operated.<br />
8. The stem should be thoroughly cleaned and lubricated<br />
with a heavy duty grease, such as Shell Alvania<br />
#2EP or similar heavy duty grease.<br />
9. The stop collar should be threaded onto the stem only<br />
after the operator has been installed and the gate is in<br />
the fully closed position. Set it so there is approximately<br />
1/16” of clearance between the bottom of the stop collar<br />
and the top of the operator nut. The two set screws<br />
could then be tightened to hold the stop collar in place.<br />
10. The crank or handwheel should turn easily. If there is<br />
any binding in operation, check to be sure that the stem<br />
guides, floor stand and stem are properly aligned. The<br />
locking plates on the gate should be removed before the<br />
gate is operated.<br />
11. All <strong>Rodney</strong> <strong>Hunt</strong> manually operated floor stands are<br />
lubricated prior to leaving the factory and do not need<br />
lubrication at time of installation.<br />
E. Removable Crank<br />
G. Sleeved Grip<br />
H. Tapered Roller Bearings<br />
I. Mechanical Seal<br />
J. Pedestal<br />
19