Instruction Manual - Rodney Hunt Company
Instruction Manual - Rodney Hunt Company
Instruction Manual - Rodney Hunt Company

Create successful ePaper yourself
Turn your PDF publications into a flip-book with our unique Google optimized e-Paper software.
1. All anchor bolt threading should be checked to make<br />
sure that threads are undamaged.<br />
2. The gate should be lifted and put in place over the<br />
anchor bolts. Attach nuts.<br />
3. Shims should be placed between the back flange of<br />
the sluice gate and the concrete wall in sufficient number<br />
so that the gate will be plumb and flat and can be<br />
firmly tightened against the shims without distortion.<br />
4. With the gate flange located approximately 1” from<br />
the wall, a non-shrink grout should be placed between<br />
the flange and the concrete wall.<br />
5. After the grout has hardened, the shims can be removed<br />
and the nuts further tightened so that the gate is<br />
firmly in place against the grout.<br />
UPPER GATE ANCHOR BOLTS<br />
1. Embedded anchor bolts required to support the upper<br />
gate guides must be positioned in forms at the time the<br />
concrete is poured.<br />
2. These anchor bolts are provided with double nuts so<br />
that upper gate guides can be firmly clamped in position.<br />
The back-up nuts must be placed on the anchor<br />
bolts before the gate is installed.<br />
The gate should not be bolted directly to an uneven<br />
surface. Even a very small amount of gate distortion<br />
will cause excessive leakage.<br />
INSTALLATION ON PIPE FLANGES<br />
1. Where sluice gates are mounted on cast-iron pipe<br />
flanges, the procedure is the same as when the gate is<br />
mounted on a wall thimble.<br />
2. Where the gate is being mounted on a steel flange<br />
that has been welded to a pipe or adaptor, the front surface<br />
of the pipe or adaptor will not be sufficiently flat<br />
unless it has been machined after welding.<br />
A. The gate should be bolted loosely to the flange so that<br />
surfaces touch. Be sure that neither surface is distorted.<br />
A feeler gauge should be used to check the clearance<br />
completely around the periphery of the gate.<br />
B. Leakage may occur if the distortion is more than<br />
0.010 when the two surfaces are bolted together.<br />
C. By using a thick fibrated mastic between surfaces,<br />
it may be possible to prevent leakage between flanges.<br />
In no case should the gate flange be firmly tightened<br />
against a flange that is not flat.<br />
D. If the spacing is very large, the gate should be<br />
shimmed a small distance away from the flange. Space<br />
between the flanges can be caulked with non-shrink<br />
epoxy grout. This will allow the gate to be tightened to<br />
the steel flange without distortion or leakage between<br />
the flanges.<br />
Consult the factory for assistance if the flange on which<br />
the gate is to be installed is not flat and the gap between<br />
the gate flange and the mounting flange is excessive.<br />
NUT TIGHTENING TORQUE<br />
Proper tightening of nuts on anchor bolts or studs holding<br />
the sluice or slide gate to the wall or wall thimble may<br />
prevent serious problems in operation or performance<br />
of the gate. Tabulated below are recommended torque<br />
values for common fastener sizes.<br />
*DIAMETER (in.) TORQUE (ft.-lb.)<br />
1/2 35<br />
5/8 75<br />
3/4 100<br />
7/8 150<br />
1 200<br />
*Consult with factory for sizes not shown.<br />
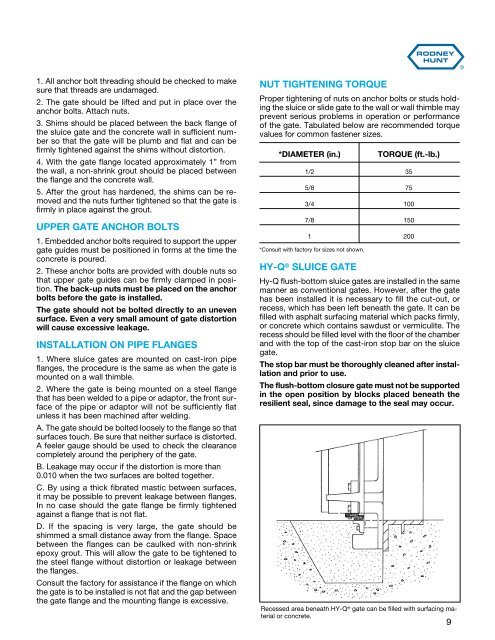
HY-Q ® SLUICE GATE<br />
Hy-Q flush-bottom sluice gates are installed in the same<br />
manner as conventional gates. However, after the gate<br />
has been installed it is necessary to fill the cut-out, or<br />
recess, which has been left beneath the gate. It can be<br />
filled with asphalt surfacing material which packs firmly,<br />
or concrete which contains sawdust or vermiculite. The<br />
recess should be filled level with the floor of the chamber<br />
and with the top of the cast-iron stop bar on the sluice<br />
gate.<br />
The stop bar must be thoroughly cleaned after installation<br />
and prior to use.<br />
The flush-bottom closure gate must not be supported<br />
in the open position by blocks placed beneath the<br />
resilient seal, since damage to the seal may occur.<br />
Recessed area beneath HY-Q ® gate can be filled with surfacing material<br />
or concrete.<br />
9