Group 3 - Rear Axle - Copyright © jholst.net, all rights reserved.
Group 3 - Rear Axle - Copyright © jholst.net, all rights reserved.
Group 3 - Rear Axle - Copyright © jholst.net, all rights reserved.

Create successful ePaper yourself
Turn your PDF publications into a flip-book with our unique Google optimized e-Paper software.
14—REAR AXLE<br />
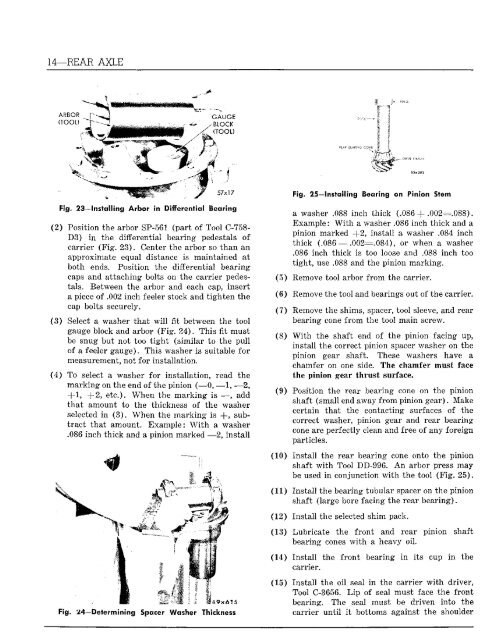
Fig. 23—Inst<strong>all</strong>ing Arbor in Differential Bearing<br />
(2) Position the arbor SP-561 (part of Tool C-758-<br />
D3) in the differential bearing pedestals of<br />
carrier (Fig. 23). Center the arbor so than an<br />
approximate equal distance is maintained at<br />
both ends. Position the differential bearing<br />
caps and attaching bolts on the carrier pedestals.<br />
Between the arbor and each cap, insert<br />
a piece of .002 inch feeler stock and tighten the<br />
cap bolts securely.<br />
(3) Select a washer that will fit between the tool<br />
gauge block and arbor (Fig. 24). This fit must<br />
be snug but not too tight (similar to the pull<br />
of a feeler gauge). This washer is suitable for<br />
measurement, not for inst<strong>all</strong>ation.<br />
(4) To select a washer for inst<strong>all</strong>ation, read the<br />
marking on the end of the pinion (—0, —1, —2,<br />
+1, +2, etc.). When the marking is —, add<br />
that amount to the thickness of the washer<br />
selected in (3). When the marking is -f, subtract<br />
that amount. Example: With a washer<br />
.086 inch thick and a pinion marked —2, inst<strong>all</strong><br />
i l l ' " " ^ \ W f M k m m<br />
Fig. 24—Determining Spacer Washer Thickness<br />
REAR BEARING CONE<br />
-DRIVE PINION<br />
" *" ' 52x382<br />
Fig. 25—Inst<strong>all</strong>ing Bearing on Pinion Stem<br />
a washer .088 inch thick (.086 + .002=.088).<br />
Example: With a washer .086 inch thick and a<br />
pinion marked -\~2, inst<strong>all</strong> a washer .084 inch<br />
thick (.086 — .002=.084), or when a washer<br />
.086 inch thick is too loose and .088 inch too<br />
tight, use .088 and the pinion marking.<br />
(5) Remove tool arbor from the carrier.<br />
(6) Remove the tool and bearings out of the carrier.<br />
(7) Remove the shims, spacer, tool sleeve, and rear<br />
bearing cone from the tool main screw.<br />
(8) With the shaft end of the pinion facing up,<br />
inst<strong>all</strong> the correct pinion spacer washer on the<br />
pinion gear shaft. These washers have a<br />
chamfer on one side. The chamfer must face<br />
the pinion gear thrust surface.<br />
(9) Position the rear bearing cone on the pinion<br />
shaft (sm<strong>all</strong> end away from pinion gear). Make<br />
certain that the contacting surfaces of the<br />
correct washer, pinion gear and rear bearing<br />
cone are perfectly clean and free of any foreign<br />
particles.<br />
(10) Inst<strong>all</strong> the rear bearing cone onto the pinion<br />
shaft with Tool DD-996. An arbor press may<br />
be used in conjunction with the tool (Fig. 25).<br />
(11) Inst<strong>all</strong> the bearing tubular spacer on the pinion<br />
shaft (large bore facing the rear bearing).<br />
(12) Inst<strong>all</strong> the selected shim pack.<br />
(13) Lubricate the front and rear pinion shaft<br />
bearing cones with a heavy oil.<br />
(14) Inst<strong>all</strong> the front bearing in its cup in the<br />
carrier.<br />
(15) Inst<strong>all</strong> the oil seal in the carrier with driver,<br />
Tool C-3656. Lip of seal must face the front<br />
bearing. The seal must be driven into the<br />
carrier until it bottoms against the shoulder