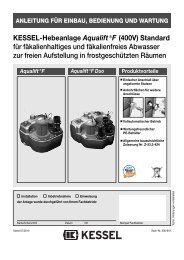
KESSEL Grease separator âPVâ NS 2, 4, 7, 10 For installation in frost ...
KESSEL Grease separator âPVâ NS 2, 4, 7, 10 For installation in frost ...
KESSEL Grease separator âPVâ NS 2, 4, 7, 10 For installation in frost ...

Create successful ePaper yourself
Turn your PDF publications into a flip-book with our unique Google optimized e-Paper software.
3.1 Sett<strong>in</strong>g up for operation<br />
Prior to plac<strong>in</strong>g the <strong>separator</strong> <strong>in</strong>to operation, please make sure<br />
that:<br />
the <strong>separator</strong> is clean and the <strong>in</strong>terior is free from any objects<br />
which may have been placed <strong>in</strong>side dur<strong>in</strong>g shipp<strong>in</strong>g or<br />
<strong><strong>in</strong>stallation</strong>.<br />
the <strong>separator</strong> is completely filled with clean cold water. Completely<br />
fill<strong>in</strong>g the <strong>separator</strong> is complete when water beg<strong>in</strong>s<br />
to dra<strong>in</strong> from the outlet.<br />
check to <strong>separator</strong> tank to make sure that it is fully watertight,<br />
that no damage dur<strong>in</strong>g shipp<strong>in</strong>g or <strong><strong>in</strong>stallation</strong> has occurred<br />
and that all pipe connection have been properly<br />
made and are watertight.<br />
3.2 Initial Instructions<br />
Plac<strong>in</strong>g the <strong>separator</strong> <strong>in</strong>to full operation is normally handled by<br />
a licensed tradesman although upon request can be handled by<br />
a <strong>KESSEL</strong> representative.<br />
1. The follow<strong>in</strong>g personnel should be on hand when the <strong>in</strong>itial<br />
<strong>in</strong>structions for plac<strong>in</strong>g the <strong>separator</strong> <strong>in</strong>to operation are given:<br />
Build<strong>in</strong>g facilities manager<br />
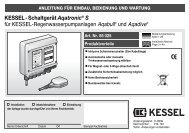
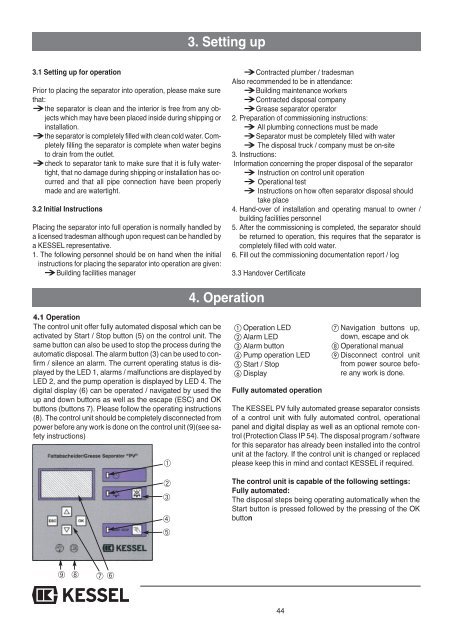
4.1 Operation<br />
The control unit offer fully automated disposal which can be<br />
activated by Start / Stop button (5) on the control unit. The<br />
same button can also be used to stop the process dur<strong>in</strong>g the<br />
automatic disposal. The alarm button (3) can be used to confirm<br />
/ silence an alarm. The current operat<strong>in</strong>g status is displayed<br />
by the LED 1, alarms / malfunctions are displayed by<br />
LED 2, and the pump operation is displayed by LED 4. The<br />
digital display (6) can be operated / navigated by used the<br />
up and down buttons as well as the escape (ESC) and OK<br />
buttons (buttons 7). Please follow the operat<strong>in</strong>g <strong>in</strong>structions<br />
(8). The control unit should be completely disconnected from<br />
power before any work is done on the control unit (9)(see safety<br />
<strong>in</strong>structions)<br />
➈<br />
➇<br />
➆ ➅<br />
➀<br />
➁<br />
➂<br />
➃<br />
➄<br />
3. Sett<strong>in</strong>g up<br />
4. Operation<br />
Contracted plumber / tradesman<br />
Also recommended to be <strong>in</strong> attendance:<br />
Build<strong>in</strong>g ma<strong>in</strong>tenance workers<br />
Contracted disposal company<br />
<strong>Grease</strong> <strong>separator</strong> operator<br />
2. Preparation of commission<strong>in</strong>g <strong>in</strong>structions:<br />
All plumb<strong>in</strong>g connections must be made<br />
Separator must be completely filled with water<br />
The disposal truck / company must be on-site<br />
3. Instructions:<br />
Information concern<strong>in</strong>g the proper disposal of the <strong>separator</strong><br />
Instruction on control unit operation<br />
Operational test<br />
Instructions on how often <strong>separator</strong> disposal should<br />
take place<br />
4. Hand-over of <strong><strong>in</strong>stallation</strong> and operat<strong>in</strong>g manual to owner /<br />
build<strong>in</strong>g facilities personnel<br />
5. After the commission<strong>in</strong>g is completed, the <strong>separator</strong> should<br />
be returned to operation, this requires that the <strong>separator</strong> is<br />
completely filled with cold water.<br />
6. Fill out the commission<strong>in</strong>g documentation report / log<br />
3.3 Handover Certificate<br />
Operation LED<br />
Alarm LED<br />
Alarm button<br />
Pump operation LED<br />
Start / Stop<br />
Display<br />
Fully automated operation<br />
The <strong>KESSEL</strong> PV fully automated grease <strong>separator</strong> consists<br />
of a control unit with fully automated control, operational<br />
panel and digital display as well as an optional remote control<br />
(Protection Class IP 54). The disposal program / software<br />
for this <strong>separator</strong> has already been <strong>in</strong>stalled <strong>in</strong>to the control<br />
unit at the factory. If the control unit is changed or replaced<br />
please keep this <strong>in</strong> m<strong>in</strong>d and contact <strong>KESSEL</strong> if required.<br />
The control unit is capable of the follow<strong>in</strong>g sett<strong>in</strong>gs:<br />
Fully automated:<br />
The disposal steps be<strong>in</strong>g operat<strong>in</strong>g automatically when the<br />
Start button is pressed followed by the press<strong>in</strong>g of the OK<br />
button<br />
44<br />
Navigation buttons up,<br />
down, escape and ok<br />
Operational manual<br />
Disconnect control unit<br />
from power source before<br />
any work is done.