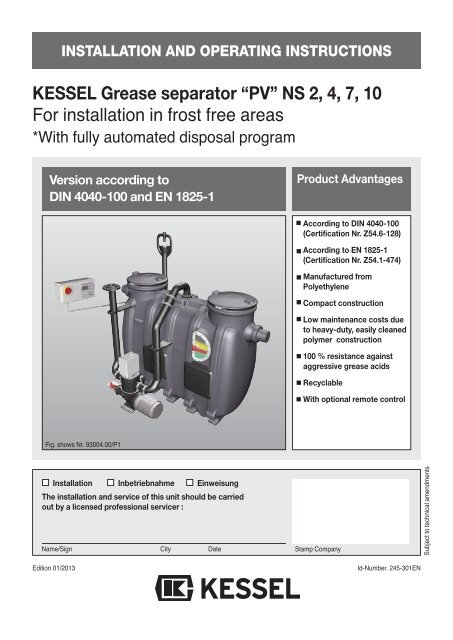
KESSEL Grease separator âPVâ NS 2, 4, 7, 10 For installation in frost ...
KESSEL Grease separator âPVâ NS 2, 4, 7, 10 For installation in frost ...
KESSEL Grease separator âPVâ NS 2, 4, 7, 10 For installation in frost ...

Create successful ePaper yourself
Turn your PDF publications into a flip-book with our unique Google optimized e-Paper software.
I<strong>NS</strong>TALLATION AND OPERATING I<strong>NS</strong>TRUCTIO<strong>NS</strong><br />
<strong>KESSEL</strong> <strong>Grease</strong> <strong>separator</strong> “PV” <strong>NS</strong> 2, 4, 7, <strong>10</strong><br />
<strong>For</strong> <strong><strong>in</strong>stallation</strong> <strong>in</strong> <strong>frost</strong> free areas<br />
*With fully automated disposal program<br />
Version accord<strong>in</strong>g to<br />
DIN 4040-<strong>10</strong>0 and EN 1825-1<br />
Fig. shows Nr. 93004.00/P1<br />
Installation Inbetriebnahme E<strong>in</strong>weisung<br />
The <strong><strong>in</strong>stallation</strong> and service of this unit should be carried<br />
out by a licensed professional servicer :<br />
Name/Sign City Date<br />
Edition 01/2013<br />
Product Advantages<br />
Accord<strong>in</strong>g to DIN 4040-<strong>10</strong>0<br />
(Certification Nr. Z54.6-128)<br />
Accord<strong>in</strong>g to EN 1825-1<br />
(Certification Nr. Z54.1-474)<br />
Manufactured from<br />
Polyethylene<br />
Compact construction<br />
Low ma<strong>in</strong>tenance costs due<br />
to heavy-duty, easily cleaned<br />
polymer construction<br />
<strong>10</strong>0 % resistance aga<strong>in</strong>st<br />
aggressive grease acids<br />
Recyclable<br />
With optional remote control<br />
Stamp Company<br />
Id-Number. 245-301EN<br />
Subject to technical amendments
Dear Customer,<br />
Before the <strong>KESSEL</strong> Euro Separator Version PV is <strong>in</strong>stalled and placed <strong>in</strong> operation please carefully read and follow<br />
all of the <strong>in</strong>structions conta<strong>in</strong>ed <strong>in</strong> this Installation, Ma<strong>in</strong>tenance and User’s Manual. Upon delivery of the Euro Separator<br />
please thoroughly <strong>in</strong>spect the <strong>separator</strong> to make sure that it has not been damaged dur<strong>in</strong>g shipp<strong>in</strong>g. In<br />
case damage has occurred to the <strong>separator</strong>, please follow the <strong>in</strong>structions listed <strong>in</strong> the Guarantee section of this<br />
user’s manual.<br />
SEPARATOR AREA<br />
REGULATIO<strong>NS</strong>:<br />
1. Safety Instructions<br />
By <strong><strong>in</strong>stallation</strong>, use, ma<strong>in</strong>tenance and repair of this unit please follow all appropriate DIN<br />
/ VDE /DVGW safety precautions and accident prevention guidel<strong>in</strong>es. Also please follow<br />
any local safety precautions and accident prevention guidel<strong>in</strong>es established <strong>in</strong> your area.<br />
Please note that the unit is designed to receive kitchen waste water with a maximum temperature<br />
of 60 degrees Celsius (140 degrees F). Temperatures higher than 60 degrees<br />
Celsius could damage the unit.<br />
Do not stand or place excessive weight on the <strong>separator</strong>. Dur<strong>in</strong>g disposal / empty<strong>in</strong>g of a<br />
Type PV <strong>separator</strong>, a step ladder should be used to help ga<strong>in</strong> access to the open<strong>in</strong>gs on<br />
the top of the <strong>separator</strong>.<br />
NO SMOKING! Smok<strong>in</strong>g must not be permitted near the <strong>separator</strong> dur<strong>in</strong>g use, ma<strong>in</strong>tenance<br />
and repair of the unit due to the potential build up of methane / biogas.<br />
SLIPPERY WHEN WET! Take caution when stand<strong>in</strong>g / walk<strong>in</strong>g near the <strong>separator</strong>. Dur<strong>in</strong>g<br />
disposal, clean<strong>in</strong>g and ma<strong>in</strong>tenance the surround<strong>in</strong>g area can become extremely slippery<br />
due to spilled water / grease / fat.<br />
❏ No access of the <strong>separator</strong> for unauthorized personnel<br />
❏ No storage of food / groceries / provisions (for hygienic reasons) is allowed <strong>in</strong> the same<br />
area/room as the <strong>separator</strong>.<br />
❏ The location of the <strong>separator</strong> should be chosen carefully as to allow sufficient access for<br />
ma<strong>in</strong>tenance, <strong>in</strong>spection, repair and disposal of the <strong>separator</strong>.<br />
❏ The wastewater <strong>in</strong> a grease <strong>separator</strong> can conta<strong>in</strong> bacteria. After com<strong>in</strong>g <strong>in</strong> contact with<br />
wastewater or the <strong>separator</strong> itself, it is important to wash, clean and dis<strong>in</strong>fect all sk<strong>in</strong><br />
which has been contam<strong>in</strong>ated. Change and wash clothes properly that have come <strong>in</strong><br />
contact with the contam<strong>in</strong>ated wastewater.<br />
These safety measures are to be made aware to anyone who operates, ma<strong>in</strong>ta<strong>in</strong>s or<br />
services this product.<br />
38
Table of Contents<br />
1. General 1.1 Application................................................................ Page 40<br />
1.2 Application area ...................................................... Page 40<br />
1.3 Separator description ............................................... Page 40<br />
1.4 Table of article numbers .......................................... Page 40<br />
2. Installation 2.1 General .................................................................... Page 41<br />
2.2 Set-up....................................................................... Page 41<br />
2.3 Electrical Installations............................................... Page 42<br />
2.4 Installation example ................................................ Page 42<br />
2.5 Dimensioned draw<strong>in</strong>gs............................................. Page 43<br />
3. Sett<strong>in</strong>g up 3.1 Sett<strong>in</strong>g up for operation............................................ Page 44<br />
3.2 Initial Instructions .................................................... Page 44<br />
3.3 What to do................................................................ Page 44<br />
4. Operation / Disposal 4.1 Manually automated disposal................................... Page 44<br />
4.2 First disposal ............................................................ Page 44<br />
4.3 Disposal <strong>in</strong>tervals..................................................... Page 44<br />
4.4 Disposal procedure – fully automated...................... Page 44<br />
4.5 Start<strong>in</strong>g the disposal................................................. Page 45<br />
4.6 Re-Programm<strong>in</strong>g...................................................... Page 45<br />
5. Disposal steps grease <strong>separator</strong> 5.1 <strong>Grease</strong> <strong>separator</strong> acc. to DIN 4040.......................... Page 46<br />
5.2 <strong>Grease</strong> <strong>separator</strong> acc. to EN 1825........................... Page 47<br />
6. Konfiguration 6.1 General .................................................................... Page 49<br />
6.2 Sett<strong>in</strong>g the Mix<strong>in</strong>g, Fill<strong>in</strong>g, Clean<strong>in</strong>g and Disposal times Page 49<br />
7. Malfunction messages ................................................................................. Page 50<br />
8. Control Unit .............................................................................................. Page 52<br />
9. SonicControl (Optional) 9.1 Safety <strong>in</strong>structions ................................................... Page 55<br />
9.2 General ..................................................................... Page 55<br />
9.3 Installation................................................................ Page 55<br />
9.4 SonicControl Sensor Installation .............................. Page 56<br />
9.5 Installation example ................................................. Page 57<br />
9.6 Remote Alarm .......................................................... Page 59<br />
9.7 Shorten<strong>in</strong>g the sensor cable length.......................... Page 59<br />
9.8 Potential free contact ............................................... Page 59<br />
9.9 Installation / Cables connections.............................. Page 59<br />
9.<strong>10</strong> Commission<strong>in</strong>g......................................................... Page 60<br />
9.11 Inspection and Ma<strong>in</strong>tenance .................................... Page 60<br />
9.12 Events display (only <strong>in</strong> logbook)............................... Page 61<br />
9.13 Malfunctions display................................................. Page 61<br />
9.14 General malfunctions ............................................... Page 62<br />
9.15 System errors........................................................... Page 63<br />
9.16 Techical data ............................................................ Page 63<br />
9.17 Replacement parts and accessories ........................ Page 63<br />
9.18 Declaration od conformity ........................................ Page 64<br />
<strong>10</strong>. Accessories / Replacement parts <strong>10</strong>.1 Remote Control ........................................................ Page 65<br />
<strong>10</strong>.2 Sampl<strong>in</strong>g chamber ................................................... Page 65<br />
<strong>10</strong>.3 Aqualift F lift<strong>in</strong>g station ............................................. Page 65<br />
11. Ma<strong>in</strong>tenance .............................................................................................. Page 67<br />
12. Warranty .............................................................................................. Page 67<br />
13. Declaration of Conformity .............................................................................................. Page 68<br />
14. Separator characteristics .............................................................................................. Page 69<br />
15. . Important contacts/<strong>in</strong>fo .............................................................................................. Page 70<br />
39
1.1 Application<br />
Wastewater conta<strong>in</strong><strong>in</strong>g oils and greases from animal or plant<br />
orig<strong>in</strong> are not allowed to be dra<strong>in</strong>ed <strong>in</strong>to public wastewater systems<br />
and <strong>in</strong>to public waters due to the fact that <strong>in</strong> a cooled<br />
state the oils and greases coat <strong>in</strong>terior dra<strong>in</strong>age pipes caus<strong>in</strong>g<br />
blockages as well as reduc<strong>in</strong>g the dra<strong>in</strong>age capacity of the<br />
pipes. In additional, after short periods of time the decompos<strong>in</strong>g<br />
greases and oils build up acids which can lead to odour<br />
nuisances as well as corrod<strong>in</strong>g dra<strong>in</strong>age pipes and build<strong>in</strong>g materials.<br />
The develop<strong>in</strong>g grease layer on water surfaces also<br />
decreases the ability for required oxygen to enter the water <strong>in</strong><br />
public watershed areas as well as public wastewater treatment<br />
facilities. Also, DIN 1986 Part I required the separation and removal<br />
of these damag<strong>in</strong>g wastes. Due to these reasons, grease<br />
<strong>separator</strong>s are required for <strong><strong>in</strong>stallation</strong> as well as the <strong>separator</strong><br />
contents be<strong>in</strong>g properly disposed.<br />
The temperature <strong>in</strong> the grease <strong>separator</strong> should be as low as<br />
possible. A temperature <strong>in</strong>crease of <strong>10</strong> deg Celsius <strong>in</strong>side the<br />
temperature reduces the <strong>separator</strong> efficiency by 50%. Most national<br />
and local regulations limit the allowable wastewater temperature<br />
which exits a build<strong>in</strong>g – the German regulations limits<br />
the temperature to 35 deg Celsius.<br />
1.2 Application area<br />
<strong>Grease</strong> <strong>separator</strong>s are to be <strong>in</strong>stalled <strong>in</strong> all wastewater dra<strong>in</strong>age<br />
pipes which could conta<strong>in</strong> oils / greases. The <strong>separator</strong> will<br />
remove the fats, oils and sludge from the wastewater. Disposal<br />
of a <strong>KESSEL</strong> PV fully automated grease <strong>separator</strong> is basically<br />
odour free s<strong>in</strong>ce the disposal, clean<strong>in</strong>g and refill<strong>in</strong>g of the <strong>separator</strong><br />
is done without the need to open the <strong>separator</strong>’s covers.<br />
The disposal vehicle connects its disposal pipe to a permanently<br />
<strong>in</strong>stalled pressure disposal l<strong>in</strong>e from the grease <strong>separator</strong><br />
which should be located <strong>in</strong> an easy accessible location (exterior<br />
wall of the build<strong>in</strong>g for example). The separated oils, greases<br />
and sludges are pumped directly <strong>in</strong>to the grease <strong>separator</strong>.<br />
1.4 Table of article numbers<br />
accord. DIN 4040<br />
<strong>NS</strong> (l/sec)<br />
2<br />
4<br />
7<br />
<strong>10</strong><br />
Pump left<br />
93222.50 / P1<br />
93224.50 /P1<br />
93227.50 / P1<br />
932<strong>10</strong>.50 / P1<br />
Article number<br />
93222.00 / P1<br />
93224.00 / P1<br />
93227.00 / P1<br />
932<strong>10</strong>.00 / P1<br />
Pump left = operation side <strong>in</strong> flow direction left<br />
Pump right = operation side <strong>in</strong> flow direction right<br />
1. General<br />
This elim<strong>in</strong>ates the unhygienic process of the truck’s disposal<br />
hose be<strong>in</strong>g brought <strong>in</strong>to the area of the build<strong>in</strong>g which conta<strong>in</strong>s<br />
the grease <strong>separator</strong>.<br />
1.3 Separator description<br />
Pump right <strong>NS</strong> (l/sec)<br />
The <strong>KESSEL</strong> PV Fully Automated <strong>Grease</strong><br />
Separator consists of a grease <strong>separator</strong> with <strong>in</strong>tegrated<br />
sludge trap. Separators built accord<strong>in</strong>g to DIN 4040 offer a sludge<br />
trap which isolated from the grease separation area by a<br />
wall. <strong>Grease</strong> <strong>separator</strong>s manufactured accord<strong>in</strong>g to EN 1825 do<br />
not have the <strong>separator</strong> sludge trap mean<strong>in</strong>g that all oils, greases<br />
and sludge are separated out of the wastewater stream <strong>in</strong><br />
one area. The <strong>separator</strong> body is manufactured from polyethylene.<br />
The <strong>separator</strong> is equipped with one pump with a macerator<br />
assembly. The <strong>separator</strong>s are equipped with tw<strong>in</strong> odour tight<br />
access covers. The polyethylene <strong>in</strong>terior walls of the <strong>separator</strong><br />
require no extra protective coat<strong>in</strong>gs.<br />
<strong>For</strong> important technical <strong>in</strong>formation concern<strong>in</strong>g this <strong>separator</strong><br />
please see the shield located on the <strong>separator</strong> itself – this <strong>in</strong>formation<br />
is also located <strong>in</strong> this User's Manual.<br />
Delivery contents of a PV grease <strong>separator</strong> are:<br />
- <strong>separator</strong> body<br />
- a refill<strong>in</strong>g system for cold and warm water<br />
- a pump for clean<strong>in</strong>g and dispos<strong>in</strong>g of the <strong>separator</strong><br />
- an actuator valve for controll<strong>in</strong>g the clean<strong>in</strong>g/disposal process<br />
- two solenoid valves<br />
- a control unit<br />
- a ma<strong>in</strong>tenance contract<br />
- an <strong>in</strong>spection w<strong>in</strong>dow located on the body of the <strong>separator</strong>.<br />
Optional:<br />
- SonicControl grease sensor<br />
- Remote control for remote operation of the disposal process<br />
accord. EN 1825<br />
2<br />
4<br />
7<br />
<strong>10</strong><br />
40<br />
Pump left<br />
93002.50 / P1<br />
93004.50 /P1<br />
93007.50 / P1<br />
930<strong>10</strong>.50 / P1<br />
Article number<br />
Pump right<br />
93002.00 / P1<br />
93004.00 / P1<br />
93007.00 / P1<br />
930<strong>10</strong>.00 / P1
2.1 General<br />
The <strong>separator</strong> is to be <strong>in</strong>stalled <strong>in</strong> a dry, <strong>frost</strong> free room / area<br />
on a smooth, solid and level surface. This is especially important<br />
due to the electronic equipment accompanied with the <strong>separator</strong>.<br />
Based on the size of the grease <strong>separator</strong> it can be<br />
equipped with the follow<strong>in</strong>g pumps (custom <strong>separator</strong>s may be<br />
equipped with custom pumps).<br />
3 kW Pump<br />
mit 400 V, 50 Hz, IP 55 protection class,<br />
Pump<strong>in</strong>g performance: Q = 30 m 3 /h, H = 12 m/h<br />
Customized systems<br />
Pump specifications for customized systems will be supplied<br />
with the manual for the custom <strong>separator</strong>.<br />
Förderhöhe (m)<br />
[m]<br />
16<br />
14<br />
12<br />
<strong>10</strong><br />
8<br />
6<br />
4<br />
2<br />
Design criteria for grease pump<br />
2.2 Set-up / Installation<br />
3,0 kW<br />
5 <strong>10</strong> 15 20 25 30 35 40 45 50 55 [Qm3 /h]<br />
Förderstrom Q (m3 /h)<br />
1. DIN 4040 / EN 1825 and EN 12056 regulations must be followed<br />
dur<strong>in</strong>g <strong><strong>in</strong>stallation</strong>!<br />
2. The entire system must be <strong>in</strong>stalled completely level.<br />
3. The pump (<strong>in</strong>cluded <strong>in</strong> the delivery) is to be placed and securedto<br />
the floor with the <strong>in</strong>cluded fasten<strong>in</strong>g bolts. In order<br />
to dampen pump vibrations be sure to place the <strong>in</strong>cluded<br />
rubber matts under each of the pumps.<br />
4. The pump´s outlet should be connected to the disposal pipe<br />
us<strong>in</strong>g a rubber coupl<strong>in</strong>g with tw<strong>in</strong> steel fasten<strong>in</strong>g clamps.<br />
Clamps should be tightened to a torque of <strong>10</strong> Nm.<br />
5. The disposal pressure pipe is to be connected to the <strong>in</strong>cluded<br />
flange on the end of the <strong>separator</strong>'s disposal pipe<br />
stub (flange connection is DN65, PN <strong>10</strong> DIN 2501, holediameter<br />
145mm). The Storz B coupl<strong>in</strong>g (with R 2 1/2 <strong>in</strong>ch<br />
<strong>in</strong>side threads) supplied with the system should be <strong>in</strong>stalled<br />
to the end of the disposal pipe where the disposal truck<br />
will connect its suction hose. Vibration dampeners should<br />
be used when <strong>in</strong>stall<strong>in</strong>g the disposal pipe to prevent vibrations<br />
from transferr<strong>in</strong>g to the build<strong>in</strong>g dur<strong>in</strong>g disposal.<br />
The disposal pipe should be laid with a slight slope back<br />
toward the <strong>separator</strong>.<br />
6. The remote control should be <strong>in</strong>stalled near the Storz B<br />
coupl<strong>in</strong>g, if possible - above the coupl<strong>in</strong>g.<br />
41<br />
2. Installation<br />
7. In order to protect the coupl<strong>in</strong>g and the remote control<br />
from unauthorized access, it is advised that both of these<br />
items be conta<strong>in</strong>ed <strong>in</strong> a lockable protective enclosure (not<br />
<strong>in</strong>cluded with the delivery). Recommended enclosure dimensions<br />
(width - 400 mm, height - 600 mm, depth - 250<br />
mm).<br />
8. The two <strong>in</strong>cluded 1 <strong>in</strong>ch solenoid valves (for the cold water<br />
refill and the warm water r<strong>in</strong>s<strong>in</strong>g) must be <strong>in</strong>stalled perfectly<br />
level (please see <strong>in</strong>cluded <strong><strong>in</strong>stallation</strong> guide). The<br />
magnet system should be <strong>in</strong>stalled upwards – this prevents<br />
materials from settl<strong>in</strong>g <strong>in</strong> the system should could<br />
lead to a shortened lifespan. The cold and warm water<br />
supply pipes should be flushed clean after <strong><strong>in</strong>stallation</strong> (follow<br />
<strong>in</strong>cluded <strong><strong>in</strong>stallation</strong> manual)<br />
9. Follow DIN 1988, DVGW as well as local <strong><strong>in</strong>stallation</strong> codes<br />
when connected the cold water refill and the warm water<br />
r<strong>in</strong>s<strong>in</strong>g pipes.<br />
Installation of <strong>KESSEL</strong> refill funnel (<strong>in</strong>cluded with shipment):<br />
- Connect warm and cold water supply pipes with each<br />
other as a T connection. The outlet of the T connection<br />
should be threaded to the R1 <strong>in</strong>ch <strong>in</strong>ner threads of the<br />
<strong>KESSEL</strong> refill funnel.<br />
<strong>10</strong>. The cold water supply pipe is the refill<strong>in</strong>g system and the<br />
warm water supply pipe is the clean<strong>in</strong>g / r<strong>in</strong>s<strong>in</strong>g connection<br />
11. The <strong>in</strong>let and outlet dra<strong>in</strong>age pipes should be connected<br />
to the grease <strong>separator</strong>. If SML cast iron dra<strong>in</strong>age pip<strong>in</strong>g<br />
is used accord<strong>in</strong>g to DIN 19522 then steel <strong>in</strong>ner support<br />
r<strong>in</strong>gs should be used on the <strong>in</strong>let and the outlet of the <strong>separator</strong><br />
(which are available as accessories). If other<br />
dra<strong>in</strong>age pip<strong>in</strong>g material is be<strong>in</strong>g used then standard rubber<br />
connection coupl<strong>in</strong>gs (FERNCO type coupl<strong>in</strong>gs)<br />
should be used.<br />
12. Accord<strong>in</strong>g to DIN EN 1825-2, the grease <strong>separator</strong> as<br />
well as the <strong>in</strong>let and outlet dra<strong>in</strong>age pipes must be properly<br />
ventilated. The ma<strong>in</strong> <strong>in</strong>let pipe to a grease <strong>separator</strong><br />
should be directly ventilated to the roof of the build<strong>in</strong>g.<br />
An additional ventilation pipe should be <strong>in</strong>stalled near the<br />
<strong>in</strong>let of the grease <strong>separator</strong> <strong>in</strong> the case that the ma<strong>in</strong><br />
<strong>in</strong>let pipe is longer than <strong>10</strong> meters and offers no ventilation<br />
for this <strong>10</strong> meters. All secondary dra<strong>in</strong>age pipes<br />
5meters or longer which enter the ma<strong>in</strong> <strong>in</strong>let pipe should<br />
also be separately ventilated.<br />
2.3 Electrical Installations<br />
All electrical connections and work should be handled by a<br />
professional, licensed electrician.<br />
1. The pump, actuator valve and solenoid valves should be<br />
connected to the control unit follow<strong>in</strong>g the connection <strong>in</strong>structions<br />
located <strong>in</strong>side the control unit. The connection<br />
cable 5 x 4mm or 5 x 2, 5 mm square depend<strong>in</strong>g on l<strong>in</strong>e<br />
length (accord<strong>in</strong>g to DIN VDE)) should be connected onsite.
➤ 3.0 pump requires a T 16 Amp fuse.<br />
2. The rotational direction of the pump must be checked (improper<br />
rotation will cause operational noise as well as<br />
decrease pump.<br />
3. The remote control (available as an accessory) is supplied<br />
with a 15 meter connection cable. The cable can be replaced<br />
with a longer cable if required (use a protected<br />
cable LiYCY 3 x 0.34 mm square)<br />
Please take care that:<br />
- That the user's manual and all operat<strong>in</strong>g <strong>in</strong>structions concern<strong>in</strong>g<br />
the <strong>separator</strong> are kept <strong>in</strong> a safe location nearby the<br />
<strong>separator</strong>.<br />
- That the disposal procedure is conducted exactly as it is described<br />
<strong>in</strong> the user's manual.<br />
- Only allow professional licensed disposal companies to<br />
handle the disposal of the <strong>separator</strong>.<br />
Right reserved for technical changes.<br />
2.4 Installation example<br />
a<br />
b<br />
Ventialtion<br />
<strong>Grease</strong> Separator<br />
Ventilation<br />
pipe<br />
<br />
2. Installation<br />
Control unit <strong><strong>in</strong>stallation</strong>:<br />
In order to open the control unit, the power safety switch<br />
must be set at the 0 position. In order to mount the control<br />
unit a drill<strong>in</strong>g template, dowels and screws are required. <strong>For</strong><br />
DIN <strong>separator</strong>s, the control unit can be mounted on a PE (polyethylene)<br />
plate directly on the grease <strong>separator</strong> itself. <strong>For</strong><br />
EURO <strong>separator</strong>s the control unit should be mounted on a<br />
nearby wall. Cables runn<strong>in</strong>g from the control unit to the <strong>separator</strong><br />
should be laid <strong>in</strong> a protective conduit. The control unit<br />
should be <strong>in</strong>stalled <strong>in</strong> a dry, <strong>frost</strong> free and easily accessible<br />
location. Protect the control unit from direct sunlight.<br />
The cap screws shall be sealed with 1 Nm.<br />
Connection for<br />
disposal truck<br />
Sidewalk<br />
Connection to public sewer<br />
Wastewater which collects below<br />
backwater level (ground level)<br />
should be pumped <strong>in</strong>to the public<br />
sewer with an appropriate wastewater<br />
lift<strong>in</strong>g station<br />
42<br />
<strong>KESSEL</strong> <strong>NS</strong> 4 ‘E+S’ PV<br />
grease <strong>separator</strong><br />
Storz-B coupl<strong>in</strong>g<br />
Sampl<strong>in</strong>g chamber<br />
Cold and Warm water<br />
supply connection<br />
Closure valve<br />
Water supply connection<br />
a cold water supply<br />
b warm water supply<br />
Disposal pipe<br />
Electrical connection<br />
Solenoid valves<br />
Sediment trap / collector<br />
<strong>KESSEL</strong> basement dra<strong>in</strong><br />
with backwater flaps<br />
(The ‘Universal’)<br />
<strong>KESSEL</strong> lift<strong>in</strong>g station<br />
Control unit
2.5 Dimensioned draw<strong>in</strong>g<br />
2.5.1 <strong>Grease</strong> <strong>separator</strong> acc. to DIN 4040<br />
alle Maße <strong>in</strong> mm<br />
<strong>NS</strong><br />
(l/sec)<br />
2<br />
4<br />
7<br />
<strong>10</strong><br />
DN<br />
<strong>10</strong>0<br />
<strong>10</strong>0<br />
150<br />
150<br />
E<strong>in</strong>br<strong>in</strong>gmaße axb<br />
a b<br />
1700 680<br />
2250 920<br />
3180 1150<br />
3600 1350<br />
b1<br />
<strong>10</strong>80<br />
1320<br />
1550<br />
1750<br />
h<br />
1455<br />
1455<br />
1455<br />
1455<br />
2.5.2 <strong>Grease</strong> <strong>separator</strong> acc. to EN 1825<br />
all <strong>in</strong> mm<br />
<strong>NS</strong><br />
(l/sec)<br />
<strong>NS</strong> 2<br />
<strong>NS</strong> 4<br />
<strong>NS</strong> 7<br />
<strong>NS</strong> <strong>10</strong><br />
DN/OD<br />
<strong>10</strong>0/1<strong>10</strong><br />
<strong>10</strong>0/1<strong>10</strong><br />
150/160<br />
150/160<br />
a<br />
<strong>10</strong>30<br />
1500<br />
1600<br />
2430<br />
E<strong>in</strong>br<strong>in</strong>gmaße<br />
l<br />
1250<br />
x b<br />
7<br />
670<br />
18<strong>10</strong> 730<br />
1850 990<br />
2700 990<br />
43<br />
2. Installation<br />
h1<br />
<strong>10</strong>30<br />
<strong>10</strong>30<br />
<strong>10</strong>30<br />
<strong>10</strong>30<br />
b1<br />
<strong>10</strong>50<br />
<strong>10</strong>50<br />
1220<br />
1220<br />
h2<br />
1<strong>10</strong>0<br />
1<strong>10</strong>0<br />
1<strong>10</strong>0<br />
1<strong>10</strong>0<br />
h1<br />
930<br />
930<br />
1130<br />
1130<br />
h3<br />
1180<br />
1180<br />
1180<br />
1180<br />
h2<br />
<strong>10</strong>00<br />
<strong>10</strong>00<br />
1200<br />
1200<br />
Separator volumes<br />
sludge chamber Separator<br />
220 l<br />
570 l<br />
430 l<br />
<strong>10</strong>70 l<br />
720 l<br />
1870 l<br />
<strong>10</strong>52 l<br />
2480 l<br />
h3<br />
13<strong>10</strong><br />
13<strong>10</strong><br />
1560<br />
1560<br />
Separator volumes<br />
sludge chamber Separator<br />
200 l 212 l<br />
400 l 354 l<br />
700 l 567 l<br />
<strong>10</strong>00 l 794 l<br />
Inlet<br />
Outlet<br />
Sludge trap<br />
<strong>Grease</strong> trap<br />
Quick-release covers<br />
Inspection w<strong>in</strong>dow<br />
Two way valve<br />
Actuator valve<br />
Clean<strong>in</strong>g jets<br />
Clean<strong>in</strong>g water stream<br />
Pump with closure<br />
Warm water connection<br />
(r<strong>in</strong>s<strong>in</strong>g) and cold water<br />
connection (refill<strong>in</strong>g with<br />
fresh water)<br />
Control unit<br />
Disposal pipe connection<br />
Weight approx<br />
240 kg<br />
290 kg<br />
400 kg<br />
440 kg<br />
OD = Outer Dimension<br />
b1 = wide<br />
<strong>Grease</strong> storage<br />
<strong>10</strong>6 l<br />
177 l<br />
302 l<br />
423 l
3.1 Sett<strong>in</strong>g up for operation<br />
Prior to plac<strong>in</strong>g the <strong>separator</strong> <strong>in</strong>to operation, please make sure<br />
that:<br />
the <strong>separator</strong> is clean and the <strong>in</strong>terior is free from any objects<br />
which may have been placed <strong>in</strong>side dur<strong>in</strong>g shipp<strong>in</strong>g or<br />
<strong><strong>in</strong>stallation</strong>.<br />
the <strong>separator</strong> is completely filled with clean cold water. Completely<br />
fill<strong>in</strong>g the <strong>separator</strong> is complete when water beg<strong>in</strong>s<br />
to dra<strong>in</strong> from the outlet.<br />
check to <strong>separator</strong> tank to make sure that it is fully watertight,<br />
that no damage dur<strong>in</strong>g shipp<strong>in</strong>g or <strong><strong>in</strong>stallation</strong> has occurred<br />
and that all pipe connection have been properly<br />
made and are watertight.<br />
3.2 Initial Instructions<br />
Plac<strong>in</strong>g the <strong>separator</strong> <strong>in</strong>to full operation is normally handled by<br />
a licensed tradesman although upon request can be handled by<br />
a <strong>KESSEL</strong> representative.<br />
1. The follow<strong>in</strong>g personnel should be on hand when the <strong>in</strong>itial<br />
<strong>in</strong>structions for plac<strong>in</strong>g the <strong>separator</strong> <strong>in</strong>to operation are given:<br />
Build<strong>in</strong>g facilities manager<br />
4.1 Operation<br />
The control unit offer fully automated disposal which can be<br />
activated by Start / Stop button (5) on the control unit. The<br />
same button can also be used to stop the process dur<strong>in</strong>g the<br />
automatic disposal. The alarm button (3) can be used to confirm<br />
/ silence an alarm. The current operat<strong>in</strong>g status is displayed<br />
by the LED 1, alarms / malfunctions are displayed by<br />
LED 2, and the pump operation is displayed by LED 4. The<br />
digital display (6) can be operated / navigated by used the<br />
up and down buttons as well as the escape (ESC) and OK<br />
buttons (buttons 7). Please follow the operat<strong>in</strong>g <strong>in</strong>structions<br />
(8). The control unit should be completely disconnected from<br />
power before any work is done on the control unit (9)(see safety<br />
<strong>in</strong>structions)<br />
➈<br />
➇<br />
➆ ➅<br />
➀<br />
➁<br />
➂<br />
➃<br />
➄<br />
3. Sett<strong>in</strong>g up<br />
4. Operation<br />
Contracted plumber / tradesman<br />
Also recommended to be <strong>in</strong> attendance:<br />
Build<strong>in</strong>g ma<strong>in</strong>tenance workers<br />
Contracted disposal company<br />
<strong>Grease</strong> <strong>separator</strong> operator<br />
2. Preparation of commission<strong>in</strong>g <strong>in</strong>structions:<br />
All plumb<strong>in</strong>g connections must be made<br />
Separator must be completely filled with water<br />
The disposal truck / company must be on-site<br />
3. Instructions:<br />
Information concern<strong>in</strong>g the proper disposal of the <strong>separator</strong><br />
Instruction on control unit operation<br />
Operational test<br />
Instructions on how often <strong>separator</strong> disposal should<br />
take place<br />
4. Hand-over of <strong><strong>in</strong>stallation</strong> and operat<strong>in</strong>g manual to owner /<br />
build<strong>in</strong>g facilities personnel<br />
5. After the commission<strong>in</strong>g is completed, the <strong>separator</strong> should<br />
be returned to operation, this requires that the <strong>separator</strong> is<br />
completely filled with cold water.<br />
6. Fill out the commission<strong>in</strong>g documentation report / log<br />
3.3 Handover Certificate<br />
Operation LED<br />
Alarm LED<br />
Alarm button<br />
Pump operation LED<br />
Start / Stop<br />
Display<br />
Fully automated operation<br />
The <strong>KESSEL</strong> PV fully automated grease <strong>separator</strong> consists<br />
of a control unit with fully automated control, operational<br />
panel and digital display as well as an optional remote control<br />
(Protection Class IP 54). The disposal program / software<br />
for this <strong>separator</strong> has already been <strong>in</strong>stalled <strong>in</strong>to the control<br />
unit at the factory. If the control unit is changed or replaced<br />
please keep this <strong>in</strong> m<strong>in</strong>d and contact <strong>KESSEL</strong> if required.<br />
The control unit is capable of the follow<strong>in</strong>g sett<strong>in</strong>gs:<br />
Fully automated:<br />
The disposal steps be<strong>in</strong>g operat<strong>in</strong>g automatically when the<br />
Start button is pressed followed by the press<strong>in</strong>g of the OK<br />
button<br />
44<br />
Navigation buttons up,<br />
down, escape and ok<br />
Operational manual<br />
Disconnect control unit<br />
from power source before<br />
any work is done.
Manual operation:<br />
The disposal steps can also be operated manually under the<br />
display head<strong>in</strong>g ‘Ma<strong>in</strong>tenance’ – ‘Manual Operation’ – Operational<br />
conditions, disposal steps and malfunctions are displayed<br />
on the control unit and the remote control.<br />
The mix<strong>in</strong>g, r<strong>in</strong>s<strong>in</strong>g and disposal times can be changed <strong>in</strong> parameter<br />
3.1 on the digital display.<br />
0 System<strong>in</strong>fo 1 Informations<br />
2 Ma<strong>in</strong>tenance<br />
3 Sett<strong>in</strong>gs<br />
Without SonicControl-Option<br />
1.<br />
0. System<strong>in</strong>fo<br />
Datum 13.<strong>10</strong>.<strong>10</strong><br />
Uhrzeit 11:32:55<br />
Fettabscheider DIN 4040 <strong>NS</strong> 2<br />
2 Pumpen 2,6kW 3.0 kW<br />
0. System<strong>in</strong>fo<br />
Datum 13.<strong>10</strong>.<strong>10</strong><br />
Uhrzeit 11:32:55<br />
Fettabscheider DIN 4040 <strong>NS</strong> 2<br />
Schicht-Dicke 4 cm<br />
Temperatur 22 C<br />
Informationen<br />
Wartung<br />
E<strong>in</strong>stellungen<br />
Men¸<br />
2.1 Manual operation<br />
2.2 Automatic operation<br />
2.3 SDS<br />
ohne SonicControl Option im Ñ Leerlaufì<br />
With SonicControl-Option<br />
mit SonicControl Option im Ñ Leerlaufì<br />
OK<br />
ESC<br />
2.4 Ma<strong>in</strong>tenance<br />
2.5 Free Switch<strong>in</strong>g RemoteControl<br />
45<br />
4. Operation<br />
OK<br />
ESC<br />
1.1 Informationen<br />
Betriebsstunden<br />
Logbuch<br />
Steuerungstyp<br />
Wartungsterm<strong>in</strong><br />
Akt. Messwerte<br />
4.2 <strong>Grease</strong> <strong>separator</strong> disposal function / steps<br />
Disposal of the grease <strong>separator</strong> can take place <strong>in</strong> the automatic<br />
or manual modes.<br />
• Turn on the control unit with the ma<strong>in</strong> power switch<br />
• Chang<strong>in</strong>g from manual to automatic mode can be done at<br />
any time! In the case that dur<strong>in</strong>g automatic disposal that the<br />
control unit is changed to manual mode, the automated disposal<br />
will be stopped.<br />
• The mix<strong>in</strong>g, r<strong>in</strong>s<strong>in</strong>g and disposal times have been set at the<br />
factory. On-site conditions may vary and require these<br />
times to be changed which can be done us<strong>in</strong>g the control<br />
unit.<br />
OK<br />
ESC<br />
1.1.1 Betriebsstunden<br />
Gesamtlaufzeit<br />
Laufzeit Pumpe<br />
Anl‰ ufe Pumpe<br />
Netzausfall<br />
OK<br />
ESC<br />
1.1.1 Gesamtlaufzeit<br />
00001,0h
The first disposal should take place approximately 2-3 weeks<br />
afer the <strong>separator</strong> has been placed <strong>in</strong>to operation.<br />
Disposal <strong>in</strong>tervals<br />
Accord<strong>in</strong>g to DIN EN 1825-2 the <strong>separator</strong> should be disposed<br />
/ emptied every 14 days but at a m<strong>in</strong>imum every month.<br />
The grease layer thickness can be monitored by the new SonicControl<br />
automated grease layer measurement system or<br />
by the use of the <strong>in</strong>cluded <strong>in</strong>spection w<strong>in</strong>dow.<br />
Attention: Timely dispos<strong>in</strong>g of the grease <strong>separator</strong> contents<br />
is required to assure proper grease <strong>separator</strong> operation.<br />
Due to this, the disposal should be handled by a licensed disposal<br />
company placed under contract to empty the <strong>separator</strong><br />
on a regular basis. Dur<strong>in</strong>g disposal, no wastewater should<br />
enter the <strong>separator</strong>.<br />
Disposal of the grease <strong>separator</strong> <strong>in</strong> fully automatic mode<br />
Requirement – all grease <strong>separator</strong> covers must be securely<br />
closed<br />
1. Connect the disposal truck to the end of the <strong>separator</strong>’s<br />
disposal pipe<br />
2. To beg<strong>in</strong> disposal, press the Start button and then the OK<br />
button on the control unit. On the control unit’s digital display,<br />
the <strong>in</strong>dividual disposal steps are displayed<br />
3. If a remote control is <strong>in</strong>stalled, the disposal can also be<br />
started with the remote control – however, prior to do<strong>in</strong>g<br />
this the control unit must be un-locked by the ma<strong>in</strong> control<br />
unit by go<strong>in</strong>g to the ‘Ma<strong>in</strong>tenance’ – ‘Remote control activation’<br />
sett<strong>in</strong>g (2.5.1). The automatic disposal can also be<br />
activated here by press<strong>in</strong>g the OK button.<br />
4. Beg<strong>in</strong> the automated disposal by press<strong>in</strong>g the<br />
‘START/STOP’ button on the control unit or the remote<br />
control<br />
5. The automatic disposal program beg<strong>in</strong>s operation. The<br />
current step of the disposal process is displayed on the digital<br />
display of the control unit and the remote control.<br />
6. In the case that the disposal truck needs to be changed<br />
dur<strong>in</strong>g the automated disposal process, press the<br />
‘START/STOP’ button<br />
- remove disposal hose from first truck<br />
- connect disposal hose of new truck<br />
- press the ‘START/STOP’ button on the control unit to<br />
cont<strong>in</strong>ue the disposal process<br />
7. When step 13 (f<strong>in</strong>al refill) is displayed on the control unit<br />
or the remote control, the disposal truck can disconnect<br />
the disposal hose and leave. Step 13 is the f<strong>in</strong>al refill step<br />
and the grease <strong>separator</strong> will automatically fill itself and<br />
turn off when full – the presence of the disposal truck is no<br />
longer required.<br />
5. Disposal<br />
The grease <strong>separator</strong> can also be operated from the remote<br />
control. Go to Menu 2 (Ma<strong>in</strong>tenance). Here the activation<br />
of the remote control can be made.<br />
- Here you have the option of activat<strong>in</strong>g the remote control<br />
for a specific period of time.<br />
- The remote control can also be permanently activated<br />
Disposal of the grease <strong>separator</strong> <strong>in</strong> manual mode<br />
Requirement – all grease <strong>separator</strong> covers must be securely<br />
closed<br />
1. Connect the disposal truck to the end of the <strong>separator</strong>’s<br />
disposal pipe<br />
2. To be<strong>in</strong>g the manual disposal process go to Menu 2.1<br />
Ma<strong>in</strong>tenance – 2.2.1 Manual Operation and confirm the<br />
desired disposal step by press<strong>in</strong>g the OK button. ON the<br />
display the chosen disposal step can be followed.<br />
3. If a remote control is <strong>in</strong>stalled, the disposal can also be<br />
started with the remote control – however, prior to do<strong>in</strong>g<br />
this the control unit must be un-locked by the ma<strong>in</strong> control<br />
unit by go<strong>in</strong>g to the ‘Ma<strong>in</strong>tenance’ – ‘Remote control activation’<br />
sett<strong>in</strong>g (2.5.1). The automatic disposal can also be<br />
activated here by press<strong>in</strong>g the OK button.<br />
4. Beg<strong>in</strong> the automated disposal by press<strong>in</strong>g the<br />
‘START/STOP’ button on the control unit or the remote<br />
control<br />
5. The disposal step beg<strong>in</strong>s operation. The current step of<br />
the disposal process is displayed on the digital display of<br />
the control unit and the remote control.<br />
6. In the case that the disposal truck needs to be changed<br />
dur<strong>in</strong>g the automated disposal process, press the<br />
‘START/STOP’ button<br />
- remove disposal hose from first truck<br />
- connect disposal hose of new truck<br />
- press the ‘START/STOP’ button on the control unit to<br />
cont<strong>in</strong>ue the disposal process<br />
7. When step 13 (f<strong>in</strong>al refill) is displayed on the control unit<br />
or the remote control, the disposal truck can disconnect<br />
the disposal hose and leave. Step 13 is the f<strong>in</strong>al refill step<br />
and the grease <strong>separator</strong> will automatically fill itself and<br />
turn off when full – the presence of the disposal truck is no<br />
longer required.<br />
46
5. Disposal steps grease <strong>separator</strong> acc. to. DIN 4040<br />
5.1 <strong>For</strong> <strong>separator</strong>s with Fully Automated disposal Separators <strong>NS</strong> 2, <strong>NS</strong> 4, <strong>NS</strong> 7 and <strong>NS</strong> <strong>10</strong> acc. to DIN 4040<br />
H<strong>in</strong>ts<br />
reduce fill<strong>in</strong>g level<br />
degree 30 cm<br />
Pump run times <strong>in</strong> seconds<br />
Disposal Step Function Valve position Pump<br />
Warm water Cold water<br />
<strong>NS</strong> 2 <strong>NS</strong> 4 <strong>NS</strong> 7 <strong>NS</strong> <strong>10</strong><br />
valve valve<br />
1 Dispose Dispose 30 55 90 120 on off off<br />
off<br />
off<br />
on<br />
595<br />
435<br />
225<br />
135<br />
Mix<strong>in</strong>g<br />
2 Mix<strong>in</strong>g<br />
Until the pump<br />
runs dry<br />
ca. 25 cm<br />
fill<strong>in</strong>g level<br />
off<br />
off<br />
on<br />
300<br />
220<br />
130<br />
70<br />
Dispose<br />
Dispose<br />
3<br />
off<br />
on<br />
off<br />
295<br />
220<br />
125<br />
70<br />
Mix<strong>in</strong>g<br />
Fill<strong>in</strong>g<br />
4<br />
47<br />
off<br />
off<br />
on<br />
200<br />
145<br />
85<br />
45<br />
Mix<strong>in</strong>g<br />
Mix<strong>in</strong>g<br />
5<br />
Until the pump<br />
runs dry<br />
ca. 25 cm<br />
fill<strong>in</strong>g level<br />
off<br />
off<br />
on<br />
35<br />
25<br />
15<br />
<strong>10</strong><br />
Dispose<br />
Dispose<br />
6<br />
off<br />
on<br />
off<br />
295<br />
220<br />
125<br />
70<br />
R<strong>in</strong>s<strong>in</strong>g<br />
Fill<strong>in</strong>g<br />
7<br />
off<br />
off<br />
on<br />
135<br />
<strong>10</strong>0<br />
60<br />
30<br />
R<strong>in</strong>s<strong>in</strong>g<br />
R<strong>in</strong>s<strong>in</strong>g<br />
8<br />
Until the pump<br />
runs dry<br />
ca. 25 cm<br />
fill<strong>in</strong>g level<br />
off<br />
off<br />
on<br />
35<br />
25<br />
15<br />
<strong>10</strong><br />
Dispose<br />
Dispose<br />
9<br />
off<br />
on<br />
off<br />
295<br />
220<br />
125<br />
70<br />
R<strong>in</strong>s<strong>in</strong>g<br />
Fill<strong>in</strong>g<br />
<strong>10</strong><br />
off<br />
off<br />
on<br />
70<br />
50<br />
30<br />
15<br />
R<strong>in</strong>s<strong>in</strong>g<br />
R<strong>in</strong>s<strong>in</strong>g<br />
11<br />
Until the pump<br />
runs dry<br />
to overfow the<br />
system<br />
off<br />
on<br />
on<br />
35<br />
25<br />
15<br />
<strong>10</strong><br />
Dispose<br />
Dispose<br />
12<br />
on<br />
off<br />
off<br />
<strong>10</strong>40<br />
765<br />
445<br />
235<br />
Dispose<br />
Fill<strong>in</strong>g<br />
13<br />
It is possible that on-site conditions such as pump<strong>in</strong>g height, temperature and / or water pressure will require that <strong>in</strong>dividual disposal step times need to be changed.<br />
Outlet from a DN 25 water supply pipe at 4 Bar pressure is approx 23 cubic meters per hour
5. Disposal for grease <strong>separator</strong> acc. to. EN 1825<br />
5.2 <strong>For</strong> <strong>separator</strong>s with Fully Automated disposal Separators <strong>NS</strong> 2, <strong>NS</strong> 4, <strong>NS</strong> 7 and <strong>NS</strong> <strong>10</strong> acc. to EN 1825<br />
H<strong>in</strong>ts<br />
Cold water<br />
valve<br />
Warm water<br />
valve<br />
Pump<br />
Pump run times <strong>in</strong> seconds<br />
<strong>NS</strong> 2 <strong>NS</strong> 4 <strong>NS</strong> 7 <strong>NS</strong> <strong>10</strong><br />
Disposal Step Function Valve position<br />
reduce fill<strong>in</strong>g level<br />
degree 30 cm<br />
1 Teil-Dispose Dispose 15 30 45 65 on off off<br />
off<br />
off<br />
on<br />
305<br />
215<br />
130<br />
70<br />
R<strong>in</strong>s<strong>in</strong>g<br />
2 Mix<strong>in</strong>g<br />
Until the pump<br />
runs dry<br />
ca. 25 cm<br />
fill<strong>in</strong>g level<br />
off<br />
off<br />
on<br />
155<br />
1<strong>10</strong><br />
65<br />
35<br />
Dispose<br />
Dispose<br />
3<br />
off<br />
on<br />
off<br />
225<br />
160<br />
95<br />
55<br />
R<strong>in</strong>s<strong>in</strong>g<br />
Fill<strong>in</strong>g<br />
4<br />
off<br />
off<br />
on<br />
150<br />
1<strong>10</strong><br />
65<br />
35<br />
R<strong>in</strong>s<strong>in</strong>g<br />
Mix<strong>in</strong>g<br />
5<br />
Until the pump<br />
runs dry<br />
ca. 25 cm<br />
fill<strong>in</strong>g level<br />
off<br />
off<br />
on<br />
25<br />
20<br />
15<br />
<strong>10</strong><br />
Dispose<br />
Dispose<br />
6<br />
off<br />
on<br />
off<br />
225<br />
160<br />
95<br />
55<br />
R<strong>in</strong>s<strong>in</strong>g<br />
Fill<strong>in</strong>g<br />
7<br />
off<br />
off<br />
on<br />
<strong>10</strong>0<br />
75<br />
45<br />
25<br />
R<strong>in</strong>s<strong>in</strong>g<br />
R<strong>in</strong>s<strong>in</strong>g<br />
8<br />
Until the pump<br />
runs dry<br />
ca. 25 cm<br />
fill<strong>in</strong>g level<br />
off<br />
off<br />
on<br />
25<br />
20<br />
15<br />
<strong>10</strong><br />
Dispose<br />
Dispose<br />
9<br />
48<br />
off<br />
on<br />
off<br />
225<br />
160<br />
95<br />
55<br />
R<strong>in</strong>s<strong>in</strong>g<br />
Fill<strong>in</strong>g<br />
<strong>10</strong><br />
off<br />
off<br />
on<br />
50<br />
40<br />
25<br />
15<br />
R<strong>in</strong>s<strong>in</strong>g<br />
R<strong>in</strong>s<strong>in</strong>g<br />
11<br />
Until the pump<br />
runs dry<br />
to overfow the<br />
system<br />
off<br />
on<br />
on<br />
25<br />
20<br />
<strong>10</strong><br />
<strong>10</strong><br />
Dispose<br />
Dispose<br />
12<br />
on<br />
off<br />
off<br />
740<br />
525<br />
3<strong>10</strong><br />
170<br />
Dispose<br />
Fill<strong>in</strong>g<br />
13<br />
It is possible that on-site conditions such as pump<strong>in</strong>g height, temperature and / or water pressure will require that <strong>in</strong>dividual disposal step times need to be changed.<br />
Outlet from a DN 25 water supply pipe at 4 Bar pressure is approx 23 cubic meters per hour
6.1 General<br />
49<br />
6. Konfiguration<br />
Please follow all safety <strong>in</strong>structions!<br />
Configur<strong>in</strong>g and mak<strong>in</strong>g sett<strong>in</strong>g the control unit should only be handled by a qualified servicer. Control unit sett<strong>in</strong>gs can be<br />
made <strong>in</strong> the ‘Sett<strong>in</strong>gs’ mode of the control unit – here the ‘Norm’ (3.5) or the ‘Nom<strong>in</strong>al Size’ (3.6) can be changed.<br />
3 Sett<strong>in</strong>gs 3.5. Norm<br />
3.6 Nom<strong>in</strong>al Size<br />
3.5.1 DIN 4040<br />
3.5.2 DIN<br />
Underground <strong><strong>in</strong>stallation</strong><br />
3.5.3 Euro-Norm<br />
1825<br />
3.5.4 Euro-Norm<br />
Underground <strong><strong>in</strong>stallation</strong><br />
3.6.1 <strong>NS</strong> 2<br />
3.6.8 <strong>NS</strong> 30<br />
6.2 Sett<strong>in</strong>g the Mix<strong>in</strong>g, Fill<strong>in</strong>g, Clean<strong>in</strong>g and Disposal times<br />
Changes to the mix<strong>in</strong>g, fill<strong>in</strong>g, clean<strong>in</strong>g and disposal times can be made <strong>in</strong> the ‘Parameter’ section (3.1) <strong>in</strong> the control unit<br />
3 Sett<strong>in</strong>gs 3.1. Parameter Access Code 3.1.1 Partial Disposal<br />
3.1.1 Value <strong>in</strong> seconds<br />
In this sett<strong>in</strong>g the length of the disposal steps can be changed for example:<br />
Partial disposal, Mix<strong>in</strong>g, Disposal, Fill<strong>in</strong>g and Clean<strong>in</strong>g<br />
3.1.13 Fill<strong>in</strong>g 3.1.13 Value <strong>in</strong> seconds<br />
With SonicControl Accessory also the follow<strong>in</strong>g can be changed:<br />
Alarm layer thickness, Pre-alarm layer thickness, Temperature alarm, Measur<strong>in</strong>g start, Measur<strong>in</strong>g <strong>in</strong>tervals, Level check
7. Malfunction messages<br />
7.1 Log book entries<br />
This table shows the possible malfunction messages, all errors and results will be stored <strong>in</strong> the control unit’s log book.<br />
Result LED Potential free<br />
display contact Fault’ /<br />
‘Warn<strong>in</strong>g’<br />
First <strong>in</strong>itialization No No<br />
Install unit No No<br />
Factory sett<strong>in</strong>gs No No<br />
Acute alarm confirm No No<br />
Parameters changed No No<br />
Exp. Parameters changed No No<br />
Manual operation No No<br />
Automated operation No No<br />
Read logbook No No<br />
Confirm malfunctions No No<br />
Change number of pumps No No<br />
Change norm No No<br />
Change nom<strong>in</strong>al size No No<br />
Save USB No No<br />
Send SMS No No<br />
Disposal discont<strong>in</strong>ued No No<br />
Message<br />
Relay switch<strong>in</strong>g 1 Yes Warn<strong>in</strong>g<br />
Relay switch<strong>in</strong>g 2 (optional) Yes Warn<strong>in</strong>g<br />
Relay switch<strong>in</strong>g 3 (optional) Yes Warn<strong>in</strong>g<br />
Malfunction LED Potential free<br />
display contact ‘Fault’<br />
‘Warn<strong>in</strong>g’<br />
Phase malfunction Yes Error<br />
Rotat<strong>in</strong>g field malfunction Yes Error<br />
Communication malfunction Yes Error<br />
Motor protection 1 Yes Error<br />
Motor protection 2 (optional) Yes Error<br />
Motor protection 2 (optional) Yes Error<br />
Over current P 1 Yes Error<br />
Over current P 2 (optional) Yes Error<br />
Over current P 3 (optional) Yes Error<br />
Under current P 1 Yes Error<br />
Under current P 2 (optional) Yes Error<br />
Under current P 3 (optional) Yes Error<br />
Temperature error P 1 Yes Error<br />
Temperature error P 2 (optional) Yes Error<br />
Temperature error P 3 (optional) Yes Error<br />
Relay malfunction P 1 Yes Error<br />
Relay malfunction P 2 (optional) Yes Error<br />
Relay malfunction P 3 (optional) Yes Error<br />
Max. run time exceeded P 1 Yes Error<br />
Max. run time exceeded P 2 Yes Error<br />
(optional)<br />
Max. run time exceeded P 3 Yes Error<br />
(optional)<br />
Actuator valve error 1 Yes Error<br />
Actuator valve error 2 (optional) Yes Error<br />
50
7. Malfunction messages<br />
Malfunction Cause Solution<br />
Pumps do not start Motor protection switch has activated<br />
– Motor is blocked<br />
Pump suddenly starts<br />
Bad odour<br />
Pungent odour<br />
Pump<strong>in</strong>g performance too low<br />
Control unit not function<strong>in</strong>g<br />
(no displays or lights)<br />
Motor does not run smoothly<br />
1 or 2 phases do not have power<br />
Control unit shuts off due to power<br />
surges<br />
Rotat<strong>in</strong>g field <strong>in</strong>correct<br />
Pump damaged due to foreign<br />
object<br />
<strong>For</strong>eign object <strong>in</strong> pump rotat<strong>in</strong>g area<br />
<strong>Grease</strong> <strong>separator</strong> body is not air tight<br />
Pump leak<br />
Pump(s) runn<strong>in</strong>g too hot / overloaded<br />
Rotat<strong>in</strong>g field <strong>in</strong>correct<br />
Pump rotat<strong>in</strong>g <strong>in</strong> wrong direction<br />
Power outage<br />
51<br />
Remove pump, and remove any debris<br />
/ blockage <strong>in</strong> impeller or pump hous<strong>in</strong>g<br />
area<br />
Contact <strong>KESSEL</strong> Customer Service for<br />
repair<br />
Check power supply and fuses – contact<br />
power company<br />
Switch 2 phases from the <strong>in</strong>com<strong>in</strong>g<br />
cable<br />
Check pump for damage and repair / replace<br />
if necessary<br />
Remove foreign object, check pump for<br />
damage and repair / replace if necessary<br />
Check ventilation, <strong>in</strong>let, outlet, pump outlet<br />
and <strong>separator</strong> covers to make sure<br />
they are air tight. Add 2 liters of water to<br />
re-fill <strong>in</strong>let <strong>in</strong> case P-trap has dried out.<br />
Check pump for damage and repair / replace<br />
if necessary (via Customer Service)<br />
Check pump and impeller for easy rotation,<br />
check system for switch<strong>in</strong>g problems<br />
(especially motor protection<br />
switch)<br />
Swap power cables (control unit alarm)<br />
Check pump power supply cables for<br />
proper connection<br />
- Check to make sure power supply to<br />
control unit is <strong>in</strong>tact<br />
- Check fuses<br />
- Check power supply cable for damage<br />
- Check micro-fuses <strong>in</strong> control unit (only<br />
replace with fuses with identical operat<strong>in</strong>g<br />
characteristics)
7. Malfunction messages<br />
Malfunction Cause Solution<br />
Temperature malfunction Motor w<strong>in</strong>d<strong>in</strong>g temperature Allow pump to cool, alarm must be<br />
switch has activated confirmed on control unit. If motor w<strong>in</strong>d<strong>in</strong>g<br />
temperature cont<strong>in</strong>ues to cause<br />
malfunctions – replace pump<br />
Over current The maximum allowable pump Remove blockage <strong>in</strong><br />
power has been exceeded impeller (follow safety <strong>in</strong>structions<br />
(impeller blocked)<br />
Let pump run shortly <strong>in</strong> opposite direction<br />
(‘Ma<strong>in</strong>tenance’ – ‘Manual operation’ –<br />
‘Opposite rotation’<br />
Under current The m<strong>in</strong>imum allowable pump power Check power supply cable and repair<br />
has been reached (power supply cable / replace if necessary (replace pump<br />
to pump has been cut or damaged) if necessary)<br />
Let pump run shortly <strong>in</strong> opposite direction<br />
(‘Ma<strong>in</strong>tenance’ – ‘Manual operation’ –<br />
‘Opposite rotation’)<br />
Motor protection switch Motor protection switch has been Check that current supply is correct.<br />
has activated improperly set. Current to pump to Remove pump blockage (follow safety<br />
high due to defective or blocked pump. <strong>in</strong>structions). Replace pump if damaged<br />
or defective<br />
Excessive current due to phase failure. Check power supply for phase loss.<br />
Phase error Phase L1, L2 or L3 miss<strong>in</strong>g Check control unit, power cable and<br />
fuses<br />
Check current protection switch<br />
Activation limit System protection has activated - Can be confirmed on control unit<br />
due to more than <strong>10</strong>0.000 activations - System protection allows another<br />
<strong>10</strong>00 activation before alarm activates<br />
aga<strong>in</strong><br />
- Replace system protection (contact<br />
<strong>KESSEL</strong> Customer Service<br />
- Activation alarm will cont<strong>in</strong>ue to activate<br />
after every <strong>10</strong>00 pump activations<br />
Actuator valve malfunction End position of actuator valve is Check actuator valve for proper rotation<br />
not be<strong>in</strong>g reached / movement – remove any obstructions<br />
Rotat<strong>in</strong>g field malfunction Incorrect rotat<strong>in</strong>g field at power Swap two phases of power supply<br />
connection<br />
Relay malfunction Surge protection does not switch off Disconnect control unit from power<br />
supply. Replace surge protector –<br />
contact <strong>KESSEL</strong> customer service<br />
52
8.1 Control unit and description of operation panel<br />
Fig. 1<br />
Control unit description:<br />
Control unit identification code<br />
Control unit article number<br />
Voltage and frequency<br />
Amperage<br />
Protection class<br />
Control unit serial number<br />
Control unit replacement number<br />
Danger symbol<br />
Electrical protection class<br />
CE symbol<br />
Disposal symbol (do not dispose <strong>in</strong> normal trash)<br />
Hardware status code<br />
8.2 Outputs<br />
Potential free contact • Change-over contact,<br />
center contact<br />
• Clos<strong>in</strong>g contact,<br />
Open<strong>in</strong>g contact<br />
• max. 42 VAC / 0,5 Amp<br />
Optional: remote alarm Connection option<br />
(Article Number 20162) for a remotely<br />
<strong>in</strong>stalled audible alarm<br />
53<br />
8. Control Unit<br />
Fig. 2<br />
The type plate is on<br />
the right outside of the<br />
control unit.
12. Control unit<br />
54
9.1 Safety <strong>in</strong>structions<br />
Dear Customer,<br />
Before <strong>in</strong>stall<strong>in</strong>g and plac<strong>in</strong>g the SonicControl<br />
<strong>in</strong>to operation, please read<br />
and follow all <strong>in</strong>structions <strong>in</strong> the user’s<br />
and operational manual! First check<br />
that the system has arrived undamaged.<br />
In case damage has occurred dur<strong>in</strong>g<br />
shipp<strong>in</strong>g, please follow the <strong>in</strong>structions<br />
<strong>in</strong> the ‘Guarantee’ section of<br />
this manual (Section 12).<br />
1. Safety <strong>in</strong>structions:<br />
All local and <strong>in</strong>ternational safety regulations<br />
as well as all related DIN and VDE regulations<br />
should be followed when <strong>in</strong>stall<strong>in</strong>g,<br />
operat<strong>in</strong>g, ma<strong>in</strong>ta<strong>in</strong><strong>in</strong>g or servic<strong>in</strong>g<br />
this system! Before plac<strong>in</strong>g the system<br />
<strong>in</strong>to operation, a qualified professional<br />
should <strong>in</strong>sure that all safety measures are<br />
<strong>in</strong> place. Fault current and ground must<br />
meet the local power supply regulations.<br />
The SonicControl should not be <strong>in</strong>stalled<br />
<strong>in</strong> areas that are explosion hazards. The<br />
system operated on electrical current. Not<br />
9. SonicControl (Optional)<br />
follow<strong>in</strong>g all local and <strong>in</strong>ternational safety<br />
measures could result <strong>in</strong> significant damage<br />
to the system, <strong>in</strong>jury to the operator<br />
or someone nearby as well the possibility<br />
of a fatal accident.<br />
The power supply to the SonicControl<br />
should be disconnect before any work is<br />
begun.<br />
It is important to <strong>in</strong>sure that the power<br />
supply cable to the SonicControl is <strong>in</strong> perfect<br />
operat<strong>in</strong>g condition. If the cable is damage<br />
or defective – DO NOT connect the<br />
cable to a power source. If the system is<br />
<strong>in</strong> operation and it is determ<strong>in</strong>ed that the<br />
cable is damaged or defective, immediately<br />
disconnect the SonicControl from its<br />
power source.<br />
VDE 0<strong>10</strong>0 regulations must be followed.<br />
The control unit should not be <strong>in</strong>stalled <strong>in</strong><br />
any area / room that are explosion hazards.<br />
In order to <strong>in</strong>sure that the system operates<br />
appropriately, it should be regularly <strong>in</strong>-<br />
9.3 Installation<br />
Installation of sensor and sensor support<br />
➊ ➋ ➌ ➍<br />
55<br />
spected and ma<strong>in</strong>ta<strong>in</strong>ed. We recommend<br />
that a service contract with a licensed professional<br />
is signed.<br />
9.2 General<br />
Dear Customer,<br />
<strong>KESSEL</strong> thanks you for choos<strong>in</strong>g this product.<br />
Before leav<strong>in</strong>g the factory this system<br />
has gone through very strict quality<br />
control <strong>in</strong>spections. Please check that the<br />
system is complete and that no damaged<br />
occurred dur<strong>in</strong>g shipp<strong>in</strong>g. In case damage<br />
has occurred dur<strong>in</strong>g shipp<strong>in</strong>g, please<br />
follow the <strong>in</strong>structions <strong>in</strong> the ‘Guarantee’<br />
section of this manual (Section 12).<br />
This Installation and Operat<strong>in</strong>g manual<br />
conta<strong>in</strong>s valuable <strong>in</strong>formation and <strong>in</strong>structions<br />
for the proper <strong><strong>in</strong>stallation</strong>, operation,<br />
ma<strong>in</strong>tenance and repair of this product.<br />
Prior to do<strong>in</strong>g any work with this system,<br />
this entire manual should be<br />
thoroughly read and followed.<br />
sensor bracket<br />
PT screw Torx 40x12<br />
PT screw Torx K 50x20<br />
Pipe clamp PE d25<br />
Drill<strong>in</strong>g template/ screw cover<br />
Outlet structure partition<br />
Place the drill<strong>in</strong>g template on the outside of the outlet structure and drill 2 x Ø 4 mm holes<br />
SonicControl sensor<br />
(top two holes!).<br />
Red arrow mark<strong>in</strong>g<br />
Place the drill<strong>in</strong>g template on the <strong>in</strong>side of the outlet structure and fix <strong>in</strong> place from the outside (see ).<br />
Put the sensor and the pipe clamps together to the sensor bracket.<br />
Screw the sensor bracket to the outlet structure us<strong>in</strong>g a torque of 1 Nm<br />
and clip the sensor <strong>in</strong> place.
9.4 SonicControl Sensor Installation<br />
9. SonicControl (Optional)<br />
Above Freie Aufstellung ground Artikel <strong>NS</strong><br />
Abstand Distance Oberkannte<br />
between top<br />
unterer of lower "F<strong>in</strong>ger" sensor zu ‘f<strong>in</strong>-<br />
Unterkannte ger’ to base of Auslauf separa-<br />
(Wasserl<strong>in</strong>ie)<br />
tor outlet (waterl<strong>in</strong>e)<br />
Holes to use on drill<strong>in</strong>g<br />
template<br />
Bohrlöcher <strong>in</strong><br />
Bohrschablone<br />
Alarm Alarmniveau level = = Recommend empfohlenes Prealarm Vor-<br />
max max. grease level alarmniveau <strong>in</strong> cm (2/3 <strong>in</strong> of cm max<br />
layer Fettschicht- thickness layer (= 2/3 thickness) des max.<br />
<strong>in</strong><br />
dicke<br />
cm<br />
<strong>in</strong> cm Speichervolumens)<br />
Maximum sludge<br />
layer thickness <strong>in</strong> cm<br />
(50% of total sludge<br />
trap volume)<br />
EURO "G"<br />
93002<br />
93004<br />
93007<br />
930<strong>10</strong><br />
EURO "D"<br />
2<br />
4<br />
7<br />
<strong>10</strong><br />
50 cm<br />
50 cm<br />
50 cm<br />
50 cm<br />
obere beiden Bohrlöcher<br />
obere beiden Bohrlöcher<br />
obere beiden Bohrlöcher<br />
obere beiden Bohrlöcher<br />
obere beiden Bohrlöcher<br />
23<br />
24<br />
27<br />
24<br />
15<br />
16<br />
18<br />
16<br />
20<br />
25<br />
30<br />
27<br />
93002.00 / D1 2 50 cm obere beiden Bohrlöcher 23 15<br />
20<br />
93004.00 / D1 4 50 cm obere beiden Bohrlöcher 24 16<br />
25<br />
93007.00 / D1 7 50 cm obere beiden Bohrlöcher 27 18<br />
30<br />
930<strong>10</strong>.00 / D1 <strong>10</strong> 50 cm obere beiden Bohrlöcher 24 16<br />
27<br />
EURO "DS"<br />
93002.50 und .00 / DS1<br />
93004.50 und .00 / DS1<br />
2<br />
4<br />
50 cm<br />
50 cm<br />
obere beiden Bohrlöcher<br />
obere beiden Bohrlöcher<br />
23<br />
24<br />
15<br />
16<br />
20<br />
25<br />
93007.50 und .00/ DS1 7 50 cm obere beiden Bohrlöcher 27 18<br />
30<br />
930<strong>10</strong>.50 und .00 / DS1 <strong>10</strong> 50 cm obere beiden Bohrlöcher 24 16<br />
27<br />
EURO E+S "M"<br />
93002.50 und .00 / M1<br />
93004.50 und .00 / M1<br />
93007.50 und .00 / M1<br />
930<strong>10</strong>.50 und .00 / M1<br />
2<br />
4<br />
7<br />
<strong>10</strong><br />
50 cm<br />
50 cm<br />
50 cm<br />
50 cm<br />
obere beiden Bohrlöcher<br />
obere beiden Bohrlöcher<br />
obere beiden Bohrlöcher<br />
obere beiden Bohrlöcher<br />
23<br />
24<br />
27<br />
24<br />
15<br />
16<br />
18<br />
16<br />
20<br />
25<br />
30<br />
27<br />
EURO E+S "PV"<br />
93002.50 und .00 / P1<br />
93004.50 und .00 / P1<br />
93007.50 und .00 / P1<br />
930<strong>10</strong>.50 und .00 / P1<br />
2<br />
4<br />
7<br />
<strong>10</strong><br />
50 cm<br />
50 cm<br />
50 cm<br />
50 cm<br />
obere beiden Bohrlöcher<br />
obere beiden Bohrlöcher<br />
obere beiden Bohrlöcher<br />
obere beiden Bohrlöcher<br />
23<br />
24<br />
27<br />
24<br />
15<br />
16<br />
18<br />
16<br />
20<br />
25<br />
30<br />
27<br />
DIN 4040 "G" rund<br />
98201 1 58 cm obere beiden Bohrlöcher 16 11<br />
46<br />
98202<br />
DIN 4040 "D" rund<br />
2 58 cm obere beiden Bohrlöcher 16 11<br />
54<br />
98201.00/D1 1 58 cm obere beiden Bohrlöcher 16 11<br />
14<br />
98202.00/D1 2 58 cm obere beiden Bohrlöcher 16 11<br />
23<br />
Underground <strong><strong>in</strong>stallation</strong> 93001<br />
93001 Euro / ‘G’ 80 / 120 B und D 1<br />
93002 / 80<br />
80<br />
/ 120<br />
120<br />
B und<br />
und<br />
D 2<br />
1<br />
93004<br />
93002<br />
/ 80<br />
80<br />
/ 120<br />
120<br />
B und<br />
und<br />
D 4<br />
2<br />
93007<br />
93004<br />
/ 120<br />
80 /<br />
B<br />
120<br />
und<br />
B<br />
D<br />
und D<br />
7<br />
4<br />
930<strong>10</strong><br />
93007<br />
/ 120<br />
120<br />
B und<br />
und<br />
D <strong>10</strong><br />
7<br />
93015<br />
930<strong>10</strong><br />
/ 120<br />
120<br />
B und<br />
und<br />
D 15<br />
<strong>10</strong><br />
93020<br />
93015<br />
/ 120<br />
120<br />
B und<br />
und<br />
D 20<br />
15<br />
93020 / 120 B und D 20<br />
E<br />
DIN 4040 "G"<br />
98201<br />
DIN 4040<br />
/ 00<br />
"G"<br />
/ 80 / 120 B und D 1<br />
98202 / 00 / 80 / 120 B und D 2<br />
98204 / 00 / 80 / 120 B und D 4<br />
50 cm<br />
50<br />
50<br />
cm<br />
cm<br />
50<br />
50<br />
cm<br />
cm<br />
48<br />
50<br />
cm<br />
cm<br />
48<br />
48<br />
cm<br />
cm<br />
56<br />
48<br />
cm<br />
cm<br />
56<br />
56<br />
cm<br />
cm<br />
56 cm<br />
58 cm<br />
58 cm<br />
58 cm<br />
obere beiden Bohrlöcher<br />
obere<br />
obere<br />
beiden<br />
beiden<br />
Bohrlöcher<br />
Bohrlöcher<br />
obere<br />
obere<br />
beiden<br />
beiden<br />
Bohrlöcher<br />
Bohrlöcher<br />
untere<br />
obere beiden<br />
beiden<br />
Bohrlöcher<br />
Bohrlöcher<br />
untere<br />
untere<br />
beiden<br />
beiden<br />
Bohrlöcher<br />
Bohrlöcher<br />
untere<br />
untere<br />
beiden<br />
beiden<br />
Bohrlöcher<br />
Bohrlöcher<br />
untere<br />
untere<br />
beiden<br />
beiden<br />
Bohrlöcher<br />
Bohrlöcher<br />
untere beiden Bohrlöcher<br />
untere beiden Bohrlöcher<br />
untere beiden Bohrlöcher<br />
untere beiden Bohrlöcher<br />
17<br />
17<br />
17<br />
17<br />
17<br />
17<br />
17<br />
17<br />
17<br />
17<br />
17<br />
17<br />
17<br />
17<br />
16<br />
16<br />
16<br />
11<br />
11<br />
11<br />
11<br />
11<br />
11<br />
11<br />
11<br />
11<br />
11<br />
11<br />
11<br />
11<br />
11<br />
11<br />
11<br />
11<br />
15<br />
27<br />
23<br />
23<br />
32<br />
31<br />
54<br />
54<br />
Für weitere Artikel kontaktieren Sie bitte den <strong>KESSEL</strong>-Werkskundendienst (Telefon +49 (0) 8456 / 27462)<br />
Note:<br />
<strong>For</strong> more articles please contact the <strong>KESSEL</strong> customer service. After <strong><strong>in</strong>stallation</strong> completely fill the <strong>separator</strong> with water, check<br />
height and correct if necessary! Completely filled <strong>separator</strong> must perform the "manual mode" (2.1.15) SonicControl "0 cm"<br />
show. Should be no mechanical correction possible change <strong>in</strong> "Parameters -> level adjustment"(3.1.20) to perform.<br />
The parameters are password protected - please contact the <strong>KESSEL</strong> customer service at +49 (0) 8456/27462.<br />
56
9.5 Installation example<br />
9. SonicControl (Optional)<br />
Illustration shows a Euro Norm <strong>NS</strong> 2 above ground grease<br />
<strong>separator</strong><br />
57<br />
Make sure SoncControl<br />
cable is not <strong>in</strong> tension –<br />
should be loose. Also make<br />
sure cable is clear (not<br />
below or above) any of the<br />
SonicControl sensors.<br />
<strong>Grease</strong> Separator < <strong>NS</strong> 15<br />
Conta<strong>in</strong>er wall < = <strong>10</strong> mm<br />
Cable screw<br />
connection*<br />
<strong>Grease</strong> Separator > <strong>NS</strong> 15<br />
Conta<strong>in</strong>er wall > = <strong>10</strong> mm<br />
Cable screw<br />
connection*<br />
* to avoid odor nuisances draw cable<br />
screw connection close.<br />
Drill<strong>in</strong>g ø 19 mm<br />
Sensor cable<br />
Thread PG 11<br />
The sensor should be <strong>in</strong>stalled at a 60<br />
degree angle to make sure than the <strong>separator</strong>’s<br />
<strong>in</strong>ternal support rod is not near the<br />
SonicControl sensors.
9.6 Remote Alarm<br />
The remote alarm (Article Number 20162)<br />
should be used when an audible alarm is<br />
desired <strong>in</strong> a different area than where the<br />
grease <strong>separator</strong>’s control unit is <strong>in</strong>stalled.<br />
9.7 Shorten<strong>in</strong>g the sensor cable length<br />
The SonicControl cable can be shortened<br />
if necessary. Please note that the<br />
cable connection jacks are for use with<br />
cables with a maximum crossectional<br />
area of 1.5 square mm – do not use cables<br />
with a large area.<br />
9.8 Potential free contact<br />
The potential free contact can be used<br />
to transfer a warn<strong>in</strong>g signal to a BMS<br />
(Build<strong>in</strong>g Management System). (Max<br />
connection of 42 V / 0.5 Amp).<br />
9. SonicControl (Optional)<br />
The <strong>in</strong>cluded stickers are to notify the disposal company of which <strong>separator</strong><br />
access hole should be opened and used for disposal of the<br />
grease <strong>separator</strong>. Do not used the access hole which conta<strong>in</strong>s the SonicControl<br />
to empty the grease <strong>separator</strong> – the disposal truck’s hose<br />
could damage or dislodge the SonicControl.<br />
<strong>For</strong> above ground grease <strong>separator</strong>s, the sticker should be placed on<br />
the exterior of the <strong>separator</strong> near the access cover that should not be<br />
used.<br />
Note: <strong>in</strong>form the disposal company when a SonicControl sensor<br />
is <strong>in</strong>stalled <strong>in</strong> a grease <strong>separator</strong>.<br />
58
9. SonicControl (Optional)<br />
9.9 Installation / Cables connections<br />
The cables should be connected to the control unit as shown <strong>in</strong> the <strong><strong>in</strong>stallation</strong> manual. Please use the <strong>in</strong>cluded M16 cable<br />
screws<br />
IMPORTANT: After all cables have been connected, they should be secured<br />
with tie-wraps. The sonic control cable should be laid separately from the<br />
power cable <strong>in</strong> order to avoid electrical <strong>in</strong>terference.<br />
59
Cable extensions – watertight (IP 68)<br />
The SonicControl is supplied with <strong>10</strong><br />
meter cables. If required this can be extended<br />
on site to a max total length of<br />
30 meters. With a total length of over 30<br />
meters, a reliable operation of the SonicControl<br />
can no longer be guaranteed<br />
as <strong>in</strong>ductive disturbances effect the<br />
sensor.<br />
2<br />
Note:<br />
Follow all VDE 0<strong>10</strong>0 regulations<br />
when extend<strong>in</strong>g the cable. The control<br />
unit must not be <strong>in</strong>stalled <strong>in</strong> areas<br />
which are at risk of explosion. If the<br />
cable is to be laid with other cables –<br />
the SonicControl cable should be<br />
wrapped with a shielded jacket to<br />
prevent <strong>in</strong>terference.<br />
9.<strong>10</strong> Commission<strong>in</strong>g<br />
In order to activate the SonicControl,<br />
<strong>KESSEL</strong> Customer service must be<br />
contacted<br />
9.11 Inspection and Ma<strong>in</strong>tenance<br />
The sensor must be cleaned on a regular<br />
basis. Dur<strong>in</strong>g every disposal of the<br />
grease <strong>separator</strong>, the SonicControl<br />
probe should be cleaned with warm or<br />
hot water. If a pressure washer is used<br />
– spray at a distance of at least 30cm.<br />
The sensor does not need to be removed<br />
to be cleaned.<br />
• If the SonicControl is <strong>in</strong>stalled <strong>in</strong> a<br />
<strong>KESSEL</strong> PV fully automated <strong>separator</strong>,<br />
clean<strong>in</strong>g of the probe does not<br />
need to be done dur<strong>in</strong>g every disposal.<br />
With a PV <strong>separator</strong>, the Sonic-<br />
Control should be cleaned dur<strong>in</strong>g<br />
every service / ma<strong>in</strong>tenance of the <strong>separator</strong>.<br />
9. SonicControl (Optional)<br />
Fig.1<br />
fig.2<br />
Fig.3<br />
Fig.4<br />
60<br />
Fig. 1: connect bare cables with compression<br />
connectors<br />
Fig. 2: Enclose connection <strong>in</strong> appropriate<br />
watertight encloser and seal<br />
both sides<br />
Fig. 3: Fill enclosure with plastic res<strong>in</strong><br />
Fig. 4: View of completed connection<br />
Individual parts available upon request
Please follow all safety <strong>in</strong>structions <strong>in</strong> Section 1.<br />
9.12 Events display (only <strong>in</strong> logbook)<br />
9. SonicControl (Optional)<br />
Event Cause Remediation measures<br />
Type of system changed Type of system was changed<br />
Ma<strong>in</strong>tenance Ma<strong>in</strong>tenance dates have been entered<br />
Manual operation Manual operation has been set<br />
Confirm audible alarm Audible alarm has been confirmed<br />
Malfunction confirmed Malfunction has been confirmed<br />
Factory sett<strong>in</strong>gs Re-set to factory sett<strong>in</strong>gs<br />
9.13 Malfunctions display<br />
Malfunction display Malfunction type Cause Remediation measures<br />
Pre-Alarm layer thickness Bl<strong>in</strong>k<strong>in</strong>g (Alarm) <strong>Grease</strong> layer level has also Check grease layer<br />
been reached thickness and contact<br />
(see Section 3.3) disposal company if required<br />
No calm phase detected Bl<strong>in</strong>k<strong>in</strong>g (Alarm) Measurement tak<strong>in</strong>g place Check measurement times<br />
dur<strong>in</strong>g kitchen operation <strong>in</strong> Parameter section of<br />
wastewater enter<strong>in</strong>g grease control unit and re-set if<br />
<strong>separator</strong> results <strong>in</strong> <strong>in</strong>accurate<br />
measurements.<br />
required<br />
<strong>Grease</strong> layer alarm Audible alarm and Maximum grease layer Dispose grease<br />
bl<strong>in</strong>k<strong>in</strong>g alarm thickness reached<br />
(also see section 3.3)<br />
<strong>separator</strong> contents<br />
Temperature alarm Audible alarm and Wastewater temperature Reduce wastewater<br />
bl<strong>in</strong>k<strong>in</strong>g alarm enter<strong>in</strong>g grease <strong>separator</strong> temperature enter<strong>in</strong>g<br />
too high grease <strong>separator</strong><br />
Communication error Audible alarm and Error <strong>in</strong> modem reception Step 1 – check reception<br />
bl<strong>in</strong>k<strong>in</strong>g alarm Step 2 if not reception is<br />
available then use of modem<br />
is not possible. If reception is<br />
available then replace modem<br />
61
9. SonicControl (Optional)<br />
9.14 General malfunctions<br />
First attempt to resolve the problem. If the problem can not be solved place the ma<strong>in</strong> switch to the ‘0’ sett<strong>in</strong>g and then<br />
press the alarm button for a m<strong>in</strong>imum of 5 seconds. This will confirm the malfunction and enter the data <strong>in</strong>to the logbook<br />
(this will not however solve the problem).<br />
Malfunction Error Cause Remedial measures<br />
Deviation between grease Inaccurate Improper <strong><strong>in</strong>stallation</strong> Check type of <strong>separator</strong> and<br />
layer seen <strong>in</strong> <strong>in</strong>spection SonicControl of SonicControl sensor assure SonicControl sett<strong>in</strong>g is<br />
w<strong>in</strong>dow (if available) and measurement correct<br />
SonicControl grease Improper <strong>in</strong>itialization Newly calibrate<br />
layer read<strong>in</strong>g of SonicControl the sensor<br />
Dirt or debris on Check position and <strong><strong>in</strong>stallation</strong><br />
SonicControl sensor of SonicControl probe<br />
Sensors are not <strong>in</strong> proper Set type of grease<br />
position and are not able<br />
to sense accurately<br />
Type of grease <strong>separator</strong> Clean sensor probes<br />
or size/model improperly<br />
set<br />
9.15 System errors<br />
Malfunction Cause Remedial measures<br />
Odour nuisance Cable entrance po<strong>in</strong>t <strong>in</strong>to grease <strong>separator</strong> Check conduit entrance<br />
is not air tight for tightness – repair if necessary<br />
Water <strong>in</strong> grease Cable entrance po<strong>in</strong>t <strong>in</strong>to grease <strong>separator</strong> Check conduit entrance<br />
<strong>separator</strong> area is not water tight for tightness – repair if necessary<br />
9.16 Techical data<br />
Inputs<br />
Sensor <strong>in</strong>put Sensor <strong>in</strong>put SonicControl<br />
62
9.17 Replacement parts and accessories<br />
➀ ➁<br />
9. SonicControl (Optional)<br />
63<br />
Order Number<br />
11. Ultrasonic sensor 395-<strong>10</strong>4<br />
2. Conduit entrance system 9178221<br />
DN/OD 50<br />
<strong>in</strong>nen aussen
9. SonicControl (Optional)<br />
64
<strong>10</strong>. Accessories / Replacement parts<br />
Add<strong>in</strong>g accessories to a system is <strong>in</strong> general not a problem. We would k<strong>in</strong>dly ask you to contact the <strong>KESSEL</strong> Customer Service<br />
Department for <strong>in</strong>formation concern<strong>in</strong>g this.<br />
<strong>10</strong>.1 Remote Control (Article Number 916601)<br />
The remote control can be directly connected to the ma<strong>in</strong> control unit. The remote controls allows complete grease <strong>separator</strong><br />
operation (dur<strong>in</strong>g disposal) from a remote location (normally the same location where the disposal truck connects its disposal<br />
hose to the grease <strong>separator</strong> disposal pipe). The remote controls cable length is <strong>10</strong> meters which can be extended to<br />
a maximum length of <strong>10</strong>0 meters.<br />
<strong>10</strong>.2 Sampl<strong>in</strong>g chamber DN <strong>10</strong>0/150<br />
<strong>10</strong>.3 Aqualift F lift<strong>in</strong>g station<br />
<strong>KESSEL</strong> offers a wide range of lift<strong>in</strong>g station with different for<br />
use prior or after a grease <strong>separator</strong>. Please note that only<br />
tw<strong>in</strong> pump lift<strong>in</strong>g stations are recommended for use with grease<br />
<strong>separator</strong>s <strong>in</strong> order to assure cont<strong>in</strong>uous operation.<br />
<strong>KESSEL</strong> offers a wide range of sampl<strong>in</strong>g chambers for above ground and underground<br />
<strong><strong>in</strong>stallation</strong>. The sampl<strong>in</strong>g chambers are odour tight. The sampl<strong>in</strong>g chamber<br />
allows an accurate sample of the treated wastewater to be taken without the<br />
release of annoy<strong>in</strong>g odours. The samples can be used for test<strong>in</strong>g purposes – for<br />
example DIN 38409. Prior to tak<strong>in</strong>g a sample, the <strong>in</strong>terior of the sampl<strong>in</strong>g chamber<br />
should be cleaned. There are no uniform regulations requir<strong>in</strong>g the <strong><strong>in</strong>stallation</strong> of a<br />
sampl<strong>in</strong>g chamber but it is required by DIN 1986 Part I. Please follow local guidel<strong>in</strong>es<br />
and regulations <strong>in</strong> your area.<br />
Type Art. Nr.<br />
Dra<strong>in</strong>age horizontally 915 871<br />
Dra<strong>in</strong>age vertically 915 870<br />
65<br />
Nom<strong>in</strong>al<br />
activity<br />
Electrical Connection <strong>NS</strong> Art. Nr.<br />
1,1 kW 400 V DS (3-phase) DN <strong>10</strong>0 28 659<br />
2,2 kW 400 V DS (3-phase) DN <strong>10</strong>0 28 631
<strong>10</strong>. Accessories / Replacement parts<br />
<strong>10</strong>.5 Replacement parts / Accessories for ma<strong>in</strong>tenance and general <strong>in</strong>spection<br />
Article Order Nr.<br />
<strong>For</strong> <strong>KESSEL</strong> DIN 4040 grease <strong>separator</strong>s<br />
• Separator access cover 630 mm diameter 916901<br />
• Gasket for access cover 630 mm diameter 917201<br />
• Quick release clamp for access cover 630 mm diameter 917001<br />
<strong>For</strong> <strong>KESSEL</strong> EN 1825 grease <strong>separator</strong>s<br />
• Separator access cover 420 mm diameter 916904<br />
• Gasket for access cover 420 mm diameter 917204<br />
• Quick release clamp for access cover 420 mm diameter 917004<br />
<strong>For</strong> all <strong>KESSEL</strong> grease <strong>separator</strong>s<br />
• 3.0 kW disposal pump with macerat<strong>in</strong>g system (for <strong>NS</strong> 2-<strong>10</strong> <strong>separator</strong>s) 419-001<br />
• Control unit PV 400 363-412<br />
• General grease <strong>separator</strong> <strong>in</strong>spection (from <strong>KESSEL</strong> Customer Service) 917411<br />
• Operational log book for grease <strong>separator</strong> 917409<br />
• Watertightness test 917417<br />
66
Please follow all safety <strong>in</strong>structions!<br />
11.1 Ma<strong>in</strong>tenance<br />
11. Ma<strong>in</strong>tenance / General Inspection<br />
The grease <strong>separator</strong> should be <strong>in</strong>spected once per year.<br />
Along with the <strong>in</strong>spection, the follow<strong>in</strong>g po<strong>in</strong>t should also be<br />
conducted:<br />
- Inspection of the <strong>in</strong>terior walls of the grease <strong>separator</strong><br />
- Inspection of all electrical parts and connection (if <strong>separator</strong><br />
model has electrical equipment)<br />
- Any work done on the <strong>separator</strong> should be entered <strong>in</strong>to the<br />
<strong>separator</strong>’s logbook<br />
Mechanical parts such as pumps, valves, <strong>in</strong>spection w<strong>in</strong>dows,<br />
and closure valves should be <strong>in</strong>spected and ma<strong>in</strong>ta<strong>in</strong>ed<br />
twice per year.<br />
11.2 General Inspection<br />
Before plac<strong>in</strong>g the <strong>separator</strong> <strong>in</strong>to service and every 5 years<br />
thereafter, the <strong>separator</strong> should undergo a general <strong>in</strong>spection.<br />
The <strong>in</strong>spection should take place after the <strong>separator</strong> has been<br />
emptied and cleaned. The follow<strong>in</strong>g po<strong>in</strong>ts should be checked<br />
dur<strong>in</strong>g this <strong>in</strong>spection:<br />
Calculation of <strong>separator</strong> system<br />
- General condition and watertightness of grease <strong>separator</strong><br />
- Conditions of <strong>in</strong>ternal walls of grease <strong>separator</strong><br />
1. In the case that a <strong>KESSEL</strong> product is defective, <strong>KESSEL</strong> has<br />
the option of repair<strong>in</strong>g or replac<strong>in</strong>g the product. If the product<br />
rema<strong>in</strong>s defective after the second attempt to repair or replace<br />
the product or it is economically unfeasible to repair or replace<br />
the product, the customer has the right to cancel the<br />
order / contract or reduce payment accord<strong>in</strong>gly. <strong>KESSEL</strong><br />
must be notified immediately <strong>in</strong> writ<strong>in</strong>g of defects <strong>in</strong> a product.<br />
In the case that the defect is not visible or difficult to detect,<br />
<strong>KESSEL</strong> must be notified immediately <strong>in</strong> writ<strong>in</strong>g of the defect<br />
as soon as it is discovered. If the product is repaired or replaced,<br />
the newly repaired or replaced product shall receive<br />
a new warranty identical to that which the orig<strong>in</strong>al (defective)<br />
product was granted. The term defective product refers only<br />
to the product or part need<strong>in</strong>g repair or replacement and not<br />
necessarily to the entire product or unit. <strong>KESSEL</strong> products are<br />
warranted for a period of 24 month. This warranty period beg<strong>in</strong>s<br />
on the day the product is shipped form <strong>KESSEL</strong> to its customer.<br />
The warranty only applies to newly manufactured<br />
products. Additional <strong>in</strong>formation can be found <strong>in</strong> section 377<br />
of the HGB.<br />
67<br />
12. Warranty<br />
- Condition of electrical parts (if <strong>separator</strong> has electrical equipment)<br />
- Check for proper grease <strong>separator</strong> ventilation<br />
- Check log book for completeness and accuracy<br />
- Confirmation that <strong>separator</strong> has been properly and timely<br />
disposed<br />
- Check for availability and completeness of all paperwork and<br />
certifications<br />
The <strong>in</strong>spection report should list any defects or problems with<br />
the <strong>separator</strong> which should immediately be repaired or brought<br />
<strong>in</strong>to the operat<strong>in</strong>g condition.<br />
In addition to the standard warranty, <strong>KESSEL</strong> offers an additional<br />
20 year warranty on the polymer bodies of class I / II<br />
fuel <strong>separator</strong>s, grease <strong>separator</strong>s, <strong>in</strong>spection chambers, wastewater<br />
treatment systems and ra<strong>in</strong>water storage tanks. This<br />
additional warranty applies to the watertightness, usability<br />
and structural soundness of the product.<br />
A requirement of this additional warranty is that the product is<br />
properly <strong>in</strong>stalled and operated <strong>in</strong> accordance with the valid<br />
<strong><strong>in</strong>stallation</strong> and user's manual as well as the correspond<strong>in</strong>g<br />
norms / regulations.<br />
2. Wear and tear on a product will not be considered a defect.<br />
Problems with products result<strong>in</strong>g from improper <strong><strong>in</strong>stallation</strong>,<br />
handl<strong>in</strong>g or ma<strong>in</strong>tenance will also not be considered a defect.<br />
Note: Only the manufacturer may open sealed components or<br />
screw connections. Otherwise, the warranty may become null<br />
and void<br />
01.06.20<strong>10</strong>
EU-KONFORMITÄTSERKLÄRUNG<br />
EC declaration of conformity/ Déclaration CE de conformité<br />
Nach der Masch<strong>in</strong>enrichtl<strong>in</strong>ie 2006/42/EG, der Niederspannungsrichtl<strong>in</strong>ie 2006/95/EG, Richtl<strong>in</strong>ie der<br />
elektromagnetischen Verträglichkeit 2004/<strong>10</strong>8/EG und Bauproduktrichtl<strong>in</strong>ie 89/<strong>10</strong>6/EWG / Accord<strong>in</strong>g to<br />
the Mach<strong>in</strong>e Guidel<strong>in</strong>es 2006/42/EG, the Low Voltage Guidel<strong>in</strong>es 2006/95/EG, Electromagnetism<br />
Guidel<strong>in</strong>es 2004/<strong>10</strong>8/EG and <strong>in</strong> accordance with Directive 89/<strong>10</strong>6/EWG / Selon les directives<br />
mécaniques 2006/42/EG, les directives de basse tension 2006/95/EG, les directives pour la<br />
compatibilité électromagnétique 2004/<strong>10</strong>8/EG et les directives de construction 89/<strong>10</strong>6/EWG<br />
Hiermit erklären wir, / Herewith we declare, / Par la présente, nous déclarons,<br />
dass das Produkt/ that the product/ que le produit<br />
<strong>KESSEL</strong> AG<br />
Bahnhofstraße 31<br />
D-85<strong>10</strong>1 Lent<strong>in</strong>g<br />
<strong>KESSEL</strong>- Fettabscheider Euro “E+S” PV<br />
Zur freien Aufstellung <strong>in</strong> <strong>frost</strong>geschützten Räumen<br />
<strong>KESSEL</strong> Euro „E+S“ PV <strong>Grease</strong> Separator<br />
for <strong>in</strong>terior <strong><strong>in</strong>stallation</strong><br />
Séparateur à graisses <strong>KESSEL</strong> Euro “E+S” PV<br />
Pour une <strong><strong>in</strong>stallation</strong> en local à l’abri du gel<br />
den Bestimmungen der EN 1825-1:2004 entspricht und die Vorraussetzungen für die CE-<br />
Kennzeichnung gemäß Anhang ZA der Norm erfüllt./ meets EN 1825-1:2004 requirements and fulfills<br />
the pre-requisites for the CE Mark attachment ZA./ est conforme à la norme EN 1825-1:2004 et<br />
présente les directives pour marquage CE selon complément ZA de la norme.<br />
Zur Kennzeichnung der Übere<strong>in</strong>stimmung der Produkte ist auf dem Typenschild das Zeichen der<br />
Richtl<strong>in</strong>ie 93/68/EWG angebracht./ The 93/68/EEC code mark should be located on the ID plate on<br />
the product./ Le marquage et l´<strong>in</strong>dentification du produit figurent sur la plaquette d´identification selon<br />
les directives 93/68 EWG.<br />
Lent<strong>in</strong>g, den 03.01.2012<br />
M. R<strong>in</strong>ckens E. Thiemt<br />
Leiter Innovationsmanagement / Dokumentationsverantwortlicher Vorstand<br />
Innovation Management Manager / Responsible for Documentation Manag<strong>in</strong>g Board<br />
Responsable du management pour <strong>in</strong>novation et de la documentation Conseil d´adm<strong>in</strong>istration<br />
Prüfstelle/ Accredited Laboratory/ Bureau de vérification:<br />
LGA QualiTest GmbH, TÜV Rhe<strong>in</strong>land Group, Dreikronenstraße 31, D-97082 Würzburg<br />
68
Mat.-Description<br />
14. Separator characteristics<br />
Mat.-No./Order-No./Prod. Date<br />
Ref.No./Material/Weight<br />
69<br />
EN/Approval<br />
Dimensions<br />
Volume<br />
Density<br />
Description 1<br />
Description 2<br />
16<br />
This unit has been checked for watertightness to be sure that it is fully operational before leav<strong>in</strong>g the factory.<br />
Date Name of exam<strong>in</strong>er
15. Important contacts / Info<br />
Separator Type: __________________________________________________________<br />
Day / Hour __________________________________________________________<br />
Project description /Build<strong>in</strong>g services supervisor __________________________________________________________<br />
Address __________________________________________________________<br />
Telephone / Fax __________________________________________________________<br />
Builder __________________________________________________________<br />
Address __________________________________________________________<br />
Telephone / Fax __________________________________________________________<br />
Planner __________________________________________________________<br />
Address __________________________________________________________<br />
Telephone / Fax __________________________________________________________<br />
Contracted plumb<strong>in</strong>g company __________________________________________________________<br />
Address __________________________________________________________<br />
Telephone / Fax __________________________________________________________<br />
<strong>KESSEL</strong>-Commissions no.:<br />
System operator /owner __________________________________________________________<br />
Address __________________________________________________________<br />
Telephone / Fax __________________________________________________________<br />
User __________________________________________________________<br />
Address __________________________________________________________<br />
Telephone / Fax __________________________________________________________<br />
Person of delivery __________________________________________________________<br />
Other remarks __________________________________________________________<br />
The system operator, and those responsible, were present dur<strong>in</strong>g the commission<strong>in</strong>g of this system.<br />
____________________________ ____________________________ ____________________________<br />
Place and date Signature owner Signature user<br />
70
15. Important contacts / Info<br />
Handover certificate (copy for the company carry<strong>in</strong>g out the <strong><strong>in</strong>stallation</strong>)<br />
❏ The <strong>in</strong>itial operation and <strong>in</strong>struction was carried out <strong>in</strong> the presence of the person authorised to perform the<br />
acceptance and the system operator.<br />
❏ The system operator/person authorised to perform the acceptance was <strong>in</strong>formed about the obligation to service<br />
the product accord<strong>in</strong>g to the enclosed operat<strong>in</strong>g <strong>in</strong>structions.<br />
❏ Initial operation and <strong>in</strong>struction were not carried out.<br />
The client/ person responsible for <strong>in</strong>itial operation was handed the follow<strong>in</strong>g components and/or product components<br />
Initial operation and <strong>in</strong>struction is be<strong>in</strong>g carried out by (company, address, contact, phone)<br />
The exact coord<strong>in</strong>ation of the dates for <strong>in</strong>itial operation/<strong>in</strong>struction is be<strong>in</strong>g carried out by the system operator and person<br />
responsible for <strong>in</strong>itial operation.<br />
Place, date Signature of person Signature of system operator Signature of the company<br />
authorised to perform acceptance carry<strong>in</strong>g out the <strong><strong>in</strong>stallation</strong> work<br />
71
❑ Rückstauverschlüsse ❑ Kle<strong>in</strong>kläranlagen<br />
❑ Backwater protection ❑ Septic Systems<br />
❑ Hebeanlagen<br />
❑ Schächte<br />
❑ Lift<strong>in</strong>g Stations and pumps ❑ Inspection Chambers<br />
❑ Abläufe / Duschr<strong>in</strong>nen ❑ Regenwassernutzung<br />
❑ Dra<strong>in</strong>s and shower channels ❑ Ra<strong>in</strong>water Management<br />
❑ Abscheider<br />
❑ Separators<br />
Systems<br />
-Fettabscheider<br />
-<strong>Grease</strong> Separators<br />
-Öl-/Benz<strong>in</strong>-/<br />
-Oil-/Fuel-/Coalescence<br />
Koaleszenzabscheider<br />
Separators<br />
-Stärkeabscheider<br />
-Starch Separators<br />
-S<strong>in</strong>kstoffabscheider<br />
-SedimentSeparators