SMC2482W
SMC2482W
SMC2482W

Create successful ePaper yourself
Turn your PDF publications into a flip-book with our unique Google optimized e-Paper software.
<strong>SMC2482W</strong>
Copyright<br />
Information furnished by SMC Networks, Inc. (SMC) is believed to be accurate and<br />
reliable. However, no responsibility is assumed by SMC for its use, nor for any<br />
infringements of patents or other rights of third parties which may result from its use.<br />
No license is granted by implication or otherwise under any patent or patent rights of<br />
SMC. SMC reserves the right to change specifications at any time without notice.<br />
Copyright © 2002 by<br />
SMC Networks, Inc.<br />
38 Tesla<br />
Irvine, California 92618<br />
All rights reserved. Printed in Taiwan<br />
Trademarks<br />
SMC is a registered trademark; and EZ Connect is a trademark of SMC Networks, Inc.<br />
Other product and company names are trademarks or registered trademarks of their<br />
respective holders.
1<br />
Compliances<br />
FCC Class B<br />
Federal Communication Commission Interference Statement<br />
This equipment has been tested and found to comply with the<br />
limits for a Class B digital device, pursuant to Part 15 of the FCC<br />
Rules. These limits are designed to provide reasonable protection<br />
against harmful interference in a residential installation.<br />
This equipment generates, uses and can radiate radio frequency<br />
energy and, if not installed and used in accordance with the<br />
instructions, may cause harmful interference to radio communications.<br />
However, there is no guarantee that interference will<br />
not occur in a particular installation. If this equipment does<br />
cause harmful interference to radio or television reception,<br />
which can be determined by turning the equipment off and on,<br />
the user is encouraged to try to correct the interference by one<br />
of the following measures:<br />
• Reorient or relocate the receiving antenna.<br />
• Increase the separation between the equipment and receiver.<br />
• Connect the equipment into an outlet on a circuit different<br />
fromthat to which the receiver is connected.<br />
• Consult the dealer or an experienced radio/TV technician for<br />
help.<br />
FCC Caution: FCC Caution: Any changes or modifications not<br />
expressly approved by the party responsible for compliance<br />
could void the user's authority to operate this equipment.<br />
This device complies with Part 15 of the FCC Rules. Operation is<br />
subject to the following two conditions: (1) This device may not<br />
cause harmful interference, and (2) this device must accept any<br />
interference received, including interference that may cause<br />
undesired operation.
IMPORTANT NOTE<br />
FCC Radiation Exposure Statement: This equipment complies<br />
with FCC radiation exposure limits set forth for an uncontrolled<br />
environment. This equipment should be installed and operated<br />
with minimum<br />
distance 20cm between the radiator & your body.<br />
This transmitter must not be co-located or operating in conjunction<br />
with any other antenna or transmitter.<br />
Industry Canada - Class B<br />
This digital apparatus does not exceed the Class B limits for<br />
radio noise emissions from digital apparatus as set out in the<br />
interference-causing equipment standard entitled “Digital<br />
Apparatus,” ICES-003 of the Department of Communications.<br />
Cet appareil numérique respecte les limites de bruits radioélectriques<br />
applicables aux appareils numériques de Classe B prescrites<br />
dans la norme sur le matérial brouilleur:“Appareils<br />
Numériques,” NMB-003 édictée par l’Industrie.<br />
2
3<br />
Warranty<br />
Limited Warranty Statement: SMC Networks, Inc. (“SMC”) warrants<br />
its products to be free from defects in workmanship and<br />
materials, under normal use and service, for the applicable warranty<br />
term. All SMC products carry a standard 90-day limited<br />
warranty from the date of purchase from SMC or its Authorized<br />
Reseller. SMC may, at its own discretion, repair or replace any<br />
product not operating as warranted with a similar or functionally<br />
equivalent product, during the applicable warranty term. SMC<br />
will endeavor to repair or replace any product returned under<br />
warranty within 30 days of receipt of the product.<br />
The standard limited warranty can be upgraded to a Limited<br />
Lifetime* warranty by registering new products within 30 days<br />
of purchase from SMC or its Authorized Reseller. Registration<br />
can be accomplished via the enclosed product registration card<br />
or online via the SMC web site. Failure to register will not affect<br />
the standard limited warranty. The Limited Lifetime warranty<br />
covers a product during the Life of that Product, which is<br />
defined as the period of time during which the product is an<br />
“Active” SMC product. A product is considered to be “Active”<br />
while it is listed on the current SMC price list. As new technologies<br />
emerge, older technologies become obsolete and SMC will,<br />
at its discretion, replace an older product in its product line with<br />
one that incorporates these newer technologies. At that point,<br />
the obsolete product is discontinued and is no longer an<br />
“Active” SMC product. A list of discontinued products with their<br />
respective dates of discontinuance can be found at:<br />
http://www.smc.com/index.cfm?action=customer_service_warranty<br />
All products that are replaced become the property of SMC.<br />
Replacement products may be either new or reconditioned. Any<br />
replaced or repaired product carries either a 30-day limited warranty<br />
or the remainder of the initial warranty, whichever is<br />
longer. SMC is not responsible for any custom software or
firmware, configuration information, or memory data of<br />
Customer contained in, stored on, or integrated with any products<br />
returned to SMC pursuant to any warranty. Products<br />
returned to SMC should have any customer-installed accessory<br />
or add-on components, such as expansion modules, removed<br />
prior to returning the product for replacement. SMC is not<br />
responsible for these items if they are returned with the product.<br />
Customers must contact SMC for a Return Material<br />
Authorization number prior to returning any product to SMC.<br />
Proof of purchase may be required. Any product returned to<br />
SMC without a valid Return Material Authorization (RMA) number<br />
clearly marked on the outside of the package will be<br />
returned to customer at customer’s expense. For warranty<br />
claims within North America, please call our toll-free customer<br />
support number at (800) 762-4968. Customers are responsible for<br />
all shipping charges from their facility to SMC. SMC is responsible<br />
for return shipping charges from SMC to customer.<br />
4
5<br />
WARRANTIES EXCLUSIVE: IF AN SMC PRODUCT DOES NOT OPERATE AS WAR-<br />
RANTED ABOVE, CUSTOMER’S SOLE REMEDY SHALL BE REPAIR OR REPLACE-<br />
MENT OF THE PRODUCT IN QUESTION, AT SMC’S OPTION. THE FOREGOING<br />
WARRANTIES AND REMEDIES ARE EXCLUSIVE AND ARE IN LIEU OF ALL OTHER<br />
WARRANTIES OR CONDITIONS, EXPRESS OR IMPLIED, EITHER IN FACT OR BY<br />
OPERATION OF LAW, STATUTORY OR OTHERWISE, INCLUDING WARRANTIES<br />
OR CONDITIONS OF<br />
MERCHANTABILITY AND FITNESS FOR A PARTICULAR PURPOSE. SMC NEITHER<br />
ASSUMES NOR AUTHORIZES ANY OTHER PERSON TO ASSUME FOR IT ANY<br />
OTHER LIABILITY IN CONNECTION WITH THE SALE, INSTALLATION, MAINTE-<br />
NANCE OR USE OF ITS PRODUCTS. SMC SHALL NOT BE LIABLE UNDER THIS<br />
WARRANTY IF ITS TESTING AND EXAMINATION DISCLOSE THE ALLEGED<br />
DEFECT IN THE PRODUCT DOES NOT EXIST OR WAS CAUSED BY CUSTOMER’S<br />
OR ANY THIRD PERSON’S MISUSE, NEGLECT, IMPROPER INSTALLATION OR<br />
TESTING, UNAUTHORIZED ATTEMPTS TO REPAIR, OR ANY OTHER CAUSE<br />
BEYOND THE RANGE OF THE INTENDED USE, OR BY ACCIDENT, FIRE, LIGHT-<br />
NING, OR OTHER HAZARD.<br />
LIMITATION OF LIABILITY: IN NO EVENT, WHETHER BASED IN CONTRACT OR<br />
TORT (INCLUDING NEGLIGENCE), SHALL SMC BE LIABLE FOR INCIDENTAL,<br />
CONSEQUENTIAL, INDIRECT, SPECIAL, OR PUNITIVE DAMAGES OF ANY KIND,<br />
OR FOR LOSS OF REVENUE, LOSS OF BUSINESS, OR OTHER FINANCIAL LOSS<br />
ARISING OUT OF OR IN CONNECTION WITH THE SALE, INSTALLATION, MAIN-<br />
TENANCE, USE, PERFORMANCE, FAILURE, OR INTERRUPTION OF ITS PROD-<br />
UCTS, EVEN IF SMC OR ITS AUTHORIZED RESELLER HAS BEEN ADVISED OF<br />
THE POSSIBILITY OF SUCH DAMAGES. SOME STATES DO NOT ALLOW THE<br />
EXCLUSION OF IMPLIED WARRANTIES OR THE LIMITATION OF INCIDENTAL OR<br />
CONSEQUENTIAL DAMAGES FOR CONSUMER PRODUCTS, SO THE ABOVE<br />
LIMITATIONS AND EXCLUSIONS MAY NOT APPLY TO YOU.<br />
THIS WARRANTY GIVES YOU SPECIFIC LEGAL RIGHTS, WHICH MAY VARY<br />
FROM STATE TO STATE. NOTHING IN THIS WARRANTY SHALL BE TAKEN TO<br />
AFFECT YOUR STATUTORY RIGHTS.<br />
SMC Networks will provide warranty service for one year following<br />
discontinuance from the active SMC price list. Under the limited<br />
lifetime warranty, internal and external power supplies, fans,<br />
and cables are covered by a standard one-year warranty from<br />
date of purchase.<br />
SMC Networks, Inc.<br />
38 Tesla<br />
Irvine, CA 92618
Product Registration<br />
Please register your EZ Connect Turbo 2.4GHz 11/22 Mbps<br />
Wireless Bridge online to activate your warranty:<br />
Registration website:<br />
http://www.smc.com/index.cfm?action=customer_service_<br />
new_registration<br />
6
7<br />
Congratulations on your purchase of this EZ Connect Turbo<br />
2.4GHz 11/22 Mbps Auto-Sensing Wireless Bridge. The EZ<br />
Connect Turbo Wireless Bridge supports multiple modes for<br />
different wireless solutions. To provide wireless connectivity to<br />
one or more buildings, the <strong>SMC2482W</strong> offers both point-topoint<br />
and point-to-multi-point Bridging options. If you need to<br />
set up a temporary wireless network or expand an existing one,<br />
the <strong>SMC2482W</strong> also supports a full-featured Access Point mode.<br />
Plug-and-Play installation, Web-based Configuration Wizard, and<br />
Windows-based EZ Installation Wizard allow users to easily set<br />
up this Wireless Bridge in minutes. By offering both a Windowsbased<br />
and Web-based administration utility, the EZ Connect<br />
Turbo Wireless Bridge can be managed from any PC on your<br />
network. To secure this wireless connection, the EZ Connect<br />
Turbo Wireless Bridge supports 64/128/256-bit Wired Equivalent<br />
Privacy (WEP) encryption.<br />
Feature Highlights:<br />
• IEEE 802.11b high-speed wireless connection up to 22 Mbps<br />
• Supports extra Packet Binary Convolutional Coding (PBCC)<br />
modulation technique<br />
• Removable Antennas for use with add-on high gain antennas<br />
• Plug-and-Play installation<br />
• 64/128/256-bit WEP encryption and MAC address filtering<br />
function to ensure secure wireless data transmission<br />
• Supports a maximum of 253 users<br />
• Offers multiple operating modes (Access Point, Point-to-Point,<br />
Point-to-Multi-Point) for wireless configuration flexibility
Compatibility:<br />
• IEEE 802.3, 802.3u<br />
• IEEE 802.11b<br />
• Wi-Fi Complaint<br />
The EZ ConnectTM Turbo Wireless Bridge package includes the<br />
following:<br />
• One EZ Connect Turbo 11/22 Mbps Wireless Bridge<br />
• One CD containing EZ Installation Wizard, Utility Software and<br />
Complete Documentation<br />
• One Power Adapter<br />
• One Manual<br />
Minimum Requirements:<br />
• An A/C power outlet (100 – 240V, 50 – 60Hz), to supply power<br />
to the EZ Connect TM Turbo Wireless Bridge.<br />
• An available RJ-45 port on a 10BASE-T/100BASE-TX Ethernet<br />
device.<br />
8
9<br />
Section 1 | Getting Started<br />
Site Location<br />
Choose a location for your EZ Connect Turbo Wireless Bridge. In<br />
Bridge mode, the best location for the <strong>SMC2482W</strong> is at the edge<br />
of your wireless coverage area. In Access Point mode, the best<br />
location is at the center of your wireless network.<br />
Connect the Ethernet cable<br />
The EZ Connect Turbo Wireless Bridge should be connected to a<br />
network switch or hub that is connected to a DHCP server, or<br />
connected to a Barricade Broadband Router. Use a standard<br />
Category 5 UTP Ethernet cable with an RJ-45 connector to connect<br />
the Bridge to one of router, hub, or switch.<br />
Connect the power cable<br />
Connect the power adapter cable to the 5V DC power socket on<br />
the rear panel.<br />
Warning: Use only the power adapter supplied with the<br />
<strong>SMC2482W</strong>. Using another power adapter will cause<br />
damage to the unit and void the warranty.<br />
Antennas<br />
LED Indicator lights:<br />
• Power<br />
• Wireless Transmit/Receiver<br />
• Ethernet Link/Activity
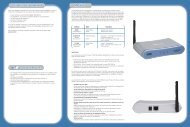
1.1 | EZ Connect Turbo 11/22 Mbps Wireless Bridge<br />
LED Indicators<br />
The preceding diagram shows the LED indicator lights on the EZ<br />
Connect Turbo Wireless Bridge. The EZ Connect Turbo Wireless<br />
Bridge has 2 removable antennas, which are adjustable for best<br />
wireless reception.<br />
The front of the Wireless Bridge has 3 labeled indicator lights.<br />
When you connect your Bridge to your network, these lights will<br />
be on, off, or blinking, indicating the following states.<br />
Light On Off Blinking<br />
LAN Ethernet Connection No Ethernet Data being sent or<br />
Connection received over<br />
Ethernet connection<br />
WLAN Wireless Connection No Wireless Data being sent or<br />
Connection received over<br />
wireless connection<br />
Power Receiving Power Not Receiving<br />
Power<br />
N/A<br />
1.2 | Resetting the <strong>SMC2482W</strong> EZ ConnectTM Turbo<br />
11/22 Mbps Wireless Bridge<br />
To correct temporary connectivity problems, the <strong>SMC2482W</strong><br />
Wireless Bridge can be reset by the following methods:<br />
• The physical reset button on the back of the unit.<br />
• You can reset the unit or reset the unit to factory defaults<br />
using the Web-based Utility.<br />
Using the Reset button on the back of the <strong>SMC2482W</strong><br />
1. Locate the [Reset] button on the back of the Wireless Bridge.<br />
2. Unplug the power from the back of the Wireless Bridge for<br />
5 seconds.<br />
10
11<br />
3. Hold down the [Reset] button which is located on the back of<br />
the device. You may need to use a pin or other pointed object<br />
to hold the button down.<br />
4. Plug the power connector into the Wireless Bridge while<br />
holding down the [Reset] button.<br />
5. The “TX/RX” LED will be solid, then flash 5-6 times.<br />
6. Then the “LINK/ACT” LED will blink quickly several times.<br />
7. Release the [Reset] button.<br />
8. Unplug the power from the Wireless Bridge for 2 seconds, and<br />
then plug the power back in.<br />
9. The Wireless Bridge will reboot and the LEDs will return to the<br />
normal status.<br />
Using the Web-based Utility<br />
1. Log into the <strong>SMC2482W</strong> Web-based Utility. (See section 4.2<br />
for more information)<br />
2. Click on [Tools] link on the left hand navigation menu, and<br />
then click the [Reset] option.
3. Click the [APPLY] button to complete the reset process.<br />
4. The unit will reboot and reset the <strong>SMC2482W</strong>.<br />
Using the Web-based Utility to reset the <strong>SMC2482W</strong> to<br />
factory defaults<br />
1. Log into the <strong>SMC2482W</strong> using the Web-based Utility.<br />
(See section 4.2 for more information)<br />
2. Click on [Tools] link on the left hand navigation menu, and<br />
then click the [Configuration Tools] option.<br />
3. Click the [Default] button to reset the unit to factory defaults.<br />
4. The unit will reboot and reset the <strong>SMC2482W</strong> to factory default.<br />
Note: If you set the <strong>SMC2482W</strong> to be DHCP-enabled and<br />
changed the IP address or wireless settings on the<br />
<strong>SMC2482W</strong>, you will need to use the Windows Utility to<br />
re-configure the device so you can access the Web-based<br />
Utility again.<br />
12
13<br />
Section 2 |Understanding Wireless Connections<br />
The EZ Connect Turbo Wireless Bridge is based on the IEEE<br />
802.11b Wi-Fi standard, which uses radio transmission for network<br />
connectivity. These 802.11b radio waves travel in all directions,<br />
and can transmit through walls and floors. Wireless transmission<br />
operating range and data throughput rate are based on<br />
several factors, as described below in the following section.<br />
2.1 | Recommendations for Best Wireless Performance<br />
The following information will help you achieve the best wireless<br />
range, coverage, and transmission rate for the <strong>SMC2482W</strong>:<br />
•Radio signals can travel farther outside of buildings, and the<br />
best performance is when wireless components are in direct<br />
line-of-sight to one another.<br />
•Putting wireless components in high places helps avoid<br />
obstacles and provides better connectivity.<br />
•Building construction such as metal framing, stucco, and<br />
concrete walls and floors will reduce radio signal strength.<br />
Try to avoid putting the Wireless Bridge next to walls, large<br />
solid objects; or next to large metal objects such as computer<br />
cases, monitors, and appliances (i.e. microwave ovens).<br />
•Wireless signal range, speed, and strength can be affected by<br />
interference from neighboring wireless networks and<br />
devices. Electro-magnetic devices that operate in the 2.4GHz<br />
frequency range, such as radios, and cordless phones, may<br />
also interfere with wireless transmission.<br />
2.2 | Adjusting the Antennas<br />
The antennas on the <strong>SMC2482W</strong> can be adjusted for best radio<br />
reception. Start with the antennas pointing straight up, and<br />
adjust each antenna if wireless reception is poor. Certain areas,<br />
such as directly below the antennas, get relatively poor reception.<br />
Pointing the antennas toward another wireless component<br />
does not improve reception.
Important: Enable wireless security Wired Equivalent Privacy<br />
(WEP) to protect your network from unwanted<br />
access. For more information, see section 6 for<br />
instructions on how to configure WEP on the<br />
<strong>SMC2482W</strong>.<br />
2.3 | Wireless Distance Table<br />
The following distance table shows the interaction between<br />
wireless coverage area and transmission speed for <strong>SMC2482W</strong><br />
under typical installation circumstances.<br />
Speed (Mbps) Outdoor Environment* Indoor Environment**<br />
11 Mbps 528ft (160m) 236 ft (72m)<br />
5.5 Mbps 640 ft (195m) 240 ft (73m)<br />
2 Mbps 837 ft (255m) 240 ft (73m)<br />
1 Mbps 1155 ft (350m) 246 ft (75m)<br />
* Outdoors Environment: A line-of-sight environment with no<br />
interference or obstruction between the EZ Connect Turbo<br />
Wireless Bridges.<br />
**Indoor Environment: A typical office or home environment<br />
with floor to ceiling obstructions between the EZ Connect<br />
Turbo Wireless Bridges.<br />
14
15<br />
2.4 | Understanding Wireless Security (WEP)<br />
Anyone within range of your wireless network is a potential<br />
security risk. Without wireless security options configured on<br />
your network, a person outside of your physical location but<br />
within your wireless range may be able to access the network<br />
and any data that is being transmitted over it. SMC Networks<br />
wireless devices support the wireless security standard called<br />
Wired Equivalent Privacy (WEP) to prevent unauthorized users<br />
from accessing your network over a wireless connection. This<br />
security feature uses a secure network key, called a WEP key. The<br />
WEP key encrypts wireless data so that it is only readable by<br />
other computers that have the matching WEP key. The WEP key<br />
is stored on each wireless device, so that data can be encrypted<br />
and decrypted as it is transmitted over the network.<br />
If you are transferring private information over this wireless<br />
connection, it is recommended to enable WEP for your EZ<br />
Connect Turbo Wireless Bridge. For more information about WEP<br />
and security, see section 6.<br />
Section 3 | Setup<br />
Typical uses for the SMC EZ Connect Turbo Wireless Bridge:<br />
•Connecting multiple locations with a wireless signal<br />
•Wireless office for extension of Ethernet range<br />
•Setting up temporary networks quickly<br />
The EZ Connect Turbo Wireless Bridge default configuration is:<br />
SSID: WLAN<br />
Wireless Adapter Name: SMC<br />
IP Address: DHCP<br />
Subnet Mask: DHCP<br />
Gateway: DHCP
The <strong>SMC2482W</strong> is a Plug-and-Play device. When you plug this<br />
Wireless Bridge into your network, it will automatically get an IP<br />
address from your DHCP server and begin to provide wireless<br />
connections based on your current network IP configuration.<br />
3.1 | Verify Equipment and Permissions<br />
At computer that you want to install the EZ ConnectTM Turbo<br />
Wireless Bridge Utility software, please have the following items<br />
available:<br />
•The EZ ConnectTM Turbo Wireless Bridge CD-ROM<br />
•These installation instructions<br />
Before you proceed with the Utility setup, verify the following:<br />
•You have administrator privileges on the computer that you<br />
are working on. On computers running Windows 2000 or<br />
Windows XP, you must be a member of the Administrator<br />
group to install software and change network settings. If<br />
you cannot run setup, click Log Off from the Start menu,<br />
and then log on with an administrator’s account. If you<br />
don’t have administrator access please contact your system<br />
administrator.<br />
•Disable any Anti-Virus or other software applications that<br />
could hinder the installation process.<br />
To install the Wireless Bridge Utility program, insert the<br />
“<strong>SMC2482W</strong> Utility and Documentation” CD-ROM into your<br />
CD-ROM drive. If the CD does not start automatically after a few<br />
seconds, open My Computer, double-click the CD-ROM icon, and<br />
then double-click Setup.exe. The Welcome splash screen should<br />
appear.<br />
16
17<br />
3.2 | Installing the Utility Software<br />
1. At the splash screen, click the [Install Utility] option to<br />
launch the Installation Wizard.<br />
2. Click the [Next >] button to confirm the installation.<br />
3. Configure the install location, and then click the [Next >]<br />
button to continue.
* It is recommended that you choose the default folder name.<br />
4. Click the [Finish] button to complete the installation process.<br />
18
19<br />
Section 4 | Accessing the <strong>SMC2482W</strong><br />
The EZ Connect TM Turbo Wireless Bridge can be configured and<br />
managed by using two different utilities.<br />
• Windows Utility<br />
• Web-based Utility<br />
4.1 | Using the Windows Utility<br />
1. Click [Start],then [Programs],then [<strong>SMC2482W</strong> Bridge<br />
Utility],then [<strong>SMC2482W</strong> Bridge Utility].<br />
2. The Utility will search your network for the EZ ConnectTM Turbo Wireless Bridge. When the <strong>SMC2482W</strong> is located, you<br />
can view the current settings and make changes as needed.<br />
Note: If the utility does not locate your Wireless Bridge on the<br />
first scan, click the [Refresh] button.
3. Once you have logged into the Windows Utility, you can:<br />
• View link and device information<br />
• See the available EZ ConnectTM Turbo Wireless Bridges<br />
(<strong>SMC2482W</strong>) in your network if you have more than one<br />
<strong>SMC2482W</strong> installed.<br />
• Configure wireless settings, operating mode, TCP/IP<br />
settings<br />
• Configure wireless security (WEP)<br />
4.2 | Using the Web-based Utility<br />
1. Launch your web browser. (i.e. Internet Explorer or Netscape)<br />
2. In the Address Bar, type in the IP address that is configured<br />
on your Wireless Bridge.<br />
20
21<br />
Note: The <strong>SMC2482W</strong> is DHCP-enabled by default. If you do not<br />
know the IP address that was assigned by your DHCP<br />
server, please use the Windows Utility or look at your<br />
DHCP client list to get the correct IP address to use. If you<br />
do not have a DHCP server on your network, then the<br />
<strong>SMC2482W</strong> will auto-assign itself an IP address of:<br />
192.168.2.55.<br />
3. Log into the Web-based Utility. The factory default password<br />
for the <strong>SMC2482W</strong> is “default”,all lower-case.<br />
4. Once logged into the Web-based Utility, you can:<br />
• Configure wireless settings and TCP/IP settings<br />
• Configure Operating Mode<br />
• Configure wireless security (WEP)<br />
• Configure MAC address filtering<br />
• Change administrator password<br />
• View connection status and Bridge information<br />
• Reset/Restore Wireless Bridge<br />
• Upgrade Firmware
Section 5 | Configure<br />
The <strong>SMC2482W</strong> EZ Connect Turbo Wireless Bridge can be configured<br />
from both the Windows and Web-based utility. Since<br />
the EZ Connect Turbo Wireless Bridge ships with the default<br />
configuration of DHCP-enabled, it will auto-configure itself to<br />
any network setting.<br />
5.1 | Configure the Wireless Bridge using<br />
Windows-based Utility<br />
1. Log into the <strong>SMC2482W</strong> using the Windows-based Utility.<br />
(See section 4.1 for more information)<br />
2. On “LINK INFORMATION” page you will see detailed<br />
information about the <strong>SMC2482W</strong> you are accessing. To<br />
change your wireless settings click the [AP Settings] button.<br />
22
23<br />
3. From this section, you can configure the following settings:<br />
• SSID<br />
• Channel<br />
• AP Name<br />
• Operating Mode<br />
• Advanced Settings<br />
Note: For more information on the different operating modes,<br />
see section 5.4.<br />
4. Click [Apply] button to save your settings.<br />
5. To change your IP settings, click the [IP Settings] button.<br />
6. From this section, you can configure the following settings:<br />
• DHCP/Fixed IP address configuration<br />
• IP Address<br />
• Subnet Mask<br />
• Gateway<br />
7. Click [Apply] button to save your settings.
5.2 | Configure the Wireless Bridge using Web-based<br />
Utility (Setup Wizard)<br />
1. Log into the <strong>SMC2482W</strong> Web-based Utility.<br />
(See section 4.2 for more information)<br />
2. Click on [Setup Wizard] link.<br />
3. The Setup Wizard will guide you through the basic<br />
configuration settings for the <strong>SMC2482W</strong>. Through the<br />
wizard, you can configure the following settings:<br />
• SSID<br />
• Channel<br />
• Operating Mode<br />
• Wired Equivalent Privacy (WEP)<br />
24
25<br />
4. The first step in the Setup Wizard is to configure SSID and<br />
wireless channel (default wireless channel is 6).<br />
Note: For more information on the different operating modes,<br />
see section 5.4.<br />
5. When you have completed this step, click the [NEXT] button.
6. The second step in the Setup Wizard is to configure WEP<br />
encryption:<br />
Note: If this is your first experience with wireless networking, it<br />
is a good idea to keep WEP disabled until you have the<br />
connection up and running. Then enable this security<br />
feature on all of the Wireless Bridges.<br />
7. When you have completed this step, click the [FINISH] button to<br />
save the settings and reboot the Wireless Bridge. When you do<br />
this, the Wireless Bridge will log you out of the Web-based Utility.<br />
26
27<br />
5.3 | Configure the Wireless Bridge using Web-based<br />
Utility (Advanced Setup)<br />
The Advanced Setup option provides more configuration<br />
options for the <strong>SMC2482W</strong> Wireless Bridge.<br />
1. Log into the <strong>SMC2482W</strong> Web-based Utility.<br />
(See section 4.2 for more information)<br />
2. Click on [Advanced Setup] link.<br />
3. To change the IP configuration on the <strong>SMC2482W</strong>, click on<br />
the [LAN] link on the left hand navigation menu.<br />
From this section, you can configure the following:<br />
• Static IP or DHCP Configuration<br />
For static IP settings, you can configure:<br />
• IP Address<br />
• Subnet Mask<br />
• Gateway
4. When you have completed configuring these settings, click<br />
the [APPLY] button to save the settings and reboot the<br />
Wireless Bridge.<br />
5. To configure wireless settings, click on the [Wireless] link on<br />
the left hand navigation menu, and then choose the<br />
[Configuration] option.<br />
From this section, you can configure:<br />
• AP Name<br />
• SSID<br />
• Transmission Rate<br />
• Basic Rate<br />
• Channel<br />
• Preamble<br />
• Beacon Interval<br />
• RTS Threshold<br />
• Fragmentation Threshold<br />
• DTIM Interval<br />
• Authentication Type<br />
• Antenna<br />
• SSID Broadcast<br />
Note: Definitions of these settings can be found in the Glossary<br />
section at the end of this User Guide.<br />
6. When you have completed configuring these settings, click<br />
the [APPLY] button to save the settings and reboot the<br />
Bridge.<br />
28
29<br />
5.4 | <strong>SMC2482W</strong> Operating Modes<br />
The EZ Connect Turbo Wireless Bridge has 3 operating modes to<br />
provide a flexible wireless solution for any situation. The<br />
support modes are:<br />
• Point-to-Point Bridge<br />
• Point-to-Multi-Point Bridge<br />
• Access Point<br />
Below is an outline of each operating mode and a basic<br />
configuration.<br />
Point-to-Point Bridge<br />
The operating mode is configured when you need to connect<br />
two locations with a wireless connection. This operating mode<br />
needs to be configured on both units. To configure a Point-to-<br />
Point connection you need the MAC address of each <strong>SMC2482W</strong><br />
unit. To setup this connection, follow the steps below:<br />
1. Log into the <strong>SMC2482W</strong> Windows Utility or Web-based Utility.<br />
2. Set the operating mode to: Point-to-Point<br />
3. Set the MAC Address of the <strong>SMC2482W</strong> that you are connecting<br />
to in the MAC Address text input box. This is the MAC<br />
address that is listed in the Status section of the <strong>SMC2482W</strong><br />
Web-based Utility.<br />
4. Install the Wireless Bridge units in each location, and then<br />
connect the LAN port on the Wireless Bridge to a port on the<br />
wired network in that location.<br />
Point-to-Multi-Point Bridge<br />
The operating mode is configured when you need to connect<br />
more than two locations with a wireless connection. This operating<br />
mode needs to be configured on each <strong>SMC2482W</strong> used.<br />
To setup this connection, follow the steps below:<br />
1. Log into the <strong>SMC2482W</strong> Windows Utility or Web-based Utility.<br />
2. Set the operating mode to: Point-to-Multi-Point<br />
3. Install the Wireless Bridge units in each location, and then<br />
connect the LAN port on the Wireless Bridge to a port on the<br />
wired network in that location.
Access Point<br />
The operating mode is configured when you need to add a<br />
wireless connection to your network or extend the coverage of<br />
an existing wireless network. To setup this operating mode, follow<br />
the steps below:<br />
1. Log into the <strong>SMC2482W</strong> Windows Utility or Web-based Utility.<br />
2. Set the operating mode to: Access Point<br />
3. Set the SSID<br />
4. Install the <strong>SMC2482W</strong> at the center of your wireless network<br />
to provide the best coverage<br />
Section 6 | Security<br />
Wired Equivalent Privacy (WEP) is used to protect your data as it<br />
is transmitted over the wireless connection. The EZ Connect<br />
Turbo Wireless Bridge supports 3 levels of encryption, 64-/128-<br />
/256-bit, and both HEX and ASCII formats. Please refer to the<br />
chart below for the each key and formats requirements<br />
64-bit 128-bit 256-bit Character<br />
Limits<br />
ASCII 5 characters 13 characters 29 characters 0-9 A-Z<br />
HEX 10 characters 26 characters 58 characters 0-9 A-F<br />
The <strong>SMC2482W</strong> also supports MAC address filtering security<br />
feature when operating in Access Point mode. This feature<br />
allows you to block unrecognized MAC address access to your<br />
wireless network.<br />
Note: The MAC Filtering option is only available using the<br />
Web-based Utility and in Access Point mode.<br />
30
31<br />
6.1 | Configure WEP using Windows-based Utility<br />
1. Log into the <strong>SMC2482W</strong> using the Windows-based Utility.<br />
(See section 4.1 for more information)<br />
2. Click on the [WEP Settings] button.<br />
3. Check the [Data Encryption] checkbox.<br />
Under the WEP Settings section, you can configure:<br />
• WEP Key Length<br />
• HEX or ASCII format<br />
• Set Key Number to use<br />
Note: For information on WEP Key structures, see Section 6.
6.2 | Configure WEP using Web-based Utility<br />
1. Log into the <strong>SMC2482W</strong> Web-based Utility.<br />
(See section 4.2 for more information)<br />
2. Click on [Advanced Setup] link.<br />
3. Click on [Wireless] link on the left hand navigation menu,<br />
and then select the [Encryption] option.<br />
4. To enable WEP, choose the WEP key length you want to use.<br />
5. Then set the WEP key format.<br />
6. Enter in the WEP key you want to use, based on the key<br />
length and format.<br />
7. Select the WEP key you want to use by clicking the button<br />
next to the Key number.<br />
8. When you have completed configuring these settings, click<br />
the [APPLY] button to save the settings and reboot the<br />
Wireless Bridge.<br />
Note: Once you enable WEP, please make sure you have the<br />
same settings configured on all the Wireless Bridges that<br />
you are using to connect each location.<br />
32
33<br />
6.3 | Configure MAC Filtering using Web-based<br />
Utility (Access Point mode)<br />
1. Log into the <strong>SMC2482W</strong> Web-based Utility.<br />
(See section 4.2 for more information)<br />
2. Click on [Advanced Setup] link.<br />
3. Click on [Filter] link on the left hand navigation menu.<br />
4. Check the [Enable] option.<br />
5. Enter in the MAC address of the clients/users that you want<br />
to have access to your wireless network.<br />
Note: On the MAC Filtering option, there is a Connection list<br />
option. This drop-down menu will list all of the clients<br />
connecting to the AP who received a DHCP IP address. If<br />
you want to add one of these users to the MAC table,<br />
simply select them in the drop-down menu and select the<br />
ID that you want to copy them and click the [Copy to]<br />
button.
Section 7 | EZ Connect Turbo Wireless<br />
Bridge Information<br />
Both the Windows Utility and Web-based Utility provide information<br />
about the EZ Connect Turbo Wireless Bridge. The information<br />
below outlines which information can be found in<br />
which utility:<br />
Windows Utility:<br />
• AP Name<br />
• SSID<br />
• IP Address<br />
• Channel<br />
• WEP (Enable/Disable)<br />
• Utility Version<br />
Web Utility:<br />
LAN Information<br />
• IP Settings<br />
• IP Configuration<br />
SYSTEM Information<br />
• Firmware version<br />
• SSID<br />
• AP Name<br />
• MAC Address<br />
• Channel<br />
• WEP (Enable/Disable)<br />
• Network Activity Log<br />
34
35<br />
7.1 | View Wireless Bridge information using<br />
Windows-based Utility<br />
1. Log into the <strong>SMC2482W</strong> using the Windows-based Utility.<br />
(See section 4.1 for more information)<br />
2. The default page of the Windows-based Utility displays all of<br />
the information outlined above.
7.2 | View Wireless Bridge information using<br />
Web-based Utility<br />
1. Log into the <strong>SMC2482W</strong> using the Web-based Utility.<br />
(See section 4.2 for more information)<br />
2. Click on [Advanced Setup] link.<br />
3. Click on [Status] link on the left hand navigation menu.<br />
36
37<br />
Section 8 | Changing the Password<br />
on the <strong>SMC2482W</strong><br />
For network security, it is a good idea to change the EZ<br />
ConnectTM Turbo Wireless Bridge’s default password. To change<br />
the password on your <strong>SMC2482W</strong>, follow the steps outlined<br />
below:<br />
1. Log into the <strong>SMC2482W</strong> using the Web-based Utility.<br />
(See section 4.2 for more information)<br />
2. Click on [Advanced Setup] link.<br />
3. The default page is the [System] section. Click on<br />
[Password Settings] option.<br />
Note: From this section, you can also change the idle Time-Out<br />
option. This is the amount of time that Web-based Utility<br />
will stay logged in without activity.
Section 9 | Upgrading the <strong>SMC2482W</strong><br />
The EZ ConnectTM Turbo Wireless Bridge is upgradeable through<br />
the Web-based Utility. Please verify that you have the latest<br />
firmware available from http://www.smc.com.<br />
1. Log into the <strong>SMC2482W</strong> using the Web-based Utility.<br />
(See section 4.2 for more information)<br />
2. Click on [Advanced Setup] link.<br />
3. Click on [Tools] link on the left hand navigation menu, and<br />
then click the [Firmware Upgrade] option.<br />
4. Click the [Browse…] button and browse to the location on<br />
you computer where you have the latest <strong>SMC2482W</strong> (.bin)<br />
firmware saved.<br />
38
39<br />
5. When you have the correct installation path, click the<br />
[APPLY] button to begin the upgrade process.<br />
6. Click [OK] to the pop-up dialog boxes to begin the upgrade<br />
process.<br />
Warning: Do not turn the power off during the upgrade<br />
process. This will damage the unit.<br />
7. When the upgrade process has completed, verify the new<br />
version by logging into either the Windows or Web-based<br />
Utility.
Section 10 | Backing up and Restoring the<br />
Wireless Bridge<br />
The EZ Connect TM Turbo Wireless Bridge offers a configuration<br />
backup and configuration restore option through the Webbased<br />
Utility. This feature will allow you to save all of your configuration<br />
settings to a separate file, so you can easily configure<br />
multiple Wireless Bridges with the same configuration.<br />
10.1 | Back-up the <strong>SMC2482W</strong> configuration<br />
1. Log into the <strong>SMC2482W</strong> using the Web-based Utility.<br />
(See section 4.2 for more information)<br />
2. Click on [Advanced Setup] link.<br />
3. Click on [Tools] link on the left hand navigation menu, and<br />
then click the [Configuration Tools] option.<br />
4. Click the [Backup] button to save the Bridge<br />
configuration file.<br />
5. When prompted, save the “<strong>SMC2482W</strong>_backup.bin” file on<br />
your computer.<br />
40
41<br />
10.2 | Restore the <strong>SMC2482W</strong> configuration from<br />
“<strong>SMC2482W</strong>_backup.bin” file<br />
1. Log into the <strong>SMC2482W</strong> using the Web-based Utility.<br />
(See section 4.2 for more information)<br />
2. Click on [Advanced Setup] link.<br />
3. Click on [Tools] link on the left hand navigation menu, and<br />
then click the [Configuration Tools] option.<br />
4. Click the [Browse…] button and locate the <strong>SMC2482W</strong><br />
“<strong>SMC2482W</strong>_backup.bin” located on your computer.<br />
5. Click the [Restore] button to begin the restoration process.
Section 11 | Uninstalling the <strong>SMC2482W</strong><br />
Windows Utility<br />
If you need to uninstall the EZ Connect Wireless Turbo Wireless<br />
Bridge Windows Utility program, please follow the steps below:<br />
1. Click [Start],then [Programs], choose [<strong>SMC2482W</strong> Bridge<br />
Utility],and then select [Uninstall].<br />
2. To complete the uninstall process, when prompted by the<br />
[Confirm File Deletion] dialog box, click [OK] to continue.<br />
3. The uninstall process will begin.<br />
4. Click [Finish] to complete the uninstall process.<br />
42
Section 12 | Technical Specifications<br />
Data Rate<br />
•Up to 22Mbps with Auto Fallback<br />
to 11/5.5/2/1 Mbps<br />
Operating Range<br />
•Up to 1,155 feet<br />
Interface<br />
•RJ-45 – 10/100 Mbps<br />
•Power Jack – 2.5mm<br />
Network Configuration<br />
•Infrastructure<br />
Configuration and Management<br />
•Web and Windows-based<br />
Radio Signal Type<br />
•Direct Sequence Spread Spectrum<br />
(DSSS)<br />
Media Access Protocol<br />
•CSMA/CA (Collision Avoidance)<br />
with ACK<br />
Security<br />
•64-/128-/256-bit Wired Equivalent<br />
Privacy (WEP)<br />
RF Frequency<br />
• 2400MHz – 2497 MHz –<br />
Japan Band<br />
• 2400MHz – 2483.5MHz –<br />
North America, Europe<br />
• 2455MHz – 2475MHz – Spain<br />
• 2446.5MHz – 2483.5MHz – France<br />
Operating Channel<br />
• 11 Channels (US, Canada)<br />
• 13 Channels (Europe)<br />
• 14 Channels (Japan)<br />
RF Output Power<br />
• 16 -18 dBm<br />
Antenna Gain<br />
•2 dBi<br />
Sensitivity<br />
• -80 dBm @ 22 Mbps PBCC<br />
• -85 dBm @ 11Mbps PBCC<br />
• -82 dBm @ 11Mbps CCK<br />
Frequency Stability<br />
•Within + 25 ppm<br />
Data modulation type<br />
•BPSK (1 Mbps)<br />
•QPSK (2 Mbps)<br />
•CCK (5.5/11 Mbps)<br />
•PBCC (5.5/11/22 Mbps)<br />
Antenna Type<br />
•2 Removable Antennas<br />
with Diversity<br />
Power Consumption<br />
•Operation:Maximum 1.05 A<br />
•Standby: 600mA +/- 20mA<br />
Dimension<br />
• 198 x 150 x 61.5 mm<br />
Weight<br />
•1.5 lbs<br />
Compliance<br />
•FCC Class B<br />
•CE<br />
•Industry Canada<br />
•Wi-Fi Compliant<br />
Temperature Range<br />
•Operating: -0 C - +50 C<br />
•Storage: -20 C - +70 C<br />
Humidity<br />
•Operating:0% to 70%<br />
•Storage:0% to 95% Non-condensing<br />
Warranty<br />
•Limited Lifetime Warranty
Section 13 | Troubleshooting<br />
This section provides possible solutions to issues regarding the<br />
installation and operation of your EZ Connect Turbo Wireless<br />
Bridge. If the solution you are looking for is not listed here,<br />
please visit SMC Networks web site at www.smc.com.<br />
Before you begin troubleshooting your EZ Connect Turbo<br />
Wireless Bridge, please make sure you are running the latest<br />
firmware. You can download the latest firmware from<br />
www.smc.com.<br />
1. If you are not able to connect to the Wireless Bridge through<br />
a Web Browser, please check the following:<br />
• First,make sure the computer trying to connect to the<br />
<strong>SMC2482W</strong> is in the correct network range. By default, the<br />
<strong>SMC2482W</strong> has an IP address of 192.168.2.55.<br />
• Second, you can use the Utility to scan for the <strong>SMC2482W</strong><br />
and change the IP address to an available IP address on<br />
your network.<br />
2. If you are not able to scan for the Wireless Bridge with the<br />
Utility while it is connected to your hub, switch, router, you<br />
can connect it directly to your computer with a crossover<br />
cable to test the connection. Also make sure all firewall software<br />
is turned off and that all LEDs are on for the <strong>SMC2482W</strong>.<br />
3. If you are not able to gain wireless access to the <strong>SMC2482W</strong><br />
Wireless Bridge, you will first need to check and configure the<br />
correct mode. Wireless clients can connect to the <strong>SMC2482W</strong><br />
while it is in Access Point mode. If the Wireless Bridge is set to<br />
either Point-to-Point or Point-to-Multi-Point Bridge mode,<br />
then only another <strong>SMC2482W</strong> can connect with the correct<br />
settings.<br />
4. Please see Section 1.2 for the <strong>SMC2482W</strong> reset procedure.<br />
44
45<br />
Section 14 | Glossary<br />
802.11 - 802.11 refers to a family of specifications developed by<br />
the IEEE for wireless LAN technology. 802.11 specifies the<br />
over-the-air interface used between a wireless client and a base<br />
station or between two wireless clients. The IEEE accepted the<br />
specification in 1997.<br />
802.11b - An extension to 802.11 that applies to wireless LANS<br />
and provides 11 Mbps transmission (with a fallback to 5.5, 2 and<br />
1 Mbps) in the 2.4 GHz band. 802.11b uses only DSSS.<br />
Antenna Selection- This selection is for choosing which<br />
antenna transmits data.<br />
Authentication Type- You may choose between Open System,<br />
Shared Key, and Both. The Authentication Type default is set to<br />
Open System. Shared Key is when both the sender and the<br />
recipient share a secret key. All points on your network must use<br />
the same authentication type. It is recommended that you use<br />
the default setting.<br />
Beacon Interval- This value indicates the frequency interval of<br />
the beacon. A beacon is a packet broadcast by the Access Point<br />
to keep the network synchronized. A beacon includes the<br />
wireless LAN service area, the AP address, the Broadcast<br />
destination addresses, a time stamp, Delivery Traffic Indicator<br />
Maps, and the Traffic Indicator Message (TIM).<br />
Channel- Refers to a communications path between two<br />
computers or devices. It can refer to the physical medium or to a<br />
set of properties that distinguishes one channel from another.<br />
For example, wireless channels refer to particular frequencies at<br />
which radio signals are transmitted on. Wireless Networks in the<br />
US have 11 channels to choose from. If an “Auto” channel is<br />
selected the device will automatically located and configure the<br />
best possible channel.
DHCP (Dynamic Host Configuration Protocol) - A protocol for<br />
assigning dynamic IP addresses to devices on a network. With<br />
dynamic addressing, a device can have a different IP address<br />
every time it connects to the network. In some systems, the<br />
device's IP address can even change while it is still connected.<br />
DHCP also supports a mix of static and dynamic IP addresses.<br />
DNS (Domain Name System) - Is the system that is used to<br />
translate Internet domain names into Internet Protocol (IP)<br />
addresses. A domain name is a meaningful and easy-to-remember<br />
“handle” for an Internet address.<br />
DSSS (Direct-Sequence Spread Spectrum) - Is a transmission<br />
technology used in wireless transmissions where a data signal<br />
at the sending station is combined with a higher data rate bit<br />
sequence, or chipping code, that divides the user data according<br />
to a spreading ratio. The chipping code is a redundant bit<br />
pattern for each bit that is transmitted, which increases the<br />
signal's resistance to interference. If one or more bits in the<br />
pattern are damaged during transmission, the original data can<br />
be recovered due to the redundancy of the transmission.<br />
DTIM Interval- This value indicates the interval of the Delivery<br />
Traffic Indication Message (DTIM). A DTIM field is a countdown<br />
field informing clients of the next window for listening to broadcast<br />
and multicast messages. When the Access Point has<br />
buffered broadcast or multicast messages for associated clients,<br />
it sends the next DTIM with a DTIM Interval value. Access Point<br />
Clients hear the beacons and awaken to receive the broadcast<br />
and multicast messages.<br />
Dynamic IP Address - An IP address that is automatically<br />
assigned to a client station in a TCP/IP network, typically by a<br />
DHCP server. Network devices that serve multiple users, such as<br />
servers and printers,are usually assigned static IP addresses.<br />
FHSS (Frequency-Hopping Spread Spectrum) - Is transmission<br />
technology used in wireless transmissions where the data signal<br />
46
47<br />
is modulated with a narrowband carrier signal that "hops" in a<br />
random but predictable sequence from frequency to frequency<br />
as a function of time over a wide band of frequencies. The signal<br />
energy is spread in time domain rather than chopping each bit<br />
into small pieces in the frequency domain. This technique<br />
reduces interference because a signal from a narrowband<br />
system will only affect the spread spectrum signal if both are<br />
transmitting at the same frequency at the same time. If<br />
synchronized properly, a single logical channel is maintained.<br />
Firmware - Code that is written onto read-only memory (ROM)<br />
or programmable read-only memory (PROM). Once firmware<br />
has been written onto the ROM or PROM, it is still new settings<br />
remain even when the device is turned off.<br />
Fragmentation Threshold- This specifies the maximum size a<br />
data packet will be before splitting and creating a new packet<br />
and should remain at its default setting of 2,346. A smaller<br />
setting means smaller packets, which will create more packets<br />
for each transmission. Only minor modifications of this value are<br />
recommended.<br />
IEEE - The Institute of Electrical and Electronics Engineers, pronounced<br />
I-triple-E, is an organization that develops standards<br />
that often become national and international standards.<br />
IP Address - An identifier for a computer or device on a TCP/IP<br />
network. Networks using the TCP/IP protocol route messages<br />
based on the IP address of the destination. The format of an IP<br />
address is a 32-bit numeric address written as four numbers separated<br />
by periods. Each number can be zero to 255. For example,<br />
192.168.2.25 is a valid an IP address.<br />
IPCONFIG - A utility that provides for querying, defining and<br />
managing IP addresses within a network. This utility is usually<br />
run from the DOS prompt and is the perfect tool for troubleshooting<br />
connection issues.
LAN - A local area network (LAN) is a group of computers and associated<br />
devices that share a common communications line and<br />
typically share the resources of a single processor or server<br />
within a small geographic area (for example, within an office<br />
building).<br />
MAC Address - Short for Media Access Control address, a hardware<br />
address that uniquely identifies each node of a network. In<br />
IEEE 802 networks, the Data Link Control (DLC) layer of the OSI<br />
Reference Model is divided into two sublayers: the Logical Link<br />
Control (LLC) layer and the Media Access Control (MAC) layer.<br />
The MAC layer interfaces directly with the network media.<br />
Consequently, each different type of network media requires a<br />
different MAC layer.<br />
Ping (Packet INternet Groper) - A utility to determine whether<br />
a specific IP address is accessible. It works by sending a packet<br />
to the specified address and waiting for a reply. PING is used primarily<br />
to troubleshoot Internet connections.<br />
Preamble Type- The preamble defines the length of the CRC<br />
block for communication between the Access Point and a roaming<br />
Network Card. (High network traffic areas should use the<br />
shorter preamble type.) All wireless points (nodes) on your network<br />
should use the same preamble type.<br />
RJ-45 - Short for Registered Jack-45, an eight-wire connector<br />
used commonly to connect computers into local-area networks<br />
(LAN), especially Ethernets. RJ-45 connectors look similar to the<br />
RJ-11 connectors used for connecting telephone equipment,<br />
only wider.<br />
RTS Threshold- This value should remain at its default setting of<br />
2,432. Should you encounter inconsistent data flow, only minor<br />
modifications are recommended.<br />
Roaming – Is the ability to move from one AP coverage area to<br />
another without interruption in service or loss in connectivity.<br />
48
49<br />
Static IP Address - A permanent IP address that is assigned to a<br />
node in a TCP/IP network.<br />
Subnet Mask - The method used for splitting IP networks into a<br />
series of subgroups, or subnets. The mask is a binary pattern<br />
that is matched up with the IP address to turn part of the host<br />
ID address field into a field for subnets.<br />
SSID Broadcast- For security purposes, this selection can be disabled,<br />
allowing only those wireless network cards with the<br />
Access Point’s SSID to communicate with the Access Point. By<br />
default, this selection is enabled, allowing all wireless network<br />
cards in your wireless network to communicate with the Access<br />
Point.<br />
TCP (Transmission Control Protocol) - TCP is one of the main<br />
protocols in TCP/IP networks. Whereas the IP protocol deals only<br />
with packets, TCP enables two hosts to establish a connection<br />
and exchange streams of data.<br />
TCP/IP (Transmission Control Protocol/Internet Protocol) - TCP<br />
is one of the main protocols in TCP/IP networks.Whereas the IP<br />
protocol deals only with packets,TCP enables two hosts to establish<br />
a connection and exchange streams of data.<br />
Transmission Rates- The basic transfer rates should be set<br />
depending on the speed of your wireless network. You must<br />
select 1-2 (MBps) if you have older 802.11 compliant equipment<br />
on your network, such as wireless adapters that support only 1<br />
or 2 Mbps. Selecting 1-2 (MBps), however, does not limit the<br />
basic transfer rates of faster adapters.<br />
UDP (User Datagram Protocol) - UDP is a connectionless protocol<br />
that, like TCP, runs on top of IP networks. Unlike TCP/IP,<br />
UDP/IP provides very few error recovery services, offering<br />
instead a direct way to send and receive datagrams over an IP<br />
network.
WEP (Wired Equivalent Privacy) - Is a security protocol for<br />
wireless local area networks (WLANs) defined in the 802.11b<br />
standard.<br />
WINIPCFG - Configuration utility based on the Win32 API for<br />
querying,defining, and managing IP addresses within a network.<br />
A commonly used utility, under Windows 95, 98, and Me, for<br />
configuring networks.<br />
WLAN - Acronym for wireless local-area network. A type of localarea<br />
network that uses high-frequency radio waves rather than<br />
wires to communicate between nodes.<br />
50
FOR TECHNICAL SUPPORT, CALL:<br />
From U.S.A. and Canada (24 hours a day, 7 days a week)<br />
(800) SMC-4-YOU; (949) 679-8000; Fax: (949) 679-1481<br />
From Europe (8:00 AM - 5:30 PM UK Time)<br />
44 (0) 118 974 8700; Fax: 44 (0) 118 974 8701<br />
INTERNET<br />
E-mail addresses:<br />
techsupport@smc.com<br />
european.techsupport@smc-europe.com<br />
Driver updates:<br />
http://www.smc.com/index.cfm?action=tech_support_drivers_downloads<br />
World Wide Web:<br />
http://www.smc.com/<br />
http://www.smc-europe.com/<br />
For Literature or Advertising Response, Call:<br />
U.S.A. and Canada: (800) SMC-4-YOU; Fax (949) 679-1481<br />
Spain: 34-93-477-4935; Fax 34-93-477-3774<br />
UK: 44 (0) 118 974 8700; Fax 44 (0) 118 974 8701<br />
France: 33 (0) 41 38 32 32; Fax 33 (0) 41 38 01 58<br />
Italy: 39 02 739 12 33; Fax 39 02 739 14 17<br />
Benelux: 31 33 455 72 88; Fax 31 33 455 73 30<br />
Central Europe: 49 (0) 89 92861-0; Fax 49 (0) 89 92861-230<br />
Switzerland: 41 (0) 1 9409971; Fax 41 (0) 1 9409972<br />
Nordic: 46 (0) 868 70700; Fax 46 (0) 887 62 62<br />
Northern Europe: 44 (0) 118 974 8700; Fax 44 (0) 118 974 8701<br />
Eastern Europe: 34 -93-477-4920; Fax 34 93 477 3774<br />
Sub Saharan Africa: 27-11 314 1133; Fax 27-11 314 9133<br />
North Africa: 34 93 477 4920; Fax 34 93 477 3774<br />
Russia: 7 (095) 290 29 96; Fax 7 (095) 290 29 96<br />
PRC: 86-10-6235-4958; Fax 86-10-6235-4962<br />
Taiwan: 886-2-2659-9669; Fax 886-2-2659-9666<br />
Asia Pacific: (65) 238 6556; Fax (65) 238 6466<br />
Korea: 82-2-553-0860; Fax 82-2-553-7202<br />
Japan: 81-45-224-2332; Fax 81-45-224-2331<br />
Australia: 61-2-9416-0437; Fax 61-2-9416-0474<br />
India: 91-22-8204437; Fax 91-22-8204443<br />
If you are looking for further contact information, please visit www.smc.com or<br />
www.smc-europe.com.<br />
38 Tesla<br />
Irvine, CA 92618<br />
Phone: (949) 679-8000<br />
Model Number: <strong>SMC2482W</strong>