Owner's Manual - QVC.com
Owner's Manual - QVC.com
Owner's Manual - QVC.com
You also want an ePaper? Increase the reach of your titles
YUMPU automatically turns print PDFs into web optimized ePapers that Google loves.
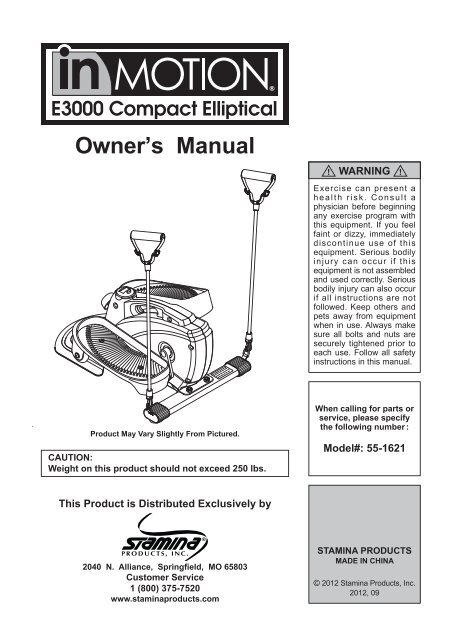
Owner’s <strong>Manual</strong><br />
Product May Vary Slightly From Pictured.<br />
CAUTION:<br />
Weight on this product should not exceed 250 lbs.<br />
This Product is Distributed Exclusively by<br />
2040 N. Alliance, Springfield, MO 65803<br />
Customer Service<br />
1 (800) 375-7520<br />
www.staminaproducts.<strong>com</strong><br />
! WARNING !<br />
Exercise can present a<br />
h e a l t h r i s k . C o n s u l t a<br />
physician before beginning<br />
any exercise program with<br />
this equipment. If you feel<br />
faint or dizzy, immediately<br />
discontinue use of this<br />
equipment. Serious bodily<br />
injury can occur if this<br />
equipment is not assembled<br />
and used correctly. Serious<br />
bodily injury can also occur<br />
if all instructions are not<br />
followed. Keep others and<br />
pets away from equipment<br />
when in use. Always make<br />
sure all bolts and nuts are<br />
securely tightened prior to<br />
each use. Follow all safety<br />
instructions in this manual.<br />
When calling for parts or<br />
service, please specify<br />
the following number :<br />
Model#: 55-1621<br />
STAMINA PRODUCTS<br />
MADE IN CHINA<br />
© 2012 Stamina Products, Inc.<br />
2012, 09
TABLE OF CONTENTS<br />
Safety Instructions ...................................... 2<br />
Before You Begin ........................................ 4<br />
Equipment Warning, Caution & Notice Labels ... 5<br />
Hardware Identification Chart .................... 6<br />
Assembly Instructions ................................ 7<br />
Precautions for Using ................................ 8<br />
Set Up Instructions ..................................... 8<br />
Operational Instructions ............................ 9<br />
Storage ....................................................... 11<br />
SAFETY INSTRUCTIONS<br />
2<br />
Maintenance ............................................... 11<br />
Conditioning Guidelines ........................... 12<br />
Warm-Up and Cool-Down ......................... 13<br />
Product Parts Drawing .............................. 14<br />
Parts List .................................................... 15<br />
Warranty ..................................................... 17<br />
Notes ........................................................... 18<br />
Fax/Mail Ordering Form ............................ 19<br />
! WARNING This product contains a chemical known to the State of California to cause<br />
cancer and birth defects or other reproductive harm.<br />
! WARNING Consult your physician before starting this or any exercise program. This is<br />
especially important if you are over the age of 35, have never exercised before,<br />
are pregnant, or suffer from any health problem. This product is for home use<br />
only. Do not use in institutional or <strong>com</strong>mercial applications. Failure to follow<br />
all warnings and instructions could result in serious injury or death.<br />
! CAUTION The Resistance Tubes(69) contain natural rubber latex which may cause<br />
allergic reactions.<br />
! WARNING<br />
To reduce the risk of serious injury, read the following Safety Instructions<br />
before using the InMotion® E3000 Compact Elliptical.<br />
1. Read all warnings and cautions posted on the InMotion® E3000 Compact Elliptical.<br />
2. The InMotion® E3000 Compact Elliptical should only be used after a thorough review of the Owner’s <strong>Manual</strong>.<br />
3. We re<strong>com</strong>mend that two people be available for assembly of this product.<br />
4. Keep children away from the InMotion® E3000 Compact Elliptical. Do not allow children to use or play on the<br />
InMotion® E3000 Compact Elliptical. Keep children and pets away from the InMotion® E3000 Compact Elliptical<br />
when it is in use.<br />
5. Inspect the Resistance Tubes(69) for nicks and cuts before each use. Do not use Resistance Tubes(69) that are<br />
nicked or cut.<br />
6. It is re<strong>com</strong>mended that you place this exercise equipment on an equipment mat.<br />
7. Set up and operate the InMotion® E3000 Compact Elliptical on a solid level surface. Do not position the InMotion®<br />
E3000 Compact Elliptical on loose rugs or uneven surfaces.<br />
8. Make sure that adequate space is available for access to and around the InMotion® E3000 Compact Elliptical.<br />
9. Before using, inspect the InMotion® E3000 Compact Elliptical for worn or loose <strong>com</strong>ponents, and securely<br />
tighten or replace any worn or loose <strong>com</strong>ponents prior to use.<br />
10. Consult a physician prior to <strong>com</strong>mencing an exercise program. If, at any time during exercise, you feel faint, dizzy,<br />
or experience pain, stop and consult your physician.<br />
11. Follow your physician’s re<strong>com</strong>mendations in developing your own personal fitness program.<br />
12. Always choose the workout which best fits your physical strength and flexibility level. Know your limits and train<br />
within them. Always use <strong>com</strong>mon sense when exercising.<br />
13. Do not wear loose or dangling clothing while using the InMotion® E3000 Compact Elliptical.<br />
14. Never exercise in bare feet or socks; always wear correct footwear, such as running, walking, or crosstraining<br />
shoes. Be sure that they fit well, provide foot support and feature non-skid rubber soles.<br />
15. Be careful to maintain your balance while using, mounting, dismounting, or assembling the InMotion® E3000<br />
Compact Elliptical, loss of balance may result in a fall and serious bodily injury.<br />
16. To maintain your balance, always mount or dismount the InMotion® E3000 Compact Elliptical from the lowest<br />
foot pedal. Refer to the detail instructions on page 8.<br />
17. Keep both feet firmly and securely on the pedal caps while exercising.<br />
18. This unit is not equipped with a free-wheel. Pedal speed should be reduced in a controlled manner.<br />
19. The InMotion® E3000 Compact Elliptical should not be used by persons weighing over 250 pounds.<br />
20. The InMotion® E3000 Compact Elliptical should be used by only one person at a time.<br />
21. The InMotion® E3000 Compact Elliptical is for consumer use only. It is not for use in public or semipublic facilities.
To help you get started, we have pre-assembled most of your<br />
InMotion® E3000 Compact Elliptical at the factory with the exception<br />
of those few parts left unassembled for shipping purposes.<br />
Simply follow the few assembly instructions set forth in this manual.<br />
With regular workouts, you will be getting your body into shape<br />
and be on your way to achieving a happier and healthier lifestyle.<br />
Should you have any questions,<br />
please call our Customer Service Department toll-free number,<br />
1 (800) 375-7520<br />
Monday - Thursday, 7:30 A.M. - 5:00 P.M., Central Time.<br />
Friday, 8:00 A.M. - 3:00 P.M., Central Time.<br />
ONLINE<br />
CUSTOMER SERVICE<br />
customerservice@staminaproducts.<strong>com</strong><br />
www.staminaproducts.<strong>com</strong><br />
Call Us First<br />
Customer Service<br />
1 (800) 375-7520<br />
www.staminaproducts.<strong>com</strong><br />
THANK YOU FOR PURCHASING THE<br />
InMotion® E3000 Compact Elliptical<br />
To enact your warranty, please register your product<br />
by going to register.staminaproducts.<strong>com</strong><br />
TELEPHONE<br />
CUSTOMER SERVICE<br />
Tel: 1 (800) 375-7520<br />
3<br />
FAX<br />
CUSTOMER SERVICE<br />
Fax: (417) 889-8064<br />
MAIL<br />
STAMINA PRODUCTS, INC.<br />
ATTN: Customer Service<br />
P.O. Box 1071<br />
Springfield, MO. 65801-1071
BEFORE YOU BEGIN<br />
Thank you for choosing the InMotion® E3000<br />
Compact Elliptical. We take great pride in<br />
producing this quality product and hope it will<br />
provide many hours of quality exercise to make<br />
you feel better, look better, and enjoy life to its<br />
fullest.<br />
It's a proven fact that a regular exercise program<br />
can improve your physical and mental health.<br />
Too often, our busy lifestyles limit our time and<br />
opportunity to exercise. The InMotion® E3000<br />
Compact Elliptical provides a convenient and<br />
simple method to begin your journey of getting<br />
your body in shape and achieving a happier and<br />
healthier lifestyle.<br />
Before reading further, please review the<br />
drawing below and familiarize yourself with the<br />
parts that are labeled.<br />
Read this manual carefully before using the<br />
InMotion® E3000 Compact Elliptical.<br />
Resistance Tube<br />
Base Board<br />
Left Pedal Arm<br />
Roller<br />
Left Pedal Cap<br />
Tension Knob<br />
D Ring<br />
Meter<br />
Oval Endcap<br />
THE FOLLOWING TOOLS ARE INCLUDED FOR ASSEMBLY : Wrench<br />
4<br />
Although Stamina constructs its products with<br />
the finest materials and uses the highest standards<br />
of manufacturing and quality control, there can<br />
sometimes be missing parts or incorrectly sized<br />
parts. If you have any questions or problems with<br />
the parts included with your InMotion® E3000<br />
Compact Elliptical, please do not return the<br />
product. Contact us FIRST!<br />
If a part is missing or defective, please go to<br />
staminaproducts.<strong>com</strong> under the Service section<br />
and order the part needed, or call us toll free<br />
at 1-800-375-7520 (in the U.S.). Our Customer<br />
Service Staff is available to assist you from 7:30<br />
A.M. to 5:00 P.M. (Central Time) Monday through<br />
Thursday and 8:00 A.M. to 3:00 P.M. (Central<br />
Time) on Friday.<br />
Be sure to have the name and model number of<br />
the product available when you contact us.<br />
Resistance Tube<br />
Right Pedal Cap<br />
Right Cover<br />
Crank<br />
D Ring<br />
Oval Endcap<br />
Warning Label<br />
Main Frame<br />
Rear Stabilizer<br />
Allen Wrench (6mm)
EQUIPMENT WARNING, CAUTION & NOTICE LABELS<br />
This chart is provided to help identify the warning, caution, and notice labels on the InMotion® E3000<br />
Compact Elliptical. Please take a moment to familiarize yourself with all of the warning, caution, and<br />
notice labels.<br />
Label is larger than actual size<br />
W1<br />
WARNING LABEL(55)<br />
5
HARDWARE IDENTIFICATION CHART<br />
This chart is provided to help identify the hardware used in the assembly process. Place the washers or<br />
the ends of the bolts or screws on the circles to check for the correct diameter. Use the small scale to<br />
check the length of the bolts and screws.<br />
3/16" 1/4" 5/16" 3/8" 1/2"<br />
0 1/2 1 1/2 2 1/2 3 1/2 4 1/2 5 1/2 6<br />
in.<br />
mm.<br />
0 10 20 30 40 50 60 70 80 90 100 110 120 130 140 150<br />
6 8 10 12<br />
Part Number and Description Qty<br />
42 Carriage Bolt (M10 x 1.5 x 43mm) 2<br />
45 Bolt, Button Head (M8 x 1.25 x 20mm) 4<br />
59 Bolt, Button Head (M8 x 1.25 x 16mm) 2<br />
51 Nylock Nut (M10 x 1.5) 2<br />
40 Stand 2<br />
6<br />
INCHES<br />
MILLIMETERS<br />
NOTICE: The length of all bolts and screws, except those with flat<br />
heads, is measured from below the head to the end of the bolt<br />
or screw. Flat head bolts and screws are measured from the<br />
top of the head to the end of the bolt or screw.<br />
length<br />
length<br />
After unpacking the unit, open the hardware bag and make sure that you have all the following items.<br />
Some hardware may be already attached to the part.
ASSEMBLY INSTRUCTIONS<br />
Place all parts from the box in a cleared area and position them on the floor in front of you. Remove<br />
all packing materials from your area and place them back into the box. Do not dispose of the packing<br />
materials until assembly is <strong>com</strong>pleted. Read each step carefully before beginning. If you are missing<br />
a part, please go to staminaproducts.<strong>com</strong> under the Service section and order the part needed,<br />
e-mail us at customerservice@staminaproducts.<strong>com</strong>, or call us toll free at 1-800-375-7520 (in the<br />
U.S.). Our Customer Service Staff is available to assist you from 7:30 A.M. to 5:00 P.M. (Central<br />
Time) Monday through Thursday and 8:00 A.M. to 3:00 P.M. (Central Time) on Friday.<br />
STEP 1: Attach the REAR STABILIZER(2) to the MAIN FRAME(1) with CARRIAGE BOLTS(M10x1.5x43mm)<br />
(42) and NYLOCK NUTS(M10x1.5)(51).<br />
STEP 2: Attach the BASE BOARD(37) to the MAIN FRAME(1) with the STANDS(40) and BUTTON<br />
HEAD BOLTS(M8x1.25x16mm)(59).<br />
STEP 3: Attach the LEFT PEDAL CAP(33) to the LEFT PEDAL ARM(3) with BUTTON HEAD BOLTS<br />
(M8x1.25x20mm)(45). Repeat on the other side.<br />
NOTE: The LEFT and RIGHT PEDAL CAPS(33, 34) have a raised lip on three sides. Attach the LEFT<br />
and RIGHT PEDAL CAPS(33, 34) to the LEFT and RIGHT PEDAL ARMS(3, 4) so that the side<br />
without the raised lip is on the outside.<br />
STEP 4: Refer to the illustration below. Hook the RESISTANCE TUBES(69) to the D RINGS(68) on<br />
both sides.<br />
7
PRECAUTIONS FOR USING<br />
1. To maintain your balance, always mount or dismount the InMotion® E3000 Compact Elliptical from<br />
the lowest foot pedal, refer to the following illustrations. Loss of balance may result in a fall and serious<br />
bodily injury.<br />
2. Use a wall or a table to help to maintain your balance while using the InMotion® E3000 Compact<br />
Elliptical until you are familiar with the InMotion® E3000 Compact Elliptical.<br />
CORRECT INCORRECT<br />
SET UP INSTRUCTIONS<br />
Place the InMotion® E3000 Compact Elliptical in the area where it will be used. It is re<strong>com</strong>mended that<br />
the InMotion® E3000 Compact Elliptical be placed on an equipment mat. The InMotion® E3000 Compact<br />
Elliptical is approximately 24.3 inches long x 17.5 inches wide x 11.4 inches tall. (These dimensions may<br />
vary up to one inch.) Make sure that adequate space is available for access to move around and emergency<br />
dismount from the InMotion® E3000 Compact Elliptical. A minimum of 20 inches on at least one side and<br />
20 inches either behind or in front of the InMotion® E3000 Compact Elliptical is required for safe operation.<br />
LEVELING: Adjust the location of InMotion® E3000 Compact Elliptical to ensure InMotion® E3000<br />
Compact Elliptical sits on the floor without rocking.<br />
MOVING: Grasp the handle on the top of the product to move the InMotion® E3000 Compact<br />
Elliptical. Do not use the PEDAL ARMS(3,4) to move the InMotion® E3000 Compact<br />
Elliptical. The PEDAL ARMS(3,4) will move and may pinch your hand or fingers.<br />
FUNCTION INSPECTION:<br />
Visually inspect the InMotion® E3000 Compact<br />
Elliptical to verify that assembly is as shown in the<br />
illustration. Check the function of the InMotion®<br />
E3000 Compact Elliptical. Stand on the foot<br />
pedals. Slowly move your highest foot forward and<br />
follow the natural path of the machine. Turn the<br />
crank slowly through one <strong>com</strong>plete revolution to<br />
verify that the drive train functions properly. Adjust<br />
the TENSION KNOB(21) and verify that it functions<br />
properly and the resistance changes.<br />
CAUTION: Locate and read the WARNING<br />
LABEL(55) on the InMotion® E3000<br />
Compact Elliptical. Make sure<br />
that all users read the WARNING<br />
LABEL(55).<br />
8<br />
Handle<br />
Equipment Mat
OPERATIONAL INSTRUCTIONS<br />
USING THE FITNESS METER<br />
POWER ON:<br />
POWER OFF:<br />
FUNCTIONS:<br />
Automatic shut off after four minutes of inactivity.<br />
FUNCTION BUTTON:<br />
Press and release to select functions.<br />
Press and hold for four seconds to reset all functions to zero.<br />
SCAN: Automatically scans TIME, DISTANCE, COUNT, and CALORIES in sequence with a change<br />
every six seconds. Press and release the button until “SCAN” appears on the display.<br />
TIME: Displays the time from one second up to 99:59 minutes.<br />
DISTANCE: Displays the distance from zero to 999.9 miles.<br />
COUNT : Displays the total number of strides you have taken from zero to 9999 strides.<br />
CALORIES: Displays the calorie consumption from zero to 999.9 Kcal.<br />
The calorie readout is an estimate for an average user. It should be used only as a<br />
<strong>com</strong>parison between workouts on this unit.<br />
NOTE:<br />
Pedal movement or press the button.<br />
The meter will shut off automatically after four minutes of inactivity. All function values will<br />
be kept. Push the button and hold it down for four seconds to reset all functions to zero.<br />
BATTERY<br />
The meter operates with a 1.5v LR44 button cell battery. Replace the battery when you see inconsistencies<br />
in the display.<br />
LOAD LEVEL ADJUSTMENT<br />
The load level of InMotion® E3000 Compact Elliptical can be changed<br />
at any time during your workout. Adjusting your load level will allow you<br />
to increase or decrease your intensity level.<br />
To increase the load, turn the TENSION KNOB(21) clockwise. To<br />
decrease the load, turn the TENSION KNOB(21) counterclockwise.<br />
9
OPERATIONAL INSTRUCTIONS<br />
EXERCISE WORKOUT<br />
To start using the InMotion® E3000 Compact Elliptical simply stand on the foot pedals with the front of<br />
your shoes close to the front edge of the pedal cap. Move your highest foot forward and follow the natural<br />
path of the machine.<br />
For more stability, place a chair next to the InMotion® E3000 Compact Elliptical and place your hand on<br />
the chair back while stepping onto the pedals. Start on a load level that is <strong>com</strong>fortable until you are familiar<br />
with the machine. Once you are familiar with the elliptical and <strong>com</strong>fortable with the resistance, adjust the<br />
load level as described below to achieve the workout desired.<br />
FORWARD AND REVERSE<br />
The InMotion® E3000 Compact Elliptical can be used in forward and reverse directions to vary the<br />
muscles that you work. This will help you to stay motivated and achieve the best results. To change directions,<br />
simply slow the pedals down until they stop, then pedal in the opposite direction.<br />
SITTING WORKOUT<br />
Refer to the illustration. Seated workouts are effective for toning legs and hips, and for improving<br />
circulation and mobility. When sitting, your feet will face the opposite direction on the pedals than when<br />
standing. This will put your feet, ankles, and hips at the proper workout angles. To adjust the METER(22)<br />
to face you, find the two cavities on either side of the meter case, grasp the top of the meter and pull<br />
the top of the METER(22) from the casing being careful not to disconnect or damage the SENSOR<br />
WIRE(23). Turn the meter 180 degrees, and push it back into position.<br />
Place the InMotion® E3000 Compact Elliptical on the floor in front of a chair as shown in the illustration<br />
below. Sit in the chair and pedal the InMotion® E3000 Compact Elliptical with your feet.<br />
CAUTION: Do not stand up on the InMotion® E3000 Compact Elliptical in this<br />
workout position.<br />
Cavity<br />
USING THE RESISTANCE TUBES<br />
The InMotion® E3000 Compact Elliptical includes two RESISTANCE TUBES(69). These<br />
RESISTANCE TUBES(69) add upper body toning to your cardiovascular workout. The resistance<br />
tubes can be used during your elliptical workout either while standing or while seated. The length of the<br />
adjustable hand grips can be adjusted by moving the buckles to other positions.<br />
10
STORAGE<br />
1. To store the InMotion® E3000 Compact Elliptical, simply keep it in a clean dry place.<br />
2. The InMotion® E3000 Compact Elliptical is approximately 24.3 inches long x 17.5 inches wide x 11.4<br />
inches tall. These dimensions will vary. Please measure your InMotion® E3000 Compact Elliptical if<br />
exact dimensions are needed.<br />
3. Grasp the handle located on the top of the product to move the InMotion® E3000 Compact Elliptical.<br />
Do not use the Pedal Arms to move the InMotion® E3000 Compact Elliptical.<br />
MAINTENANCE<br />
The safety and integrity designed into the InMotion® E3000 Compact Elliptical can only be maintained<br />
when the InMotion® E3000 Compact Elliptical is regularly examined for damage and wear. Special<br />
attention should be given to the following:<br />
1. Adjust the TENSION KNOB(21) and verify that it functions properly and the resistance changes.<br />
2. Inspect the RESISTANCE TUBES(69) for nicks and cuts. Replace damaged RESISTANCE<br />
TUBES(69).<br />
3. Verify that the WARNING LABEL(55) is in place and easy to read. Call Stamina Products immediately<br />
at 1-800-375-7520 for a replacement WARNING LABEL(55) if it is missing or damaged.<br />
4. It is the sole responsibility of the user/owner to ensure that regular maintenance is performed.<br />
5. Worn or damaged <strong>com</strong>ponents shall be replaced immediately or the InMotion® E3000 Compact<br />
Elliptical removed from service until repair is made.<br />
6. Only Stamina Products supplied <strong>com</strong>ponents shall be used to maintain/repair the InMotion® E3000<br />
Compact Elliptical.<br />
7. Keep your InMotion® E3000 Compact Elliptical clean by wiping it off with an absorbent cloth after<br />
use.<br />
NOTE: A standard crank extractor tool is required to remove the CRANKS(72) from the AXLE(73).<br />
11
CONDITIONING GUIDELINES<br />
How you begin your exercise program depends on your physical condition. If you have been inactive for<br />
several years or are severely overweight, start slowly and increase your workout time gradually. Increase<br />
your workout intensity gradually by monitoring your heart rate while you exercise.<br />
Remember to follow these essentials:<br />
Have your doctor review your training and diet programs.<br />
Begin your training program slowly with realistic goals that have been set by you and your physician.<br />
Warm up before you exercise and cool down after you work out.<br />
Take your pulse periodically during your workout and strive to stay within a range of 60% (lower<br />
intensity) to 90% (higher intensity) of your maximum heart rate zone. Start at the lower intensity, and<br />
build up to higher intensity as you be<strong>com</strong>e more aerobically fit.<br />
If you feel dizzy or lightheaded you should slow down or stop exercising.<br />
Initially you may only be able to exercise within your target zone for a few minutes; however, your aerobic<br />
capacity will improve over the next six to eight weeks. It is important to pace yourself while you exercise<br />
so you don't tire too quickly.<br />
To determine if you are working out at the correct intensity, use a heart rate monitor or use the table<br />
below. For effective aerobic exercise, your heart rate should be maintained at a level between 60%<br />
and 90% of your maximum heart rate. If just starting an exercise program, work out at the low end of<br />
your target heart rate zone. As your aerobic capacity improves, gradually increase the intensity of your<br />
workout by increasing your heart rate.<br />
Measure your heart rate periodically during your workout by stopping the<br />
exercise but continuing to move your legs or walk around. Place two or<br />
three fingers on your wrist and take a six second heartbeat count. Multiply<br />
the results by ten to find your heart rate. For example, if your six second<br />
heartbeat count is 14, your heart rate is 140 beats per minute. A six second<br />
count is used because your heart rate will drop rapidly when you stop<br />
exercising. Adjust the intensity of your exercise until your heart rate is at the<br />
proper level.<br />
Target Heart Rate Zone Estimated by Age*<br />
Age<br />
20 years<br />
25 years<br />
30 years<br />
35 years<br />
40 years<br />
45 years<br />
50 years<br />
55 years<br />
60 years<br />
65 years<br />
70 years<br />
Target Heart Rate Zone<br />
(55%-90% of Maximum Heart Rate)<br />
110-180 beats per minute<br />
107-175 beats per minute<br />
105-171 beats per minute<br />
102-166 beats per minute<br />
99-162 beats per minute<br />
97-157 beats per minute<br />
94-153 beats per minute<br />
91-148 beats per minute<br />
88-144 beats per minute<br />
85-139 beats per minute<br />
83-135 beats per minute<br />
Average Maximum<br />
Heart Rate 100%<br />
200 beats per minute<br />
195 beats per minute<br />
190 beats per minute<br />
185 beats per minute<br />
180 beats per minute<br />
175 beats per minute<br />
170 beats per minute<br />
165 beats per minute<br />
160 beats per minute<br />
155 beats per minute<br />
150 beats per minute<br />
wrist pulse<br />
* For cardiorespiratory training benefits, the American College of Sports Medicine re<strong>com</strong>mends<br />
working out within a heart rate range of 55% to 90% of maximum heart rate. To predict the<br />
maximum heart rate, the following formula was used: 220 - Age = predicted maximum heart rate<br />
12
WARM-UP and COOL-DOWN<br />
Warm-Up The purpose of warming up is to prepare your body for exercise and to minimize injuries.<br />
Warm up for two to five minutes before strength training or aerobic exercising. Perform activities that<br />
raise your heart rate and warm the working muscles. Activities may include brisk walking, jogging,<br />
jumping jacks, jump rope, and running in place.<br />
Stretching Stretching while your muscles are warm after a proper warm-up and again after your<br />
strength or aerobic training session is very important. Muscles stretch more easily at these times<br />
because of their elevated temperature, which greatly reduces the risk of injury. Stretches should be held<br />
for 15 to 30 seconds. Do not bounce.<br />
Suggested Stretching Exercises<br />
Lower Body Stretch<br />
Place feet shoulder-width<br />
apart and lean forward.<br />
Keep this position for 30<br />
seconds using the body as a<br />
natural weight to stretch the<br />
backs of the legs.<br />
DO NOT BOUNCE!<br />
When the pull on the back of<br />
the legs lessens, gradually<br />
try a lower position.<br />
Bent Torso Pulls<br />
While sitting on the floor,<br />
have legs apart, one leg<br />
straight and one knee bent.<br />
Pull the chest down to touch<br />
the thigh on the leg that is<br />
bent, and twist at the waist.<br />
Hold this position at least 10<br />
seconds. Repeat 10 times<br />
on each side.<br />
Floor Stretch<br />
While sitting on the floor,<br />
open the legs as wide as<br />
possible. Stretch the upper<br />
body toward the knee on the<br />
right leg by using your arms<br />
to pull your chest to your<br />
thighs. Hold this stretch 10<br />
to 30 seconds.<br />
DO NOT BOUNCE!<br />
Do this stretch 10 times.<br />
Repeat the stretch with the<br />
left leg.<br />
Bent Over Leg Stretch<br />
Stand with feet shoulderwidth<br />
apart and lean forward<br />
as illustrated. Using the<br />
arms, gently pull the upper<br />
body towards the right leg.<br />
Let the head hang down.<br />
DO NOT BOUNCE!<br />
Hold the position a minimum<br />
of 10 seconds. Repeat<br />
pulling the upper body to<br />
the left leg. Do this stretch<br />
several times slowly.<br />
Remember to always check with your physician before starting any exercise program.<br />
Cool-Down The purpose of cooling down is to return the body to its normal, or near normal, resting<br />
state at the end of each exercise session. A proper cool-down slowly lowers your heart rate and allows<br />
blood to return to the heart. Your cool-down should include the stretches listed above and should be<br />
<strong>com</strong>pleted after each strength training session.<br />
13
PRODUCT PARTS DRAWING<br />
FRONT<br />
14<br />
BACK
PARTS LIST<br />
PART# PART NAME QTY<br />
1 Main Frame 1<br />
2 Rear Stabilizer 1<br />
3 Left Pedal Arm 1<br />
4 Right Pedal Arm 1<br />
5 Pulley 1<br />
6 Bearing (6003) 2<br />
7 Pulley Spacer 1<br />
8 C Ring (16mm) 4<br />
10 V-Ribbed Belt 1<br />
11 Flywheel 1<br />
12 Bearing (6000) 2<br />
13 Bearing Spacer 1<br />
14 Flywheel Spacer 1<br />
15 Spacer Cap 2<br />
16 Flywheel Shaft Bolt (M10 x 1.5 x 82mm) 1<br />
17 Eyebolt 1<br />
18 Tension Bracket 1<br />
19 Brake Brace 1<br />
20 Spring 1<br />
21 Tension Knob 1<br />
22 Meter 1<br />
23 Sensor Wire 1<br />
24 Magnet 1<br />
25 Square Plug (25mm x 25mm) 1<br />
26 Left Cover 1<br />
27 Right Cover 1<br />
29 Flange Bolt (M8 x 1.25 x 15mm) 2<br />
30 Crank Spacer 2<br />
31 Large Washer (16.3 x 24mm) 4<br />
32 Pedal Arm Bushing 4<br />
33 Left Pedal Cap 1<br />
34 Right Pedal Cap 1<br />
35 Square Plug (30mm x 30mm) 2<br />
36 Roller 2<br />
37 Base Board 1<br />
38 Left Foam Pad 1<br />
39 Right Foam Pad 1<br />
40 Stand 2<br />
41 Oval Endcap (30mm x 60mm) 2<br />
42 Carriage Bolt (M10 x 1.5 x 43mm) 2<br />
43 Bolt, Button Head (M6 x 1 x 13mm) 3<br />
44 Bolt, Button Head (M6 x 1 x 17mm) 2<br />
45 Bolt, Button Head (M8 x 1.25 x 20mm) 4<br />
46 Bolt, Button Head (M8 x 1.25 x 42mm) 2<br />
47 Screw, Round Head (M3.4 x 8mm) 2<br />
48 Screw, Round Head (M4 x 25mm) 11<br />
49 Nylock Nut (M6 x 1) 9<br />
15
PARTS LIST<br />
PART# PART NAME QTY<br />
50 Nylock Nut (M8 x 1.25) 2<br />
51 Nylock Nut (M10 x 1.5) 3<br />
52 Nut (M10 x 1.5) 1<br />
53 Washer (M10) 1<br />
54 Wavy Washer (M16) 2<br />
55 Warning Label 1<br />
56 Wrench 1<br />
57 Allen Wrench (6mm) 1<br />
58 <strong>Manual</strong> 1<br />
59 Bolt, Button Head (M8 x 1.25 x 16mm) 2<br />
60 Wavy Washer (M17) 1<br />
61 C Ring (17mm) 1<br />
62 Pu Bushing 1<br />
63 Square Plug (38mm x 38mm) 1<br />
64 Crank Cap 2<br />
65 Large Tension Bracket 2<br />
66 Double Eyebolt 1<br />
67 Felt Bracket Pad 1<br />
68 D Ring 2<br />
69 Resistance Tube 2<br />
70 Screw, Flange Round Head (M4 x 16mm) 2<br />
71 Workout DVD 1<br />
72 Crank 2<br />
73 Axle 1<br />
16
LIMITED WARRANTY<br />
WARRANTY<br />
MODEL 55-1621<br />
Stamina Products, Inc. warrants that this product will be free from defects in materials and workmanship<br />
under normal use, service and proper operation for a period of 90 days on the parts and one year on<br />
the frame from the date of the original purchase from an authorized retailer. THIS WARRANTY SHALL<br />
NOT APPLY TO ANY PRODUCT WHICH HAS BEEN SUBJECT TO COMMERCIAL USE, ABUSE,<br />
MISUSE, ALTERATION OF ANY TYPE OR CAUSE OR TO ANY DEFECT OR DAMAGE CAUSED BY<br />
REPAIR, REPLACEMENT, SUBSTITUTION OR USE WITH PARTS OTHER THAN PARTS PROVIDED<br />
BY STAMINA PRODUCTS, INC. Commercial use includes use of the product in athletic clubs, health<br />
clubs, spas, gymnasiums, exercise facilities, and other public or semipublic facilities whether or not the<br />
product's use is in furtherance of a profit making enterprise, and all other use which is not for personal,<br />
family, or household purposes.<br />
To implement this limited warranty, send a written notice stating your name, date, and place of purchase<br />
and a brief description of the defect along with your receipt to Stamina Products, Inc. P.O. Box 1071,<br />
Springfield Missouri, USA, 65801-1071, or email us at customerservice@staminaproducts.<strong>com</strong>, or<br />
call us at 1-800-375-7520. If the defect is covered under this limited warranty, you will be requested to<br />
return the product or part to us for free repair or replacement at our option. NO ACTION FOR BREACH<br />
OF THIS LIMITED WARRANTY MAY BE COMMENCED MORE THAN ONE (1) YEAR AFTER THE<br />
DATE THE ALLEGED BREACH WAS OR SHOULD HAVE BEEN DISCOVERED. NO ACTION FOR<br />
BREACH OF ANY IMPLIED WARRANTY MAY BE COMMENCED MORE THAN ONE (1) YEAR AFTER<br />
DELIVERY OF THE PRODUCT TO THE PURCHASER. This limited warranty is not transferable. IF<br />
ANY PART OF THE PRODUCT IS NOT IN COMPLIANCE WITH THIS LIMITED WARRANTY OR ANY<br />
IMPLIED WARRANTY, THE REMEDY OF REPAIR OR REPLACEMENT IS THE EXCLUSIVE REMEDY<br />
AVAILABLE TO YOU. In the event that the purchaser makes any claim under this limited warranty or any<br />
implied warranty, the Warrantor reserves the right to require the product to be returned for inspection,<br />
at the purchaser's expense, to the Warrantor's premises in Springfield, Missouri. Return of the enclosed<br />
warranty registration card is not required for warranty coverage, but is merely a way of establishing the<br />
date and place of purchase.<br />
Stamina Products, Inc. SHALL NOT BE LIABLE FOR THE LOSS OF USE OF ANY PRODUCT, LOSS<br />
OF TIME, INCONVENIENCE, COMMERCIAL LOSS OR ANY OTHER INDIRECT, CONSEQUENTIAL,<br />
SPECIAL OR INCIDENTAL DAMAGES DUE TO BREACH OF THE ABOVE WARRANTY OR ANY<br />
IMPLIED WARRANTY.<br />
This limited warranty is the only written or express warranty given by Stamina Products, Inc. This<br />
warranty gives you specific legal rights, and you may also have other legal rights which vary from state<br />
to state. ANY OTHER RIGHT WHICH YOU MAY HAVE, INCLUDING ANY IMPLIED WARRANTY OR<br />
MERCHANTABILITY OR FITNESS FOR A PARTICULAR PURPOSE, IS LIMITED IN DURATION TO<br />
THE DURATION OF THIS WARRANTY.<br />
The laws in some jurisdictions restrict the rights of manufacturers and distributors of consumer goods<br />
to disclaim or limit implied warranties and consequential and incidental damages with respect thereto.<br />
If any such law is found to be applicable, the foregoing disclaimers and limitations of and on implied<br />
warranties and consequential and incidental damages with respect thereto shall be disregarded and shall<br />
be deemed not to have been made to the extent necessary to <strong>com</strong>ply with such legal restriction.<br />
17
NOTES<br />
18
TO CONTACT CUSTOMER SERVICE<br />
For your convenience, Stamina’s customer service representatives can be reached by email at customerservice@<br />
staminaproducts.<strong>com</strong> or by phone at 1-800-375-7520 (in the U.S.). Our customer service representatives are available Monday<br />
through Thursday from 7:30 a.m. until 5:00 p.m., and Friday 8:00 a.m. until 3 p.m. Central Time.<br />
ONLINE<br />
CUSTOMER SERVICE<br />
customerservice@staminaproducts.<strong>com</strong><br />
www.staminaproducts.<strong>com</strong><br />
Would you like to recieve email information or special offers from Stamina Products? Register at contact.staminaproducts.<strong>com</strong><br />
TO REGISTER YOUR PRODUCT<br />
Stamina Products, Inc.<br />
P.O. Box 1071<br />
Springfield, MO 65801-1071<br />
Model Number: ...................................................................................... Serial Number: .............................................................................................<br />
Product Name: ..................................................................................................................................................................................................................................<br />
Place Purchased: ..............................................................................................................................................................................................................................<br />
Date of Purchase: .................................................................................. Purchase Price: ............................................................................................<br />
First Name: ............................................................................................ Last Name: ...................................................................................................<br />
City: .................................................................. State: ................................................................ Zip Code: .................................................<br />
Email Address: ....................................................................................... Phone #: ( ) ......................................................................................<br />
Would you like to receive email information or special offers from Stamina Products?* ____Yes ____No *If yes, be sure your email address is included above.<br />
TO ORDER PARTS<br />
TELEPHONE<br />
CUSTOMER SERVICE<br />
Tel: 1 (800) 375-7520<br />
Detach and Mail or Fax the Form Above<br />
If there are missing or damaged parts, you can go to parts.staminaproducts.<strong>com</strong> and order those parts. If you have questions,<br />
please contact customer service. Do not return the product. To order parts by mail, fill out the sheet below and fax it to<br />
417-889-8064. The part will be mailed to your address.<br />
Stamina Products, Inc.<br />
P.O. Box 1071<br />
Springfield, MO 65801-1071<br />
FAX<br />
CUSTOMER SERVICE<br />
Fax: (417) 889-8064<br />
MAIL<br />
STAMINA PRODUCTS, INC.<br />
ATTN: Customer Service<br />
P.O. Box 1071 Springfield, MO. 65801-1071<br />
To enact your warranty, please register your product by going to register.staminaproducts.<strong>com</strong>. Please have your product model<br />
number (printed on the cover of this owner’s manual) and the serial number (printed on the black and white sticker on your<br />
product) ready.<br />
If you don’t have internet access, you can call customer service at 1-800-375-7520, or fill out and mail the product registration<br />
form below to Stamina Products, Inc.; P.O. Box 1071; Springfield, MO 65801-1071.<br />
PRODUCT REGISTRATION FORM<br />
PARTS ORDER FORM<br />
Detach and Mail or Fax the Form Below<br />
Mr./Ms: ..............................................................................................................................................................................................................................................<br />
Address: ........................................ ............................................................................................. Apt. #:..........................................................................<br />
City: .................................................................. State: ................................................................ Zip Code: .................................................<br />
IMPORTANT : We must have your phone number to process the order!<br />
Phone #: ( ) ................................................................................<br />
Date of Purchase: ..................................................................................<br />
Work Phone #: ( ) .............................................................................<br />
Model #: ............................................................................................................................................................................................................................................<br />
Purchased From: ..............................................................................................................................................................................................................................<br />
IMPORTANT : Before filling out the form below make sure you have the correct information.<br />
Refer to the parts list to make sure you're ordering the right parts!<br />
PART # DESCRIPTION QUANTITY<br />
EXAMPLE:<br />
1 Rear Unit Assembly 1


