BP 4 CT (Turbo) Stage Projector - Pani Projection and Lighting
BP 4 CT (Turbo) Stage Projector - Pani Projection and Lighting
BP 4 CT (Turbo) Stage Projector - Pani Projection and Lighting

Create successful ePaper yourself
Turn your PDF publications into a flip-book with our unique Google optimized e-Paper software.
<strong>Stage</strong> <strong>Projector</strong> <strong>BP</strong> 4 <strong>CT</strong> <strong>Pani</strong> <strong>Projection</strong> <strong>and</strong> <strong>Lighting</strong> Vertriebs GmbH<br />
5.1 ) HMI- Lamp<br />
5) Operation<br />
5.1.1) Installation <strong>and</strong> Replacement of the HMI- Lamp<br />
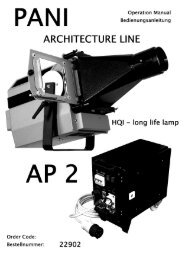
For operation of the <strong>Projector</strong> a single ended HMI- Lamp 4000 W is required. Order<br />
Code: 37206<br />
a) Disconnect the projector from the power source!<br />
b) Open the quick fastener (4) on the housing with a screw driver. Lift up the housing cover<br />
(5) . A built in safety switch prevents an accidental operation of the unit when the housing is<br />
open.<br />
c) Lift out the reflector plate <strong>and</strong> reflector after removing the knurled screw at the other end<br />
of the distance bar.<br />
d) Insert <strong>and</strong> / or replace the lamp.<br />
e) Replace the reflector into the slot of the bottom distance rods <strong>and</strong> tighten knurled screw.<br />
f) Close the housing <strong>and</strong> lock the quick fastener.<br />
ATTENTION: Do not touch the quartz envelope of the lamp with your fingers during<br />
installation. Finger prints can be burned in !<br />
5.1.2) Lamp Adjustment<br />
Each projector is carefully adjusted at the factory (lamp base, reflector <strong>and</strong><br />
condenser). With the high precision manufacturing of halogen lamps, adjustment of<br />
the lamp is rarely necessary. In direction of the optical axis the HMI-lamp can be<br />
brought into another position from the outside on the lower part of the projector by<br />
losening the two screws on the bottom (3) <strong>and</strong> moving the two screws forwards or<br />
backwards. After finding the best position re-tighten the screws.<br />
5.2) Vertical Adjustment of the <strong>Projector</strong><br />
a) Rough Positioning:<br />
For rough positioning, loosen the clamping lever on (1) both sides <strong>and</strong> move the<br />
projector to the desired position. Re–tighten the lever.<br />
b) Fine Adjustment:<br />
For fine adjustment of the projektor turn the star grip (2) <strong>and</strong> bring the projector into<br />
the exact position.<br />
5.3) Yoke Assembly for „St<strong>and</strong>ing“ or „Hanging“<br />
Configurations<br />
Separate the support yoke (8) (2 M 10 Nuts) <strong>and</strong> the telescope rails (7) on both<br />
sides from the projector; Turn the support yoke around 180° such that it is mounted<br />
again as a hanging yoke. Re-connect the telescoping rails.<br />
POSITION NUMBERS SEEPAGE 5<br />
13