1 HQI 2000 W/ D/ S bulb 37601 - Pani Projection and Lighting
1 HQI 2000 W/ D/ S bulb 37601 - Pani Projection and Lighting
1 HQI 2000 W/ D/ S bulb 37601 - Pani Projection and Lighting

You also want an ePaper? Increase the reach of your titles
YUMPU automatically turns print PDFs into web optimized ePapers that Google loves.
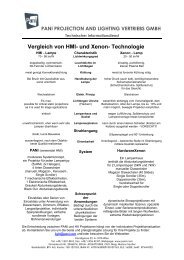
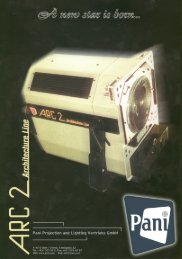
Architecture Projector ARC 2/ <strong>HQI</strong> PANI <strong>Projection</strong> <strong>and</strong> <strong>Lighting</strong> Vertriebs GmbH.<br />
Contents<br />
Status of August 2002 Page<br />
Important !<br />
1) Scope of delivery ...........................................................................2<br />
2) Technical data................................................................................2<br />
3) Accsessories..................................................................................2<br />
4) Setting up the projector ................................................................3<br />
3.1) Yoke assembly ..........................................................................3<br />
3.2) Projector angle of inclination .....................................................3<br />
5) Electrical connections...................................................................3<br />
6) Front condenser lens ....................................................................3<br />
6.1) Fitting front condenser lens .....................................................3<br />
7) Fitting accessories into the front panel .......................................4<br />
7.1) Fitting slide carrier <strong>and</strong> adjusting slide.....................................4<br />
7.2) Installing objective in objective adapter ...................................4<br />
7.2.1) Setting up objective in projector ..............................................4<br />
8) Control panel on projector ............................................................4<br />
9) Control panels on ballast ..............................................................5<br />
9.1) Top control panel.....................................................................5<br />
9.2) Side control panel....................................................................5<br />
10) Operating modes ...........................................................................5<br />
10.1) Manual at ballast .....................................................................5<br />
10.2) Remote ignition via DMX 512 ..................................................5<br />
10.3) Timer function..........................................................................5<br />
11) Removing projector cover.............................................................6<br />
11.1) Fitting <strong>HQI</strong> <strong>bulb</strong>........................................................................6<br />
11.2) Cleaning condenser.................................................................6<br />
12) Condenser ......................................................................................6<br />
13) <strong>Projection</strong> diagram ........................................................................7<br />
14) Electrical schematic ......................................................................8<br />
15) Dimension drawings......................................................................9<br />
16) Itemised drawings..................................................................... 10, 11<br />
17) Appendix: Electronic Time Switch .......................................... 12 – 16<br />
The manual below shows the reference numbers in itemised drawings or the figures only<br />
in abbreviated form:<br />
e.g. drawing 2/ position 10 = (fig.2/ 10)<br />
or figure 6 = (fig.6)<br />
Itemised drawings are on pages 10 <strong>and</strong> 11<br />
1
Architecture Projector ARC 2/ <strong>HQI</strong> PANI <strong>Projection</strong> <strong>and</strong> <strong>Lighting</strong> Vertriebs GmbH.<br />
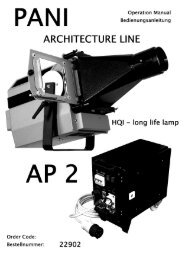
1) Scope of delivery Order Code.<br />
1 <strong>HQI</strong>/ ARC 2, 2 kW architecture projector<br />
incl. 1 front condenser lens of your choice (G 503, G505/II)<br />
1 Test slide 18x 18 cm 12805<br />
1 <strong>HQI</strong> <strong>2000</strong> W/ D/ S <strong>bulb</strong> <strong>37601</strong><br />
1 TV-Spigot DIN 15560 Ø 28 mm 16201<br />
5m Ballast power cable. 12901<br />
1 ARC 2 ballast<br />
with 5 m connecting cable incl.<br />
5 pole. CEE- 0.15- 6/ 16 A plug 19215<br />
1 Slide carrier 12516<br />
1 Objective adapter 12042<br />
2) Technical data<br />
Voltage (L1, L2, N, PE, see circuit diagram p.8) 400 V/ 230 V/ 50 Hz<br />
Output <strong>2000</strong> W<br />
Amperage 7,5 A<br />
Back-up fuse 16 A<br />
Play suspended <strong>and</strong> st<strong>and</strong>ing max. ± 90°<br />
Weight: Projector 31 kg<br />
Ballast 33 kg<br />
Bulb type <strong>HQI</strong> <strong>2000</strong> W/ D/ S<br />
3) Accessories Order Code.<br />
Carousell – Slidechanger AKD-10/18 12517<br />
For 10 slides 18x18cm, Auto Mode,<br />
DMX-512 or analog controlable<br />
Mobile Mounting Base for ARC 2 (with horizontal adjustment) 12049<br />
Outdoor Housing for ARC 2 with Slide Changer AKD-10/18 12048<br />
Examples from our general projection accessories:<br />
Plastic Filmholder for 18x18 cm Slide Film 12812<br />
Cutting/Punching Machine for Filmslides 12811<br />
Tempered Glass Plate 18x18 cm 12803<br />
Set of Reprolux-<strong>Projection</strong> Dyes (16 colours in bottles of 35g) 32801<br />
For more details, please contact our staff: phone:+(43 1) 521 08 0, mail: info@pani.com<br />
2
Architecture Projector ARC 2/ <strong>HQI</strong> PANI <strong>Projection</strong> <strong>and</strong> <strong>Lighting</strong> Vertriebs GmbH.<br />
4) Setting up projector<br />
The connecting part for suspended <strong>and</strong> st<strong>and</strong>ing installation is the TV-Spigot DIN 15560/<br />
ø 28mm. (fig.3/ 1)<br />
4.1) Yoke adjustment.<br />
When adapted to fit any existing accessory, the yoke (fig.3/ 3) can be fitted on to the<br />
projector in the proximity of the centre of gravity using one of the other two threads for<br />
mounting the yoke (fig.1/ 2) .<br />
4.2) Projector angle of inclination<br />
Depending on the mounting position of the yoke, the projector can reach up to +/- 90° <strong>and</strong><br />
more from the horizontal position by being tilted, so any desired angle position in space is<br />
accessable without any mirror!<br />
5) Electrical connections<br />
The projector is connected to the ballast with cable (fig.1/ 5 ) <strong>and</strong> plug (fig.4/ 6). The<br />
ballast is to be connected to a L1, L2, N, PE- 400 V/ 230 V/ 50 Hz power supply by<br />
connector cable (fig.5/ 7 ) <strong>and</strong> a 5-pole CEE 0.15- 6/ 16 A plug.<br />
6) Front condenser lens (fig.2/ 8)<br />
Two front condenser lenses are available:<br />
For objectives f = 11 cm to f = 27 cm: G 503, order no.: 12401<br />
For objectives f = 33 cm <strong>and</strong> f = 40 cm: G 505/ II, order no.: 12434<br />
6.1) Fitting front condenser lens<br />
After loosening the four screws (fig.2/ 9) <strong>and</strong> rotating the front condenser lens (fig.2/ 8), the<br />
lens can be removed. The lens is to be refitted in the reverse order.<br />
3
Architecture Projector ARC 2/ <strong>HQI</strong> PANI <strong>Projection</strong> <strong>and</strong> <strong>Lighting</strong> Vertriebs GmbH.<br />
7) Fitting accessories into front panel<br />
There are three groups of four recesses arranged in a square (fig.2/ 11.1, 11.2, 11.3) in<br />
the front panel (fig.2/ 10) to receive accessories. After unscrewing the two corresponding<br />
knurled screws (fig.1/ 12), the accessory fitting adapters (e.g. (fig.6/ 29)) are slid into the<br />
recesses (fig.2/ 11.1, 11.2, 11.3), pushed downwards so that the accessory “engages”,<br />
then fix into place with the knurled screws (fig.1/ 12).<br />
Important:<br />
Always fully unscrew knurled screws (fig.1/ 12) when removing accessories to simplify any<br />
future fitting operations.<br />
7.1) Fitting slide carrier <strong>and</strong> adjusting slide<br />
The slide carrier (fig. 6) must be located in the recesses (fig.2/ 11.3). For adjusting the<br />
slide to given edges in case of oblique projections, open the knurled screws (fig. 6 / 32),<br />
turn the twisting plate <strong>and</strong> fix it in the desired angle position.<br />
In the case of oblique projections it may be a problem to get an allover sharp projection.<br />
Following old optical rules you are able to adjust the projection by canting the slide out of<br />
the right angle. Therefore use the provided 4 knurled screws (fig.6 / 33). Try the effect until<br />
it fits. Depending on the focal length, the projection distance <strong>and</strong> the setting, it is possible<br />
to adjust angles up to more than 45° from the parallel st<strong>and</strong>ard projection.<br />
Only the optical distorsion <strong>and</strong> the shifting of light intensity from the shortest to the highest<br />
distance of the projection have to be corrected in an other way.<br />
7.2) Installing an objective in objective adapter (fig.7)<br />
The objective is fitted into the objective adapter (fig.7) <strong>and</strong> fixed in place with four screws<br />
(fig.7/ 30).<br />
7.2.1) Setting up objective in projector<br />
Locate the objective adapter (fig.8) in the recesses (fig.2/ 11.2).<br />
8) Control panel on the projector<br />
The service time counter (fig.3/ 17) is located on the back of the projector along with four<br />
230 VAC sockets for accessories (fig.3/ 18)<br />
4
Architecture Projector ARC 2/ <strong>HQI</strong> PANI <strong>Projection</strong> <strong>and</strong> <strong>Lighting</strong> Vertriebs GmbH.<br />
9) Control panels on ballast<br />
9.1) Top control panel (fig.4)<br />
Top control panel on the ballast includes:<br />
On-switch, green (fig.4/ 19)<br />
Off-switch, red (fig.4/ 20): glows when the supply voltage is switched on<br />
Code switch for DMX addresses (fig.4/ 21)<br />
Termination switch (fig.4/ 22)<br />
Timer switch (fig.4/23)<br />
Control circuit fuse (fig.4/ 24): 10 AT<br />
Timer (fig.4/ 25): see attached instructions<br />
Main circuit breaker (fig.4/ 26): LSS 3 pole, 16 A<br />
9.2) Side control panel (fig.5)<br />
Connection cable to projector (fig.5/ 6)<br />
Power supply cable (fig.5/ 7)<br />
DMX input (fig.5/ 27)<br />
DMX output (fig.5/ 28)<br />
10) Operating modes<br />
The projector can be operated in three modes:<br />
10.1) Manually at ballast<br />
On-switch (fig.4/ 19)<br />
Off-switch (fig.4/ 20)<br />
10.2) Remote ignition via DMX 512<br />
DMX input (fig.5/ 27)<br />
DMX output (fig.5/ 28)<br />
DMX address coding (fig.4/ 21)<br />
DMX termination (fig.4/ 22), if necessary<br />
Important<br />
For 10.1) <strong>and</strong> 10.2): switch off timer switch (fig.4/23)<br />
10.3) Timer function<br />
Put the timer switch in the on position (fig.4/ 23)<br />
For timer (fig.4/ 25) see operating instructions in the Appendix of chapter 17<br />
(pages 12-16)<br />
5
Architecture Projector ARC 2/ <strong>HQI</strong> PANI <strong>Projection</strong> <strong>and</strong> <strong>Lighting</strong> Vertriebs GmbH.<br />
11) Removing projector cover<br />
Warning<br />
Unplug projector before removing cover!<br />
After removing the four allen screws - size 3 - (fig.1/ 15) the projector cover (fig.1/ 16) can<br />
be removed backwards from the projector.<br />
11.1) Fitting <strong>HQI</strong> <strong>bulb</strong><br />
● Remove the earth cable from the reflector holder. Take out the reflector holder.<br />
● After loosening the retaining leaf springs on the lamp holders, insert HMI <strong>bulb</strong> (seal<br />
facing the reflector).<br />
● Tighten retaining leaf springs <strong>and</strong> replace reflector holder in the projector.<br />
● Connect <strong>bulb</strong> <strong>and</strong> ignition cable <strong>and</strong> reattach earth.<br />
● Fit lamp cover.<br />
11.2) Cleaning the condenser<br />
When the projector cover is opened, the three individual condenser elements can be<br />
removed for cleaning.<br />
12) Condenser<br />
Legend:<br />
(1) Front Condenser Lens<br />
(2) Middle Lens<br />
(3) PANI – Universal Filter<br />
(4) Plano-convex Lens lampside<br />
(5) <strong>HQI</strong> <strong>2000</strong> – lamp<br />
(6) Spherical cold mirror<br />
6
Architecture Projector ARC 2/ <strong>HQI</strong> PANI <strong>Projection</strong> <strong>and</strong> <strong>Lighting</strong> Vertriebs GmbH.<br />
13) <strong>Projection</strong> diagram<br />
for 0= 17cm<br />
<strong>Projection</strong> formulas<br />
10 20 30 40 50 60 70 80 90 100 METER<br />
5 10 15 20 25<br />
width of projection<br />
F Required Focal Length in cm<br />
B Picture Size<br />
D <strong>Projection</strong> Distance (measured from the middle of the Objective Lens )<br />
O Object Size<br />
Usable Format (O) =<br />
17 cm for Glass Slides<br />
15.5cm for film frames<br />
7<br />
60cm<br />
50cm<br />
40cm<br />
33cm<br />
27cm<br />
25cm<br />
22cm<br />
18cm<br />
13,5cm<br />
11cm<br />
required focal length<br />
F<br />
30 METER
Architecture Projector ARC 2/ <strong>HQI</strong> PANI <strong>Projection</strong> <strong>and</strong> <strong>Lighting</strong> Vertriebs GmbH.<br />
14) Electrical schematic<br />
8
Architecture Projector ARC 2/ <strong>HQI</strong> PANI <strong>Projection</strong> <strong>and</strong> <strong>Lighting</strong> Vertriebs GmbH.<br />
15) Dimension drawings<br />
Architecture projector ARC 2 / <strong>HQI</strong><br />
Ballast<br />
íìêÉ=iáåÉ<br />
9
Architecture Projector ARC 2/ <strong>HQI</strong> PANI <strong>Projection</strong> <strong>and</strong> <strong>Lighting</strong> Vertriebs GmbH.<br />
16) Itemised drawings<br />
Figure 1 Figure 2<br />
Projector - side projection Projector - front projection<br />
íìêÉ=iáåÉ<br />
Figure 3 Figure 4<br />
Projector - rear view Ballast – top view<br />
10
Architecture Projector ARC 2/ <strong>HQI</strong> PANI <strong>Projection</strong> <strong>and</strong> <strong>Lighting</strong> Vertriebs GmbH.<br />
Figure 5 Figure 6<br />
Ballast – side view Slide carrier<br />
Figure 7<br />
Objective carrier<br />
Figure 8<br />
Objective carrier with objective<br />
11
Architecture Projector ARC 2/ <strong>HQI</strong> PANI <strong>Projection</strong> <strong>and</strong> <strong>Lighting</strong> Vertriebs GmbH.<br />
17) Appendix: Electronic Time Switch<br />
12
Architecture Projector ARC 2/ <strong>HQI</strong> PANI <strong>Projection</strong> <strong>and</strong> <strong>Lighting</strong> Vertriebs GmbH.<br />
13
Architecture Projector ARC 2/ <strong>HQI</strong> PANI <strong>Projection</strong> <strong>and</strong> <strong>Lighting</strong> Vertriebs GmbH.<br />
14
Architecture Projector ARC 2/ <strong>HQI</strong> PANI <strong>Projection</strong> <strong>and</strong> <strong>Lighting</strong> Vertriebs GmbH.<br />
15
Architecture Projector ARC 2/ <strong>HQI</strong> PANI <strong>Projection</strong> <strong>and</strong> <strong>Lighting</strong> Vertriebs GmbH.<br />
16