

Magazines for All | Download in PDF - Ken Gilbert
Magazines for All | Download in PDF - Ken Gilbert
Magazines for All | Download in PDF - Ken Gilbert

Create successful ePaper yourself
Turn your PDF publications into a flip-book with our unique Google optimized e-Paper software.
DIGITAL TOOLBOX<br />
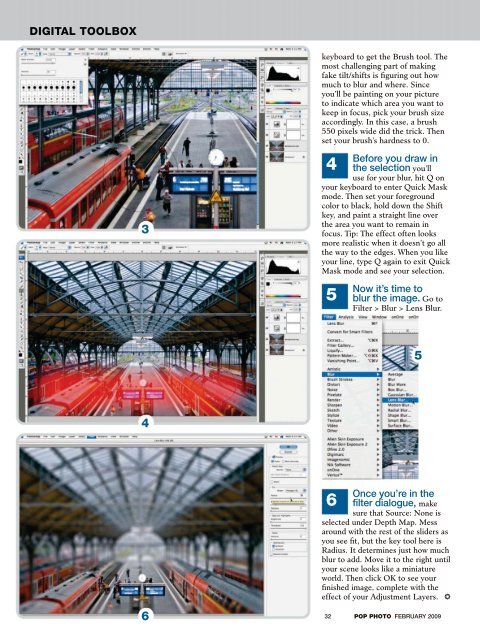
3<br />
4<br />
6<br />
keyboard to get the Brush tool. The<br />
most challeng<strong>in</strong>g part of mak<strong>in</strong>g<br />
fake tilt/shifts is figur<strong>in</strong>g out how<br />
much to blur and where. S<strong>in</strong>ce<br />
you’ll be pa<strong>in</strong>t<strong>in</strong>g on your picture<br />
to <strong>in</strong>dicate which area you want to<br />
keep <strong>in</strong> focus, pick your brush size<br />
accord<strong>in</strong>gly. In this case, a brush<br />
550 pixels wide did the trick. Then<br />
set your brush’s hardness to 0.<br />
4<br />
Be<strong>for</strong>e you draw <strong>in</strong><br />
the selection you’ll<br />
use <strong>for</strong> your blur, hit Q on<br />
your keyboard to enter Quick Mask<br />
mode. Then set your <strong>for</strong>eground<br />
color to black, hold down the Shift<br />
key, and pa<strong>in</strong>t a straight l<strong>in</strong>e over<br />
the area you want to rema<strong>in</strong> <strong>in</strong><br />
focus. Tip: The effect often looks<br />
more realistic when it doesn’t go all<br />
the way to the edges. When you like<br />
your l<strong>in</strong>e, type Q aga<strong>in</strong> to exit Quick<br />
Mask mode and see your selection.<br />
5<br />
6<br />
Now it’s time to<br />
blur the image. Go to<br />
Filter > Blur > Lens Blur.<br />
5<br />
Once you’re <strong>in</strong> the<br />
filter dialogue, make<br />
sure that Source: None is<br />
selected under Depth Map. Mess<br />
around with the rest of the sliders as<br />
you see fit, but the key tool here is<br />
Radius. It determ<strong>in</strong>es just how much<br />
blur to add. Move it to the right until<br />
your scene looks like a m<strong>in</strong>iature<br />
world. Then click OK to see your<br />
f<strong>in</strong>ished image, complete with the<br />
effect of your Adjustment Layers.<br />
32 POP PHOTO FEBRUARY 2009


