Operating Instructions And Parts Manual Dust Collector ... - JET Tools
Operating Instructions And Parts Manual Dust Collector ... - JET Tools
Operating Instructions And Parts Manual Dust Collector ... - JET Tools

Create successful ePaper yourself
Turn your PDF publications into a flip-book with our unique Google optimized e-Paper software.
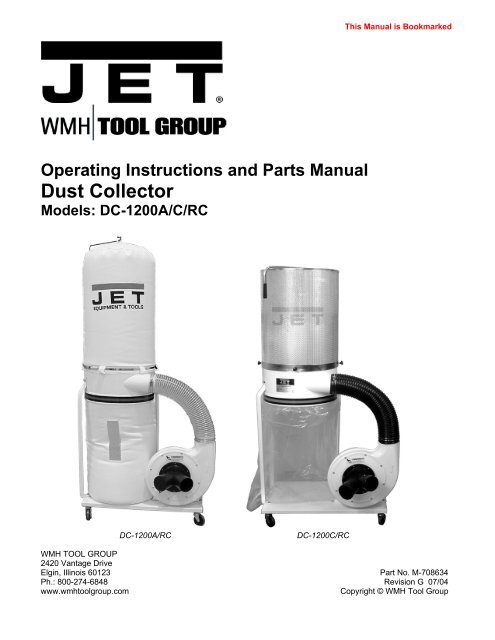
<strong>Operating</strong> <strong>Instructions</strong> and <strong>Parts</strong> <strong>Manual</strong><br />
<strong>Dust</strong> <strong>Collector</strong><br />
Models: DC-1200A/C/RC<br />
DC-1200A/RC DC-1200C/RC<br />
This <strong>Manual</strong> is Bookmarked<br />
WMH TOOL GROUP<br />
2420 Vantage Drive<br />
Elgin, Illinois 60123 Part No. M-708634<br />
Ph.: 800-274-6848 Revision G 07/04<br />
www.wmhtoolgroup.com Copyright © WMH Tool Group
This manual has been prepared for the owner and operators of the <strong>JET</strong> DC-1200 Series <strong>Dust</strong> <strong>Collector</strong>s. Its<br />
purpose, aside from machine operation, is to promote safety using accepted operating and maintenance<br />
procedures. To obtain maximum life and efficiency from your dust collector and to aid in using it safely, please<br />
read this manual thoroughly and follow the instructions carefully.<br />
Warranty and Service<br />
WMH Tool Group warrants every product it sells. If one of our tools needs service or repair, one of our<br />
Authorized Repair Stations located throughout the United States can provide quick service or information.<br />
In most cases, a WMH Tool Group Repair Station can assist in authorizing repair work, obtaining parts, or<br />
perform routine or major maintenance repair on your <strong>JET</strong> product.<br />
For the name of an Authorized Repair Station in your area, please call 1-800-274-6848, or visit our web site at<br />
www.wmhtoolgroup.com.<br />
More Information<br />
WMH Tool Group is consistently adding new products to the line. For complete, up-to-date product<br />
information, check with your local WMH Tool Group distributor, or visit our web site at www.wmhtoolgroup.com<br />
WMH Tool Group Warranty<br />
WMH Tool Group makes every effort to assure that its products meet high quality and durability standards and<br />
warrants to the original retail consumer/purchaser of our products that each product be free from defects in<br />
materials and workmanship as follows: 1 YEAR LIMITED WARRANTY ON ALL PRODUCTS UNLESS<br />
SPECIFIED OTHERWISE. This Warranty does not apply to defects due directly or indirectly to misuse, abuse,<br />
negligence or accidents, normal wear-and-tear, repair or alterations outside our facilities, or to a lack of<br />
maintenance.<br />
WMH TOOL GROUP LIMITS ALL IMPLIED WARRANTIES TO THE PERIOD SPECIFIED ABOVE,<br />
BEGINNING FROM THE DATE THE PRODUCT WAS PURCHASED AT RETAIL. EXCEPT AS STATED<br />
HEREIN, ANY IMPLIED WARRANTIES OR MERCHANTABILITY AND FITNESS ARE EXCLUDED. SOME<br />
STATES DO NOT ALLOW LIMITATIONS ON HOW LONG THE IMPLIED WARRANTY LASTS, SO THE<br />
ABOVE LIMITATION MAY NOT APPLY TO YOU. IN NO EVENT SHALL WMH TOOL GROUP BE LIABLE<br />
FOR DEATH, INJURIES TO PERSONS OR PROPERTY, OR FOR INCIDENTAL, CONTINGENT, SPECIAL,<br />
OR CONSEQUENTIAL DAMAGES ARISING FROM THE USE OF OUR PRODUCTS. SOME STATES DO<br />
NOT ALLOW THE EXCLUSION OR LIMITATION OF INCIDENTAL OR CONSEQUENTIAL DAMAGES, SO<br />
THE ABOVE LIMITATION OR EXCLUSION MAY NOT APPLY TO YOU.<br />
To take advantage of this warranty, the product or part must be returned for examination, postage prepaid, to<br />
an Authorized Repair Station designated by our office. Proof of purchase date and an explanation of the<br />
complaint must accompany the merchandise. If our inspection discloses a defect, we will either repair or<br />
replace the product at our discretion, or refund the purchase price if we cannot readily and quickly provide a<br />
repair or replacement. We will return the repaired product or replacement at WMH Tool Group’s expense, but<br />
if it is determined there is no defect, or that the defect resulted from causes not within the scope of WMH Tool<br />
Group’s warranty, then the user must bear the cost of storing and returning the product. This warranty gives<br />
you specific legal rights; you may also have other rights, which vary from state to state.<br />
WMH Tool Group sells through distributors only. Members of the WMH Tool Group reserve the right to effect at<br />
any time, without prior notice, alterations to parts, fittings and accessory equipment, which they may deem<br />
necessary for any reason whatsoever.<br />
2
Table of Contents<br />
Warranty and Service ...........................................................................................................................................2<br />
Table of Contents..................................................................................................................................................3<br />
Warnings...............................................................................................................................................................4<br />
Introduction ...........................................................................................................................................................6<br />
Specifications........................................................................................................................................................6<br />
<strong>Dust</strong> <strong>Collector</strong> with Filter Bag............................................................................................................................6<br />
<strong>Dust</strong> <strong>Collector</strong> with Canister..............................................................................................................................6<br />
Ordering Replacement <strong>Parts</strong> ................................................................................................................................6<br />
Unpacking .............................................................................................................................................................7<br />
DC-1200A/RC <strong>Dust</strong> <strong>Collector</strong>............................................................................................................................7<br />
DC-1200C/RC <strong>Dust</strong> <strong>Collector</strong> ...........................................................................................................................8<br />
Assembly...............................................................................................................................................................9<br />
Base ..................................................................................................................................................................9<br />
Motor and Fan Assembly ..................................................................................................................................9<br />
Connector Housing..........................................................................................................................................10<br />
Hose ................................................................................................................................................................10<br />
Filter Bag Installation – DC-1200A/RC............................................................................................................11<br />
<strong>Collector</strong> Bag Installation – DC-1200A/RC .....................................................................................................11<br />
<strong>Collector</strong> Bag Installation – DC-1200C/RC .....................................................................................................12<br />
Canister Filter Assembly and Installation – DC-1200C/RC.............................................................................12<br />
Electrical Connections ........................................................................................................................................13<br />
Turning the Machine On & Off ............................................................................................................................13<br />
DC-1200A and DC-1200C...............................................................................................................................13<br />
DC-1200RC.....................................................................................................................................................13<br />
Setting the Timer .............................................................................................................................................13<br />
Maintenance........................................................................................................................................................14<br />
Cleaning the Filter Bag – DC-1200A/RC.........................................................................................................14<br />
Removing the <strong>Collector</strong> Bag – DC-1200A/RC ................................................................................................14<br />
Cleaning the Filter – DC-1200C/RC................................................................................................................14<br />
Removing the <strong>Collector</strong> Bag – DC-1200C/RC ................................................................................................14<br />
Motor ...............................................................................................................................................................14<br />
Connecting the <strong>Dust</strong> <strong>Collector</strong> to a Machine...................................................................................................14<br />
Grounding the <strong>Dust</strong> Collection System ...........................................................................................................14<br />
<strong>Parts</strong> List – DC-1200A/RC <strong>Dust</strong> <strong>Collector</strong>.......................................................................................................15<br />
Assembly – DC-1200A/RC <strong>Dust</strong> <strong>Collector</strong>......................................................................................................16<br />
Filter Assembly for DC-1200C/RC Models......................................................................................................17<br />
Remote Control Breakdown for DC-1200RC ..................................................................................................18<br />
Wiring Diagram ...................................................................................................................................................19<br />
DC-1200A-3: 3 Phase 230V/460V ..................................................................................................................19<br />
DC-1200A-1/DC-1200C ..................................................................................................................................19<br />
DC-1200RC.....................................................................................................................................................20<br />
3
Warnings<br />
1. Read and understand the entire owners manual before attempting assembly or operation.<br />
2. Read and understand the warnings posted on the machine and in this manual. Failure to comply with all of<br />
these warnings may cause serious injury.<br />
3. Replace the warning labels if they become obscured or removed.<br />
4. This dust collector is designed and intended for use by properly trained and experienced personnel only. If<br />
you are not familiar with the proper and safe operation of a dust collector, do not use until proper training<br />
and knowledge have been obtained.<br />
5. Do not use this dust collector for other than its intended use. If used for other purposes, WMH Tool Group<br />
disclaims any real or implied warranty and holds itself harmless from any injury that may result from that<br />
use.<br />
6. Always wear approved safety glasses/face shields while using this dust collector. Everyday eyeglasses<br />
only have impact resistant lenses; they are not safety glasses.<br />
7. Before operating this dust collector, remove tie, rings, watches and other jewelry, and roll sleeves up past<br />
the elbows. Remove all loose clothing and confine long hair. Non-slip footwear or anti-skid floor strips are<br />
recommended. Do not wear gloves.<br />
8. Wear ear protectors (plugs or muffs) during extended periods of operation.<br />
9. Some dust created by power sanding, sawing, grinding, drilling and other construction activities contain<br />
chemicals known to cause cancer, birth defects or other reproductive harm. Some examples of these<br />
chemicals are:<br />
• Lead from lead based paint.<br />
• Crystalline silica from bricks, cement and other masonry products.<br />
• Arsenic and chromium from chemically treated lumber.<br />
Your risk of exposure varies, depending on how often you do this type of work. To reduce your exposure<br />
to these chemicals, work in a well-ventilated area and work with approved safety equipment, such as face<br />
or dust masks that are specifically designed to filter out microscopic particles.<br />
10. Do not operate this machine while tired or under the influence of drugs, alcohol or any medication.<br />
11. Make certain the switch is in the OFF position before connecting the machine to the power supply.<br />
12. Make certain the machine is properly grounded.<br />
13. Make all machine adjustments or maintenance with the machine unplugged from the power source.<br />
14. Remove adjusting keys and wrenches. Form a habit of checking to see that keys and adjusting wrenches<br />
are removed from the machine before turning it on.<br />
15. Keep safety guards in place at all times when the machine is in use. If removed for maintenance purposes,<br />
use extreme caution and replace the guards immediately.<br />
16. Check damaged parts. Before further use of the machine, a guard or other part that is damaged should be<br />
carefully checked to determine that it will operate properly and perform its intended function. Check for<br />
alignment of moving parts, binding of moving parts, breakage of parts, mounting and any other conditions<br />
that may affect its operation. A guard or other part that is damaged should be properly repaired or<br />
replaced.<br />
17. Provide for adequate space surrounding work area and non-glare, overhead lighting.<br />
18. Keep the floor around the machine clean and free of scrap material, oil and grease.<br />
19. Keep visitors a safe distance from the work area. Keep children away.<br />
4
lahblahblah<br />
20. Make your workshop child proof with padlocks, master switches or by removing starter keys.<br />
21. Give your work undivided attention. Looking around, carrying on a conversation and “horse-play” are<br />
careless acts that can result in serious injury.<br />
22. Do not use the dust collector for anything except wood dust. Materials such as liquids, metal shavings,<br />
metal dust, screws, glass, plastic or rock can cause sparks and/or damage when coming into contact with<br />
any part of the dust collector.<br />
23. Use recommended accessories; improper accessories may be hazardous.<br />
24. Maintain tools with care. Follow instructions for lubricating and changing accessories.<br />
25. Turn off the machine before cleaning. Use a brush or compressed air to remove chips or debris — do not<br />
use your hands.<br />
26. Do not stand on the machine. Serious injury could occur if the machine tips over.<br />
27. Never leave the machine running unattended. Turn the power off and do not leave the machine until it<br />
comes to a complete stop.<br />
28. Remove loose items and unnecessary work pieces from the area before starting the machine.<br />
Familiarize yourself with the following safety notices used in this manual:<br />
This means that if precautions are not heeded, it may result in minor injury and/or possible<br />
machine damage.<br />
death.<br />
This means that if precautions are not heeded, it may result in serious injury or possibly even<br />
- - SAVE THESE INSTRUCTIONS - -<br />
5
Introduction<br />
This manual is provided by <strong>JET</strong> covering the safe operation and maintenance procedures for model<br />
DC-1200 Series <strong>Dust</strong> <strong>Collector</strong>s. This manual contains instructions on installation, safety precautions, general<br />
operating procedures, maintenance instructions and parts breakdown. This machine has been designed and<br />
constructed to provide years of trouble free operation if used in accordance to instructions set forth in this<br />
manual. If there are any questions or comments, please contact either your local supplier or WMH Tool Group.<br />
Specifications<br />
<strong>Dust</strong> <strong>Collector</strong> with Filter Bag<br />
Model ........................................................................................... DC-1200A-1/ A-3................................DC-1200RC<br />
Stock Number ................................................................................. 708634/708635.................................. 708634RC<br />
Blower Wheel Diameter ......................................................................................12".............................................. 12”<br />
Sound Rating at 3 feet ...............................................................................80-85 db..................................... 80-85 db<br />
Hose Diameter .............................................................................................. 4" & 6”........................................ 4" & 6”<br />
Air Flow (CFM)................................................................................................ 1,200.......................................... 1,200<br />
Velocity at 4” (FPM) ...................................................................................... 13,745........................................ 13,745<br />
Static Pressure (inch of water)........................................................................ 11.44.......................................... 11.44<br />
Bag Diameter ......................................................................................................20".............................................. 20"<br />
Bag Length....................................................................................................31-1/2"........................................31-1/2"<br />
<strong>Collector</strong> Bag Capacity (cu. ft.) ........................................................................... 5.6.............................................. 5.6<br />
Overall Dimensions 30 Micron.................................................37"L x 28"W x 79"H....................37"L x 28"W x 79"H<br />
Overall Dimensions 5 Micron...................................................37"L x 28"W x 96"H....................37"L x 28"W x 96"H<br />
Motor (TEFC) – DC-1200A-1 only ..........................................2 HP, 1Ph 230V only..................2 HP, 1Ph 230V only<br />
Motor (TEFC) – DC-1200A-3 only ................ 2 HP, 3Ph 230/460V, Prewired 230V...................................................<br />
Net Weight (approx.)....................................................................................105 lbs........................................105 lbs.<br />
<strong>Dust</strong> <strong>Collector</strong> with Canister<br />
Model ...................................................................................................... DC-1200C............................. DC-1200CRC<br />
Stock Number ............................................................................................708634C.................................. 708635RC<br />
Blower Wheel Diameter ......................................................................................12".............................................. 12"<br />
Sound Rating at 3 feet ...............................................................................80-85 db..................................... 80-85 db<br />
Hose Diameter .............................................................................................. 4" & 6” ....................................... 4" & 6”<br />
Air Flow (CFM)................................................................................................ 1,200.......................................... 1,200<br />
Velocity at 4” (FPM) ...................................................................................... 13,745........................................ 13,745<br />
Static Pressure (inch of water)........................................................................ 11.44.......................................... 11.44<br />
Bag Diameter ......................................................................................................20".............................................. 20"<br />
Bag Length................................................................................................ 45” & 28".................................... 45” & 28"<br />
<strong>Collector</strong> Bag Capacity (cu. ft.) ........................................................................... 5.6.............................................. 5.6<br />
Overall Dimensions 2 Micron............................................ 37"L x 28"W x 70-7/8"H............. 37"L x 28"W x 70-7/8"H<br />
Motor (TEFC) ..........................................................................2 HP, 1Ph 230V only..................2 HP, 1Ph 230V only<br />
Net Weight (approx.)....................................................................................126 lbs. ......................................126 lbs.<br />
The above specifications were current at the time this manual was published, but because of our policy of<br />
continuous improvement, WHM Tool Group reserves the right to change specifications at any time and without<br />
prior notice, without incurring obligations.<br />
Ordering Replacement <strong>Parts</strong><br />
Replacement parts are listed in the back of this manual. To order parts or reach our service department, call<br />
800-274-6848 between 7:00 a.m. and 6:00 p.m. (CST), Monday through Friday. Having the Model Number<br />
and Serial Number of your machine available when you call will allow us to serve you quickly and accurately.<br />
6
Unpacking<br />
DC-1200A/RC <strong>Dust</strong> <strong>Collector</strong><br />
1. Remove all contents from the shipping carton.<br />
2. Report any damage to your distributor.<br />
3. Do not discard any shipping material until after<br />
the dust collector has been assembled and is<br />
running properly.<br />
Contents of the Shipping Carton<br />
1 – Upper Bag Hanger<br />
1 – Base<br />
1 – Housing<br />
1 – Hanger Bracket<br />
1 – Owner's <strong>Manual</strong><br />
1 – Hose<br />
1 – Warranty Card<br />
1 – Motor/Fan Assembly<br />
1 – <strong>Collector</strong> Bag<br />
1 – Filter Bag<br />
2 – Hose Clamps<br />
1 – Retainer Strap<br />
4 – Casters<br />
1 – Inlet Port & Inlet Cap<br />
3 – Support Legs<br />
1 – Bag of Assembly Hardware<br />
(16) M8 x 16 Hex Cap Screws<br />
(22) M8 Flat Washers<br />
0(8) M6 x 12 Pan Head Flange Screws<br />
0(6) M8 Hex Nuts<br />
<strong>Tools</strong> Required for Assembly<br />
2 – 13mm Wrenches or Sockets<br />
1 – 14mm Wrench or Socket<br />
1 – #2 Cross Point Screw Driver<br />
7<br />
Bag of Assembly Hardware<br />
Read and understand the entire contents of this manual before attempting set-up or<br />
operation! Failure to comply may cause serious injury.
Unpacking<br />
DC-1200C/RC <strong>Dust</strong> <strong>Collector</strong><br />
1. Remove all contents from the shipping carton.<br />
2. Report any damage to your distributor.<br />
3. Do not discard any shipping material until after<br />
the dust collector has been assembled and is<br />
running properly.<br />
Contents of the Shipping Carton<br />
Canister Filter Box<br />
1 – Canister Filter<br />
1 – Handle<br />
1 – Bag of Hardware for Handles<br />
(2) M10 Hex Nuts<br />
(2) M10 Flat Washers<br />
(1) M10 Lock Washer<br />
(4) Knobs<br />
DC-1200C/RC<br />
1 – Base<br />
1 – Housing<br />
1 – Owner's <strong>Manual</strong><br />
1 – Warranty Card<br />
1 – Motor/Fan Assembly<br />
5 – <strong>Collector</strong> Bags<br />
1 – Snap Ring<br />
2 – Ring Clamps<br />
4 – Casters<br />
1 – Inlet Port & Inlet Cap<br />
3 – Support Legs<br />
1 – Hose<br />
1 – Bag of Assembly Hardware<br />
(16) M8 x 16 Hex Cap Screws<br />
(22) M8 Flat Washers<br />
0(8) M6 x 12 Pan Head Flange Bolts<br />
(36) M8 Hex Nuts<br />
<strong>Tools</strong> Required for Assembly<br />
2 – 13mm Wrenches or Sockets<br />
1 – 14mm Wrench or Socket<br />
1 – #2 Cross Point Screw Driver<br />
1 – 17mm Wrench<br />
8<br />
Bag of Hardware for Handles<br />
Bag of Assembly Hardware<br />
Read and understand the entire contents of this manual before attempting set-up or<br />
operation! Failure to comply may cause serious injury.
Assembly<br />
Base<br />
1. Install four casters to the under side of the base as<br />
pictured in Fig. 2.<br />
2. Thread the hex nut (B, Fig. 1) onto the caster<br />
shaft. Then slide the lock washer (A, Fig. 1) over<br />
the caster shaft. Thread the caster shaft into the<br />
threaded hole on the underside of the base, turn<br />
until snug. Tighten the nut (B, Fig. 1) against the<br />
base with a 14mm wrench. This will give the<br />
caster proper clearance.<br />
Motor and Fan Assembly<br />
3. Place the base with casters on the ground. Attach<br />
the motor and fan assembly (A, Fig. 2) to the base<br />
using four M8 x 16 hex cap screws, four M8 flat<br />
washers (B, Fig. 2), and a 13mm wrench.<br />
The dust collector must not be<br />
connected to the power source during assembly.<br />
Failure to comply may result in serious injury!<br />
4. Attach inlet guard (A, Fig. 3) to fan housing using<br />
eight M6 x 12 pan head screws (B, Fig. 3). Press<br />
the inlet ports (C, Fig. 3) onto the inlet guard until it<br />
snaps into place.<br />
To reduce the risk of injury from<br />
moving parts, always keep inlet port covered with<br />
the caps provided, if they are not connected to a<br />
hose. Failure to comply may result in serious<br />
injury!<br />
9<br />
Figure 1<br />
Figure 2<br />
Figure 3
Connector Housing<br />
5. Attach three support brackets (A, Fig. 4) to the<br />
base using six M8 x 16 hex cap bolts and six M8<br />
flat washers (B, Fig. 4). Hand-tighten only at this<br />
time.<br />
6. Install the housing (A, Fig. 5) to two support<br />
brackets using four M8 x 16 hex cap bolts, eight<br />
M8 flat washers, and four M8 hex nuts (B, Fig.5).<br />
Be sure hose opening faces fan housing. Be sure<br />
hose opening faces fan housing.<br />
7. Before attaching third support bracket place the<br />
hanger bracket (D, Fig.5) between the support<br />
bracket and the housing.<br />
Note: The hanger bracket is used in models<br />
DC-1200A/RC only.<br />
Tighten all nuts and bolts at this time with a 13mm<br />
wrench.<br />
Hose<br />
8. Attach the hose (A, Fig. 6) between the fan<br />
housing and the collector housing with two clamps<br />
(B, Fig. 6). Tighten the clamps to secure the hose.<br />
If you are assembling the DC-1200A/RC <strong>Dust</strong><br />
<strong>Collector</strong>, proceed to the next section. If you are<br />
assembling the DC-1100C/RC <strong>Dust</strong> <strong>Collector</strong>, proceed<br />
to <strong>Collector</strong> Bag Installation – DC-1100C/RC section.<br />
10<br />
Figure 4<br />
Figure 5<br />
Figure 6
Filter Bag Installation – DC-1200A/RC<br />
Referring to Figure 7:<br />
1. Place the hanger (A) on the hanger bracket (B).<br />
2. Slide the filter bag loop (C) over the hanger hook.<br />
3. Thread the retainer strap (D) through the loops on<br />
the filter bag (E) and fasten to the collector<br />
housing (F).<br />
<strong>Collector</strong> Bag Installation – DC-1200A/RC<br />
Referring to Figure 8:<br />
4. Insert the ring (A) of the collector bag into the<br />
bottom of the housing (B) at an angle. Pull down<br />
on the bag to make sure it “seats” in the housing.<br />
5. Position the plastic window in front so that you can<br />
easily see when the collector bag is full.<br />
After completing the filter bag and collector bag<br />
installation, proceed to Electrical Connections.<br />
11<br />
Figure 7<br />
Figure 8
<strong>Collector</strong> Bag Installation – DC-1200C/RC<br />
1. Place the ring over the top of the plastic bag and<br />
fold over the bag approximately three inches,<br />
Figure 9.<br />
2. Insert the snap ring (A, Fig. 10) of the collector<br />
bag into the bottom of the housing at an angle.<br />
3. Pull down on the ring to make sure it “seats” in the<br />
housing.<br />
Note: make sure the snap ring “snaps” into place<br />
in the housing, and also that the plastic bag<br />
hangs down approximately 3” so that there are no<br />
air leaks.<br />
Canister Filter Assembly and Installation –<br />
DC-1200C/RC<br />
4. Mount the handle onto the canister filter with two<br />
M10 hex nuts, two M10 flat washers, and a M10<br />
lock washer (Figure 11).<br />
5. Mount the canister filter on top of the collector<br />
housing (A, Fig. 5) and tighten the knobs on the<br />
canister filter (Figure 11).<br />
12<br />
Figure 9<br />
Figure 10<br />
Figure 11
Electrical Connections<br />
All electrical connections must<br />
be done by a qualified<br />
electrician. All adjustments or repairs must be<br />
done with the dust collector disconnected from<br />
the power source, unplugged. Failure to comply<br />
may result in serious injury!<br />
The DC-1200A-1 and DC-1200C/RC dust collectors<br />
are rated at 230V Only. The DC-1200C is not<br />
supplied with a plug. Use a plug and outlet rated at<br />
least 20amps. The circuit for the machine should also<br />
be protected by at least a 20 amp circuit breaker or<br />
fuse.<br />
The DC-1200A-3 is rated at 3 Phase 230V/460V,<br />
Prewired 230V. If you want to run the DC-1200A-3<br />
on 460V refer to the wiring diagram found on the<br />
inside of the switch box cover.<br />
Keep in mind that a circuit being used by other<br />
machines: tools, lights, heaters, etc. at the same time<br />
will add to the electrical load. A dedicated circuit to<br />
the dust collector will give you the best results since<br />
dust collectors are generally used at the same time<br />
other tools are running.<br />
Before hooking up to the power source, make sure<br />
that the switch is in the off position.<br />
Turning the Machine On & Off<br />
This machine is intended for<br />
indoor use only.<br />
Before hooking up to the power source, make sure<br />
that the switch is in the off position.<br />
DC-1200A and DC-1200C<br />
Turn the DC-1200A and DC-1200C dust collectors on<br />
by pressing the Start button mounted next to the<br />
motor. Press the Stop button to turn off the dust<br />
collector.<br />
DC-1200RC<br />
The DC-1200RC dust collectors can be controlled<br />
from the control panel mounted on the side of the<br />
motor (Figure 9) or from a remote control unit (Figure<br />
10).<br />
To start the dust collector, press the ON button. If the<br />
remote control unit (Figure 10) is used, aim it at the<br />
control panel (Figure 9). The machine will remain<br />
running until the OFF button is pressed. The digital<br />
readout will always display 00 while running.<br />
13<br />
Setting the Timer<br />
Once the machine is running, press the TIME button<br />
to activate the timer. Each time the button is pressed<br />
and released, the run time is incremented on the<br />
digital display by one minute and can be set up to 99<br />
minutes.<br />
If the TIME button is pressed and held, the time will<br />
scroll up to 99 minutes, then start again at 00.<br />
Release the button when the desired set time is<br />
reached. The dust collector will run for the amount of<br />
time displayed on the digital display. If you scroll past<br />
99 and release the button at 10, for example, the<br />
machine will run for ten minutes, not 110 minutes.<br />
If the OFF button is pressed while machine is running<br />
with the timer engaged, the machine turns off and the<br />
timer is disengaged, i.e., when the machine is<br />
restarted, the timer must be reset.<br />
Figure 9<br />
Figure 10
Maintenance<br />
Never perform maintenance on<br />
this machine before turning switch off and<br />
removing plug from power source. Failure to<br />
comply may cause serious injury!<br />
Cleaning the Filter Bag – DC-1200A/RC<br />
Wearing a particle mask or<br />
respirator for protection against fine dust<br />
particles during cleaning is highly recommended.<br />
During first use and after cleaning, the filter bag may<br />
allow some dust to escape. This is normal and will<br />
stop after a short period of time.<br />
Clean both the filter and collector bags frequently to<br />
keep the collector's performance at its optimum. To<br />
clean:<br />
1. Disconnect the machine from the power source.<br />
2. Unhook the filter bag from the hanger and shake<br />
the bag so that the majority of the dust falls into<br />
the collector bag.<br />
3. Loosen the retaining strap, and remove the filter<br />
bag from the housing.<br />
4. Turn the bag inside out and clean.<br />
5. Turn the bag outside in and re-attach to the<br />
housing using the retainer strap to secure.<br />
Removing the <strong>Collector</strong> Bag –<br />
DC-1200A/RC<br />
1. Disconnect the machine from the power source.<br />
2. Remove the collector bag by pushing the ring of<br />
the collector bag upwards and pulling the bag<br />
out at an angle.<br />
3. Empty the contents into an appropriate<br />
container.<br />
4. Turn the bag inside out and clean.<br />
5. Turn the bag outside in and insert into the<br />
housing.<br />
To replace the collector bag, refer to the <strong>Collector</strong><br />
Bag Installation – DC1200A/RC section.<br />
Use the proper type hose to connect the dust<br />
collector to the machine being operated. Dryer vent<br />
hose is not acceptable for this purpose. Contact your<br />
nearest <strong>JET</strong> distributor for the full line of <strong>JET</strong> <strong>Dust</strong><br />
<strong>Collector</strong> Hoses and Accessories. Customize your<br />
installation and obtain maximum performance with<br />
<strong>JET</strong>'s dust hoods, hoses, clamps, fittings, and blast<br />
gates.<br />
14<br />
Cleaning the Filter – DC-1200C/RC<br />
Never perform maintenance on<br />
this machine before turning switch off and<br />
removing plug from power source. Failure to<br />
comply may cause serious injury!<br />
Clean both the filter and collector bags frequently to<br />
keep the collector's performance at its optimum.<br />
To clean the filter, turn the handle a couple of<br />
rotations so the dust falls into the collector bag.<br />
Removing the <strong>Collector</strong> Bag –<br />
DC-1200C/RC<br />
Wearing a particle mask or<br />
respirator for protection against fine dust<br />
particles during cleaning is highly recommended.<br />
1. Disconnect the machine from the power source<br />
outlet.<br />
2. Remove the collector bag by pushing the ring of<br />
the collector bag upwards at an angle and<br />
pulling the bag and snap ring out.<br />
3. Empty the contents into an appropriate<br />
container.<br />
To replace the collector bag, refer to the <strong>Collector</strong><br />
Bag Installation – DC-1200C/RC section.<br />
Motor<br />
Make frequent inspections of the motor fan and blow<br />
out (with low pressure air hose) or vacuum any<br />
accumulation of foreign material in order to maintain<br />
normal motor ventilation.<br />
Connecting the <strong>Dust</strong> <strong>Collector</strong> to a<br />
Machine<br />
Use the proper type hose to connect the dust<br />
collector to the machine being operated. Dryer vent<br />
hose is not acceptable for this purpose. Contact your<br />
nearest <strong>JET</strong> distributor for the full line of <strong>JET</strong> <strong>Dust</strong><br />
<strong>Collector</strong> Hoses and Accessories. Customize your<br />
installation and obtain maximum performance with<br />
<strong>JET</strong>'s dust hoods, hoses, clamps, fittings, and blast<br />
gates.<br />
Grounding the <strong>Dust</strong> Collection System<br />
The dust collection system includes the dust collector<br />
and the hose, or ductwork you use to connect the<br />
tools. The dust collector is grounded though the<br />
ground wire in the cord. The hose or ductwork you<br />
use to connect the tool to the dust collector must also<br />
be grounded. To assist in grounding your system<br />
you can purchase the <strong>JET</strong> “<strong>Dust</strong> <strong>Collector</strong> Grounding<br />
Kit” stock # JW1053 through <strong>JET</strong> Distributors.
<strong>Parts</strong> List – DC-1200A/RC <strong>Dust</strong> <strong>Collector</strong><br />
Index No. Part No. Description Size Qty<br />
1............... 411035W ................. Impeller Housing.....................................................................................................1<br />
2............... 411026W ................. Motor Bracket .........................................................................................................1<br />
3............... 998621..................... Strain Relief ............................................................................................................1<br />
4............... MA411003 ............... Motor.....................................................................2 HP, 1Ph .................................1<br />
................. MA411003-3............ Motor.....................................................................2 HP, 3 Ph ................................1<br />
................. DC1100-50W........... Motor Fan Cover (not shown).................................................................................1<br />
................. MF411012 ............... Motor Fan (not shown) ...........................................................................................1<br />
................. CA003030................ Running Capacitor (not shown)............................30µf, 300V................................1<br />
................. CA020010................ Starting Capacitor (not shown).............................200MFD, 125VAC ....................1<br />
5............... 411051..................... Switch Box..............................................................................................................1<br />
6............... 411053..................... Switch Plate (DC-1200A/C only) ............................................................................1<br />
7............... 994542..................... Switch (DC-1200A/C only) ...................................1 Ph ..........................................1<br />
................. DC1900-23B............ Switch (DC-1200A/C only) ...................................3 Ph ..........................................1<br />
8............... IC420002................. Power Cord.............................................................................................................1<br />
9............... 420051..................... Motor Packing.........................................................................................................1<br />
10............. AB411059................ Impeller.................................................................12” ............................................1<br />
11............. 411036W ................. Inlet Guard..............................................................................................................1<br />
12............. 427028..................... Inlet Port ...............................................................2 @ 4”.......................................1<br />
13............. 420203..................... Inlet Cap .................................................................................................................2<br />
14............. 430034..................... Inlet Flange Packing...............................................................................................1<br />
15............. 411041W ................. Base........................................................................................................................1<br />
16............. 402036..................... Pivoting Caster .......................................................................................................4<br />
17............. 420012W ................. Housing ..................................................................................................................1<br />
18............. 402004W ................. Support ...................................................................................................................3<br />
19............. 523011W ................. Hanger Bracket (DC-1200A/RC only) ....................................................................1<br />
20............. 411009..................... Hose .....................................................................5”x65(CM) ................................1<br />
21............. 420010..................... Ring Clamp...........................................................5” ..............................................2<br />
22............. 402040..................... Hanger (DC-1200A/RC only)................................30 Micron Bag Hanger .............1<br />
................. AB430039................ Hanger (DC-1200A/RC only)................................5 Micron Bag Hanger ...............1<br />
24............. 708698..................... Filter Bag (DC-1200A/RC only) ............................30 Micron Bag ..........................1<br />
................. 708702..................... Filter Bag (optional for DC-1200A/RC only) .........5 Micron Bag ............................1<br />
25............. AB410012................ Retainer Strap ........................................................................................................1<br />
26............. 708699A .................. Collection Bag (DC-1200A/RC only) ......................................................................1<br />
27............. 450038..................... Bracket Cap............................................................................................................1<br />
31............. ST039304................ Tapping Screw......................................................M3.5x12(AB) ............................6<br />
32............. KS050525................ Key........................................................................5x5x25......................................1<br />
34............. TS-1540061............. Hex Nut.................................................................M8 ..........................................10<br />
35............. TS-0561031............. Hex Nut.................................................................3/8”-16UNC ..............................4<br />
36............. TS-1490031............. Hex Cap Screw.....................................................M8x20.......................................1<br />
37............. TS-1490011............. Hex Cap Screw.....................................................M8x12.......................................4<br />
38............. TS-1490021............. Hex Cap Screw.....................................................M8x16.....................................16<br />
39............. TS-1490041............. Hex Cap Screw.....................................................M8x25.......................................4<br />
40............. TS-1554041............. Pan Head Bolt W/Flange......................................M6x12.......................................2<br />
41............. TS-1550061............. Flat Washer ..........................................................M8 ............................................1<br />
42............. TS-1554041............. Pan Head Bolt W/Flange......................................M6x12.......................................8<br />
43............. TS-1550061............. Flat Washer ..........................................................M8 ..........................................34<br />
44............. TS-2361081............. Lock Washer.........................................................M8 ............................................8<br />
45............. TS-2361101............. Lock Washer.........................................................M10 ..........................................4<br />
46............. ST059304................ Tapping Screw......................................................M5x12.......................................2<br />
................. DC1200-53 .............. Grounding Label (not shown) .................................................................................1<br />
................. DC1200-54 .............. Direction Label (not shown)....................................................................................1<br />
................. DC1200A-NP........... Name Plate (not shown).........................................................................................1<br />
................. DC1100-HP ............. Hardware Package (not shown) .............................................................................1<br />
................. DC1200A-CS........... Centrifugal Switch (not shown)...............................................................................1<br />
................. DC1900-53 .............. Warning Label (not shown) ....................................................................................1<br />
15
Assembly – DC-1200A/RC <strong>Dust</strong> <strong>Collector</strong><br />
16
Filter Assembly for DC-1200C/RC Models<br />
Index No. Part No. Description Size Qty<br />
1............... 331050..................... Handle ....................................................................................................................1<br />
2............... TS-1540071............. Hex Nut.................................................................M10 ..........................................2<br />
3............... TS-1550071............. Flat Washer ..........................................................M10 ..........................................2<br />
4............... TS-2361101............. Lock Washer.........................................................M10 ..........................................1<br />
5............... BR000052................ Rivet......................................................................5-2 ............................................3<br />
6............... 331014..................... Bracket ...................................................................................................................1<br />
7............... 150623..................... Pad .........................................................................................................................1<br />
8............... 331051..................... Soft Grip Handle .....................................................................................................2<br />
9............... TS-1540041............. Hex Nut.................................................................M6 ............................................8<br />
10............. 708739..................... Filter........................................................................................................................1<br />
11............. 331052..................... Shaft .......................................................................................................................1<br />
12............. TS-1482041............. Hex Cap Screw.....................................................M6X20 ......................................4<br />
13............. TS-2361061............. Lock Washer.........................................................M6 ............................................4<br />
14............. TS-1550041............. Flat Washer ..........................................................M6 ............................................4<br />
15............. 331012..................... Scraper ...................................................................................................................2<br />
16............. 331017..................... Strip ........................................................................................................................2<br />
17............. 331015..................... Press Plate .............................................................................................................2<br />
18............. TS-1482021............. Hex Cap Screw.....................................................M6x12.......................................4<br />
19............. 331037..................... Knob .......................................................................................................................4<br />
20............. 331031..................... Pad .........................................................................................................................1<br />
21............. 331009..................... Support ...................................................................................................................1<br />
22............. ST049200................ Tapping Screw......................................................M4X8 ........................................4<br />
23............. 331038..................... Snap Ring...............................................................................................................1<br />
24............. 709563..................... Plastic Bag..............................................................................................................5<br />
17
Remote Control Breakdown for DC-1200RC<br />
Index No. Part No. Description Size Qty<br />
................. DC1200RC-100....... Receiver Assembly (Items 1-12) ............................................................................1<br />
1............... DCRC-101............... Label.......................................................................................................................1<br />
2............... DCRC-102............... Counter Screw........................................................................................................3<br />
3............... DCRC-103............... Switch Plate............................................................................................................1<br />
4............... DCRC-104............... Seal.........................................................................................................................1<br />
5............... DCRC-105............... Digital Switch ..........................................................................................................1<br />
6............... DCRC-106............... Circuit Board...........................................................................................................1<br />
7............... DCRC-107............... Fuse......................................................................250V, 1A...................................1<br />
8............... DCRC-108............... Switch Box..............................................................................................................1<br />
9............... CA003030................ Running Capacitor................................................30µf, 300V................................1<br />
10............. CA020010................ Starting Capacitor.................................................200MFD, 125VAC ....................1<br />
11............. DCRC-111............... Tapping Screw......................................................M3.5x10....................................1<br />
12............. ST039304................ Tapping Screw......................................................M3.5x12....................................6<br />
13............. DCRC-113............... Remote Control ......................................................................................................1<br />
14............. ................................. Battery ..................................................................AAA ..........................................2<br />
18
Wiring Diagram<br />
DC-1200A-3: 3 Phase 230V/460V<br />
DC-1200A-1/DC-1200C<br />
19
DC-1200RC<br />
20