Powermatic Model 66 Table Saw Manual.pdf - Woodworkers Guild
Powermatic Model 66 Table Saw Manual.pdf - Woodworkers Guild
Powermatic Model 66 Table Saw Manual.pdf - Woodworkers Guild

Create successful ePaper yourself
Turn your PDF publications into a flip-book with our unique Google optimized e-Paper software.
If the saw raising arm has been re-located, the<br />
table may have to be realigned so as to provide<br />
clearance between the saw blade and table<br />
insert slot. The splitter will also have to be<br />
realigned.<br />
NOTE: The saw arm setscrew must be tight to<br />
avoid the possibility of movement which could<br />
cause the blade to hit the insert.<br />
Tilting Mechanism Adjustment<br />
If binding occurs in the tilting mechanism, clean<br />
off the saw dust and pitch accumulation and regrease.<br />
If binding continues, check the<br />
alignment and readjust as required to center<br />
worm with the worm gear segment on the<br />
trunnion.<br />
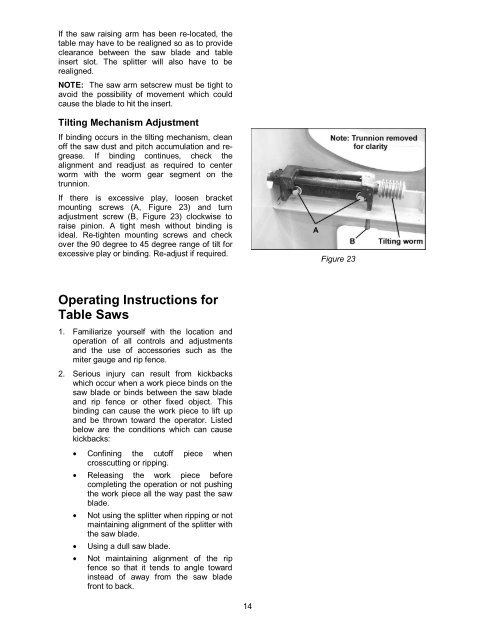
If there is excessive play, loosen bracket<br />
mounting screws (A, Figure 23) and turn<br />
adjustment screw (B, Figure 23) clockwise to<br />
raise pinion. A tight mesh without binding is<br />
ideal. Re-tighten mounting screws and check<br />
over the 90 degree to 45 degree range of tilt for<br />
excessive play or binding. Re-adjust if required.<br />
Operating Instructions for<br />
<strong>Table</strong> <strong>Saw</strong>s<br />
1. Familiarize yourself with the location and<br />
operation of all controls and adjustments<br />
and the use of accessories such as the<br />
miter gauge and rip fence.<br />
2. Serious injury can result from kickbacks<br />
which occur when a work piece binds on the<br />
saw blade or binds between the saw blade<br />
and rip fence or other fixed object. This<br />
binding can cause the work piece to lift up<br />
and be thrown toward the operator. Listed<br />
below are the conditions which can cause<br />
kickbacks:<br />
• Confining the cutoff piece when<br />
crosscutting or ripping.<br />
• Releasing the work piece before<br />
•<br />
completing the operation or not pushing<br />
the work piece all the way past the saw<br />
blade.<br />
Not using the splitter when ripping or not<br />
maintaining alignment of the splitter with<br />
the saw blade.<br />
• Using a dull saw blade.<br />
• Not maintaining alignment of the rip<br />
fence so that it tends to angle toward<br />
instead of away from the saw blade<br />
front to back.<br />
14<br />
Figure 23