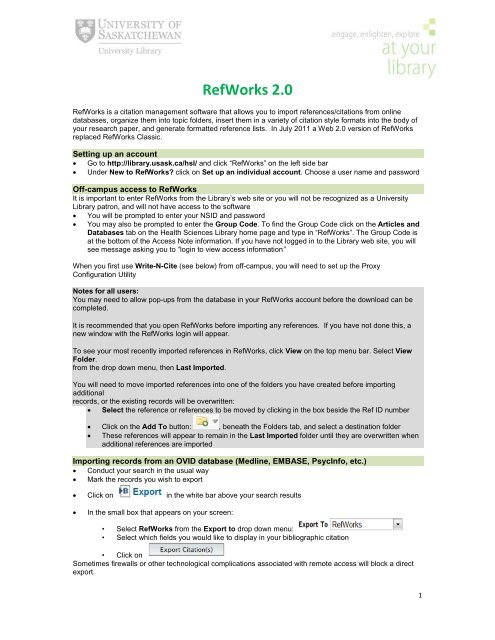
RefWorks 2.0 - University Library - University of Saskatchewan
RefWorks 2.0 - University Library - University of Saskatchewan
RefWorks 2.0 - University Library - University of Saskatchewan

Create successful ePaper yourself
Turn your PDF publications into a flip-book with our unique Google optimized e-Paper software.
<strong>RefWorks</strong> <strong>2.0</strong><br />
<strong>RefWorks</strong> is a citation management s<strong>of</strong>tware that allows you to import references/citations from online<br />
databases, organize them into topic folders, insert them in a variety <strong>of</strong> citation style formats into the body <strong>of</strong><br />
your research paper, and generate formatted reference lists. In July 2011 a Web <strong>2.0</strong> version <strong>of</strong> <strong>RefWorks</strong><br />
replaced <strong>RefWorks</strong> Classic.<br />
Setting up an account<br />
• Go to http://library.usask.ca/hsl/ and click “<strong>RefWorks</strong>” on the left side bar<br />
• Under New to <strong>RefWorks</strong>? click on Set up an individual account. Choose a user name and password<br />
Off-campus access to <strong>RefWorks</strong><br />
It is important to enter <strong>RefWorks</strong> from the <strong>Library</strong>’s web site or you will not be recognized as a <strong>University</strong><br />
<strong>Library</strong> patron, and will not have access to the s<strong>of</strong>tware<br />
• You will be prompted to enter your NSID and password<br />
• You may also be prompted to enter the Group Code. To find the Group Code click on the Articles and<br />
Databases tab on the Health Sciences <strong>Library</strong> home page and type in “<strong>RefWorks</strong>”. The Group Code is<br />
at the bottom <strong>of</strong> the Access Note information. If you have not logged in to the <strong>Library</strong> web site, you will<br />
see message asking you to “login to view access information”<br />
When you first use Write-N-Cite (see below) from <strong>of</strong>f-campus, you will need to set up the Proxy<br />
Configuration Utility<br />
Notes for all users:<br />
You may need to allow pop-ups from the database in your <strong>RefWorks</strong> account before the download can be<br />
completed.<br />
It is recommended that you open <strong>RefWorks</strong> before importing any references. If you have not done this, a<br />
new window with the <strong>RefWorks</strong> login will appear.<br />
To see your most recently imported references in <strong>RefWorks</strong>, click View on the top menu bar. Select View<br />
Folder.<br />
from the drop down menu, then Last Imported.<br />
You will need to move imported references into one <strong>of</strong> the folders you have created before importing<br />
additional<br />
records, or the existing records will be overwritten:<br />
• Select the reference or references to be moved by clicking in the box beside the Ref ID number<br />
• Click on the Add To button: , beneath the Folders tab, and select a destination folder<br />
• These references will appear to remain in the Last Imported folder until they are overwritten when<br />
additional references are imported<br />
Importing records from an OVID database (Medline, EMBASE, PsycInfo, etc.)<br />
• Conduct your search in the usual way<br />
• Mark the records you wish to export<br />
• Click on in the white bar above your search results<br />
• In the small box that appears on your screen:<br />
• Select <strong>RefWorks</strong> from the Export to drop down menu:<br />
• Select which fields you would like to display in your bibliographic citation<br />
• Click on<br />
Sometimes firewalls or other technological complications associated with remote access will block a direct<br />
export.<br />
1
Should this occur, try to ‘Export to’ a .txt, RIS, or other format, which will require that you download the file to<br />
the hard drive <strong>of</strong> the computer you are using and import it into <strong>RefWorks</strong>. Follow the steps above, choosing<br />
.txt, RIS, or some other format, and save the file to your computer.<br />
If your file is saved as a .txt:<br />
• From <strong>RefWorks</strong>, select Import from the drop down menu<br />
• Under Import Filter/Data Source, choose The <strong>University</strong> <strong>of</strong> <strong>Saskatchewan</strong><br />
• Under Database, choose the database your references are from<br />
• Under Select Text File, browse to find the file that you saved, and double click on it<br />
• Click to begin importing the records<br />
If importing from other formats, e.g. RIS, the Import Filter/Data Source and the Database information must<br />
match<br />
Saving and importing records from PubMed<br />
• Conduct your search in the usual way<br />
• Mark the records you wish to save<br />
• Click on the upper right above the yellow bar<br />
• In the Choose Destination box, click on "Citation manager” as the destination, “MEDLINE” as the<br />
format, then click:<br />
• In the File Download box, select Save<br />
• Choose the disk drive and folder location to save the records to. Give your file a name and click Save.<br />
When the download is complete, click Close<br />
NOTE to Firefox users: Firefox will automatically name your file and download it to the “Downloads” file<br />
within the “My Documents” file on your hard drive]<br />
• Log into <strong>RefWorks</strong>. Under , click Import<br />
• From Import Filter/Data Source, choose The NLM PubMed<br />
• Under Database, choose PubMed<br />
• Select Text File, browse to find the file that you saved, and click Open<br />
• Click to begin importing records<br />
An alternative method for importing individual records from PubMed<br />
• If you wish to import one PubMed record at a time, you can use RefGrab-it<br />
• First, you will need to download RefGrab-it onto the computer you are using. Under the<br />
menu in <strong>RefWorks</strong>, choose RefGrab-it, and follow the directions for downloading it for your<br />
computer and browser<br />
• Conduct your PubMed search in the standard fashion<br />
• Click on the blue link for the title <strong>of</strong> the record you are interested in – you should then see only the<br />
record <strong>of</strong> interest on your screen<br />
• Click RefGrab-it from your browser menu or toolbar<br />
• A window will open<br />
• Select the record that appears in the window<br />
• Click to bring the record into your <strong>RefWorks</strong> account<br />
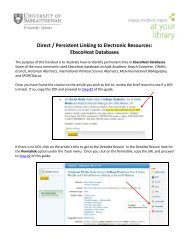
Importing records from an EBSCOhost database (CINAHL, SportDiscus, etc.)<br />
• Conduct your search in the usual way<br />
• Click on under each record you wish to import<br />
• Click on , found under:<br />
• Select the items from your folder that you wish to export<br />
• Click on at the right side <strong>of</strong> the screen<br />
• Choose Direct Export to <strong>RefWorks</strong> under “Save citations to a file formatted for”<br />
2
• Click<br />
Saving and importing records from Scopus<br />
• Conduct your search in the usual way<br />
• Mark the records you wish to save<br />
• Click on on the grey toolbar directly above your search results<br />
• On the Output: Export, Print, E-Mail or Create a Bibliography screen:<br />
• Click on<br />
o Ensure that is selected<br />
o From the Export format menu, select <strong>RefWorks</strong> direct export<br />
o From the Output menu, select Complete format<br />
Saving and importing records from ISI Web <strong>of</strong> Knowledge (BIOSIS Previews, CABI, Web <strong>of</strong><br />
Science, Zoological Record, etc.)<br />
• Conduct your search in the usual way<br />
• Mark the records you wish to save<br />
• At the top <strong>of</strong> the page, click<br />
• If the "Export" process does not start automatically, click on the “Processing Records”<br />
screen<br />
Saving and importing records from The Cochrane <strong>Library</strong><br />
• Conduct your search in the standard fashion<br />
• Mark the records you wish to save<br />
• Click or at the bottom <strong>of</strong> the screen<br />
• Choose Abstract and citation from the Export Type drop-down menu<br />
• Choose the type <strong>of</strong> computer you are using from the File Type drop-down menu<br />
• Click<br />
• Click when the “File Download” dialogue box comes up<br />
• Choose the disk drive and folder location to save the records to. Give your file a name and click Save.<br />
When the download is complete, click Close<br />
[NOTE to Firefox users: Firefox will automatically name your file and download it to the “Downloads”<br />
file within the “My Documents” file on your hard drive]<br />
• Login to <strong>RefWorks</strong>. Under , click Import<br />
o For Import Filter/Data Source, choose “<strong>University</strong> <strong>of</strong> <strong>Saskatchewan</strong> “ (at top <strong>of</strong> drop-down<br />
list)<br />
o For Database, choose “Wiley Interscience [Cochrane <strong>Library</strong>]” (near the bottom <strong>of</strong> the dropdown<br />
list)<br />
o For Select Text File, Browse to find the file you saved above<br />
o For Encoding, use the “ANSI-Latin I” default<br />
• Click to begin importing records<br />
Saving and importing records from a ProQuest database (ABI/Inform Global, CBCA,<br />
Canadian Newstand, Dissertations and Theses, etc.)<br />
• Conduct your search in the usual way<br />
• Mark the records you wish to save<br />
• At the top <strong>of</strong> your results list, choose<br />
• Select “<strong>RefWorks</strong>” from the Export to: drop down menu<br />
3
• Click<br />
Saving and importing records from SciFinder Scholar (web version)<br />
• Conduct your search in the usual way<br />
• Mark the records you wish to save<br />
• At the upper right corner <strong>of</strong> the screen, choose<br />
• Under Export click<br />
• Under Citation Manager click<br />
• Give the file a name<br />
• Click<br />
• In the window that opens, click Save<br />
[NOTE to Firefox users: Firefox will automatically download your file it to the “Downloads” file within the<br />
“My<br />
Documents” file on your hard drive]<br />
• Choose the folder into which you wish to save the records and click<br />
• When download is complete, click on Close<br />
• In <strong>RefWorks</strong>, click<br />
• Choose from drop down menu<br />
• From Import Filter/Data Source, choose The <strong>University</strong> <strong>of</strong> <strong>Saskatchewan</strong>.<br />
• Under Database, choose CAPlus [CAS SciFinder]<br />
• Under Select Text File, browse to find the file that you saved, and click<br />
• From Import Into Folder choose the folder into which you wish to import the records<br />
• Click to begin importing records<br />
• Once the process is complete you will see the following information:<br />
• To ensure that you imported the correct records you may click on in<br />
the bottom right hand corner <strong>of</strong> the “Import Reference” window<br />
Saving and importing records from SciFinder Scholar (client/server version)<br />
• Conduct your search in the usual way<br />
• Mark the records you wish to save<br />
• Click from the top <strong>of</strong> the search screen<br />
• Choose as the file type and save on your computer<br />
• In <strong>RefWorks</strong>, click<br />
• Choose from drop down menu<br />
• From Import Filter/Data Source, choose The <strong>University</strong> <strong>of</strong> <strong>Saskatchewan</strong>.<br />
• Under Database, choose CAPlus [CAS SciFinder]<br />
• Under Select Text File, browse to find the file that you saved, and click<br />
• From Import Into Folder choose the folder into which you wish to import the records<br />
4
• Click to begin importing records<br />
Saving and importing records from STAT!Ref<br />
• Conduct your search in the usual way<br />
• Click on the title <strong>of</strong> the result in which you are interested<br />
• Click the blue link at the upper right corner <strong>of</strong> the screen<br />
• Click Bibliographic Citations<br />
• From the drop-down menu, choose Export Directly to <strong>RefWorks</strong>, and then click<br />
Saving and importing records from Google Scholar<br />
• Click on in the top right corner <strong>of</strong> the search screen<br />
o Under Bibliography Manager at the bottom <strong>of</strong> the screen, select Show links to import<br />
citations into and then choose from the drop-down menu<br />
• Click at the bottom right corner <strong>of</strong> the page<br />
• When you search, you’ll see the link after each record. Click this link to<br />
import a single record. You can only import to <strong>RefWorks</strong> one record at a time<br />
Saving and importing records from the <strong>University</strong> <strong>Library</strong> Catalogue<br />
• Conduct your Catalogue search in the usual way<br />
• Click the title <strong>of</strong> the book you are interested in<br />
• Click on on the right side <strong>of</strong> the screen<br />
Entering references manually<br />
Sometimes you need to enter references for items that you found without using a database or library<br />
catalogue. In<br />
this case, follow the steps below:<br />
• From the top menu bar, click on<br />
• Select Add New<br />
• By choosing the View fields used by: for the style in which you will eventually create your bibliography<br />
(e.g., APA, Vancouver, etc.), and indicating Ref Type (i.e., whether this is a reference for a book,<br />
journal, web page, etc.), you will ensure that all necessary information is entered – required fields are<br />
identified with an asterisk (*)<br />
• Type in the information. At the bottom <strong>of</strong> the screen, you will find some tips on entering references in<br />
the format you have selected<br />
• Under Add to Folder: you may want to indicate which folder you would like to add the reference to<br />
• When you have finished, click<br />
Inserting citations into a Micros<strong>of</strong>t Word paper<br />
• Open Word<br />
• If Write-N-Cite has been downloaded on the machine you are using, you will see the red icon for it<br />
on your Word toolbar and/or see it as an option under Tools. If you don’t see it there, download<br />
Write-N-Cite onto the computer by choosing Write-N-Cite from Tools in <strong>RefWorks</strong>. If you use a<br />
Windows machine, you will be able to download Write-N-Cite III, which is a newer, simpler version<br />
<strong>of</strong> Write-N-Cite<br />
• Once you have downloaded Write-N-Cite, you will need to run the installation program (called<br />
either wncinstall.exe, wnc3install.exe or macwncinstall.dmg) to install it. Once you have done this,<br />
you should see the Write-N-Cite icon in Word<br />
• If you are using Write-N-Cite on an <strong>of</strong>f-campus computer, you will need to set up the proxy<br />
configuration utility. To set this up on a Windows computer, from the Start Menu select Programs<br />
5
and <strong>RefWorks</strong>. Select the WNC Proxy Configuration Utility. Into the window that pops up,<br />
enter http://cyber.usask.ca/login?url=http://refworks.scholarsportal.info/Ref<br />
works/?WNC=true Click OK<br />
• To set up Write-N-Cite on a Mac computer, activate Write-N-Cite. Select Preferences from the<br />
Write-N-Cite menu. Select the Proxy option and enter<br />
http://cyber.usask.ca/login?url=http://refworks.scholarsportal.info/Refwor<br />
ks/?WNC=true Restart Write-N-Cite for this proxy configuration to take effect<br />
• Once Write-N-Cite is installed, click on the Write-N-Cite icon to log in. From the View menu, you<br />
may display all references in your account, or only those found in a particular folder<br />
• Begin writing your paper. Position your cursor at the end <strong>of</strong> the sentence (but before the period) in<br />
which you wish to cite your source<br />
• Enter a single space to separate the citation from the text<br />
• From Write-N-Cite, click Cite for the reference <strong>of</strong> interest<br />
• Continue in this fashion until you have completed your paper and all citations have been inserted<br />
• *Note that the citations will appear in a temporary format; once you have selected a bibliographic<br />
style and created your bibliography, in-text citations will be formatted correctly<br />
• Save your paper<br />
• From Write-N-Cite, click Bibliography. Choose the style (e.g., APA, Vancouver, etc.) that you<br />
wish to use. Click Create Bibliography<br />
• If you are using Write-N-Cite II, <strong>RefWorks</strong> will create a new file, prefixed with the word “Final” that<br />
will contain the final, formatted bibliography and references. If you wish to reformat your paper in<br />
another style, or add or delete references, you will go back to the unformatted version that you<br />
saved earlier and click Bibliography again<br />
• If you are using Write-N-Cite III, <strong>RefWorks</strong> will format the references in your paper to create a<br />
single, formatted document with bibliography. If you want to add additional references to your<br />
formatted paper or if you wish to format your paper in another style, simply add the additional<br />
references (as needed) and click Bibliography and choose the style that you want. If however,<br />
you would like to delete references from your formatted paper, from Write-N-Cite, click Tools and<br />
Display unformatted citations, and then Unformat. This will display all <strong>of</strong> your references in<br />
temporary format. You can then delete unneeded citations, save, and click Bibliography to<br />
reformat<br />
Creating a reference list or bibliography<br />
• If you want to create an independent bibliography, i.e., a reference list without an accompanying paper,<br />
from within <strong>RefWorks</strong>, click on the upper gray toolbar. Then click on Create<br />
• Choose the Output Style (e.g., APA, Vancouver, etc.) that you wish to use<br />
• Click<br />
• Select the File Type format you wish to use<br />
• Determine which References to include<br />
• Click<br />
• When the Bibliography has been created the Completed window will open<br />
• Click on the first link in the “Completed” window<br />
• Click on to view the completed Reference List<br />
• Rename the file as desired<br />
For further assistance with <strong>RefWorks</strong>, please phone 966-6024<br />
or drop into the Health Sciences <strong>Library</strong>.<br />
Last updated: January 2012 by S. Murphy<br />
6