
You also want an ePaper? Increase the reach of your titles
YUMPU automatically turns print PDFs into web optimized ePapers that Google loves.
consTrucTion<br />
by STEvEn SAnTIcH photos by STEvEn SAnTIcH<br />
The<br />
elecTro<br />
hoTs<br />
The newest member of this fun fly family is also<br />
<strong>the</strong> lightest and 3D capable!<br />
Today, in The compeTiTion 3d world,<br />
<strong>the</strong> models being used are little more than<br />
a wing and tail with a powerful engine<br />
bolted in for good measure. But more and<br />
more, <strong>the</strong> development of powerful lightweight<br />
electric power systems is changing<br />
<strong>the</strong> way competitive airplanes are being<br />
designed. There’s no question that <strong>the</strong> performance<br />
now available from lipo battery<br />
packs and brushless outrunner motors is<br />
absolutely awesome. i have had great success<br />
in bringing toge<strong>the</strong>r my fa<strong>the</strong>r’s (dan<br />
Santich) <strong>hots</strong> designs and today’s e-power<br />
packages. you don’t even have to spend a<br />
lot of money as many of today’s sport-level<br />
60 MORE FROM THIS ISSUE AT MODELAIRPLANENEWS.COM<br />
electric power systems, when applied to<br />
a very lightweight airframe, will produce<br />
very impressive aerobatic performance.<br />
The <strong>electro</strong> <strong>hots</strong> is <strong>the</strong> latest in my<br />
updated <strong>hots</strong> designs and i think it takes<br />
<strong>the</strong> “keep it light” concept to <strong>the</strong> very limit<br />
using standard hobby materials like balsa,<br />
lite-ply and off-<strong>the</strong>-shelf hardware. no<br />
sense in trying to redesign <strong>the</strong> wheel!<br />
ConstruCtion<br />
The first thing to do is to assemble all your<br />
hardware, radio and power system equipment.<br />
Then, take sheet 2 of <strong>the</strong> plans<br />
and go to <strong>the</strong> hobby shop and buy <strong>the</strong><br />
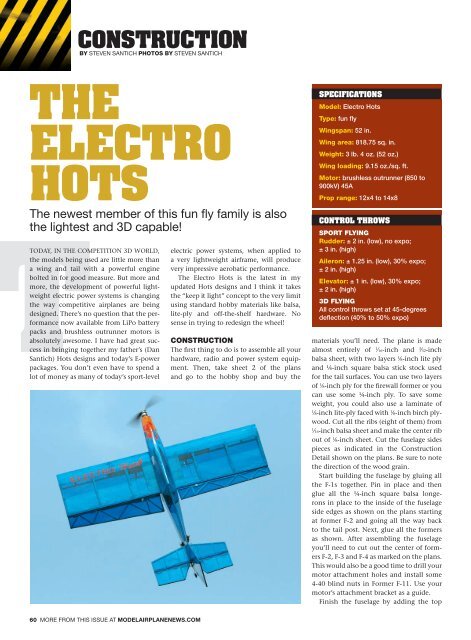
specificaTions<br />
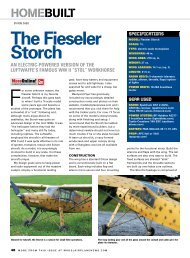
Model: Electro Hots<br />
type: fun fly<br />
Wingspan: 52 in.<br />
Wing area: 818.75 sq. in.<br />
Weight: 3 lb. 4 oz. (52 oz.)<br />
Wing loading: 9.15 oz./sq. ft.<br />
Motor: brushless outrunner (850 to<br />
900kV) 45A<br />
prop range: 12x4 to 14x8<br />
conTrol Throws<br />
sport Flying<br />
Rudder: ± 2 in. (low), no expo;<br />
± 3 in. (high)<br />
Aileron: ± 1.25 in. (low), 30% expo;<br />
± 2 in. (high)<br />
Elevator: ± 1 in. (low), 30% expo;<br />
± 2 in. (high)<br />
3D Flying<br />
All control throws set at 45-degrees<br />
deflection (40% to 50% expo)<br />
materials you’ll need. The plane is made<br />
almost entirely of 1 ⁄16-inch and 3 ⁄32-inch<br />
balsa sheet, with two layers 1 ⁄8-inch lite ply<br />
and ¼-inch square balsa stick stock used<br />
for <strong>the</strong> tail surfaces. you can use two layers<br />
of 1 ⁄8-inch ply for <strong>the</strong> firewall former or you<br />
can use some ¼-inch ply. To save some<br />
weight, you could also use a laminate of<br />
1 ⁄8-inch lite-ply faced with 1 ⁄8-inch birch plywood.<br />
cut all <strong>the</strong> ribs (eight of <strong>the</strong>m) from<br />
1 ⁄16-inch balsa sheet and make <strong>the</strong> center rib<br />
out of 1 ⁄8-inch sheet. cut <strong>the</strong> fuselage sides<br />
pieces as indicated in <strong>the</strong> <strong>construction</strong><br />
detail shown on <strong>the</strong> plans. Be sure to note<br />
<strong>the</strong> direction of <strong>the</strong> wood grain.<br />
Start building <strong>the</strong> fuselage by gluing all<br />
<strong>the</strong> F-1s toge<strong>the</strong>r. pin in place and <strong>the</strong>n<br />
glue all <strong>the</strong> ¼-inch square balsa longerons<br />
in place to <strong>the</strong> inside of <strong>the</strong> fuselage<br />
side edges as shown on <strong>the</strong> plans starting<br />
at former F-2 and going all <strong>the</strong> way back<br />
to <strong>the</strong> tail post. next, glue all <strong>the</strong> formers<br />
as shown. after assembling <strong>the</strong> fuselage<br />
you’ll need to cut out <strong>the</strong> center of formers<br />
F-2, F-3 and F-4 as marked on <strong>the</strong> plans.<br />
This would also be a good time to drill your<br />
motor attachment holes and install some<br />
4-40 blind nuts in Former F-11. Use your<br />
motor’s attachment bracket as a guide.<br />
Finish <strong>the</strong> fuselage by adding <strong>the</strong> top
consTrucTion<br />
by STEvEn SAnTIcH photos by STEvEn SAnTIcH<br />
The<br />
elecTro<br />
hoTs<br />
The newest member of this fun fly family is also<br />
<strong>the</strong> lightest and 3D capable!<br />
Today, in The compeTiTion 3d world,<br />
<strong>the</strong> models being used are little more than<br />
a wing and tail with a powerful engine<br />
bolted in for good measure. But more and<br />
more, <strong>the</strong> development of powerful lightweight<br />
electric power systems is changing<br />
<strong>the</strong> way competitive airplanes are being<br />
designed. There’s no question that <strong>the</strong> performance<br />
now available from lipo battery<br />
packs and brushless outrunner motors is<br />
absolutely awesome. i have had great success<br />
in bringing toge<strong>the</strong>r my fa<strong>the</strong>r’s (dan<br />
Santich) <strong>hots</strong> designs and today’s e-power<br />
packages. you don’t even have to spend a<br />
lot of money as many of today’s sport-level<br />
60 MORE FROM THIS ISSUE AT MODELAIRPLANENEWS.COM<br />
electric power systems, when applied to<br />
a very lightweight airframe, will produce<br />
very impressive aerobatic performance.<br />
The <strong>electro</strong> <strong>hots</strong> is <strong>the</strong> latest in my<br />
updated <strong>hots</strong> designs and i think it takes<br />
<strong>the</strong> “keep it light” concept to <strong>the</strong> very limit<br />
using standard hobby materials like balsa,<br />
lite-ply and off-<strong>the</strong>-shelf hardware. no<br />
sense in trying to redesign <strong>the</strong> wheel!<br />
ConstruCtion<br />
The first thing to do is to assemble all your<br />
hardware, radio and power system equipment.<br />
Then, take sheet 2 of <strong>the</strong> plans<br />
and go to <strong>the</strong> hobby shop and buy <strong>the</strong><br />
specificaTions<br />
Model: Electro Hots<br />
type: fun fly<br />
Wingspan: 52 in.<br />
Wing area: 818.75 sq. in.<br />
Weight: 3 lb. 4 oz. (52 oz.)<br />
Wing loading: 9.15 oz./sq. ft.<br />
Motor: brushless outrunner (850 to<br />
900kV) 45A<br />
prop range: 12x4 to 14x8<br />
conTrol Throws<br />
sport Flying<br />
Rudder: ± 2 in. (low), no expo;<br />
± 3 in. (high)<br />
Aileron: ± 1.25 in. (low), 30% expo;<br />
± 2 in. (high)<br />
Elevator: ± 1 in. (low), 30% expo;<br />
± 2 in. (high)<br />
3D Flying<br />
All control throws set at 45-degrees<br />
deflection (40% to 50% expo)<br />
materials you’ll need. The plane is made<br />
almost entirely of 1 ⁄16-inch and 3 ⁄32-inch<br />
balsa sheet, with two layers 1 ⁄8-inch lite ply<br />
and ¼-inch square balsa stick stock used<br />
for <strong>the</strong> tail surfaces. you can use two layers<br />
of 1 ⁄8-inch ply for <strong>the</strong> firewall former or you<br />
can use some ¼-inch ply. To save some<br />
weight, you could also use a laminate of<br />
1 ⁄8-inch lite-ply faced with 1 ⁄8-inch birch plywood.<br />
cut all <strong>the</strong> ribs (eight of <strong>the</strong>m) from<br />
1 ⁄16-inch balsa sheet and make <strong>the</strong> center rib<br />
out of 1 ⁄8-inch sheet. cut <strong>the</strong> fuselage sides<br />
pieces as indicated in <strong>the</strong> <strong>construction</strong><br />
detail shown on <strong>the</strong> plans. Be sure to note<br />
<strong>the</strong> direction of <strong>the</strong> wood grain.<br />
Start building <strong>the</strong> fuselage by gluing all<br />
<strong>the</strong> F-1s toge<strong>the</strong>r. pin in place and <strong>the</strong>n<br />
glue all <strong>the</strong> ¼-inch square balsa longerons<br />
in place to <strong>the</strong> inside of <strong>the</strong> fuselage<br />
side edges as shown on <strong>the</strong> plans starting<br />
at former F-2 and going all <strong>the</strong> way back<br />
to <strong>the</strong> tail post. next, glue all <strong>the</strong> formers<br />
as shown. after assembling <strong>the</strong> fuselage<br />
you’ll need to cut out <strong>the</strong> center of formers<br />
F-2, F-3 and F-4 as marked on <strong>the</strong> plans.<br />
This would also be a good time to drill your<br />
motor attachment holes and install some<br />
4-40 blind nuts in Former F-11. Use your<br />
motor’s attachment bracket as a guide.<br />
Finish <strong>the</strong> fuselage by adding <strong>the</strong> top
ThE ELECTRO hOTS IS ThE<br />
LATEST IN My uPDATED hOTS<br />
DESIgNS AND I ThINk IT TAkES<br />
ThE “kEEP IT LIghT” CONCEPT<br />
TO ThE vERy LIMIT<br />
and bottom sheeting sections as well<br />
as <strong>the</strong> landing gear plate lG-1 and <strong>the</strong><br />
spruce servo rails in <strong>the</strong> tail section. Use<br />
your servos as a guide to cut <strong>the</strong> servo<br />
openings to size and properly space <strong>the</strong><br />
rails. don’t cut out <strong>the</strong> large lightening<br />
openings in <strong>the</strong> fuselage sides until after<br />
you attach <strong>the</strong> wing.<br />
<strong>the</strong> wing is <strong>the</strong> thing<br />
when you begin building <strong>the</strong> wing, start<br />
by pinning <strong>the</strong> bottom spar into place<br />
over <strong>the</strong> plans. Glue <strong>the</strong> grids to <strong>the</strong> spar<br />
using alignment blocks to ensure that all<br />
<strong>the</strong> ribs are plumb and square to <strong>the</strong> spar<br />
and building board. Glue <strong>the</strong> top spar, <strong>the</strong><br />
leading edge and trailing edge in place<br />
<strong>the</strong>n glue <strong>the</strong> top wing sheeting over <strong>the</strong><br />
start building <strong>the</strong> fuselage after cutting out all <strong>the</strong> formers and<br />
<strong>the</strong> outer fuselage side pieces. Do not cut out <strong>the</strong> large weightsaving<br />
sections until <strong>the</strong> fuselage has been assembled.<br />
ribs. Trim <strong>the</strong> center ribs back 1 ⁄8-inch and<br />
glue <strong>the</strong> dowel support plate w2 in place.<br />
Glue <strong>the</strong> hardwood servo mounts in place<br />
and install <strong>the</strong> ¼-inch balsa braces under<br />
<strong>the</strong> mounts for additional support. if you<br />
haven’t already done so, use a dremel<br />
moto-Tool to cut holes in <strong>the</strong> ribs for <strong>the</strong><br />
ailerons servo leads to pass through and<br />
glue <strong>the</strong> rib cap-strips into place. To make<br />
routing <strong>the</strong> servo leads easier, i installed<br />
paper tubes in <strong>the</strong> ribs leading to <strong>the</strong><br />
center rib.<br />
install <strong>the</strong> aileron servos in <strong>the</strong> wing<br />
and <strong>the</strong>n add <strong>the</strong> bottom wing sheeting.<br />
Glue <strong>the</strong> 1 ⁄16-inch balsa vertical shear webbing<br />
to <strong>the</strong> main spar and <strong>the</strong>n glue <strong>the</strong><br />
wing hold-down bolt plate wB-2 at <strong>the</strong><br />
center trailing edge. Glue <strong>the</strong> wingtips on<br />
Gear used<br />
Radio: JR X9303 transmitter<br />
(jrradios.com); Spektrum DSM2<br />
AR6200 6-channel Ultralite receiver<br />
(spektrumrc.com), 4 JR DS-3421SA<br />
ultra torque mini digital servos<br />
power system: E-flite Power 25<br />
BL outrunner motor (e-fliterc.com),<br />
Castle Creations Thunderbird 54 ESC<br />
(castlecreations.com); Flight Power<br />
Evo25 2500mAh 3S LiPo battery<br />
prop: APC 12x6 to 14x6 Eprop<br />
(apcprop.com)<br />
and sand everything nice and smooth with<br />
some 150- and 220-grit sandpaper.<br />
Test fit <strong>the</strong> wing to <strong>the</strong> fuselage and see<br />
how it fits. you may need to sand <strong>the</strong> wing<br />
saddle and formers w-4 and w-10 a bit to<br />
make <strong>the</strong> wing fit properly. it should sit<br />
90 degrees to <strong>the</strong> fuselage centerline. drill<br />
<strong>the</strong> holes for <strong>the</strong> wing hold-down dowels<br />
and for <strong>the</strong> ¼-inch nylon wing bolt. cut<br />
before cutting free <strong>the</strong> belly pan section below <strong>the</strong> wing saddle,<br />
be sure to add <strong>the</strong> cross-pieces to hold <strong>the</strong> side parts toge<strong>the</strong>r.<br />
you can trim and fit <strong>the</strong> pan in place after <strong>the</strong> wing has been<br />
fitted to <strong>the</strong> fuselage.<br />
JULY 2010 61
consTrucTion The elecTro hoTs<br />
Use a fine-tooth hobby saw to separate<br />
<strong>the</strong> belly pan from <strong>the</strong> rest of <strong>the</strong> fuselage<br />
assembly.<br />
<strong>the</strong> ailerons are built just like <strong>the</strong> tail<br />
surfaces, flat over <strong>the</strong> plans using ¼-inch<br />
square balsa stock.<br />
an opening in <strong>the</strong> top center wing sheeting<br />
for servo leads. Sand <strong>the</strong> model smooth<br />
with 320-grit sandpaper and it’s ready for<br />
covering! install your motor, eSc, battery<br />
pack, receiver and servos. Build a battery<br />
hatch forward of <strong>the</strong> landing gear plate out<br />
of 1 ⁄16-inch sheet balsa.<br />
Build <strong>the</strong> horizontal stabilizer, vertical<br />
fin, elevators, rudder and ailerons using<br />
¼-inch square balsa stock. Glue <strong>the</strong> wing<br />
support wB-1 into place and glue a ½-inch<br />
thick balsa piece on top of wB-1. install<br />
wing saddle former F-9 and <strong>the</strong>n build <strong>the</strong><br />
belly-pan section in place over <strong>the</strong> bottom<br />
of <strong>the</strong> wing while it’s bolted in place. Glue<br />
horizontal stab and vertical fin in place.<br />
drill holes in lG-1 and lG-2 for landing<br />
gear attachment bolts.<br />
Final assembly<br />
i used transparent monoKote to cover<br />
my prototype, but you can use whatever<br />
build <strong>the</strong> tail surfaces from ¼-inchsquare<br />
stock directly over <strong>the</strong> plans. be<br />
sure to add material to properly support<br />
your hinges.<br />
With <strong>the</strong> wing removed, you have<br />
unlimited access to your radio gear. A<br />
hatch just forward of <strong>the</strong> landing gear<br />
allows battery changes without removing<br />
<strong>the</strong> wing.<br />
covering material you like, just be sure to<br />
keep it light. For power i used an e-flite<br />
power 25 Bl outrunner motor, 870kV<br />
with a castle creations Thunderbird 54<br />
eSc. you can use an apc 12x6 to 14x6<br />
eprop. du-Bro hardware is used throughout,<br />
including 2-56 kwik-links and du-Bro<br />
control horns. The landing gear is from a<br />
hangar-9 .40-size arF. For servos, i prefer<br />
<strong>the</strong> Jr dS-3421Sa ultra torque mini digital<br />
servos. i used a Flight power evo25<br />
2500mah 3S lipo pack. move your equipment<br />
around and <strong>the</strong>n secure it in place<br />
with Velcro when your model balances at<br />
<strong>the</strong> range shown on <strong>the</strong> plans.<br />
in <strong>the</strong> air<br />
as soon as i finished building <strong>the</strong> <strong>electro</strong><br />
<strong>hots</strong>, i headed straight to <strong>the</strong> flying field.<br />
ready to fly, <strong>the</strong> model weighed three<br />
pounds, four ounces. when i took off,<br />
<strong>the</strong> model only needed a couple of clicks<br />
JULY 2010 65
consTrucTion The elecTro hoTs<br />
son of The hoTs!<br />
Steven Santich is <strong>the</strong> son of <strong>the</strong> designer of <strong>the</strong> Hots, Dan Santich. Dan,<br />
who was once <strong>the</strong> editor of Model Airplane News, designed <strong>the</strong> original<br />
Hots, which at <strong>the</strong> time, was one of <strong>the</strong> first true fun fly designs. It went<br />
on to be developed into all types and sizes of glow-powered kits.<br />
Steven, what was <strong>the</strong> basic idea behind your fa<strong>the</strong>r’s original design concept?<br />
My fa<strong>the</strong>r designed <strong>the</strong> Hots for better flight characteristics and simplicity of design.<br />
Those two elements not only made <strong>the</strong> original airplane a household name, but <strong>the</strong>y<br />
also have contributed to <strong>the</strong> success of all its successors.<br />
What maneuvers were considered “Hots” moves back <strong>the</strong>n?<br />
At <strong>the</strong> time, <strong>the</strong> Hots set <strong>the</strong> standard for fun-fly flight characteristics. Things like<br />
tight spins, loops and knife-edge passes were all in <strong>the</strong> Hots’ bag of tricks. When<br />
it came to snap rolls, <strong>the</strong> Hots could often be seen flipping end over end. Vertical<br />
square-8s were my favorites.<br />
What about landing?<br />
With all its aerobatic capabilities, you could still land a lightly built Hots at a<br />
near walking speed. Slow flight got very close to hovering even in <strong>the</strong> lightest of<br />
headwinds.<br />
Are you going to kit this new design?<br />
Yes. The Electro Hots is now available in a laser-cut kit from dansantichmodels.net.<br />
The kits are made from top-quality balsa and lite-ply and include all ribs, bulkhead,<br />
doublers and formers for $65.<br />
to <strong>the</strong> right aileron for straight and level<br />
flight. The model flies extremely well and<br />
is very light on <strong>the</strong> controls. i set up my<br />
dual rate switch so full throw gives 120%<br />
of travel. at this setting you can really test<br />
<strong>the</strong> glue joints and see how much stress<br />
<strong>the</strong> model could take. i came in at full<br />
speed and did some snap rolls and <strong>the</strong>n<br />
slowed down for some 3d harrier flybys.<br />
loops are very tight and lovely! really,<br />
<strong>the</strong> <strong>electro</strong> <strong>hots</strong> is limited only by your<br />
own piloting skills! its light weight and<br />
flyer-friendly wing loading make landings<br />
trainer-like. if you want to shoot touch<br />
and gos on a lazy Sunday afternoon, this<br />
is <strong>the</strong> plane for you!<br />
whe<strong>the</strong>r you are a beginner or an expert,<br />
<strong>the</strong> <strong>electro</strong> <strong>hots</strong> can be set up to challenge<br />
you. it’s very easy to construct and<br />
is designed for <strong>the</strong> new breed of outrunner<br />
electric motors. while building, take<br />
out any balsa that is just dead weight but<br />
not too much of <strong>the</strong> frame structure. The<br />
lighter <strong>the</strong> model, <strong>the</strong> better slow flight<br />
performance will be. But please, don’t use a<br />
glow engine. The airframe is not designed<br />
to take <strong>the</strong> vibration and stress put out by a<br />
nitro-sipping engine. have fun! <br />
JULY 2010 67