
You also want an ePaper? Increase the reach of your titles
YUMPU automatically turns print PDFs into web optimized ePapers that Google loves.
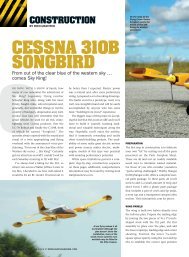
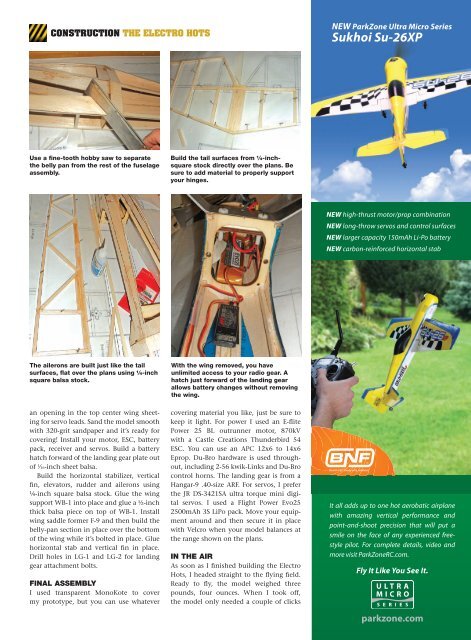
consTrucTion The elecTro hoTs<br />
Use a fine-tooth hobby saw to separate<br />
<strong>the</strong> belly pan from <strong>the</strong> rest of <strong>the</strong> fuselage<br />
assembly.<br />
<strong>the</strong> ailerons are built just like <strong>the</strong> tail<br />
surfaces, flat over <strong>the</strong> plans using ¼-inch<br />
square balsa stock.<br />
an opening in <strong>the</strong> top center wing sheeting<br />
for servo leads. Sand <strong>the</strong> model smooth<br />
with 320-grit sandpaper and it’s ready for<br />
covering! install your motor, eSc, battery<br />
pack, receiver and servos. Build a battery<br />
hatch forward of <strong>the</strong> landing gear plate out<br />
of 1 ⁄16-inch sheet balsa.<br />
Build <strong>the</strong> horizontal stabilizer, vertical<br />
fin, elevators, rudder and ailerons using<br />
¼-inch square balsa stock. Glue <strong>the</strong> wing<br />
support wB-1 into place and glue a ½-inch<br />
thick balsa piece on top of wB-1. install<br />
wing saddle former F-9 and <strong>the</strong>n build <strong>the</strong><br />
belly-pan section in place over <strong>the</strong> bottom<br />
of <strong>the</strong> wing while it’s bolted in place. Glue<br />
horizontal stab and vertical fin in place.<br />
drill holes in lG-1 and lG-2 for landing<br />
gear attachment bolts.<br />
Final assembly<br />
i used transparent monoKote to cover<br />
my prototype, but you can use whatever<br />
build <strong>the</strong> tail surfaces from ¼-inchsquare<br />
stock directly over <strong>the</strong> plans. be<br />
sure to add material to properly support<br />
your hinges.<br />
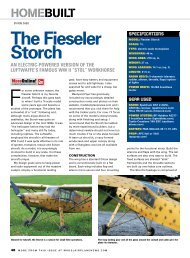
With <strong>the</strong> wing removed, you have<br />
unlimited access to your radio gear. A<br />
hatch just forward of <strong>the</strong> landing gear<br />
allows battery changes without removing<br />
<strong>the</strong> wing.<br />
covering material you like, just be sure to<br />
keep it light. For power i used an e-flite<br />
power 25 Bl outrunner motor, 870kV<br />
with a castle creations Thunderbird 54<br />
eSc. you can use an apc 12x6 to 14x6<br />
eprop. du-Bro hardware is used throughout,<br />
including 2-56 kwik-links and du-Bro<br />
control horns. The landing gear is from a<br />
hangar-9 .40-size arF. For servos, i prefer<br />
<strong>the</strong> Jr dS-3421Sa ultra torque mini digital<br />
servos. i used a Flight power evo25<br />
2500mah 3S lipo pack. move your equipment<br />
around and <strong>the</strong>n secure it in place<br />
with Velcro when your model balances at<br />
<strong>the</strong> range shown on <strong>the</strong> plans.<br />
in <strong>the</strong> air<br />
as soon as i finished building <strong>the</strong> <strong>electro</strong><br />
<strong>hots</strong>, i headed straight to <strong>the</strong> flying field.<br />
ready to fly, <strong>the</strong> model weighed three<br />
pounds, four ounces. when i took off,<br />
<strong>the</strong> model only needed a couple of clicks<br />
JULY 2010 65