
You also want an ePaper? Increase the reach of your titles
YUMPU automatically turns print PDFs into web optimized ePapers that Google loves.
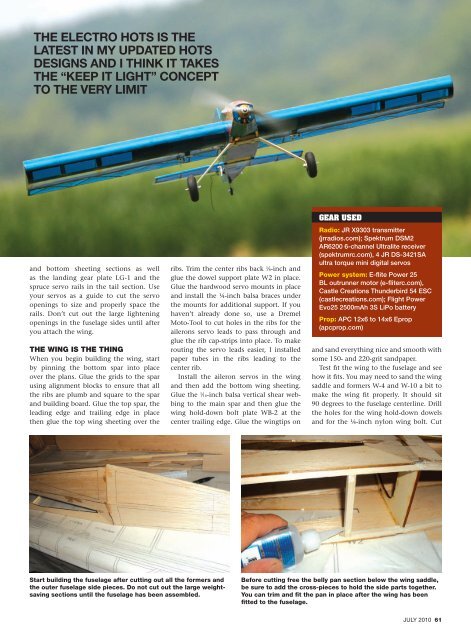
ThE ELECTRO hOTS IS ThE<br />
LATEST IN My uPDATED hOTS<br />
DESIgNS AND I ThINk IT TAkES<br />
ThE “kEEP IT LIghT” CONCEPT<br />
TO ThE vERy LIMIT<br />
and bottom sheeting sections as well<br />
as <strong>the</strong> landing gear plate lG-1 and <strong>the</strong><br />
spruce servo rails in <strong>the</strong> tail section. Use<br />
your servos as a guide to cut <strong>the</strong> servo<br />
openings to size and properly space <strong>the</strong><br />
rails. don’t cut out <strong>the</strong> large lightening<br />
openings in <strong>the</strong> fuselage sides until after<br />
you attach <strong>the</strong> wing.<br />
<strong>the</strong> wing is <strong>the</strong> thing<br />
when you begin building <strong>the</strong> wing, start<br />
by pinning <strong>the</strong> bottom spar into place<br />
over <strong>the</strong> plans. Glue <strong>the</strong> grids to <strong>the</strong> spar<br />
using alignment blocks to ensure that all<br />
<strong>the</strong> ribs are plumb and square to <strong>the</strong> spar<br />
and building board. Glue <strong>the</strong> top spar, <strong>the</strong><br />
leading edge and trailing edge in place<br />
<strong>the</strong>n glue <strong>the</strong> top wing sheeting over <strong>the</strong><br />
start building <strong>the</strong> fuselage after cutting out all <strong>the</strong> formers and<br />
<strong>the</strong> outer fuselage side pieces. Do not cut out <strong>the</strong> large weightsaving<br />
sections until <strong>the</strong> fuselage has been assembled.<br />
ribs. Trim <strong>the</strong> center ribs back 1 ⁄8-inch and<br />
glue <strong>the</strong> dowel support plate w2 in place.<br />
Glue <strong>the</strong> hardwood servo mounts in place<br />
and install <strong>the</strong> ¼-inch balsa braces under<br />
<strong>the</strong> mounts for additional support. if you<br />
haven’t already done so, use a dremel<br />
moto-Tool to cut holes in <strong>the</strong> ribs for <strong>the</strong><br />
ailerons servo leads to pass through and<br />
glue <strong>the</strong> rib cap-strips into place. To make<br />
routing <strong>the</strong> servo leads easier, i installed<br />
paper tubes in <strong>the</strong> ribs leading to <strong>the</strong><br />
center rib.<br />
install <strong>the</strong> aileron servos in <strong>the</strong> wing<br />
and <strong>the</strong>n add <strong>the</strong> bottom wing sheeting.<br />
Glue <strong>the</strong> 1 ⁄16-inch balsa vertical shear webbing<br />
to <strong>the</strong> main spar and <strong>the</strong>n glue <strong>the</strong><br />
wing hold-down bolt plate wB-2 at <strong>the</strong><br />
center trailing edge. Glue <strong>the</strong> wingtips on<br />
Gear used<br />
Radio: JR X9303 transmitter<br />
(jrradios.com); Spektrum DSM2<br />
AR6200 6-channel Ultralite receiver<br />
(spektrumrc.com), 4 JR DS-3421SA<br />
ultra torque mini digital servos<br />
power system: E-flite Power 25<br />
BL outrunner motor (e-fliterc.com),<br />
Castle Creations Thunderbird 54 ESC<br />
(castlecreations.com); Flight Power<br />
Evo25 2500mAh 3S LiPo battery<br />
prop: APC 12x6 to 14x6 Eprop<br />
(apcprop.com)<br />
and sand everything nice and smooth with<br />
some 150- and 220-grit sandpaper.<br />
Test fit <strong>the</strong> wing to <strong>the</strong> fuselage and see<br />
how it fits. you may need to sand <strong>the</strong> wing<br />
saddle and formers w-4 and w-10 a bit to<br />
make <strong>the</strong> wing fit properly. it should sit<br />
90 degrees to <strong>the</strong> fuselage centerline. drill<br />
<strong>the</strong> holes for <strong>the</strong> wing hold-down dowels<br />
and for <strong>the</strong> ¼-inch nylon wing bolt. cut<br />
before cutting free <strong>the</strong> belly pan section below <strong>the</strong> wing saddle,<br />
be sure to add <strong>the</strong> cross-pieces to hold <strong>the</strong> side parts toge<strong>the</strong>r.<br />
you can trim and fit <strong>the</strong> pan in place after <strong>the</strong> wing has been<br />
fitted to <strong>the</strong> fuselage.<br />
JULY 2010 61