556U Immobilizer Interface - Sonic Electronix
556U Immobilizer Interface - Sonic Electronix
556U Immobilizer Interface - Sonic Electronix

Create successful ePaper yourself
Turn your PDF publications into a flip-book with our unique Google optimized e-Paper software.
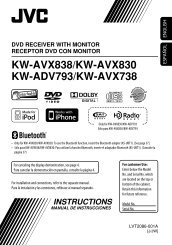
Standard <strong>Immobilizer</strong> <strong>Interface</strong><br />
1. Open the control module and place the vehicle’s coded key through the center of the black receiver ring as shown.<br />
2. Reassemble the control module. This will secure the key inside.<br />
IIMMPPOORRTTAANNTT!! When using the ring method of installing the <strong>556U</strong>, the ring from the <strong>556U</strong> MUST<br />
be in front of the factory receiver ring. It CAN NOT be on top of, or behind the factory receiver<br />
ring. See illustration below.<br />
3. Disassemble the steering column shroud and place the antenna ring around the vehicle’s ignition switch as<br />
shown, and plug into the control module.<br />
4. Plug the 6-pin power plug into the control module.<br />
5. Connect the BLACK wire to chassis (ground).<br />
6. Connect the red wire to a fused source of constant 12V.<br />
7. Connect the blue wire to the status output (blue wire) of the remote start system that provides a latched<br />
negative (-) ground while the remote start is active.<br />
8. Test unit before reassembling the steering column.<br />
9. Reassemble the steering column shroud.<br />
© 2004 Directed Electronics, Inc. 3<br />
N<strong>556U</strong> 09/04