ēKo Pro series User's Manual - Crossbow Technology
ēKo Pro series User's Manual - Crossbow Technology
ēKo Pro series User's Manual - Crossbow Technology

Create successful ePaper yourself
Turn your PDF publications into a flip-book with our unique Google optimized e-Paper software.
<strong>ēKo</strong> <strong>Pro</strong> Series User’s <strong>Manual</strong><br />
3 <strong>ēKo</strong> Gateway Set-up and Configuration<br />
This section will step you through the process of setting up and configuring the <strong>ēKo</strong> gateway.<br />
The three main steps are to<br />
1. Set-up <strong>ēKo</strong> gateway<br />
2. Set up <strong>ēKo</strong> base radio<br />
3. Start up the system and log into <strong>ēKo</strong>View<br />
3.1 Setting-up the <strong>ēKo</strong> Gateway<br />
To get started and set-up the <strong>ēKo</strong> gateway<br />
1. Remove the <strong>ēKo</strong> gateway from its packaging. An included base can be used for upright<br />
operation.<br />
2. The bag holding the <strong>ēKo</strong> gateway also contains an USB FLASH disk included in the<br />
package. Insert this device into the bottom USB port of the <strong>ēKo</strong> gateway labeled “Disk<br />
1”.<br />
IMPORTANT: Make sure that the side with the electrical contacts on the USB disk<br />
mates with the contacts inside the USB connector. If the USB disk is plugged in the wrong way<br />
the <strong>ēKo</strong> gateway will not boot. See Figure 3-1 below.<br />
3. Also included are a CAT5 Ethernet cable and a snap-on inductor. For optimal noise<br />
reduction, place the inductor close to the connector that will plug into the <strong>ēKo</strong> gateway<br />
and snap it in place.<br />
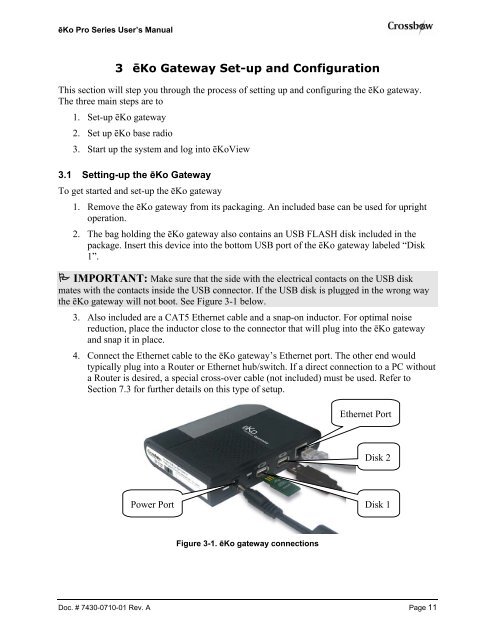
4. Connect the Ethernet cable to the <strong>ēKo</strong> gateway’s Ethernet port. The other end would<br />
typically plug into a Router or Ethernet hub/switch. If a direct connection to a PC without<br />
a Router is desired, a special cross-over cable (not included) must be used. Refer to<br />
Section 7.3 for further details on this type of setup.<br />
Power Port<br />
Figure 3-1. <strong>ēKo</strong> gateway connections<br />
Ethernet Port<br />
Disk 2<br />
Disk 1<br />
Doc. # 7430-0710-01 Rev. A Page 11