ēKo Pro series User's Manual - Crossbow Technology
ēKo Pro series User's Manual - Crossbow Technology
ēKo Pro series User's Manual - Crossbow Technology

You also want an ePaper? Increase the reach of your titles
YUMPU automatically turns print PDFs into web optimized ePapers that Google loves.
<strong>ēKo</strong> <strong>Pro</strong> Series User’s <strong>Manual</strong><br />
5.4 Configuring <strong>ēKo</strong>View<br />
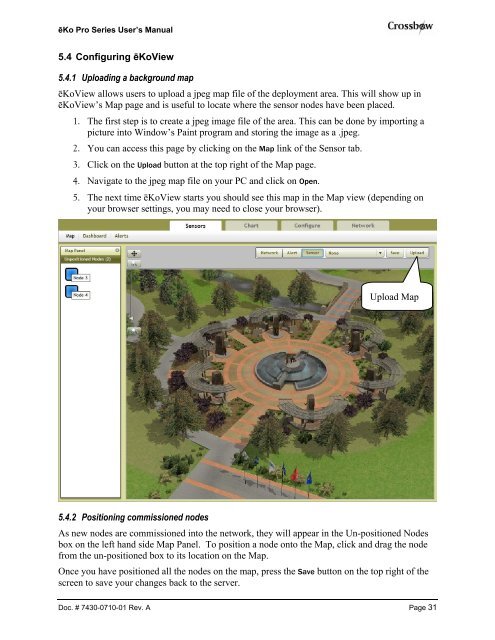
5.4.1 Uploading a background map<br />
<strong>ēKo</strong>View allows users to upload a jpeg map file of the deployment area. This will show up in<br />
<strong>ēKo</strong>View’s Map page and is useful to locate where the sensor nodes have been placed.<br />
1. The first step is to create a jpeg image file of the area. This can be done by importing a<br />
picture into Window’s Paint program and storing the image as a .jpeg.<br />
2. You can access this page by clicking on the Map link of the Sensor tab.<br />
3. Click on the Upload button at the top right of the Map page.<br />
4. Navigate to the jpeg map file on your PC and click on Open.<br />
5. The next time <strong>ēKo</strong>View starts you should see this map in the Map view (depending on<br />
your browser settings, you may need to close your browser).<br />
5.4.2 Positioning commissioned nodes<br />
Upload Map<br />
As new nodes are commissioned into the network, they will appear in the Un-positioned Nodes<br />
box on the left hand side Map Panel. To position a node onto the Map, click and drag the node<br />
from the un-positioned box to its location on the Map.<br />
Once you have positioned all the nodes on the map, press the Save button on the top right of the<br />
screen to save your changes back to the server.<br />
Doc. # 7430-0710-01 Rev. A Page 31