PT-DZ6710E PT-DZ6700E PT - Panasonic Business
PT-DZ6710E PT-DZ6700E PT - Panasonic Business
PT-DZ6710E PT-DZ6700E PT - Panasonic Business

You also want an ePaper? Increase the reach of your titles
YUMPU automatically turns print PDFs into web optimized ePapers that Google loves.
Appendix<br />
Technical Information<br />
Ceiling mount bracket safeguards<br />
The projector and the ceiling mount bracket are designed sufficiently safety though, make sure the safety cable<br />
provided with the projector is installed and attached to the bottom of the projector when mounting in the ceiling for<br />
safety and security.<br />
Installation work of the ceiling mount bracket should only be carried by a qualified technician according to<br />
the following procedure.<br />
Even if it is guarantee period, the manufacturer is not responsible for any hazard or damage caused by<br />
using a ceiling mount bracket which is not purchased from an authorized distributors, or environmental<br />
conditions.<br />
Make sure to use a torque driver and do not use an electrical screwdriver or an impact screwdriver.<br />
An unused ceiling mount bracket should be removed promptly by qualified technician.<br />
Do not use other than the provided safety cable (x1) and washers (x2).<br />
Do not use the screw holes of the front leg adjusters for the projector installation.<br />
Do not attach the safety cable to the burglar hook port and suspend the projector on it.<br />
Read the installation instructions booklet that is provided with the ceiling mount bracket to install the safety<br />
cable.<br />
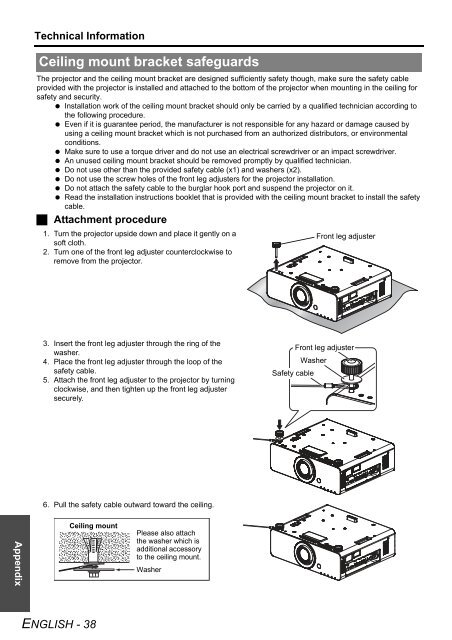
Attachment procedure<br />
1. Turn the projector upside down and place it gently on a<br />
soft cloth.<br />
2. Turn one of the front leg adjuster counterclockwise to<br />
remove from the projector.<br />
3. Insert the front leg adjuster through the ring of the<br />
washer.<br />
4. Place the front leg adjuster through the loop of the<br />
safety cable.<br />
5. Attach the front leg adjuster to the projector by turning<br />
clockwise, and then tighten up the front leg adjuster<br />
securely.<br />
6. Pull the safety cable outward toward the ceiling.<br />
Ceiling mount<br />
ENGLISH - 38<br />
Please also attach<br />
the washer which is<br />
additional accessory<br />
to the ceiling mount.<br />
Washer<br />
Washer<br />
Safety cable<br />
Front leg adjuster<br />
Front leg adjuster