
Create successful ePaper yourself
Turn your PDF publications into a flip-book with our unique Google optimized e-Paper software.
So, here is what I did for this white paper.<br />
First of all I created a form with several properties.<br />
This is (part of) that code.<br />
DEFINE CLASS baseform AS Form<br />
cTable AS string=““<br />
cDBC AS string=““<br />
cDataPath AS string=““<br />
lShared as boolean = .T.<br />
Height=186<br />
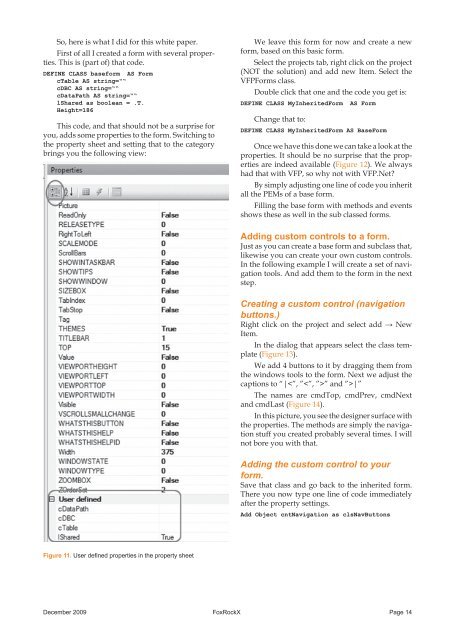
This code, and that should not be a surprise for<br />
you, adds some properties to the form. Switching to<br />
the property sheet and setting that to the category<br />
brings you the following view:<br />
Figure 11. User defined properties in the property sheet<br />
We leave this form for now and create a new<br />
form, based on this basic form.<br />
Select the projects tab, right click on the project<br />
(NOT the solution) and add new Item. Select the<br />
VFPForms class.<br />
Double click that one and the code you get is:<br />
DEFINE CLASS MyInheritedForm AS Form<br />
Change that to:<br />
DEFINE CLASS MyInheritedForm AS BaseForm<br />
Once we have this done we can take a look at the<br />
properties. It should be no surprise that the properties<br />
are indeed available (Figure 12). We always<br />
had that with VFP, so why not with VFP.Net?<br />
By simply adjusting one line of code you inherit<br />
all the PEMs of a base form.<br />
Filling the base form with methods and events<br />
shows these as well in the sub classed forms.<br />
Adding custom controls to a form.<br />
Just as you can create a base form and subclass that,<br />
likewise you can create your own custom controls.<br />
In the following example I will create a set of navigation<br />
tools. And add them to the form in the next<br />
step.<br />
Creating a custom control (navigation<br />
buttons.)<br />
Right click on the project and select add → New<br />
Item.<br />
In the dialog that appears select the class template<br />
(Figure 13).<br />
We add 4 buttons to it by dragging them from<br />
the windows tools to the form. Next we adjust the<br />
captions to “||”<br />
The names are cmdTop, cmdPrev, cmdNext<br />
and cmdLast (Figure 14).<br />
In this picture, you see the designer surface with<br />
the properties. The methods are simply the navigation<br />
stuff you created probably several times. I will<br />
not bore you with that.<br />
Adding the custom control to your<br />
form.<br />
Save that class and go back to the inherited form.<br />
There you now type one line of code immediately<br />
after the property settings.<br />
Add Object cntNavigation as clsNavButtons<br />
December 2009 FoxRockX Page 14