

Sewing Machine - Brother
Sewing Machine - Brother
Sewing Machine - Brother

You also want an ePaper? Increase the reach of your titles
YUMPU automatically turns print PDFs into web optimized ePapers that Google loves.
—————————————————————————————————————————————————————————————————————————————————————————————————————————————————————<br />
g<br />
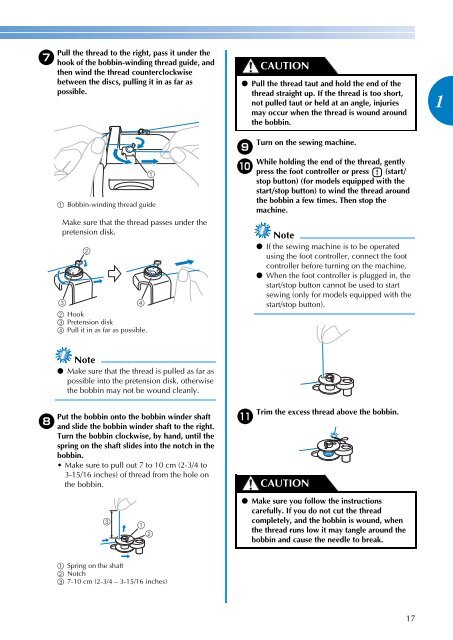
Pull the thread to the right, pass it under the<br />
hook of the bobbin-winding thread guide, and<br />
then wind the thread counterclockwise<br />
between the discs, pulling it in as far as<br />
possible.<br />
a Bobbin-winding thread guide<br />
Make sure that the thread passes under the<br />
pretension disk.<br />
b Hook<br />
c Pretension disk<br />
d Pull it in as far as possible.<br />
Note<br />
● Make sure that the thread is pulled as far as<br />
possible into the pretension disk, otherwise<br />
the bobbin may not be wound cleanly.<br />
Put the bobbin onto the bobbin winder shaft<br />
h and slide the bobbin winder shaft to the right.<br />
Turn the bobbin clockwise, by hand, until the<br />
spring on the shaft slides into the notch in the<br />
bobbin.<br />
• Make sure to pull out 7 to 10 cm (2-3/4 to<br />
3-15/16 inches) of thread from the hole on<br />
the bobbin.<br />
a Spring on the shaft<br />
b Notch<br />
c 7-10 cm (2-3/4 – 3-15/16 inches)<br />
CAUTION<br />
● Pull the thread taut and hold the end of the<br />
thread straight up. If the thread is too short,<br />
not pulled taut or held at an angle, injuries<br />
may occur when the thread is wound around<br />
the bobbin.<br />
Turn on the sewing machine.<br />
i<br />
While holding the end of the thread, gently<br />
j press the foot controller or press (start/<br />
stop button) (for models equipped with the<br />
start/stop button) to wind the thread around<br />
the bobbin a few times. Then stop the<br />
machine.<br />
Note<br />
● If the sewing machine is to be operated<br />
using the foot controller, connect the foot<br />
controller before turning on the machine.<br />
● When the foot controller is plugged in, the<br />
start/stop button cannot be used to start<br />
sewing (only for models equipped with the<br />
start/stop button).<br />
Trim the excess thread above the bobbin.<br />
k<br />
CAUTION<br />
● Make sure you follow the instructions<br />
carefully. If you do not cut the thread<br />
completely, and the bobbin is wound, when<br />
the thread runs low it may tangle around the<br />
bobbin and cause the needle to break.<br />
17<br />
1


