

Sewing Machine - Brother
Sewing Machine - Brother
Sewing Machine - Brother

You also want an ePaper? Increase the reach of your titles
YUMPU automatically turns print PDFs into web optimized ePapers that Google loves.
58<br />
UTILITY STITCHES —————————————————————————————————————————————————————————————————————————————————————————————————————<br />
e<br />
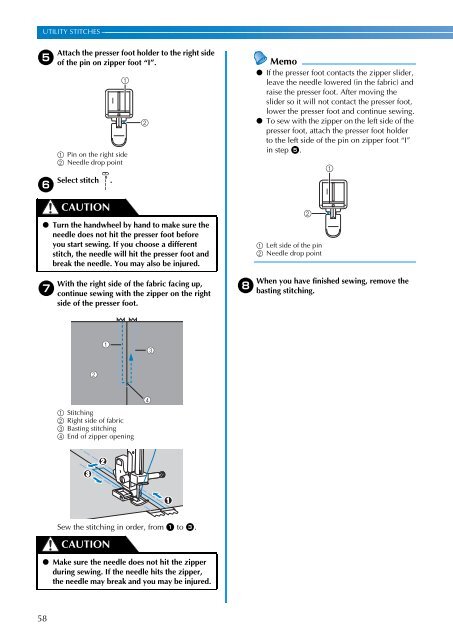
Attach the presser foot holder to the right side<br />
of the pin on zipper foot “I”.<br />
a Pin on the right side<br />
b Needle drop point<br />
Select stitch .<br />
f<br />
g<br />
CAUTION<br />
● Turn the handwheel by hand to make sure the<br />
needle does not hit the presser foot before<br />
you start sewing. If you choose a different<br />
stitch, the needle will hit the presser foot and<br />
break the needle. You may also be injured.<br />
With the right side of the fabric facing up,<br />
continue sewing with the zipper on the right<br />
side of the presser foot.<br />
a Stitching<br />
b Right side of fabric<br />
c Basting stitching<br />
d End of zipper opening<br />
Sew the stitching in order, from a to c.<br />
CAUTION<br />
I<br />
● Make sure the needle does not hit the zipper<br />
during sewing. If the needle hits the zipper,<br />
the needle may break and you may be injured.<br />
Memo<br />
● If the presser foot contacts the zipper slider,<br />
leave the needle lowered (in the fabric) and<br />
raise the presser foot. After moving the<br />
slider so it will not contact the presser foot,<br />
lower the presser foot and continue sewing.<br />
● To sew with the zipper on the left side of the<br />
presser foot, attach the presser foot holder<br />
to the left side of the pin on zipper foot “I”<br />
in step e.<br />
a Left side of the pin<br />
b Needle drop point<br />
When you have finished sewing, remove the<br />
h basting stitching.<br />
I


