
Create successful ePaper yourself
Turn your PDF publications into a flip-book with our unique Google optimized e-Paper software.
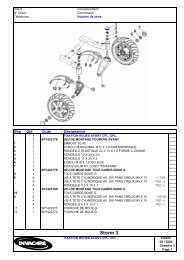
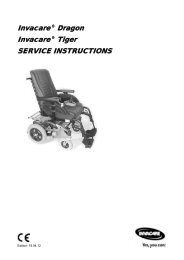
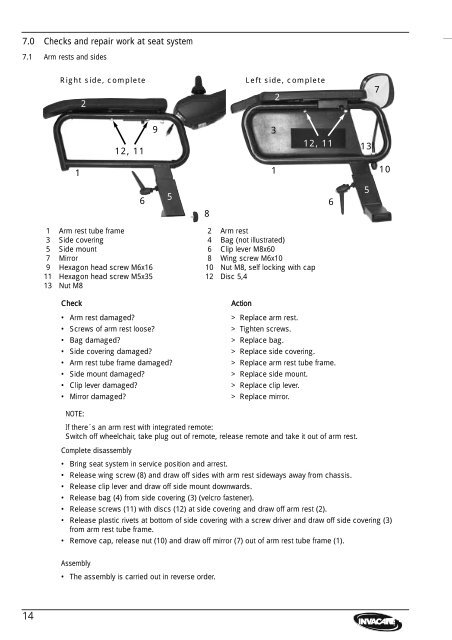
7.0 Checks and repair work at seat system<br />
7.1 Arm rests and sides<br />
14<br />
Right side, complete Left side, complete<br />
1<br />
2<br />
12, 11<br />
6<br />
9<br />
Check Action<br />
5<br />
1 Arm rest tube frame 2 Arm rest<br />
3 Side covering 4 Bag (not illustrated)<br />
5 Side mount 6 Clip lever M8x60<br />
7 Mirror 8 Wing screw M6x10<br />
9 Hexagon head screw M6x16 10 Nut M8, self locking <strong>with</strong> cap<br />
11 Hexagon head screw M5x35 12 Disc 5,4<br />
13 Nut M8<br />
• Arm rest damaged?<br />
• Screws of arm rest loose?<br />
• Bag damaged?<br />
• Side covering damaged?<br />
• Arm rest tube frame damaged?<br />
• Side mount damaged?<br />
• Clip lever damaged?<br />
• Mirror damaged?<br />
NOTE:<br />
8<br />
3<br />
1<br />
2<br />
12, 11<br />
6<br />
> Replace arm rest.<br />
> Tighten screws.<br />
> Replace bag.<br />
> Replace side covering.<br />
> Replace arm rest tube frame.<br />
> Replace side mount.<br />
> Replace clip lever.<br />
> Replace mirror.<br />
If there´s an arm rest <strong>with</strong> integrated remote:<br />
Switch off wheelchair, take plug out of remote, release remote and take it out of arm rest.<br />
Complete disassembly<br />
• Bring seat system in service position and arrest.<br />
• Release wing screw (8) and draw off sides <strong>with</strong> arm rest sideways away from chassis.<br />
• Release clip lever and draw off side mount downwards.<br />
• Release bag (4) from side covering (3) (velcro fastener).<br />
• Release screws (11) <strong>with</strong> discs (12) at side covering and draw off arm rest (2).<br />
• Release plastic rivets at bottom of side covering <strong>with</strong> a screw driver and draw off side covering (3)<br />
from arm rest tube frame.<br />
• Remove cap, release nut (10) and draw off mirror (7) out of arm rest tube frame (1).<br />
Assembly<br />
• The assembly is carried out in reverse order.<br />
13<br />
5<br />
7<br />
10