
Create successful ePaper yourself
Turn your PDF publications into a flip-book with our unique Google optimized e-Paper software.
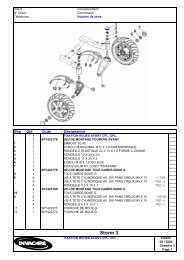
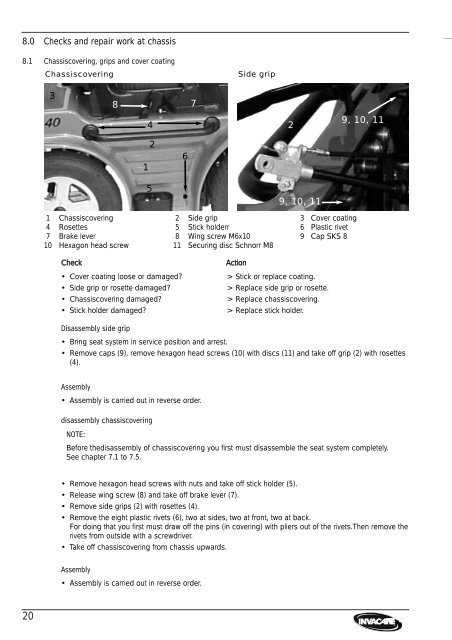
8.0 Checks and repair work at chassis<br />
8.1 Chassiscovering, grips and cover coating<br />
20<br />
Chassiscovering Side grip<br />
3<br />
8<br />
Check Action<br />
• Cover coating loose or damaged?<br />
• Side grip or rosette damaged?<br />
• Chassiscovering damaged?<br />
• Stick holder damaged?<br />
Disassembly side grip<br />
• Bring seat system in service position and arrest.<br />
• Remove caps (9), remove hexagon head screws (10) <strong>with</strong> discs (11) and take off grip (2) <strong>with</strong> rosettes<br />
(4).<br />
Assembly<br />
• Assembly is carried out in reverse order.<br />
1<br />
4<br />
2<br />
5<br />
disassembly chassiscovering<br />
6<br />
7<br />
2<br />
9, 10, 11<br />
1 Chassiscovering 2 Side grip 3 Cover coating<br />
4 Rosettes 5 Stick holderr 6 Plastic rivet<br />
7 Brake lever 8 Wing screw M6x10 9 Cap SKS 8<br />
10 Hexagon head screw 11 Securing disc Schnorr M8<br />
NOTE:<br />
> Stick or replace coating.<br />
> Replace side grip or rosette.<br />
> Replace chassiscovering.<br />
> Replace stick holder.<br />
9, 10, 11<br />
Before thedisassembly of chassiscovering you first must disassemble the seat system completely.<br />
See chapter 7.1 to 7.5.<br />
• Remove hexagon head screws <strong>with</strong> nuts and take off stick holder (5).<br />
• Release wing screw (8) and take off brake lever (7).<br />
• Remove side grips (2) <strong>with</strong> rosettes (4).<br />
• Remove the eight plastic rivets (6), two at sides, two at front, two at back.<br />
For doing that you first must draw off the pins (in covering) <strong>with</strong> pliers out of the rivets.Then remove the<br />
rivets from outside <strong>with</strong> a screwdriver.<br />
• Take off chassiscovering from chassis upwards.<br />
Assembly<br />
• Assembly is carried out in reverse order.