Description recipe
Description recipe
Description recipe

You also want an ePaper? Increase the reach of your titles
YUMPU automatically turns print PDFs into web optimized ePapers that Google loves.
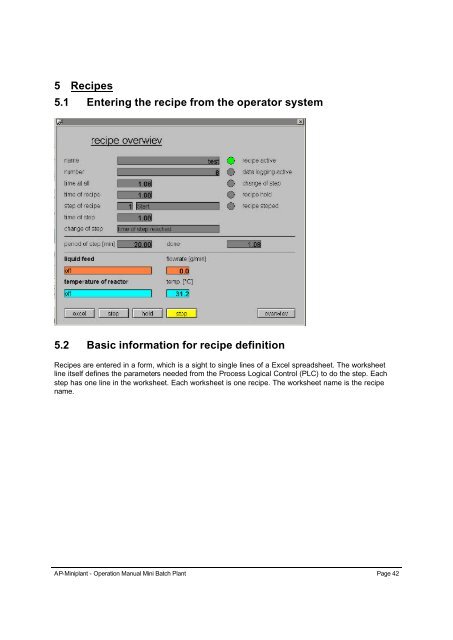
5 Recipes<br />
5.1 Entering the <strong>recipe</strong> from the operator system<br />
5.2 Basic information for <strong>recipe</strong> definition<br />
Recipes are entered in a form, which is a sight to single lines of a Excel spreadsheet. The worksheet<br />
line itself defines the parameters needed from the Process Logical Control (PLC) to do the step. Each<br />
step has one line in the worksheet. Each worksheet is one <strong>recipe</strong>. The worksheet name is the <strong>recipe</strong><br />
name.<br />
AP-Miniplant - Operation Manual Mini Batch Plant Page 42
Screen for <strong>recipe</strong> definition<br />
Recipes will be defined in the form shown above. Each register is a step.<br />
It is possible to change values in this form during the <strong>recipe</strong> is executed. It can take up to 10 seconds<br />
until the new value can be seen on the operator screen. The changes you make at the <strong>recipe</strong> during<br />
operation are resident and still valid when doing this <strong>recipe</strong> the next time.<br />
The most important parameter is the condition, where the steps are terminated and the next step is<br />
started. The other input fields allow you to enter the different set-points, ramps, constant values,<br />
on/off-values.<br />
This program can cause an error during evaluation of a macro-program. You should always answer<br />
the Windows-message with “stop program”. In this case the worksheet will appear again and you may<br />
have to start the program again with the button in the <strong>recipe</strong>-table.<br />
IMPORTANT:<br />
Do not push the „Stop“-Button and the safety question by mistake. Your experiment can be<br />
worthless.<br />
AP-Miniplant - Operation Manual Mini Batch Plant Page 43
Important:<br />
To be sure that a <strong>recipe</strong> value has been taken over into the Excel-worksheet, you have to leave the changed<br />
field button with the “Enter”- button or you have to press the acknowledge button.<br />
To be sure that your <strong>recipe</strong> has properly taken over all your important changes, just change the Step once<br />
to come back to the original one.<br />
Do not change the name or the place of the data file <strong>recipe</strong>.xls<br />
5.2.1 Change of Step<br />
The most important parameter is the one where you define how your step is terminated. In this plant<br />
you have the possibilities<br />
"time of step reached"<br />
"temperature of reactor reached"<br />
"pressure of reactor reached" (only possible in overpressure mode)<br />
"dosing mass of liquid feed reached"<br />
"dosing mass of solid feed reached"<br />
"torque of stirrer reactor reached"<br />
"change of step manually"<br />
"purge system w. pressure successful"<br />
"pressure test successful"<br />
5.2.2 Process parameter input<br />
The rest are the process values and set points you can send to the control system during a running<br />
Step. This is more or less self explaining for somebody who knows the plant.<br />
For some set points you have the possibility to enter a value for the Beginning and one for the End of<br />
a Step. A ramp will be calculated between this 2 values. This is only possible for time terminated<br />
steps. If you want a constant value, you have to enter the same value in both fields.<br />
The window structure is dynamic and some values are only visible in a certain constellation. For<br />
example if you are in a step where reaching a certain temperature will terminate the step, nobody<br />
knows exactly when this point is reached. Therefore it does not make a sense to enter a ramp function<br />
for the temperature set point. This is only useful in a time-terminated step. So in this case only one<br />
input field for the temperature set point is given.<br />
IMPORTANT:<br />
If you select or , be sure that your values in the<br />
inertisation sub screen in WinCC are as you want them. They are used and can not be<br />
influenced by the <strong>recipe</strong>.<br />
DANGER:<br />
If you select be aware of the fact that hydrogen is used to build up<br />
overpressure in any case, except there is Helium connected to the hydrogen input.<br />
5.2.3 Choosing a <strong>recipe</strong> or create a new one<br />
Recipes can be chosen in the Field right top of the screen left of the button. Please note that<br />
after choosing the <strong>recipe</strong> you have to press the enter button to show its parameters in the Register.<br />
AP-Miniplant - Operation Manual Mini Batch Plant Page 44
To delete <strong>recipe</strong>s you have to go to the Excel worksheet and delete it manually. This is only allowed<br />
for experts.<br />
Important:<br />
Make sure that you have a copy of the file before you delete single tables. Never delete the<br />
table named “data”. It is a necessary table for the start parameters and the file for stored data.<br />
New <strong>recipe</strong>s will always be created on the basis of an existing one. Please press the button top<br />
right of the screen. Choose a <strong>recipe</strong> as a basis. Enter the name of the new <strong>recipe</strong> and press .<br />
5.2.4 Step Name and Overview<br />
Under the Tab strip you can enter the name of the Step. The number will be generated automatically<br />
with a proceeding “S” for Step. Short names are recommended to keep the register smaller.<br />
If the register is wider than the screen, small arrows will appear top right which allow you to scroll to<br />
the steps in the invisible area.<br />
With the button you can go<br />
into a screen showing all the<br />
programmed steps.<br />
Selecting and double clicking a step<br />
brings you directly to this step in the<br />
<strong>recipe</strong> definition screen.<br />
AP-Miniplant - Operation Manual Mini Batch Plant Page 45
5.2.5 Paste new steps and delete steps<br />
New steps are generated copying old steps. You just go on the step you want to copy and press the<br />
button. Afterwards you can alter the values.<br />
A selected step will be deleted using the button. It is not possible to undo this operation.<br />
5.2.6 Recipe Start and Stop<br />
Input screen for identification data before the <strong>recipe</strong> is started<br />
Pressing the button opens another window. Here you have to enter the data to identify your<br />
experiment. It is also used to generate the file name. Therefore it is necessary, that your identification<br />
code is unique. The name of the data file is “Project”_”Experiment No.”_”Experiment Index”.xls. In the<br />
example above it would be P1_A01_21.xls. The data is stored in a folder named “Data” which is a<br />
subfolder of the named as the operator.<br />
The field table length gives you the possibility to define the length of a table of data which you select<br />
by making the cells in line 299 bold which you want to have in there.<br />
Important:<br />
If you press the button during a <strong>recipe</strong> by mistake and acknowledge the safety Question of<br />
the system with yes, your experiment is stopped.<br />
5.2.7 Data Acquisition<br />
To register the values you have to click the appropriate checkbox “data logging active” top left of the<br />
window.<br />
The button shows another form which will give you the possibilities you need after doing the<br />
experiments. You can generate curves, enter analytical values, show a table of the measured values.<br />
You can also open the files manually. They have a write-protection. The password to change the files<br />
is “example”.<br />
AP-Miniplant - Operation Manual Mini Batch Plant Page 46