c100r-5d/bwt
c100r-5d/bwt
c100r-5d/bwt

Create successful ePaper yourself
Turn your PDF publications into a flip-book with our unique Google optimized e-Paper software.
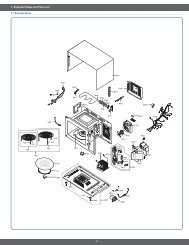
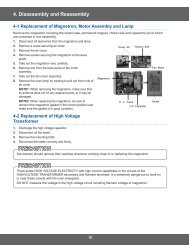
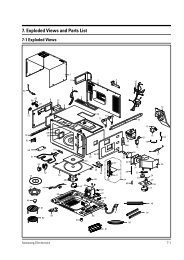
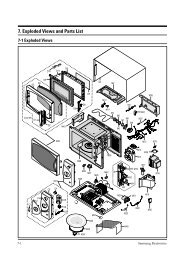
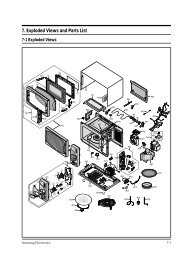
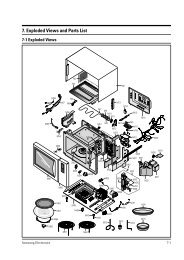
4. Disassembly and Reassembly<br />
4-1 Replacement of Magnetron, Motor Assembly and Lamp<br />
Remove the magnetron including the shield case, permanent magnet, choke coils and capacitors (all of which<br />
are contained in one assembly).<br />
1. Disconnect all lead wires from the magnetron and lamp.<br />
2. Remove a screw securing air cover.<br />
3. Remove the air cover.<br />
4. Remove screws securing the magnetron to the wave<br />
guide.<br />
5. Take out the magnetron very carefully.<br />
6. Remove tow from the back panel of fan motor<br />
assembly.<br />
7. Take out the fan motor assembly.<br />
8. Remove the oven lamp by rotating to pull out from hole of<br />
air cover.<br />
NOTE1: When removing the magnetron, make sure that<br />
its antenna does not hit any adjacent parts, or it may be<br />
damaged.<br />
NOTE2: When replacing the magnetron, be sure to<br />
remount the magnetron gasket in the correct position and<br />
make sure the gasket is in good condition.<br />
4-2 Replacement of High Voltage<br />
Transformer<br />
1. Discharge the high voltage capacitor.<br />
2. Disconnect all the leads.<br />
3. Remove the mounting bolts.<br />
4. Reconnect the leads correctly and firmly.<br />
Servicemen should remove their watches whenever working close to or replacing the magnetron.<br />
There exists HIGH VOLTAGE ELECTRICITY with high current capabilities in the circuits of the<br />
HIGHVOLTAGE TRANSFORMER secondary and filament terminals. It is extremely dangerous to work on<br />
or near these circuits with the oven energized.<br />
DO NOT measure the voltage in the high voltage circuit including filament voltage of magnetron.<br />
10<br />
Magnetron<br />
Cover Air<br />
Thermo S/W<br />
H. V. Trans<br />
H.V Capacitor<br />
Fan Motor<br />
Screw