c100r-5d/bwt
c100r-5d/bwt
c100r-5d/bwt

You also want an ePaper? Increase the reach of your titles
YUMPU automatically turns print PDFs into web optimized ePapers that Google loves.
4. Disassembly and Reassembly<br />
4-3 Replacement of Door Assembly (Continued)<br />
4-3-6 Reassembly Test<br />
After replacement of the defective component parts of the door, reassemble it and follow the<br />
instructions below for proper installation and adjustment so as to prevent an excessive microwave<br />
leakage.<br />
1. When mounting the door to the oven, be sure to adjust the door parallel to the bottom line of the oven face plate<br />
by moving the upper hinge and lower hinge in the direction necessary for proper alignment.<br />
2. Adjust so that the door has no play between the inner door surface and oven front surface. If the door assembly is<br />
not mounted properly, microwave energy may leak from the space between the door and oven.<br />
3. Do the microwave leakage test.<br />
4-4 Replacement of Fuse<br />
1. Disconnect the oven from the power source.<br />
2. When 12A fuse blows out by the operation of interlock monitor switch failure, replace the primary interlock switch,<br />
door sensing switch, monitor switch and power relay.<br />
3. When the above three switches operate properly, check if any other part such as the control circuit board, blower<br />
motor or high voltage transformer is defective.<br />
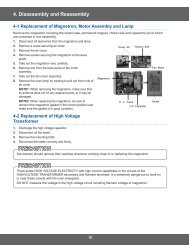
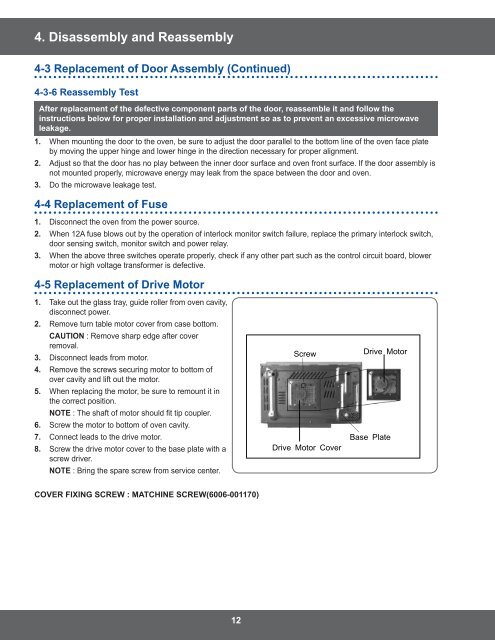
4-5 Replacement of Drive Motor<br />
1. Take out the glass tray, guide roller from oven cavity,<br />
disconnect power.<br />
2. Remove turn table motor cover from case bottom.<br />
CAUTION : Remove sharp edge after cover<br />
removal.<br />
3. Disconnect leads from motor.<br />
4. Remove the screws securing motor to bottom of<br />
over cavity and lift out the motor.<br />
5. When replacing the motor, be sure to remount it in<br />
the correct position.<br />
NOTE : The shaft of motor should fit tip coupler.<br />
6. Screw the motor to bottom of oven cavity.<br />
7. Connect leads to the drive motor.<br />
8. Screw the drive motor cover to the base plate with a<br />
screw driver.<br />
NOTE : Bring the spare screw from service center.<br />
COVER FIXING SCREW : MATCHINE SCREW(6006-001170)<br />
12<br />
Screw<br />
Drive Motor Cover<br />
Drive Motor<br />
Base Plate