Bose® in-ear headphones - Electronic Warehouse
Bose® in-ear headphones - Electronic Warehouse
Bose® in-ear headphones - Electronic Warehouse

You also want an ePaper? Increase the reach of your titles
YUMPU automatically turns print PDFs into web optimized ePapers that Google loves.
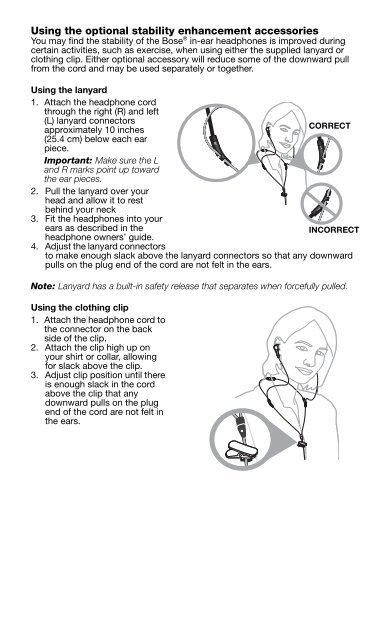
Us<strong>in</strong>g the optional stability enhancement accessories<br />
You may f<strong>in</strong>d the stability of the Bose ® <strong>in</strong>-<strong>ear</strong> <strong>headphones</strong> is improved dur<strong>in</strong>g<br />
certa<strong>in</strong> activities, such as exercise, when us<strong>in</strong>g either the supplied lanyard or<br />
cloth<strong>in</strong>g clip. Either optional accessory will reduce some of the downward pull<br />
from the cord and may be used separately or together.<br />
Us<strong>in</strong>g the lanyard<br />
1. Attach the headphone cord<br />
through the right (R) and left<br />
(L) lanyard connectors<br />
CORRECT<br />
approximately 10 <strong>in</strong>ches<br />
(25.4 cm) below each <strong>ear</strong><br />
piece.<br />
Important: Make sure the L<br />
and R marks po<strong>in</strong>t up toward<br />
the <strong>ear</strong> pieces.<br />
2. Pull the lanyard over your<br />
head and allow it to rest<br />
beh<strong>in</strong>d your neck<br />
3. Fit the <strong>headphones</strong> <strong>in</strong>to your<br />
<strong>ear</strong>s as described <strong>in</strong> the<br />
INCORRECT<br />
headphone owners’ guide.<br />
4. Adjust the lanyard connectors<br />
to make enough slack above the lanyard connectors so that any downward<br />
pulls on the plug end of the cord are not felt <strong>in</strong> the <strong>ear</strong>s.<br />
Note: Lanyard has a built-<strong>in</strong> safety release that separates when forcefully pulled.<br />
Us<strong>in</strong>g the cloth<strong>in</strong>g clip<br />
1. Attach the headphone cord to<br />
the connector on the back<br />
side of the clip.<br />
2. Attach the clip high up on<br />
your shirt or collar, allow<strong>in</strong>g<br />
for slack above the clip.<br />
3. Adjust clip position until there<br />
is enough slack <strong>in</strong> the cord<br />
above the clip that any<br />
downward pulls on the plug<br />
end of the cord are not felt <strong>in</strong><br />
the <strong>ear</strong>s.