Pure Fun 12' Trampoline/Enclosure Set Model No. 9012TS Owner's ...
Pure Fun 12' Trampoline/Enclosure Set Model No. 9012TS Owner's ...
Pure Fun 12' Trampoline/Enclosure Set Model No. 9012TS Owner's ...
Create successful ePaper yourself
Turn your PDF publications into a flip-book with our unique Google optimized e-Paper software.
STEP 2 – TOP RAIL AND SUPPORT ASSEMBLY<br />
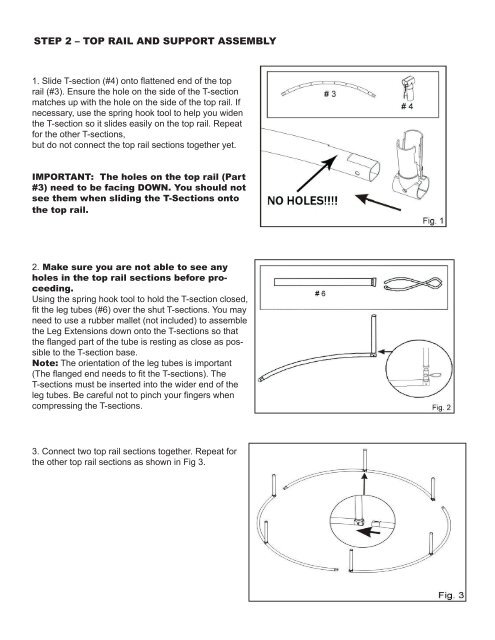
1. Slide T-section (#4) onto flattened end of the top<br />
rail (#3). Ensure the hole on the side of the T-section<br />
matches up with the hole on the side of the top rail. If<br />
necessary, use the spring hook tool to help you widen<br />
the T-section so it slides easily on the top rail. Repeat<br />
for the other T-sections,<br />
but do not connect the top rail sections together yet.<br />
IMPORTANT: The holes on the top rail (Part<br />
#3) need to be facing DOWN. You should not<br />
see them when sliding the T-Sections onto<br />
the top rail.<br />
2. Make sure you are not able to see any<br />
holes in the top rail sections before proceeding.<br />
Using the spring hook tool to hold the T-section closed,<br />
fit the leg tubes (#6) over the shut T-sections. You may<br />
need to use a rubber mallet (not included) to assemble<br />
the Leg Extensions down onto the T-sections so that<br />
the flanged part of the tube is resting as close as possible<br />
to the T-section base.<br />
<strong>No</strong>te: The orientation of the leg tubes is important<br />
(The flanged end needs to fit the T-sections). The<br />
T-sections must be inserted into the wider end of the<br />
leg tubes. Be careful not to pinch your fingers when<br />
compressing the T-sections.<br />
3. Connect two top rail sections together. Repeat for<br />
the other top rail sections as shown in Fig 3.


