ee pulse - EEWeb
ee pulse - EEWeb
ee pulse - EEWeb

Create successful ePaper yourself
Turn your PDF publications into a flip-book with our unique Google optimized e-Paper software.
TECHNICAL ARTICLE<br />
can go on during the delay function, so in effect, it brings<br />
most other activity to a halt. For alternative approaches<br />
to controlling timing, s<strong>ee</strong> the millis() function [8] used<br />
on line 49 in the sketch below. Arduino veterans usually<br />
avoid the use of delay() for timing of events longer than<br />
10’s of milliseconds unless the Arduino sketch is very<br />
simple.<br />
However, certain things do go on while the delay() function<br />
is controlling the Atmega chip because the delay function<br />
does not disable interrupts. Serial communication that<br />
appears at the RX pin is recorded, PWM (analogWrite)<br />
values and pin states are maintained, and interrupts will<br />
work as they should.<br />
Author’s Comment<br />
From what we have s<strong>ee</strong>n above, the delay()<br />
implementation behaves like a busy loop with interrupts<br />
enabled.<br />
Variables<br />
A variable is a place for storing a piece of data. It has<br />
a name, a type, and a value. For example, the line 26<br />
from the sketch above declares a variable with the name<br />
ledPin, the type int, and an initial value of 13. It’s being<br />
used to indicate which Arduino pin the LED is connected<br />
to and since it never changes, it’s declared as const,<br />
which could give the linker a hint to place it in a section<br />
other then precious RAM. Every time the name ledPin<br />
appears in the code, its value will be retrieved. In this<br />
case, the person writing the program could have chosen<br />
not to bother creating the ledPin variable and could have<br />
simply written 13 everywhere they n<strong>ee</strong>ded to specify a<br />
pin number instead. The advantage of using a variable<br />
is that it’s easier to move the LED to a different pin—you<br />
only n<strong>ee</strong>d to edit the one line that assigns the initial value<br />
to the variable.<br />
Often, however, the value of a variable will change while<br />
the sketch runs (lines 29, 34, 49). Due to the lack of<br />
insightful comments, it’s not quite obvious to me why the<br />
variable in line 30 is not defined as const as well since it<br />
does not change.<br />
Functions<br />
A function (otherwise known as a procedure or subroutine)<br />
is a named piece of code that can be used from<br />
elsewhere in a sketch. The setup() function [9] as s<strong>ee</strong>n in<br />
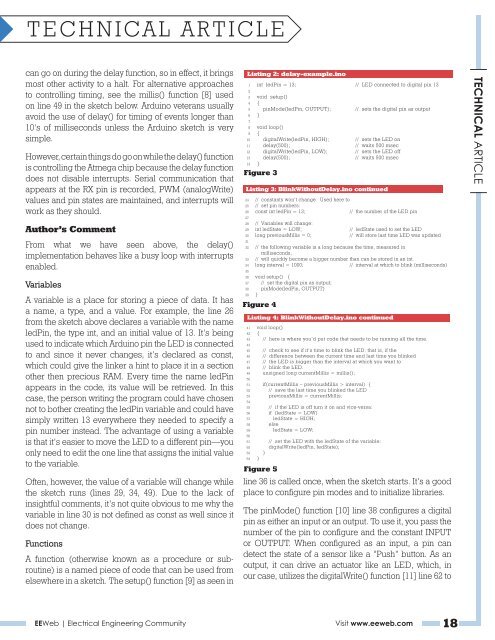
Listing 2: delay-example.ino<br />
int ledPin = 13; // LED connected to digital pin 13<br />
1<br />
2<br />
3<br />
4<br />
5<br />
6<br />
7<br />
8<br />
9<br />
10<br />
11<br />
12<br />
13<br />
14<br />
void setup()<br />
{<br />
pinMode(ledPin, OUTPUT); // sets the digital pin as output<br />
}<br />
void loop()<br />
{<br />
digitalWrite(ledPin, HIGH); // sets the LED on<br />
delay(500); // waits 500 msec<br />
digitalWrite(ledPin, LOW); // sets the LED off<br />
delay(500); // waits 500 msec<br />
}<br />
Figure 3<br />
Listing 3: BlinkWithoutDelay.ino continued<br />
24 // constants won’t change. Used here to<br />
25 // set pin numbers:<br />
26<br />
27<br />
const int ledPin = 13; // the number of the LED pin<br />
28 // Variables will change:<br />
29 int ledState = LOW; // ledState used to set the LED<br />
30<br />
31<br />
long previousMillis = 0; // will store last time LED was updated<br />
32 // the following variable is a long because the time, measured in<br />
milliseconds,<br />
33 // will quickly become a bigger number than can be stored in an int.<br />
34<br />
35<br />
long interval = 1000; // interval at which to blink (milliseconds)<br />
36 void setup() {<br />
37 // set the digital pin as output;<br />
38 pinMode(ledPin, OUTPUT)<br />
39 }<br />
Figure 4<br />
Listing 4: BlinkWithoutDelay.ino continued<br />
41 void loop()<br />
42 {<br />
43<br />
44<br />
// here is where you’d put code that n<strong>ee</strong>ds to be running all the time.<br />
45 // check to s<strong>ee</strong> if it’s time to blink the LED; that is, if the<br />
46 // difference betw<strong>ee</strong>n the current time and last time you blinked<br />
47 // the LED is bigger than the interval at which you want to<br />
48 // blink the LED.<br />
49<br />
50<br />
unsigned long currentMillis = millis();<br />
51 if(currentMillis – previousMillis > interval) {<br />
52 // save the last time you blinked the LED<br />
53<br />
54<br />
previousMillis = currentMillis;<br />
55 // if the LED is off turn it on and vice-versa:<br />
56 if (ledState = LOW)<br />
57 ledState = HIGH;<br />
58 else<br />
59<br />
60<br />
ledState = LOW;<br />
61 // set the LED with the ledState of the variable:<br />
62 digitalWrite(ledPin, ledState);<br />
63 }<br />
64 }<br />
Figure 5<br />
line 36 is called once, when the sketch starts. It’s a good<br />
place to configure pin modes and to initialize libraries.<br />
The pinMode() function [10] line 38 configures a digital<br />
pin as either an input or an output. To use it, you pass the<br />
number of the pin to configure and the constant INPUT<br />
or OUTPUT. When configured as an input, a pin can<br />
detect the state of a sensor like a “Push” button. As an<br />
output, it can drive an actuator like an LED, which, in<br />
our case, utilizes the digitalWrite() function [11] line 62 to<br />
<strong>EEWeb</strong> | Electrical Engin<strong>ee</strong>ring Community Visit www.<strong>ee</strong>web.com 18<br />
TECHNICAL ARTICLE