HDG Navora Manual - Euroheat
HDG Navora Manual - Euroheat
HDG Navora Manual - Euroheat

Create successful ePaper yourself
Turn your PDF publications into a flip-book with our unique Google optimized e-Paper software.
Operation <strong>Manual</strong><br />
<strong>HDG</strong> <strong>Navora</strong> 20/25/30 with<br />
<strong>HDG</strong> Lambda Control 1<br />
hdg-bavaria.com<br />
V 02 - 06/2008
Content<br />
Operation <strong>Manual</strong> <strong>HDG</strong> <strong>Navora</strong> 20/25/30 with <strong>HDG</strong> Lambda Control 1 - Content<br />
1 Notes on this manual . . . . . . . . . . . . . . . . . . . . . . . . . . . . . . . . . . . . . . . . . . . . . . . 5<br />
1.1 Introduction . . . . . . . . . . . . . . . . . . . . . . . . . . . . . . . . . . . . . . . . . . . . . . . . . . . . . . .5<br />
1.2 Structure of the operating manual . . . . . . . . . . . . . . . . . . . . . . . . . . . . . . . . . . . . .6<br />
1.3 Glossary . . . . . . . . . . . . . . . . . . . . . . . . . . . . . . . . . . . . . . . . . . . . . . . . . . . . . . . . . .7<br />
2 Safety notes . . . . . . . . . . . . . . . . . . . . . . . . . . . . . . . . . . . . . . . . . . . . . . . . . . . . . . . 8<br />
2.1 Intended use . . . . . . . . . . . . . . . . . . . . . . . . . . . . . . . . . . . . . . . . . . . . . . . . . . . . . .8<br />
Useful Organisations . . . . . . . . . . . . . . . . . . . . . . . . . . . . . . . . . . . . . . . . . . . . . .9<br />
Basic principles for the construction of the system . . . . . . . . . . . . . . . . . . . . . .9<br />
Proper and improper manner of operation . . . . . . . . . . . . . . . . . . . . . . . . . . . . .9<br />
2.2 Residual risk. . . . . . . . . . . . . . . . . . . . . . . . . . . . . . . . . . . . . . . . . . . . . . . . . . . . . . 10<br />
2.3 Warnings and safety symbols used . . . . . . . . . . . . . . . . . . . . . . . . . . . . . . . . . . . 11<br />
2.4 Duty to inform . . . . . . . . . . . . . . . . . . . . . . . . . . . . . . . . . . . . . . . . . . . . . . . . . . . . 13<br />
3 Functional description. . . . . . . . . . . . . . . . . . . . . . . . . . . . . . . . . . . . . . . . . . . . . . 14<br />
3.1 Sectional view . . . . . . . . . . . . . . . . . . . . . . . . . . . . . . . . . . . . . . . . . . . . . . . . . . . . 14<br />
3.2 Mode of operation . . . . . . . . . . . . . . . . . . . . . . . . . . . . . . . . . . . . . . . . . . . . . . . . . 17<br />
<strong>HDG</strong> <strong>Navora</strong> 20/25/30 with <strong>HDG</strong> Lambda Control 1 boiler . . . . . . . . . . . . . . . 17<br />
3.3 Technical data . . . . . . . . . . . . . . . . . . . . . . . . . . . . . . . . . . . . . . . . . . . . . . . . . . . . 19<br />
3.4 Fuel quality requirements . . . . . . . . . . . . . . . . . . . . . . . . . . . . . . . . . . . . . . . . . . .20<br />
Residual moisture content . . . . . . . . . . . . . . . . . . . . . . . . . . . . . . . . . . . . . . . . .20<br />
Recommendation from <strong>HDG</strong> Bavaria GmbH . . . . . . . . . . . . . . . . . . . . . . . . . . .20<br />
4 Using the <strong>HDG</strong> <strong>Navora</strong> Wood Boiler. . . . . . . . . . . . . . . . . . . . . . . . . . . . . . . . . . . 21<br />
4.1 Overview of the controls and display components. . . . . . . . . . . . . . . . . . . . . . . 21<br />
Control panel <strong>HDG</strong> Lambda Control 1 . . . . . . . . . . . . . . . . . . . . . . . . . . . . . . . . 21<br />
4.2 Initialising the system . . . . . . . . . . . . . . . . . . . . . . . . . . . . . . . . . . . . . . . . . . . . . .23<br />
Requirements . . . . . . . . . . . . . . . . . . . . . . . . . . . . . . . . . . . . . . . . . . . . . . . . . . .23<br />
Emergency heating switch . . . . . . . . . . . . . . . . . . . . . . . . . . . . . . . . . . . . . . . . .23<br />
4.3 Structure of the menus . . . . . . . . . . . . . . . . . . . . . . . . . . . . . . . . . . . . . . . . . . . . .24<br />
“Heat production off” menu structure . . . . . . . . . . . . . . . . . . . . . . . . . . . . . . .24<br />
“Heat production on” menu structure. . . . . . . . . . . . . . . . . . . . . . . . . . . . . . . .25<br />
4.4 Displaying information . . . . . . . . . . . . . . . . . . . . . . . . . . . . . . . . . . . . . . . . . . . . .26<br />
Requirements . . . . . . . . . . . . . . . . . . . . . . . . . . . . . . . . . . . . . . . . . . . . . . . . . . .26<br />
How to display information . . . . . . . . . . . . . . . . . . . . . . . . . . . . . . . . . . . . . . . .26<br />
4.5 User changeable settings . . . . . . . . . . . . . . . . . . . . . . . . . . . . . . . . . . . . . . . . . . .29<br />
Requirements . . . . . . . . . . . . . . . . . . . . . . . . . . . . . . . . . . . . . . . . . . . . . . . . . . .29<br />
Setting the boiler temperature. . . . . . . . . . . . . . . . . . . . . . . . . . . . . . . . . . . . . .29<br />
4.6 Lighting and refuelling the <strong>HDG</strong> <strong>Navora</strong> . . . . . . . . . . . . . . . . . . . . . . . . . . . . . . .30<br />
How to proceed . . . . . . . . . . . . . . . . . . . . . . . . . . . . . . . . . . . . . . . . . . . . . . . . . .30<br />
© <strong>HDG</strong> Bavaria GmbH 06/2008 <strong>HDG</strong> <strong>Navora</strong> 20/25/30 with <strong>HDG</strong> Lambda Control 1 - V 2 - en<br />
3
4<br />
Operation <strong>Manual</strong> <strong>HDG</strong> <strong>Navora</strong> 20/25/30 with <strong>HDG</strong> Lambda Control 1 - Content<br />
5 Cleaning and maintaining the <strong>HDG</strong> <strong>Navora</strong> . . . . . . . . . . . . . . . . . . . . . . . . . . . . 39<br />
5.1 Cleaning and maintenance plan. . . . . . . . . . . . . . . . . . . . . . . . . . . . . . . . . . . . . . 39<br />
5.2 How to proceed . . . . . . . . . . . . . . . . . . . . . . . . . . . . . . . . . . . . . . . . . . . . . . . . . . . 40<br />
Inspecting the heat exchanger cleaning system . . . . . . . . . . . . . . . . . . . . . . . 41<br />
Removing ashes from the post-combustion chamber and<br />
ash compartment . . . . . . . . . . . . . . . . . . . . . . . . . . . . . . . . . . . . . . . . . . . . . . . . 43<br />
Inspecting the heat exchanger cleaning system . . . . . . . . . . . . . . . . . . . . . . . 45<br />
Check the flue and clean if necessary. . . . . . . . . . . . . . . . . . . . . . . . . . . . . . . . 47<br />
Check the oxygen sensor and clean if necessary. . . . . . . . . . . . . . . . . . . . . . . 48<br />
Inspecting and cleaning the flue gas sensor . . . . . . . . . . . . . . . . . . . . . . . . . . 49<br />
Inspecting and cleaning the flue fan. . . . . . . . . . . . . . . . . . . . . . . . . . . . . . . . . 50<br />
Check the primary and secondary air acuators . . . . . . . . . . . . . . . . . . . . . . . . 52<br />
Inspecting the integrity of the door seals. . . . . . . . . . . . . . . . . . . . . . . . . . . . . 53<br />
Clean the control panel . . . . . . . . . . . . . . . . . . . . . . . . . . . . . . . . . . . . . . . . . . . 55<br />
Calibrate the oxygen sensor . . . . . . . . . . . . . . . . . . . . . . . . . . . . . . . . . . . . . . . 55<br />
Clean the panels and the primary air inlets . . . . . . . . . . . . . . . . . . . . . . . . . . . 56<br />
6 Troubleshooting . . . . . . . . . . . . . . . . . . . . . . . . . . . . . . . . . . . . . . . . . . . . . . . . . . 60<br />
6.1 How to proceed . . . . . . . . . . . . . . . . . . . . . . . . . . . . . . . . . . . . . . . . . . . . . . . . . . . 60<br />
6.2 Possible faults . . . . . . . . . . . . . . . . . . . . . . . . . . . . . . . . . . . . . . . . . . . . . . . . . . . . 61<br />
Faults which do not interrupt the production of heat . . . . . . . . . . . . . . . . . . . 61<br />
Faults which interrupt the production of heat . . . . . . . . . . . . . . . . . . . . . . . . . 62<br />
7 Commissioning the <strong>HDG</strong> <strong>Navora</strong> . . . . . . . . . . . . . . . . . . . . . . . . . . . . . . . . . . . . . 63<br />
7.1 Conditions . . . . . . . . . . . . . . . . . . . . . . . . . . . . . . . . . . . . . . . . . . . . . . . . . . . . . . . 63<br />
7.2 Commissioning the <strong>HDG</strong> <strong>Navora</strong> . . . . . . . . . . . . . . . . . . . . . . . . . . . . . . . . . . . . . 64<br />
Switching <strong>HDG</strong> <strong>Navora</strong> on . . . . . . . . . . . . . . . . . . . . . . . . . . . . . . . . . . . . . . . . . 64<br />
Configuring the control . . . . . . . . . . . . . . . . . . . . . . . . . . . . . . . . . . . . . . . . . . . 64<br />
Setting the target boiler temperature. . . . . . . . . . . . . . . . . . . . . . . . . . . . . . . . 67<br />
Customer data . . . . . . . . . . . . . . . . . . . . . . . . . . . . . . . . . . . . . . . . . . . . . . . . . . 68<br />
Memorandum for set values . . . . . . . . . . . . . . . . . . . . . . . . . . . . . . . . . . . . . . . 68<br />
Testing system components . . . . . . . . . . . . . . . . . . . . . . . . . . . . . . . . . . . . . . . 69<br />
8 Notes on dismantling and disposal . . . . . . . . . . . . . . . . . . . . . . . . . . . . . . . . . . 72<br />
8.1 Dismantling . . . . . . . . . . . . . . . . . . . . . . . . . . . . . . . . . . . . . . . . . . . . . . . . . . . . . . 72<br />
8.2 Disposal . . . . . . . . . . . . . . . . . . . . . . . . . . . . . . . . . . . . . . . . . . . . . . . . . . . . . . . . . 73<br />
9 Warranty and extended warranty . . . . . . . . . . . . . . . . . . . . . . . . . . . . . . . . . . . . 74<br />
9.1 Specification . . . . . . . . . . . . . . . . . . . . . . . . . . . . . . . . . . . . . . . . . . . . . . . . . . . . . 74<br />
9.2 Extended warranty conditions . . . . . . . . . . . . . . . . . . . . . . . . . . . . . . . . . . . . . . . 74<br />
9.3 Warranty exclusions . . . . . . . . . . . . . . . . . . . . . . . . . . . . . . . . . . . . . . . . . . . . . . . 75<br />
10 Declaration of conformity . . . . . . . . . . . . . . . . . . . . . . . . . . . . . . . . . . . . . . . . . . 76<br />
<strong>HDG</strong> <strong>Navora</strong> 20/25/30 with <strong>HDG</strong> Lambda Control 1 - V 2 - en © <strong>HDG</strong> Bavaria GmbH 06/2008
1 Notes on this manual<br />
1.1 Introduction<br />
Safe and simple<br />
operation<br />
Reading the Operation<br />
<strong>Manual</strong><br />
1 Notes on this manual – Introduction<br />
This Operation <strong>Manual</strong> contains important information for proper<br />
and safe operation of the <strong>HDG</strong> <strong>Navora</strong> 20/25/30 with <strong>HDG</strong> Lambda<br />
Control 1 boiler. Following these instructions means that danger can<br />
be avoided, repair costs and breakdowns can be prevented,<br />
reliability can be maintained and that the operational life of the<br />
heating system can be increased.<br />
This Operation <strong>Manual</strong> must be read and applied by everyone who<br />
operates or works on the <strong>HDG</strong> <strong>Navora</strong> 20/25/30 with <strong>HDG</strong> Lambda<br />
Control 1 boiler.<br />
Technical changes We continuously develop and improve our boilers. The information<br />
in this version was correct at the time of going to press.<br />
We reserve the right to make changes which may then deviate from<br />
the technical details and illustrations in this Operation <strong>Manual</strong>.<br />
Copyright Written agreement is required from <strong>HDG</strong> Bavaria GmbH for any<br />
reprints, storage in a data-processing system or transmission by<br />
electronic, mechanical, photographic or any other means, for copies<br />
or translations of this publication, in whole or in part.<br />
Symbols used In this Operation <strong>Manual</strong> the following presentation or symbols will<br />
be used for particularly important information:<br />
1. Instructions to the operator<br />
2. Work through the steps in the sequence specified.<br />
✓ The result of the action described<br />
✎ Cross reference for more explanation<br />
• List<br />
– List<br />
© <strong>HDG</strong> Bavaria GmbH 06/2008 <strong>HDG</strong> <strong>Navora</strong> 20/25/30 with <strong>HDG</strong> Lambda Control 1 - V 2 - en<br />
5
6<br />
1 Notes on this manual – Structure of the operating manual<br />
1.2 Structure of the operating manual<br />
Chapter Here you see, ...<br />
The operating manual is structured as follows:<br />
1 Notes on this manual ... how to use this operating manual.<br />
2 Safety notes ... everything on the subject of safety that you should consider<br />
when using the <strong>HDG</strong> <strong>Navora</strong>.<br />
3 Functional description ... the structure and all of the features of the <strong>HDG</strong> <strong>Navora</strong>.<br />
4 Using the <strong>HDG</strong> <strong>Navora</strong> ... how to properly operate the <strong>HDG</strong> <strong>Navora</strong>.<br />
5 Cleaning and maintaining the<br />
<strong>HDG</strong> <strong>Navora</strong><br />
... how you can clean the <strong>HDG</strong> <strong>Navora</strong> and who is responsible for<br />
its maintenance.<br />
6 Troubleshooting ... how you can remedy faults in the heating system.<br />
7 Commissioning the <strong>HDG</strong><br />
<strong>Navora</strong><br />
8 Notes on dismantling and<br />
disposal<br />
... how the <strong>HDG</strong> <strong>Navora</strong> is to be put into service.<br />
... what has to be considered when dismantling and disposing of<br />
the <strong>HDG</strong> <strong>Navora</strong>.<br />
9 Warranty ... what the terms and conditions of the warranty are.<br />
10 Appendix ... the EC Declaration of Conformity.<br />
Table 1/1 - Structure of the operating manual<br />
<strong>HDG</strong> <strong>Navora</strong> 20/25/30 with <strong>HDG</strong> Lambda Control 1 - V 2 - en © <strong>HDG</strong> Bavaria GmbH 06/2008
1.3 Glossary<br />
Term Explanation<br />
1 Notes on this manual – Glossary<br />
Actuator This is a component which carries out a certain function in the<br />
heating system.<br />
Display Display of the <strong>HDG</strong> Lambda Control unit.<br />
Flue fan Creates a negative pressure inside the boiler and supplies the<br />
boiler with air for combustion.<br />
Flue gas by-pass flap Facilitates the extraction of flue gas when the filling chute is<br />
opened and during refilling.<br />
<strong>HDG</strong> Lambda Control Microprocessor controller to regulate combustion and the heating<br />
of the accumulator.<br />
<strong>HDG</strong> <strong>Navora</strong> 20/25/30 with<br />
<strong>HDG</strong> Lambda Control 1<br />
Boiler for burning split logs.<br />
Oxygen sensor Electrical component which monitors residual oxygen levels in the<br />
flue gas.<br />
Plug board Pre-fabricated connection strip for connecting electrical<br />
components<br />
Refill button Button that must be pressed before the boiler is opened for<br />
refilling, or lighting a fire.<br />
Refill signal Electrical signal (in the form of an LED on the Lambda Control<br />
panel) which serves as a prompt to refill the fuelling chamber.<br />
Sensor Monitors certain parameters (e.g. temperature) and forwards<br />
them to the control system for analysis.<br />
Thermal safety device Safety device which allows cold water to flow through the safety<br />
heat exchanger if the boiler becomes too hot.<br />
Table 1/2 - Glossary<br />
© <strong>HDG</strong> Bavaria GmbH 06/2008 <strong>HDG</strong> <strong>Navora</strong> 20/25/30 with <strong>HDG</strong> Lambda Control 1 - V 2 - en<br />
7
8<br />
2 Safety notes – Intended use<br />
2 Safety notes<br />
2.1 Intended use<br />
Please note that it is a legal requirement under England and Wales<br />
Building Regulations that the installation of the appliance is either<br />
carried out under Local Authority Building Control approval or is<br />
installed by a Competent Person registered with a Government<br />
approved Competent Persons Scheme. HETAS Ltd operate such a<br />
Scheme and a listing of their Registered Competent Persons can be<br />
found on their website at www.hetas.co.uk.<br />
IMPORTANT<br />
The installation of this appliance must comply with all local<br />
regulations, including those referring to national and European<br />
Standards before it can be operated.<br />
This appliance is not suitable for a shared flue.<br />
Improper adjustment, alteration, maintenance or the fitting of<br />
replacement parts not recommended by the manufacturer can cause<br />
injury or property damage. Do not operate the appliance with faulty<br />
seals or components.<br />
Ensure all manuals are kept safely and are available for the user at<br />
all times.<br />
Do not store or use petrol or other flammable vapours and liquids in<br />
the vicinity of this or any other heating appliance. Do not burn<br />
anything but natural wood.<br />
Due to high operating temperatures of this appliance it should be<br />
located away from pedestrian traffic Advise all persons as to the<br />
appliances high surface temperatures, including visitors. If it is<br />
possible for children or infirm adults to come into contact, fit a<br />
suitable guard. Never let children “help” with the appliance in any<br />
way, even when cold.<br />
It is imperative that all air passageways into, out of, and within the<br />
appliance are kept clean. All permanent ventilation into the room<br />
provided must remain clear and unobstructed at all times.<br />
Consideration must be given to the need for extra ventilation if<br />
another heating source needing air is to be operated<br />
simultaneously. If an extraction fan is proposed to be fitted to a<br />
connecting area of the house, after the stove has been installed,<br />
professional advice should sought from a qualified engineer.<br />
If a flue blockage or adverse weather conditions cause the appliance<br />
to emit smoke, do not treat it as merely a nuisance, this smoke will<br />
indicate that carbon monoxide is being emitted into the room.<br />
In the event of a chimney fire the appliance should be turned to its<br />
minimum setting and the fire brigade informed. Do not re-light until<br />
the complete installation has been inspected by a qualified<br />
engineer.<br />
<strong>HDG</strong> <strong>Navora</strong> 20/25/30 with <strong>HDG</strong> Lambda Control 1 - V 2 - en © <strong>HDG</strong> Bavaria GmbH 06/2008
2 Safety notes – Intended use<br />
The appliance should be inspected regularly and the chimney<br />
cleaned at least annually. More frequent cleaning may be required<br />
and the advice of a qualified chimney sweep should be sought.<br />
Always check for any flue blockage before lighting the stove after a<br />
prolonged shut down.<br />
This appliance has been carefully designed and constructed to give<br />
clean burning with optimum efficiency and safety, but as with all<br />
appliances these standards will not be achieved unless it is installed<br />
and maintained regularly by qualified engineers. It must also be<br />
operated strictly with the procedures given in this manual.<br />
If you are unsure about anything concerning your appliance please<br />
seek professional advice.<br />
Useful Organisations<br />
Name Phone Web<br />
Solid Fuel Association 0845 601 4406 www.solidfuel.co.uk<br />
The National Association of Chimney Sweeps 01785 811732 www.chimneyworks.co.uk<br />
HETAS Ltd. 0845 634 5626 www.hetas.co.uk<br />
Basic principles for the construction of the system<br />
Basic principles The heating system was built using state of the art technology and<br />
conforms to recognised safety regulations. However, its use can<br />
result in the injury or death of the user or a third party or in<br />
impairments to the heating system itself or to other material goods.<br />
Have your specialist heating company provide you with detailed<br />
instructions on the operation of the heating system.<br />
Using the heating system Only use the heating system when it is in perfect condition. Use it<br />
properly, as intended, staying aware of safety and of the dangers<br />
involved, following the Operation <strong>Manual</strong>. Have any faults which<br />
could impair safety immediately fixed.<br />
Application of the<br />
heating system<br />
Table 2/1 - Useful Organisations<br />
Proper and improper manner of operation<br />
The <strong>HDG</strong> <strong>Navora</strong> 20/25/30 with <strong>HDG</strong> Lambda Control 1 boiler is<br />
designed to burn untreated wood in the form of split logs up to<br />
500 mm (19"), pressed briquettes and coarse wood chips, coarse<br />
grade, cross section of maximum 1000 mm2 and not less than<br />
600 m 2 ). Varnished, coated or impregnated wood should never be<br />
used for fuel.<br />
Any other application is considered improper use. The manufacturer<br />
will accept no liability for any damage resulting from improper use.<br />
The operating company bears sole responsibility in such cases.<br />
© <strong>HDG</strong> Bavaria GmbH 06/2008 <strong>HDG</strong> <strong>Navora</strong> 20/25/30 with <strong>HDG</strong> Lambda Control 1 - V 2 - en<br />
9
10<br />
2 Safety notes – Residual risk<br />
UK SMOKE CONTROL<br />
AREAS<br />
2.2 Residual risk<br />
Proper use includes adherence to the installation, operation and<br />
maintenance requirements specified by the manufacturer.<br />
Modification of the specified operating values will affect the heating<br />
system's control program and could lead to malfunctions. Only<br />
trained maintenance and operating personnel may undertake<br />
modifications to the operating values.<br />
The use of materials with other technical burning characteristics<br />
requires comprehensive modification of the control parameters by<br />
qualified specialists.<br />
The <strong>Navora</strong> 20, 25 and 30 models have been recommended for<br />
exemption under Section 21 of the Clean Air Act 1993 for use in<br />
smoke control areas when burning wood logs which are selected in<br />
accordance with the recommendations on fuel in this manual, see<br />
section “3.4 Fuel quality requirements” in chapter “3 Functional<br />
description”.<br />
Despite all precautions, the following residual risks remain:<br />
Caution!<br />
Hot surface.<br />
Contact with the hot surface of the boiler can lead to burns.<br />
Wait until the boiler has cooled down before touching uninsulated<br />
components.<br />
Warning!<br />
Danger of asphyxiation due to carbon monoxide.<br />
If the boiler is operating, carbon monoxide can be emitted through<br />
the open ash or fuel loading door.<br />
Do not leave the ash or fuel loading door open any longer than<br />
necessary.<br />
Caution!<br />
Danger of fire<br />
Working in areas marked with this symbol can lead to a fire.<br />
Do not leave the combustion chamber and/or fuelling chamber<br />
door open any longer than necessary.<br />
<strong>HDG</strong> <strong>Navora</strong> 20/25/30 with <strong>HDG</strong> Lambda Control 1 - V 2 - en © <strong>HDG</strong> Bavaria GmbH 06/2008
2 Safety notes – Warnings and safety symbols used<br />
Caution!<br />
Hand injuries<br />
Working in areas marked with this symbol can lead to hand injuries.<br />
Danger!<br />
Danger from electrical current or voltage.<br />
Work in areas marked with this symbol may only be done by a<br />
qualified electrician.<br />
Danger!<br />
Danger from explosion.<br />
Work in areas marked with this symbol may only be performed<br />
exactly as specified by <strong>HDG</strong> Bavaria.<br />
Improper operation can lead to explosions.<br />
2.3 Warnings and safety symbols used<br />
The following warnings and safety symbols are used in this<br />
Operation <strong>Manual</strong>:<br />
Danger!<br />
Danger from electrical current or voltage.<br />
Work in areas marked with this symbol may only be done by a<br />
qualified electrician.<br />
Warning!<br />
Warning about a dangerous location.<br />
Work on areas marked with this symbol can lead to serious injuries<br />
or to extensive material damage.<br />
Caution!<br />
Hand injuries<br />
Working in areas marked with this symbol can lead to hand injuries.<br />
© <strong>HDG</strong> Bavaria GmbH 06/2008 <strong>HDG</strong> <strong>Navora</strong> 20/25/30 with <strong>HDG</strong> Lambda Control 1 - V 2 - en<br />
11
12<br />
2 Safety notes – Warnings and safety symbols used<br />
Caution!<br />
Hot surface<br />
Work on locations marked with this symbol can lead to burns.<br />
Caution!<br />
Danger of fire<br />
Working in areas marked with this symbol can lead to a fire.<br />
Caution!<br />
Frost danger<br />
Working in areas marked with this symbol can lead to frost<br />
damage.<br />
Danger!<br />
Danger from explosion.<br />
Work in areas marked with this symbol may only be performed<br />
exactly as specified by <strong>HDG</strong> Bavaria.<br />
Improper operation can lead to explosions.<br />
Caution!<br />
Danger from suspended loads.<br />
Working in areas with this symbol may involve danger from falling<br />
objects.<br />
Notes on disposal.<br />
Additional information for the operator.<br />
<strong>HDG</strong> <strong>Navora</strong> 20/25/30 with <strong>HDG</strong> Lambda Control 1 - V 2 - en © <strong>HDG</strong> Bavaria GmbH 06/2008
2.4 Duty to inform<br />
Reading the Operation<br />
<strong>Manual</strong><br />
2 Safety notes – Duty to inform<br />
Everyone who works on the system must have read the Operation<br />
<strong>Manual</strong> before starting work and, in particular, have read the chapter<br />
“2 Safety notes”.<br />
This holds especially true for persons who only occasionally work on<br />
the system, e.g. when cleaning or maintaining the heating system.<br />
The Operation <strong>Manual</strong> must be kept easily accessible at the heating<br />
system's installation location.<br />
© <strong>HDG</strong> Bavaria GmbH 06/2008 <strong>HDG</strong> <strong>Navora</strong> 20/25/30 with <strong>HDG</strong> Lambda Control 1 - V 2 - en<br />
13
14<br />
3 Functional description – Sectional view<br />
3 Functional description<br />
3.1 Sectional view<br />
31<br />
29<br />
28<br />
33<br />
32<br />
30<br />
27<br />
26<br />
25<br />
24<br />
1<br />
23<br />
22<br />
21<br />
20<br />
2<br />
The boiler contains the following components:<br />
Figure 3/1 - Overview<br />
1 <strong>HDG</strong> Lambda Control 1 control unit<br />
2 Top cover<br />
3 Cleaning lid cover<br />
4 Plug board<br />
5 Cleaning lid with heat shield<br />
6 Latching mechanism for cleaning/flue gas by-pass flap<br />
7 Flue gas collection box<br />
8 Flue gas by-pass flap<br />
9 Turbulator<br />
<strong>HDG</strong> <strong>Navora</strong> 20/25/30 with <strong>HDG</strong> Lambda Control 1 - V 2 - en © <strong>HDG</strong> Bavaria GmbH 06/2008<br />
19<br />
18<br />
17<br />
3<br />
4<br />
5<br />
16<br />
6<br />
7<br />
8<br />
9<br />
10<br />
11<br />
12<br />
13<br />
14<br />
15
3 Functional description – Sectional view<br />
10 Flue gas heat exchanger (top heating surfaces)<br />
11 Combustion chamber panel, rear<br />
12 Combustion chamber panel, top<br />
13 Combustion chamber panel, bottom<br />
14 Primary air inlet<br />
15 Burner nozzle<br />
16 Nozzle bed<br />
17 Secondary combustion chamber with refactory lining<br />
18 Base insulation cassette<br />
19 Water jacket, bottom<br />
20 Ash drawer<br />
21 Ash compartment<br />
22 Heat shield for combustion chamber door<br />
23 Combustion chamber door<br />
24 Combustion chamber door handle<br />
25 Air adjustment flap for secondary air with servo motor<br />
26 Air adjustment flap for primary air with servo motor<br />
27 Front cover<br />
28 Fuelling chamber door<br />
29 Lower inside door<br />
30 Fuelling chamber door handle<br />
31 Heat shield for Fuelling chamber door<br />
32 Upper inner fuelling door<br />
33 Actuating handle for flue gas by-pass flap/cleaning system<br />
© <strong>HDG</strong> Bavaria GmbH 06/2008 <strong>HDG</strong> <strong>Navora</strong> 20/25/30 with <strong>HDG</strong> Lambda Control 1 - V 2 - en<br />
15
16<br />
3 Functional description – Sectional view<br />
46<br />
45<br />
44<br />
43<br />
42<br />
Figure 3/2 - Overview<br />
34 Electrical cable inlet<br />
35 Flue electrical connection<br />
36 Flue fan<br />
37 Oxygen sensor<br />
38 Flue connection<br />
39 Return connection 1 1/4" BSP (DN 32 IG)<br />
40 Filling/draining 1" BSP (DN 25 IG)<br />
41 Insulation cassette<br />
42 Flue gas temperature sensor<br />
43 Flow connection 1 1/4" BSP (DN 32 IG)<br />
44 Inspection opening for boiler temperature sensor<br />
45 Safety heat exchanger connections 1/2" BSP (DN 15 AG)<br />
46 Connection for immersion pocket on thermal safety device<br />
1/2" BSP (DN 15 AG)<br />
<strong>HDG</strong> <strong>Navora</strong> 20/25/30 with <strong>HDG</strong> Lambda Control 1 - V 2 - en © <strong>HDG</strong> Bavaria GmbH 06/2008<br />
35<br />
40<br />
36<br />
34<br />
38<br />
41<br />
39<br />
37
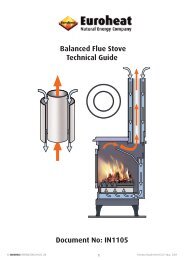
3.2 Mode of operation<br />
3 Functional description – Mode of operation<br />
<strong>HDG</strong> <strong>Navora</strong> 20/25/30 with <strong>HDG</strong> Lambda Control 1 boiler<br />
1<br />
Figure 3/3 - Boiler <strong>HDG</strong> <strong>Navora</strong> 20/25/30 with <strong>HDG</strong> Lambda Control 1<br />
Inside the <strong>HDG</strong> <strong>Navora</strong> 20/25/30 with <strong>HDG</strong> Lambda Control 1 boiler,<br />
fuel which has been manually placed in the fuelling chamber (2) and<br />
ignited is degassed through the addition of primary air.<br />
The resulting wood gas is mixed with secondary air in the<br />
combustion chamber (3) where it is burnt.<br />
Ashes are collected in the large ash compartments (5) for<br />
combustion ash and fly ash.<br />
The air necessary for combustion is supplied as required via the<br />
suction fan (1) and two servo drives with metering mechanisms (4).<br />
Via the oxygen sensor (7), the boiler temperature sensor (not visible<br />
in Figure 3/3 - Boiler <strong>HDG</strong> <strong>Navora</strong> 20/25/30 with <strong>HDG</strong> Lambda<br />
Control 1) and the flue gas temperature sensor (6):<br />
• the firing is permanently monitored,<br />
• the boiler output is adjusted,<br />
• emissions are minimised and<br />
• boiler efficiency is optimised.<br />
© <strong>HDG</strong> Bavaria GmbH 06/2008 <strong>HDG</strong> <strong>Navora</strong> 20/25/30 with <strong>HDG</strong> Lambda Control 1 - V 2 - en<br />
9<br />
8<br />
7<br />
6<br />
5<br />
3<br />
2<br />
4<br />
17
18<br />
3 Functional description – Mode of operation<br />
Cleaning system The top heating surfaces are cleaned by activating the flue gas bypass<br />
flap (9), which is coupled with the turbulators (8) located in the<br />
top heating surfaces.<br />
The <strong>HDG</strong> <strong>Navora</strong> 20/25/30 with <strong>HDG</strong> Lambda Control 1 is a<br />
specifically designed boiler for the firing of wood up to 500 mm in<br />
length. The <strong>HDG</strong> Lambda Control 1 control system regulates<br />
combustion, boiler output and the charging of the accumulator. The<br />
<strong>HDG</strong> <strong>Navora</strong> 20/25/30 with <strong>HDG</strong> Lambda Control 1 system are<br />
harmonised with one another and form a functional unit. This<br />
enables wood to be converted into heat energy in an<br />
environmentally sound and convenient manner.<br />
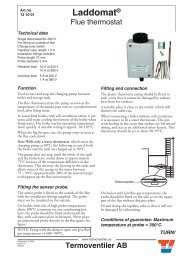
<strong>HDG</strong> Lambda Control 1<br />
Figure 3/4 - <strong>HDG</strong> Lambda Control 1 control panel<br />
The <strong>HDG</strong> Lambda Control 1 boiler control unit is the electronic hub.<br />
Via the control unit, you can manage the <strong>HDG</strong> Lambda Control 1<br />
control system and call up information about the current operating<br />
status.<br />
✎ See the section “4.3 Structure of the menus” in chapter “4 Using<br />
the <strong>HDG</strong> <strong>Navora</strong> Wood Boiler”.<br />
<strong>HDG</strong> <strong>Navora</strong> 20/25/30 with <strong>HDG</strong> Lambda Control 1 - V 2 - en © <strong>HDG</strong> Bavaria GmbH 06/2008
3.3 Technical data<br />
3 Functional description – Technical data<br />
Type of boiler <strong>HDG</strong> <strong>Navora</strong> 20 <strong>HDG</strong> <strong>Navora</strong> 25 <strong>HDG</strong> <strong>Navora</strong> 30<br />
Minimum output 18 kW 18 kW 18 kW<br />
Nominal output for wood 20 kW 25 kW 30 kW<br />
Boiler class 3 3 3<br />
Weight 680 kg 680 kg 680 kg<br />
Max. operational pressure 3 bar 3 bar 3 bar<br />
Max. supply temperature 95 ˚C 95 ˚C 95 ˚C<br />
Water capacity 168 l 168 l 168 l<br />
Necessary working pressure 15 Pa (0.06"wg) 15 Pa (0.06"wg) 15 Pa (0.06"wg)<br />
Exhaust mass flow<br />
• Nominal load<br />
• Partial load<br />
Exhaust temperature<br />
(approx.)<br />
• Nominal output<br />
• Minimum output<br />
0.014 kg/s<br />
0.012 kg/s<br />
140 ˚C<br />
120 ˚C<br />
0.016 kg/s<br />
0.012 kg/s<br />
150 ˚C<br />
120 ˚C<br />
0.019 kg/s<br />
0.012 kg/s<br />
160 ˚C<br />
120 ˚C<br />
Fuelling chamber capacity 150 l 150 l 150 l<br />
Burning duration per filling, in<br />
accordance with fuel<br />
recommendations<br />
Up to 6 h with<br />
beech, up to 4 h with<br />
spruce<br />
Up to 6 h with<br />
beech,<br />
up to 4 h with spruce<br />
Up to 6 h with<br />
beech,<br />
up to 4 h with spruce<br />
Boiler efficiency 91 % 91 % 91 %<br />
Electrical connection<br />
• Voltage<br />
• Current consumption<br />
for continuous operation<br />
Necessary auxiliary energy<br />
• Constant operation at<br />
nominal power<br />
230 V<br />
0.76 A<br />
230 V<br />
0.76 A<br />
230 V<br />
0.76 A<br />
111 W 111 W 111 W<br />
Diameter of flue supports 150 mm 150 mm 150 mm<br />
Height of flue connection 900 mm 900 mm 900 mm<br />
Safety heat exchanger<br />
connections (bushing)<br />
2 x 1/2" BSP (DN 15) 2 x 1/2" BSP (DN 15) 2 x 1/2" BSP (DN 15)<br />
Table 3/1 - Technical data <strong>HDG</strong> <strong>Navora</strong> 20/25/30 with <strong>HDG</strong> Lambda Control 1<br />
© <strong>HDG</strong> Bavaria GmbH 06/2008 <strong>HDG</strong> <strong>Navora</strong> 20/25/30 with <strong>HDG</strong> Lambda Control 1 - V 2 - en<br />
19
20<br />
3 Functional description – Fuel quality requirements<br />
Type of boiler <strong>HDG</strong> <strong>Navora</strong> 20 <strong>HDG</strong> <strong>Navora</strong> 25 <strong>HDG</strong> <strong>Navora</strong> 30<br />
Flow and return connections<br />
(bushing)<br />
3.4 Fuel quality requirements<br />
1 1/4" BSP (DN 32) 1 1/4" BSP (DN 32) 1 1/4" BSP (DN 32)<br />
Drain (bushing) 1" BSP (DN 25) 1" BSP (DN 25) 1" BSP (DN 25)<br />
Water-side resistance<br />
at Δϑ 10 K<br />
Water-side resistance<br />
at Δϑ<br />
20 K<br />
13 hPa 13 hPa 13 hPa<br />
1.5 hPa 1.5 hPa 1.5 hPa<br />
Air inlet cross section 15.000 mm 2 15.00o mm 2 15.000 mm 2<br />
Table 3/1 - Technical data <strong>HDG</strong> <strong>Navora</strong> 20/25/30 with <strong>HDG</strong> Lambda Control 1<br />
Residual moisture content<br />
When selecting fuel, it is important to understand that the thermal<br />
value of the wood is primarily dependent upon the moisture content.<br />
For the purpose of simplifying cost calculations, you can assume<br />
that 1 kg of wood (all types) with a moisture content of 20 % has a<br />
thermal value of approx. 4 kWh. Firewood must be split and its size<br />
must be adapted accordingly to fit in the fuelling chamber.<br />
Unsplit logs and square boards are not suitable for burning.<br />
Moreover, logs should be split before they are prepared for drying.<br />
This is done in order to achieve a moisture content which is suitable<br />
for burning within a reasonable amount of time (approx. two years).<br />
Moist, unsplit wood has a negative impact on the combustion<br />
efficiency of the boiler and results in higher fuel consumption.<br />
Recommendation from <strong>HDG</strong> Bavaria GmbH<br />
<strong>HDG</strong> Bavaria recommends split logs in lengths of 500 mm (19"), with<br />
a max. edge length of 120 mm (4 3/4") and a moisture content of<br />
20 %.<br />
<strong>HDG</strong> <strong>Navora</strong> 20/25/30 with <strong>HDG</strong> Lambda Control 1 - V 2 - en © <strong>HDG</strong> Bavaria GmbH 06/2008
4 Using the <strong>HDG</strong> <strong>Navora</strong> Wood Boiler – Overview of the controls and display components<br />
4 Using the <strong>HDG</strong> <strong>Navora</strong> Wood<br />
Boiler<br />
4.1 Overview of the controls and display<br />
components<br />
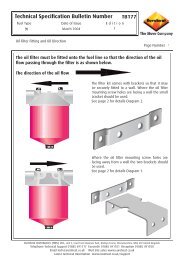
Control panel <strong>HDG</strong> Lambda Control 1<br />
1<br />
2<br />
3<br />
Figure 4/1 - <strong>HDG</strong> Lambda Control 1 control panel<br />
1 “Heat production on” indicator<br />
2 “Refill” indicator<br />
3 “Fault” indicator<br />
4 Text display<br />
5 “Heat production on/plus” button<br />
6 “Heat production off/minus” button<br />
7 “Arrow” button<br />
8 “Refill” button<br />
9 Unlocking knob for the safety temperature limiter (STB)<br />
The <strong>HDG</strong> Lambda Control 1 control panel is located on the top of the<br />
<strong>HDG</strong> <strong>Navora</strong> 20/25/30 with <strong>HDG</strong> Lambda Control 1 boiler.<br />
Via the control unit, you can manage the <strong>HDG</strong> Lambda Control 1<br />
control system and call up information about the current operating<br />
status.<br />
Display The display shows the selected information and settings. In the<br />
operating mode “Heat production on”, the display is switched on<br />
and active. In the operating mode “Heat production off/minus”, the<br />
display switches off after 15 minutes. It can be switched on again by<br />
pressing any button.<br />
✎ In section “4.3 Structure of the menus” in this chapter, all<br />
selectable information and parameters are listed.<br />
© <strong>HDG</strong> Bavaria GmbH 06/2008 <strong>HDG</strong> <strong>Navora</strong> 20/25/30 with <strong>HDG</strong> Lambda Control 1 - V 2 - en<br />
4<br />
9<br />
5<br />
6<br />
7<br />
8<br />
21
22<br />
4 Using the <strong>HDG</strong> <strong>Navora</strong> Wood Boiler – Overview of the controls and display components<br />
“Heat production on”<br />
indicator<br />
The “Heat production on” indicator (1) lights up when the<br />
combustion process is initiated by pressing the “Heat production<br />
on” button (5), or when the process starts automatically (if the<br />
exhaust flue temperature is sufficient). The indicator goes out when<br />
the combustion process is stopped via the “Heat production off”<br />
button, or when the process is automatically stopped due to lack of<br />
fuel.<br />
“Refill” indicator The “Refill” indicator (2) lights up when heat production has been<br />
switched off or when system heating requirements necessitate a<br />
refill. The indicator will blink while the system is waiting to be refilled<br />
and it will go out when heat production is switched on.<br />
✎ See the section “4.6 Lighting and refuelling the <strong>HDG</strong> <strong>Navora</strong>” in<br />
this chapter.<br />
“Fault” indicator The “Fault” indicator (3) lights up when faults occur which: prevent<br />
the further production of heat, or prevent heat production from<br />
being switched on. It will blink when faults occur which: allow for<br />
heat production to continue, or still allow heat production to be<br />
switched on (e.g. control set to an alternative programme until the<br />
fault is resolved). It will go out when faults have been acknowledged<br />
and remedied.<br />
Keypad The <strong>HDG</strong> <strong>Navora</strong> can be operated via the keypad. The various<br />
buttons have the following functions:<br />
“Heat production on/plus” button<br />
• In menu level 1, the system is switched into “Heat production on”<br />
operating mode<br />
• In the submenu, parameters can be selected and their respective<br />
settings can be changed.<br />
• “Heat production off/minus” button<br />
• In menu level 1, the system is switched into “Heat production off”<br />
operating mode, or the refill function is prematurely stopped.<br />
• In menu level 2, parameters can be selected and their respective<br />
settings can be changed.<br />
“Arrow” button<br />
• Accesses the selection menu.<br />
• Confirms the function selected with the “Plus” or “Minus”<br />
buttons.<br />
Confirms changes to settings.<br />
“Refill” button<br />
<strong>HDG</strong> <strong>Navora</strong> 20/25/30 with <strong>HDG</strong> Lambda Control 1 - V 2 - en © <strong>HDG</strong> Bavaria GmbH 06/2008
4.2 Initialising the system<br />
4 Using the <strong>HDG</strong> <strong>Navora</strong> Wood Boiler – Initialising the system<br />
• The flue fan is activated when the button is pressed. Instructions<br />
on how to proceed with opening the filling hatch will appear in the<br />
display of the <strong>HDG</strong> Lambda Control 1.<br />
✎ See section “4.6 Lighting and refuelling the <strong>HDG</strong> <strong>Navora</strong>” in this<br />
chapter.<br />
• Unlocking knob for the safety temperature limiter (STB). If the<br />
STB is triggered as a result of the boiler temperature being too<br />
high, the STB has to be reset by pressing the reset knob after the<br />
boiler temperature has dropped to approx. 80 ˚ C. The fault is<br />
automatically reset.<br />
Requirements<br />
In order for the <strong>HDG</strong> <strong>Navora</strong> to be switched on, it must have been<br />
put into service by an authorised specialist.<br />
✎ See chapter “7 Commissioning the <strong>HDG</strong> <strong>Navora</strong>”.<br />
Emergency heating switch<br />
The <strong>HDG</strong> <strong>Navora</strong> is connected to the mains supply through a fused<br />
spur isolation switch which would have been installed by the<br />
installer.<br />
Danger!<br />
Danger from electrical current or voltage.<br />
The <strong>HDG</strong> <strong>Navora</strong> and connected controls can only be completely<br />
de-energised by switching off the fused spur.<br />
1. Switch on the <strong>HDG</strong> <strong>Navora</strong> at the corresponding fused spur.<br />
✓ The <strong>HDG</strong> navora ready for operation.<br />
© <strong>HDG</strong> Bavaria GmbH 06/2008 <strong>HDG</strong> <strong>Navora</strong> 20/25/30 with <strong>HDG</strong> Lambda Control 1 - V 2 - en<br />
23
24<br />
4 Using the <strong>HDG</strong> <strong>Navora</strong> Wood Boiler – Structure of the menus<br />
4.3 Structure of the menus<br />
“Heat production off” menu structure<br />
Figure 4/2 - “Heat production off” menu structure<br />
<strong>HDG</strong> <strong>Navora</strong> 20/25/30 with <strong>HDG</strong> Lambda Control 1 - V 2 - en © <strong>HDG</strong> Bavaria GmbH 06/2008
4 Using the <strong>HDG</strong> <strong>Navora</strong> Wood Boiler – Structure of the menus<br />
“Heat production on” menu structure<br />
Figure 4/3 - “Heat production on” menu structure<br />
© <strong>HDG</strong> Bavaria GmbH 06/2008 <strong>HDG</strong> <strong>Navora</strong> 20/25/30 with <strong>HDG</strong> Lambda Control 1 - V 2 - en<br />
25
26<br />
4 Using the <strong>HDG</strong> <strong>Navora</strong> Wood Boiler – Displaying information<br />
4.4 Displaying information<br />
You can call up a variety of information on the display of the <strong>HDG</strong><br />
Lambda Control 1.<br />
Certain information and settings can only be accessed and changed<br />
in “Heat production on” or “Heat production off”.<br />
✎ See section “4 Using the <strong>HDG</strong> <strong>Navora</strong> Wood Boiler” in chapter<br />
“4.3 Structure of the menus”.<br />
Requirements<br />
Before the <strong>HDG</strong> <strong>Navora</strong> can be switched on and information and<br />
settings can be accessed and changed, the following requirements<br />
must be met.<br />
• The <strong>HDG</strong> <strong>Navora</strong> has been commissioned by authorised<br />
specialists.<br />
• The switch on the power supply is switched on.<br />
How to display information<br />
The buttons on the control panel of the <strong>HDG</strong> Lambda Control must<br />
be pressed and held for approx. two seconds in order to jump to<br />
another menu item.<br />
If a button is not pressed after 30 seconds, the selection menu will<br />
be abandoned automatically.<br />
✎ See chapter “4 Using the <strong>HDG</strong> <strong>Navora</strong> Wood Boiler”, section<br />
“4.1 Overview of the controls and display components”.<br />
<strong>HDG</strong> <strong>Navora</strong> 20/25/30 with <strong>HDG</strong> Lambda Control 1 - V 2 - en © <strong>HDG</strong> Bavaria GmbH 06/2008
Selection menu in “Heat<br />
production off” mode<br />
4 Using the <strong>HDG</strong> <strong>Navora</strong> Wood Boiler – Displaying information<br />
1. Press the Arrow button.<br />
✓ The display is activated.<br />
2. Press the Arrow button.<br />
✓ The selection menu Selection submenu Information will<br />
appear in the display.<br />
3. Press the Arrow button.<br />
✓ Information and End will appear in the display.<br />
4. Press the Plus button to scroll forward through the information or<br />
Minus to scroll backwards through the information.<br />
✓ The O2 Control program information is displayed by<br />
pressing the Plus button.<br />
5. Continue pressing the Plus button until you have obtained all of<br />
the desired information.<br />
Accessible information Preset target values, current actual values and analyses:<br />
Display Description Authorised<br />
TK S [˚C] 82.0<br />
TK I [˚C] 73.4<br />
• Maximum required boiler water<br />
temperature.<br />
• Current actual value.<br />
Operator<br />
TS I [˚C] 23.8 • Current accumulator temperature. No access<br />
TK min [˚C] 60.0<br />
TS min [˚C] 45.0<br />
TA I [˚C] 23.0<br />
Peak value 226.0<br />
O2 S [%] 6.0<br />
O2 I [%] 5.6<br />
CO2 S [%] 15.4<br />
CO2 I [%] 15.8<br />
Lambda [/] 1.9<br />
ETA-F [%] 100.0<br />
Operating hours<br />
[h]<br />
• Required minimum boiler temperature.<br />
• Required minimum accumulator<br />
temperature.<br />
• Current flue gas temperature.<br />
• Highest flue gas temperature reached<br />
since the last enquiry.<br />
• Preset target value for residual oxygen<br />
• Current actual value for residual oxygen<br />
• Target value for carbon dioxide<br />
• Calculated actual value for carbon<br />
dioxide.<br />
Operator<br />
Operator<br />
No access<br />
Manufacturer<br />
No access<br />
• Current excess air coefficient<br />
• Current degree of combustion efficiency No access<br />
• Cumulative operating hours in “Heat<br />
production on” mode. No access<br />
Table 4/1 - Target value information<br />
© <strong>HDG</strong> Bavaria GmbH 06/2008 <strong>HDG</strong> <strong>Navora</strong> 20/25/30 with <strong>HDG</strong> Lambda Control 1 - V 2 - en<br />
27
28<br />
4 Using the <strong>HDG</strong> <strong>Navora</strong> Wood Boiler – Displaying information<br />
Display Description Authorised<br />
stand-by > 88°C<br />
[%]<br />
Example calculation for<br />
operational readiness<br />
• Display of the percentage of operating<br />
hours during which the boiler<br />
temperature was above 88 ˚C (*).<br />
1000 operating hours at 20 % readiness equates to 200 hours with<br />
the boiler temperature above 88˚C.<br />
Consequence: The boiler would thus have been overheated for 200<br />
hours.<br />
Control programmes:<br />
No access<br />
Last fault • Most recent fault since the last enquiry. Operator<br />
Control programme<br />
Table 4/1 - Target value information<br />
(*) If this value is too high, there is a danger of excessive<br />
contamination of the boiler and the chimney!<br />
Danger of fire in the chimney and flue!<br />
See the following example calculation.<br />
Indication in<br />
display<br />
Standard control programme O2 control<br />
programme<br />
Alternative control programme TA control<br />
programme<br />
Table 4/2 - Control programme information<br />
Description<br />
• Combustion is regulated according to the<br />
residual oxygen content as measured by<br />
the O2 sensor<br />
• If the O2 sensor malfunctions or is<br />
defective, the <strong>HDG</strong> Lambda Control<br />
microprocessor controller switches from<br />
the standard control programme to the<br />
alternative control programme and uses<br />
the exhaust temperature to regulate<br />
combustion, thus ensuring temporary<br />
emergency operation<br />
Indication in display when the “TA control programme”<br />
alternative control programme is automatically initiated.<br />
<strong>HDG</strong> <strong>Navora</strong> 20/25/30 with <strong>HDG</strong> Lambda Control 1 - V 2 - en © <strong>HDG</strong> Bavaria GmbH 06/2008
4.5 User changeable settings<br />
Selection menu in “Heat<br />
production off” mode<br />
4 Using the <strong>HDG</strong> <strong>Navora</strong> Wood Boiler – User changeable settings<br />
Requirements<br />
In order to be able to proceed with making changes and corrections<br />
to the settings, the following requirements must be met.<br />
• The <strong>HDG</strong> <strong>Navora</strong> has been commissioned by authorised<br />
specialists.<br />
• The switch on the power supply is switched on.<br />
Setting the boiler temperature.<br />
The display reads Heat production off.<br />
1. Press the Arrow button.<br />
✓ The selection menu Selection submenu Information will<br />
appear in the display.<br />
2. Press the Plus button.<br />
✓ The display changes to the Settings submenu.<br />
3. Press the Arrow button.<br />
✓ The menu item is confirmed; Boiler target value TK S<br />
[°C] appears in the display.<br />
4. Use the Plus button to increase the value, or the Minus button to<br />
reduce the value.<br />
The available setting range is between<br />
78 and 85 ˚C, the standard setting is 80 ˚C.<br />
✓ The desired value is set.<br />
5. Press the Arrow button.<br />
✓ The target boiler temperature is assumed.<br />
6. Press the Arrow button.<br />
✓ The submenu is exited and Heat production off appears in<br />
the display again.<br />
✓ The boiler target temperature is set.<br />
✎ See section “4.3 Structure of the menus” in this chapter for more<br />
information.<br />
© <strong>HDG</strong> Bavaria GmbH 06/2008 <strong>HDG</strong> <strong>Navora</strong> 20/25/30 with <strong>HDG</strong> Lambda Control 1 - V 2 - en<br />
29
30<br />
4 Using the <strong>HDG</strong> <strong>Navora</strong> Wood Boiler – Lighting and refuelling the <strong>HDG</strong> <strong>Navora</strong><br />
4.6 Lighting and refuelling the <strong>HDG</strong> <strong>Navora</strong><br />
Heating up when the<br />
system is cold<br />
How to proceed<br />
Despite all precautions, the following residual risks remain:<br />
Caution!<br />
Hot surface.<br />
Contact with the hot surfaces of the boiler can lead to burns.<br />
Wait until the boiler has cooled down before touching uninsulated<br />
components.<br />
Warning!<br />
Danger of asphyxiation due to carbon monoxide.<br />
If the boiler is operating, carbon monoxide can be emitted through<br />
the open filling hatch.<br />
Do not leave the combustion chamber and/or filling hatch open any<br />
longer than necessary.<br />
Caution!<br />
Danger of fire<br />
Working in areas marked with this symbol can lead to a fire.<br />
Do not leave the filling hatch open any longer than necessary.<br />
Danger!<br />
Danger of explosion.<br />
Work in areas marked with this symbol may only be performed<br />
exactly as specified by <strong>HDG</strong> Bavaria.<br />
Improper operation can lead to explosions.<br />
When the “Refill” indicator lights up, there are no more embers in<br />
the filling chamber.<br />
✎ See section “4.1 Overview of the controls and display<br />
components“Paragraph” Control panel <strong>HDG</strong> Lambda Control 1”<br />
in this chapter for more information.<br />
1. Press the Refill button.<br />
✓ The “Do not open, please wait” message will appear in<br />
the display of the <strong>HDG</strong> Lambda Control control unit.<br />
✓ The flue fan starts to run.<br />
<strong>HDG</strong> <strong>Navora</strong> 20/25/30 with <strong>HDG</strong> Lambda Control 1 - V 2 - en © <strong>HDG</strong> Bavaria GmbH 06/2008
4 Using the <strong>HDG</strong> <strong>Navora</strong> Wood Boiler – Lighting and refuelling the <strong>HDG</strong> <strong>Navora</strong><br />
2. Lift up the door handle (2) and open the outer filling hatch (1).<br />
Figure 4/4 - Heating up/refilling<br />
3. Pull out the handle (1) for the flue gas by-pass flap until it stops,<br />
then lower it down.<br />
✓ The flue gas by-pass flap is now locked.<br />
Figure 4/5 - Lighting and refuelling<br />
4. Wait for approx. 15 seconds until the “Careful, open<br />
slowly” message appears.<br />
© <strong>HDG</strong> Bavaria GmbH 06/2008 <strong>HDG</strong> <strong>Navora</strong> 20/25/30 with <strong>HDG</strong> Lambda Control 1 - V 2 - en<br />
1<br />
2<br />
1<br />
31
32<br />
4 Using the <strong>HDG</strong> <strong>Navora</strong> Wood Boiler – Lighting and refuelling the <strong>HDG</strong> <strong>Navora</strong><br />
✓ The “Careful, open slowly” message appears.<br />
5. Open the top inside door (3) first.<br />
6. Insert the door opening tool (2) into the hole in the door handle<br />
on the top inside door, then open the door slowly.<br />
1<br />
Figure 4/6 - Lighting and refuelling<br />
7. Repeat the procedure in step 6 and open the lower inside<br />
door (3).<br />
Figure 4/7 - Lighting and refuelling<br />
8. Leave any remaining unburnt pieces of wood and charcoal in the<br />
fuelling chamber (1).<br />
<strong>HDG</strong> <strong>Navora</strong> 20/25/30 with <strong>HDG</strong> Lambda Control 1 - V 2 - en © <strong>HDG</strong> Bavaria GmbH 06/2008<br />
2<br />
3<br />
1<br />
2<br />
3
4 Using the <strong>HDG</strong> <strong>Navora</strong> Wood Boiler – Lighting and refuelling the <strong>HDG</strong> <strong>Navora</strong><br />
1<br />
2<br />
Figure 4/8 - Lighting and refuelling<br />
9. Place highly flammable material (small pieces of dry wood<br />
kindling) onto the burner nozzle (1). Fill to a depth of approx.<br />
100 mm (4") so that the burner nozzle (2) is covered.<br />
10.Lay some small pieces of cardboard on top of the wood inside the<br />
fuelling chamber (1).<br />
11. Place 3 or 4 sheets of crumpled up newspaper in the fuelling<br />
chamber in such a way that it can be reached from the edge (4) of<br />
the fuelling chamber.<br />
12.Fill the fuelling chamber with a quantity of wood that corresponds<br />
to the heat required by the accumulator.<br />
Only fill with as much wood as the <strong>HDG</strong> <strong>Navora</strong> and accumulator<br />
can absorb as energy.<br />
✎ See section “3.4 Fuel quality requirements” in chapter<br />
“3 Functional description”.<br />
13.Close the flue gas by-pass flap by pushing the handle (3)<br />
upwards.<br />
14.Ignite the cardboard or paper in the fuelling chamber.<br />
15.Allow the fuel to generate a good fire.<br />
© <strong>HDG</strong> Bavaria GmbH 06/2008 <strong>HDG</strong> <strong>Navora</strong> 20/25/30 with <strong>HDG</strong> Lambda Control 1 - V 2 - en<br />
3<br />
4<br />
33
34<br />
4 Using the <strong>HDG</strong> <strong>Navora</strong> Wood Boiler – Lighting and refuelling the <strong>HDG</strong> <strong>Navora</strong><br />
16.Close the top inside door (1).<br />
Figure 4/9 - Lighting and refuelling<br />
17.Leave the lower inside door (3) ajar (100 to 150 mm) until the<br />
“Heat production on” message appears in the display and<br />
the “Heat production on” indicator lamp lights up.<br />
✓ The “Heat production on” message in the display and the<br />
“Heat production on” indicator lamp appear when the<br />
required exhaust temperature is reached.<br />
18.Close the lower inside door (3).<br />
19.Close the filling hatch (2).<br />
✓ The log wood boiler is now operating and automatically<br />
controlling its combustion and heat output.<br />
<strong>HDG</strong> <strong>Navora</strong> 20/25/30 with <strong>HDG</strong> Lambda Control 1 - V 2 - en © <strong>HDG</strong> Bavaria GmbH 06/2008<br />
1<br />
2<br />
3
4 Using the <strong>HDG</strong> <strong>Navora</strong> Wood Boiler – Lighting and refuelling the <strong>HDG</strong> <strong>Navora</strong><br />
Refuelling Despite all precautions, the following residual risks remain:<br />
Caution!<br />
Hot surface.<br />
Contact with the hot surfaces of the boiler can lead to burns.<br />
Wait until the boiler has cooled down before touching uninsulated<br />
components.<br />
Warning!<br />
Danger of asphyxiation due to carbon monoxide.<br />
If the boiler is operating, carbon monoxide can be emitted through<br />
the open filling hatch.<br />
Do not leave the combustion chamber and/or filling hatch open any<br />
longer than necessary.<br />
Caution!<br />
Danger of fire<br />
Working in areas marked with this symbol can lead to a fire.<br />
Do not leave the filling hatch open any longer than necessary.<br />
Always check the integrity of the filling hatch seal before heating up<br />
the system.<br />
Danger!<br />
Danger of explosion.<br />
Work in areas marked with this symbol may only be performed<br />
exactly as specified by <strong>HDG</strong> Bavaria.<br />
Improper operation can lead to explosions.<br />
When the “Refill” indicator lights up, there are no more embers in<br />
the filling chamber.<br />
✎ See section “4.1 Overview of the controls and display<br />
components“Paragraph” Control panel <strong>HDG</strong> Lambda Control 1”<br />
in this chapter for more information.<br />
1. Press the Refill button.<br />
✓ The “Do not open, please wait” message will appear in<br />
the display of the <strong>HDG</strong> Lambda Control control unit.<br />
✓ The flue fan starts to run.<br />
© <strong>HDG</strong> Bavaria GmbH 06/2008 <strong>HDG</strong> <strong>Navora</strong> 20/25/30 with <strong>HDG</strong> Lambda Control 1 - V 2 - en<br />
35
36<br />
4 Using the <strong>HDG</strong> <strong>Navora</strong> Wood Boiler – Lighting and refuelling the <strong>HDG</strong> <strong>Navora</strong><br />
2. Lift up the door handle (2) and open the outer filling hatch (1).<br />
Figure 4/10 - Lighting and refuelling<br />
3. Pull out the handle (1) for flue gas by-pass flap until it stops, then<br />
lower it down.<br />
✓ The flue gas by-pass flap is now open.<br />
Figure 4/11 - Lighting and refuelling<br />
4. Wait for approx. 15 seconds until the “Careful, open<br />
slowly” message appears on the display.<br />
<strong>HDG</strong> <strong>Navora</strong> 20/25/30 with <strong>HDG</strong> Lambda Control 1 - V 2 - en © <strong>HDG</strong> Bavaria GmbH 06/2008<br />
1<br />
2<br />
1
4 Using the <strong>HDG</strong> <strong>Navora</strong> Wood Boiler – Lighting and refuelling the <strong>HDG</strong> <strong>Navora</strong><br />
✓ The “Careful, open slowly” message appears.<br />
5. Open the top inside door (3) first.<br />
6. Insert the door operating tool (2) into the hole in the door<br />
handle (1) on the top inside door (3), then open the door slowly.<br />
Figure 4/12 - Lighting and refuelling<br />
7. If there are only a few residual embers, place small pieces of<br />
combustible material (kindling) on the embers in the fuelling<br />
chamber (1).<br />
1<br />
1<br />
Figure 4/13 - Lighting and refuelling<br />
✓ The pieces of combustible material will ignite.<br />
8. Fill the fuelling chamber (1) with an amount of seasoned dry wood<br />
that corresponds to the potential heat requirements.<br />
9. Close the flue by-pass flap by pushing the handle (2) upwards.<br />
© <strong>HDG</strong> Bavaria GmbH 06/2008 <strong>HDG</strong> <strong>Navora</strong> 20/25/30 with <strong>HDG</strong> Lambda Control 1 - V 2 - en<br />
2<br />
3<br />
2<br />
3<br />
37
38<br />
4 Using the <strong>HDG</strong> <strong>Navora</strong> Wood Boiler – Lighting and refuelling the <strong>HDG</strong> <strong>Navora</strong><br />
Only refill with as much wood as the <strong>HDG</strong> <strong>Navora</strong> and accumulator<br />
can absorb as energy.<br />
✓ The fuelling chamber is now full.<br />
10.Close the top inside door (2).<br />
1<br />
Figure 4/14 - Lighting and refuelling<br />
11. Leave the lower inside door (1) ajar (100 to 150 mm) until the<br />
“Heat production on” message appears in the display and<br />
the “Heat production on” indicator lamp lights up.<br />
✓ The “Heat production on” message in the display and the<br />
“Heat production on” indicator lamp appear when the<br />
required exhaust temperature is reached.<br />
12.Close the lower inside door (1).<br />
13.Close the outer filling hatch (3).<br />
✓ The log wood boiler is now operating.<br />
✎ See section “3.4 Fuel quality requirements” in chapter<br />
“3 Functional description”.<br />
<strong>HDG</strong> <strong>Navora</strong> 20/25/30 with <strong>HDG</strong> Lambda Control 1 - V 2 - en © <strong>HDG</strong> Bavaria GmbH 06/2008<br />
3<br />
2
5 Cleaning and maintaining the <strong>HDG</strong> <strong>Navora</strong> – Cleaning and maintenance plan<br />
5 Cleaning and maintaining the<br />
<strong>HDG</strong> <strong>Navora</strong><br />
To ensure fault-free operation, certain cleaning and maintenance<br />
work is necessary. These avoid expensive repair work, as long as you<br />
maintain the recommended service intervals.<br />
The biannual and longer term cleaning and maintenance work can be<br />
covered by a maintenance contract with an authorised heating<br />
engineer.<br />
5.1 Cleaning and maintenance plan<br />
The specified cleaning intervals are a guideline.<br />
Depending on the quality of the fuel and the power used by the<br />
<strong>HDG</strong> <strong>Navora</strong>, the intervals may be extended.<br />
Interval Component see page ...<br />
weekly / as required • Removing ashes from the fuelling chamber and<br />
clean the burner nozzle<br />
• Removing ashes from the post-combustion<br />
chamber and ash compartment<br />
Monthly (during the heating<br />
period, approx. 240 operating<br />
hours)<br />
• Inspecting the heat exchanger cleaning system 45<br />
Approx. 900 operating hours • Check the flue and clean if necessary<br />
• Check the oxygen sensor and clean if necessary<br />
• Check the flue gas sensor and clean if<br />
necessary<br />
• Check the flue fan and clean if necessary<br />
Annually (approx. 1800<br />
operating hours)<br />
Biannually (approx. 3500<br />
operating hours)<br />
• Check the primary and secondary air acuators<br />
• Inspect the integrity of the door seals<br />
• Clean the control panel<br />
• Calibrate the oxygen sensor<br />
• Clean the panels and the primary air inlets 56<br />
Table 5/1 - Cleaning and maintenance plan<br />
© <strong>HDG</strong> Bavaria GmbH 06/2008 <strong>HDG</strong> <strong>Navora</strong> 20/25/30 with <strong>HDG</strong> Lambda Control 1 - V 2 - en<br />
41<br />
43<br />
47<br />
48<br />
49<br />
50<br />
52<br />
53<br />
55<br />
55<br />
39
40<br />
5 Cleaning and maintaining the <strong>HDG</strong> <strong>Navora</strong> – How to proceed<br />
5.2 How to proceed<br />
Cleaning tools<br />
Warning!<br />
Danger of asphyxiation due to carbon monoxide.<br />
If the boiler is operating, carbon monoxide can be emitted through<br />
open combustion chamber doors.<br />
Do not leave the combustion chamber doors open any longer than<br />
necessary.<br />
The operating status of the <strong>HDG</strong> <strong>Navora</strong> must be indicated with<br />
“Heat production off” in the display of the <strong>HDG</strong> Lambda Control.<br />
See section “4.1 Overview of the controls and display components”<br />
in chapter “4 Using the <strong>HDG</strong> <strong>Navora</strong> Wood Boiler”<br />
Caution!<br />
Danger of burns from hot surfaces.<br />
When operating, the boiler surfaces under the cladding are hot.<br />
Even when turned off, they only cool down slowly.<br />
Only touch the hot surfaces while wearing protective clothing or<br />
wait until the surfaces have cooled down before starting with the<br />
cleaning and maintenance work.<br />
Caution!<br />
Danger of fire<br />
Working in areas marked with this symbol can lead to a fire.<br />
1<br />
Figure 5/1 - Supplied cleaning tools<br />
1 Ash shovel<br />
2 Door opening tool (inside doors)<br />
3 Poker<br />
<strong>HDG</strong> <strong>Navora</strong> 20/25/30 with <strong>HDG</strong> Lambda Control 1 - V 2 - en © <strong>HDG</strong> Bavaria GmbH 06/2008<br />
2<br />
3
5 Cleaning and maintaining the <strong>HDG</strong> <strong>Navora</strong> – How to proceed<br />
Inspecting the heat exchanger cleaning system<br />
1. Allow the fire in the boiler to burn out.<br />
The operating status of the <strong>HDG</strong> <strong>Navora</strong> must be indicated with<br />
“Heat production off” in the display of the <strong>HDG</strong> Lambda<br />
Control.<br />
✎ See section “4.1 Overview of the controls and display<br />
components” in chapter “4 Using the <strong>HDG</strong> <strong>Navora</strong> Wood Boiler”.<br />
Caution!<br />
Danger of burns from hot surfaces.<br />
The surfaces of the boiler can be hot. Even when turned off, they<br />
only cool down slowly.<br />
Do not start with the maintenance work until the surfaces have<br />
cooled down.<br />
2. Press the “Refill” button.<br />
1<br />
Figure 5/2 -<br />
2<br />
3<br />
3. Open the outer fuelling chamber door (4).<br />
4. Open the flue by-pass flap.<br />
5. Open the top inside door (2) first, and the the lower inside<br />
door (3).<br />
© <strong>HDG</strong> Bavaria GmbH 06/2008 <strong>HDG</strong> <strong>Navora</strong> 20/25/30 with <strong>HDG</strong> Lambda Control 1 - V 2 - en<br />
4<br />
41
42<br />
5 Cleaning and maintaining the <strong>HDG</strong> <strong>Navora</strong> – How to proceed<br />
6. Use the supplied cleaning tools to remove loose ash from the<br />
fuelling chamber (1).<br />
7. Leave any unburnt pieces of wood and charcoal in the refuelling<br />
chamber (1).<br />
8. Remove the burner nozzle (2).<br />
Figure 5/3 - Cleaning the stationary grate<br />
9. Clean the secondary air inlets (4) with a suitable vacuum cleaner.<br />
4<br />
1<br />
2<br />
3<br />
Figure 5/4 - Cleaning the ash compartment<br />
10.Reinsert the burner nozzle (2).<br />
11. Close the fuelling chamber door doors in reverse order.<br />
<strong>HDG</strong> <strong>Navora</strong> 20/25/30 with <strong>HDG</strong> Lambda Control 1 - V 2 - en © <strong>HDG</strong> Bavaria GmbH 06/2008<br />
2
5 Cleaning and maintaining the <strong>HDG</strong> <strong>Navora</strong> – How to proceed<br />
Caution!<br />
Danger of fire<br />
Do not suck up hot ashes with the vacuum!<br />
✓ The fuelling chamber and the burner nozzle are clean.<br />
Removing ashes from the post-combustion chamber and<br />
ash compartment<br />
1. Allow the fire in the boiler to burn out.<br />
The operating status of the <strong>HDG</strong> <strong>Navora</strong> must be indicated with<br />
“Heat production off” in the display of the <strong>HDG</strong> Lambda<br />
Control.<br />
✎ See section “4.1 Overview of the controls and display<br />
components” in chapter “4 Using the <strong>HDG</strong> <strong>Navora</strong> Wood Boiler”.<br />
Caution!<br />
Danger of burns from hot surfaces.<br />
The surfaces of the boiler can be hot. Even when turned off, they<br />
only cool down slowly.<br />
Do not start with the maintenance work until the surfaces have<br />
cooled down.<br />
Press the “Refill” button.<br />
Caution!<br />
Danger of fire<br />
Do not suck up hot ashes with a vacuum!<br />
© <strong>HDG</strong> Bavaria GmbH 06/2008 <strong>HDG</strong> <strong>Navora</strong> 20/25/30 with <strong>HDG</strong> Lambda Control 1 - V 2 - en<br />
43
44<br />
5 Cleaning and maintaining the <strong>HDG</strong> <strong>Navora</strong> – How to proceed<br />
2. Pull out the ash drawer approx. 300 mm.<br />
Figure 5/5 - Cleaning the ash compartment<br />
3. Open the combustion chamber door (2).<br />
4. Use the supplied cleaning tools to pull the combustion residues<br />
out of the combustion chamber (1) and the ash compartment (3),<br />
and into the ash drawer (2).<br />
1<br />
2<br />
5. Empty the ashes into a fireproof container.<br />
<strong>HDG</strong> <strong>Navora</strong> 20/25/30 with <strong>HDG</strong> Lambda Control 1 - V 2 - en © <strong>HDG</strong> Bavaria GmbH 06/2008<br />
1<br />
Figure 5/6 - Cleaning the ash compartment<br />
3<br />
2
5 Cleaning and maintaining the <strong>HDG</strong> <strong>Navora</strong> – How to proceed<br />
Caution!<br />
Danger of fire<br />
Place hot ashes in a fireproof container!<br />
6. Reinsert the ash drawer and close the combustion chamber in<br />
reverse order.<br />
✓ The post-combustion chamber and the ash compartment are<br />
clean again.<br />
Inspecting the heat exchanger cleaning system<br />
1. Allow the fire in the boiler to burn out.<br />
The operating status of the <strong>HDG</strong> <strong>Navora</strong> must be indicated with<br />
“Heat production off” in the display of the <strong>HDG</strong> Lambda<br />
Control.<br />
✎ See section “4.1 Overview of the controls and display<br />
components” in chapter “4 Using the <strong>HDG</strong> <strong>Navora</strong> Wood Boiler”.<br />
Caution!<br />
Danger of burns from hot surfaces.<br />
The surfaces of the boiler can be hot. Even when turned off, they<br />
only cool down slowly.<br />
Do not start with the maintenance work until the surfaces have<br />
cooled down.<br />
2. Disconnect the plug for the power supply to the flue fan (4).<br />
© <strong>HDG</strong> Bavaria GmbH 06/2008 <strong>HDG</strong> <strong>Navora</strong> 20/25/30 with <strong>HDG</strong> Lambda Control 1 - V 2 - en<br />
45
46<br />
5 Cleaning and maintaining the <strong>HDG</strong> <strong>Navora</strong> – How to proceed<br />
3. Remove the top cover plate (1).<br />
5<br />
Figure 5/7 - Cleaning the burner nozzle<br />
4. Unscrew the four M 8 wing nuts (2).<br />
5. Pull the inspection hatch (3) up and out.<br />
6. Inspect the cleaning system (5) for deposits.<br />
7. If necessary, remove deposits and dust with a suitable vacuum<br />
cleaner.<br />
8. Close the cleaning system in reverse order.<br />
9. Reconnect the plug for the power supply to the flue fan (4).<br />
✓ The cleaning system has been inspected.<br />
<strong>HDG</strong> <strong>Navora</strong> 20/25/30 with <strong>HDG</strong> Lambda Control 1 - V 2 - en © <strong>HDG</strong> Bavaria GmbH 06/2008<br />
1<br />
Caution!<br />
Danger of fire<br />
Be careful not to suck any hot ashes into the vacuum cleaner.<br />
2<br />
3<br />
4
5 Cleaning and maintaining the <strong>HDG</strong> <strong>Navora</strong> – How to proceed<br />
Check the flue and clean if necessary<br />
1. Allow the fire in the boiler to burn out.<br />
The operating status of the <strong>HDG</strong> <strong>Navora</strong> must be indicated with<br />
“Heat production off” in the display of the <strong>HDG</strong> Lambda<br />
Control.<br />
✎ See section “4.1 Overview of the controls and display<br />
components” in chapter “4 Using the <strong>HDG</strong> <strong>Navora</strong> Wood Boiler”.<br />
Caution!<br />
Danger of burns from hot surfaces.<br />
The surfaces of the boiler can be hot. Even when turned off, they<br />
only cool down slowly.<br />
Do not start with the maintenance work until the surfaces have<br />
cooled down.<br />
2. Allow the boiler and the flue (3) to cool down.<br />
3. Unscrew the wing nut (1) on the inspection hatch (2).<br />
4. Remove the inspection hatch (2) from the flue (3).<br />
5. Check whether the flue needs cleaning.<br />
6. If necessary, use a suitable vacuum cleaner to clean out the<br />
flue (3).<br />
7. Slide any deposits into the flue gas collection box, but not in the<br />
direction of the boiler.<br />
8. Refit the inspection hatch (2) firmly onto the flue pipe (3) using<br />
the wing nut (1).<br />
✓ The flue pipe is clean.<br />
© <strong>HDG</strong> Bavaria GmbH 06/2008 <strong>HDG</strong> <strong>Navora</strong> 20/25/30 with <strong>HDG</strong> Lambda Control 1 - V 2 - en<br />
1<br />
Figure 5/8 - Cleaning the flue<br />
2<br />
3<br />
47
48<br />
5 Cleaning and maintaining the <strong>HDG</strong> <strong>Navora</strong> – How to proceed<br />
Check the oxygen sensor and clean if necessary<br />
1. Allow the fire in the boiler to burn out.<br />
The operating status of the <strong>HDG</strong> <strong>Navora</strong> must be indicated with<br />
“Heat production off” in the display of the <strong>HDG</strong> Lambda<br />
Control.<br />
✎ See section “4.1 Overview of the controls and display<br />
components” in chapter “4 Using the <strong>HDG</strong> <strong>Navora</strong> Wood Boiler”.<br />
Caution!<br />
Danger of burns from hot surfaces.<br />
The surfaces of the boiler can be hot. Even when turned off, they<br />
only cool down slowly.<br />
Do not start with the maintenance work until the surfaces have<br />
cooled down.<br />
2. Unscrew the union nut (1) with a pipe wrench.<br />
Figure 5/9 - Cleaning the oxygen sensor<br />
3. Remove the oxygen sensor (2), including the insulating disc (3)<br />
and the seal (4), from the installation fitting (5).<br />
4. Brush off the oxygen sensor (2) with a brass brush.<br />
Do not use steel bristles!<br />
Steel bristles will damage the oxygen sensor.<br />
5. Clean out any deposits found inside the installation fitting (5).<br />
6. Reinstall the oxygen sensor (2) in reverse order.<br />
<strong>HDG</strong> <strong>Navora</strong> 20/25/30 with <strong>HDG</strong> Lambda Control 1 - V 2 - en © <strong>HDG</strong> Bavaria GmbH 06/2008<br />
1<br />
2<br />
3<br />
4<br />
5
5 Cleaning and maintaining the <strong>HDG</strong> <strong>Navora</strong> – How to proceed<br />
Tightness<br />
When reinstalling the oxygen sensor, make sure it is firmly<br />
tightened.<br />
Use a pipe wrench to tighten the union nut (1). Do not over tighten!<br />
Never tighten the oxygen sensor by the shaft body.<br />
✓ The oxygen sensor is clean.<br />
Inspecting and cleaning the flue gas sensor<br />
1. Allow the fire in the boiler to burn out.<br />
The operating status of the <strong>HDG</strong> <strong>Navora</strong> must be indicated with<br />
“Heat production off” in the display of the <strong>HDG</strong> Lambda<br />
Control.<br />
✎ See section “4.1 Overview of the controls and display<br />
components” in chapter “4 Using the <strong>HDG</strong> <strong>Navora</strong> Wood Boiler”.<br />
Caution!<br />
Danger of burns from hot surfaces.<br />
The surfaces of the boiler can be hot. Even when turned off, they<br />
only cool down slowly.<br />
Do not start with the maintenance work until the surfaces have<br />
cooled down.<br />
2. Using light pressure, rotate the flue gas sensor (1) downwards<br />
one quarter turn in an anticlockwise direction.<br />
1<br />
2<br />
Figure 5/10 - Cleaning the flue sensor<br />
3. Pull the flue sensor (1) out of the holder (2).<br />
4. Clean the sensor.<br />
5. Reinstall the flue sensor (1) in reverse order.<br />
✓ The flue sensor is cleaned.<br />
© <strong>HDG</strong> Bavaria GmbH 06/2008 <strong>HDG</strong> <strong>Navora</strong> 20/25/30 with <strong>HDG</strong> Lambda Control 1 - V 2 - en<br />
49
50<br />
5 Cleaning and maintaining the <strong>HDG</strong> <strong>Navora</strong> – How to proceed<br />
Inspecting and cleaning the flue fan<br />
1. Allow the fire in the boiler to burn out.<br />
The operating status of the <strong>HDG</strong> <strong>Navora</strong> must be indicated with<br />
“Heat production off” in the display of the <strong>HDG</strong> Lambda<br />
Control.<br />
✎ See section “4.1 Overview of the controls and display<br />
components” in chapter “4 Using the <strong>HDG</strong> <strong>Navora</strong> Wood Boiler”.<br />
Caution!<br />
Danger of burns from hot surfaces.<br />
The surfaces of the boiler can be hot. Even when turned off, they<br />
only cool down slowly.<br />
Do not start with the maintenance work until the surfaces have<br />
cooled down.<br />
Caution!<br />
Hand injuries<br />
Working in areas marked with this symbol can lead to hand injuries.<br />
2. Disconnect the plug (2) from the flue fan (3).<br />
3. Use a hand ratchet to unscrew the four M8 nuts (1).<br />
1 3<br />
4<br />
Figure 5/11 - Cleaning the flue fan<br />
4. Remove the exhaust blower (3), including the flange plate (4),<br />
from the boiler.<br />
<strong>HDG</strong> <strong>Navora</strong> 20/25/30 with <strong>HDG</strong> Lambda Control 1 - V 2 - en © <strong>HDG</strong> Bavaria GmbH 06/2008<br />
2
5 Cleaning and maintaining the <strong>HDG</strong> <strong>Navora</strong> – How to proceed<br />
5. Clean the flue gas collection box (1).<br />
Figure 5/12 - Cleaning the flue fan<br />
6. Clean the impeller (3) with a brass brush.<br />
7. Clean the flue fan also betwen the impeller (3) and the mounting<br />
plate of the flue fan (2).<br />
8. Inspect the seal and the contact surfaces around the flue fan (2)<br />
and the flue gas collection box (1).<br />
9. Replace the seal if it is damaged.<br />
10.Reinstall the flue fan in reverse order.<br />
✓ The flue fan is clean again.<br />
© <strong>HDG</strong> Bavaria GmbH 06/2008 <strong>HDG</strong> <strong>Navora</strong> 20/25/30 with <strong>HDG</strong> Lambda Control 1 - V 2 - en<br />
1<br />
2<br />
3<br />
51
52<br />
5 Cleaning and maintaining the <strong>HDG</strong> <strong>Navora</strong> – How to proceed<br />
Check the primary and secondary air acuators<br />
1. Allow the fire in the boiler to burn out.<br />
The operating status of the <strong>HDG</strong> <strong>Navora</strong> must be indicated with<br />
“Heat production off” in the display of the <strong>HDG</strong> Lambda<br />
Control.<br />
✎ See section “4.1 Overview of the controls and display<br />
components” in chapter “4 Using the <strong>HDG</strong> <strong>Navora</strong> Wood Boiler”.<br />
Caution!<br />
Danger of burns from hot surfaces.<br />
The surfaces of the boiler can be hot. Even when turned off, they<br />
only cool down slowly.<br />
Do not start with the maintenance work until the surfaces have<br />
cooled down.<br />
2. Lift up on the cladding (2) which covers the actuators (1) and pull<br />
it out towards.<br />
Figure 5/13 - Inspecting the door seals<br />
3. Use a fine brush and a vacuum cleaner to remove dust deposits<br />
from the actuators and surrounding area (1).<br />
4. Reinsert the actuator cover in reverse order.<br />
✓ The actuator units are now clean.<br />
<strong>HDG</strong> <strong>Navora</strong> 20/25/30 with <strong>HDG</strong> Lambda Control 1 - V 2 - en © <strong>HDG</strong> Bavaria GmbH 06/2008<br />
1<br />
2
Inspect the fuelling<br />
chamber door<br />
5 Cleaning and maintaining the <strong>HDG</strong> <strong>Navora</strong> – How to proceed<br />
Inspecting the integrity of the door seals<br />
1. Allow the fire in the boiler to burn out.<br />
The operating status of the <strong>HDG</strong> <strong>Navora</strong> must be indicated with<br />
“Heat production off” in the display of the <strong>HDG</strong> Lambda<br />
Control.<br />
✎ See section “4.1 Overview of the controls and display<br />
components” in chapter “4 Using the <strong>HDG</strong> <strong>Navora</strong> Wood Boiler”.<br />
Caution!<br />
Danger of burns from hot surfaces.<br />
The surfaces of the boiler can be hot. Even when turned off, they<br />
only cool down slowly.<br />
Do not start with the maintenance work until the surfaces have<br />
cooled down.<br />
2. Press the “Refill” button.<br />
3. Open the fuelling chamber door (2)<br />
4. Clamp a sheet of paper (approx. 300 mm long and 40 mm wide)<br />
between the contact surface (1) and the seal (3).<br />
5. Close the fuelling chamber door (2).<br />
6. Pull on the paper.<br />
Figure 5/14 - Inspecting the door seals<br />
✓ If the paper moves, the door is not properly sealed.<br />
✓ If the paper does not move, the door is properly sealed.<br />
7. Repeat the procedure from step 2 to step 5 until you have<br />
inspected all four of the contact surfaces (1).<br />
© <strong>HDG</strong> Bavaria GmbH 06/2008 <strong>HDG</strong> <strong>Navora</strong> 20/25/30 with <strong>HDG</strong> Lambda Control 1 - V 2 - en<br />
1<br />
If the fuelling chamber door does not seal properly, contact a<br />
specialist to have it repaired.<br />
3<br />
2<br />
53
54<br />
5 Cleaning and maintaining the <strong>HDG</strong> <strong>Navora</strong> – How to proceed<br />
Inspecting the<br />
combustion chamber<br />
door<br />
8. Remove the paper and close the fuelling chamber door (2).<br />
✓ The fuelling chamber door seal has been checked.<br />
1. Allow the fire in the boiler to burn out.<br />
The operating status of the <strong>HDG</strong> <strong>Navora</strong> must be indicated with<br />
“Heat production off” in the display of the <strong>HDG</strong> Lambda<br />
Control.<br />
✎ See section “4.1 Overview of the controls and display<br />
components” in chapter “4 Using the <strong>HDG</strong> <strong>Navora</strong> Wood Boiler”.<br />
Caution!<br />
Danger of burns from hot surfaces.<br />
The surfaces of the boiler can be hot. Even when turned off, they<br />
only cool down slowly.<br />
Do not start with the maintenance work until the surfaces have<br />
cooled down.<br />
2. Press the “Refill” button.<br />
3. Open the combustion chamber door (2).<br />
4. Clamp a sheet of paper (approx. 300 mm long and 40 mm wide)<br />
between the contact surface (1) and the seal (3).<br />
5. Close the combustion chamber door (2).<br />
6. Pull on the paper.<br />
1<br />
Figure 5/15 - Inspecting the door seals<br />
✓ If the paper moves, the door is not properly sealed.<br />
✓ If the paper does not move, the door is properly sealed.<br />
If the combustion chamber door does not seal properly, contact a<br />
specialist to have it repaired.<br />
<strong>HDG</strong> <strong>Navora</strong> 20/25/30 with <strong>HDG</strong> Lambda Control 1 - V 2 - en © <strong>HDG</strong> Bavaria GmbH 06/2008<br />
2<br />
3
5 Cleaning and maintaining the <strong>HDG</strong> <strong>Navora</strong> – How to proceed<br />
7. Repeat the procedure from step 2 to step 5 until you have<br />
inspected all four of the contact surfaces (1).<br />
8. Remove the paper and close the combustion chamber door (2).<br />
✓ The combustion chamber door seal has been checked.<br />
Clean the control panel<br />
1<br />
Figure 5/16 - <strong>HDG</strong> Lambda Control 1 control panel<br />
1. Clean the control unit with a moist, lint-free cloth.<br />
2. For stubborn dirt, use a mild cleaning agent.<br />
3. Dry the control unit with a soft cloth.<br />
✓ The control unit is clean.<br />
Calibrate the oxygen sensor<br />
1. Allow the fire in the boiler to burn out.<br />
The operating status of the <strong>HDG</strong> <strong>Navora</strong> must be indicated with<br />
“Heat production off” in the display of the <strong>HDG</strong> Lambda<br />
Control.<br />
There can not be any residual embers in the fuelling chamber!<br />
✎ See section “4.1 Overview of the controls and display<br />
components” in chapter “4 Using the <strong>HDG</strong> <strong>Navora</strong> Wood Boiler”.<br />
2. Press the Arrow button.<br />
✓ The “Selection/information” message will appear in the<br />
display.<br />
3. Press the Plus button twice.<br />
✓ The “Testing system components” message will appear in<br />
the display.<br />
4. Press the Arrow button.<br />
✓ The “Test O2 sensor” message will appear in the display.<br />
5. Press the Plus button.<br />
✓ The calibration of the oxygen sensor starts. The runtime is 720<br />
seconds.<br />
© <strong>HDG</strong> Bavaria GmbH 06/2008 <strong>HDG</strong> <strong>Navora</strong> 20/25/30 with <strong>HDG</strong> Lambda Control 1 - V 2 - en<br />
55
56<br />
5 Cleaning and maintaining the <strong>HDG</strong> <strong>Navora</strong> – How to proceed<br />
✓ When the sensor test is complete, the “Sensor okay” message<br />
will appear in the display.<br />
✓ The oxygen sensor is calibrated.<br />
If the “Sensor defective” message appears in the display,<br />
have the fault rectified by a qualified electrician or an authorised<br />
<strong>HDG</strong> installer.<br />
6. Press the Plus and Minus buttons simultaneously.<br />
✓ The system component test is complete.<br />
Clean the panels and the primary air inlets<br />
1. Allow the fire in the boiler to burn out.<br />
The operating status of the <strong>HDG</strong> <strong>Navora</strong> must be indicated with<br />
“Heat production off” in the display of the <strong>HDG</strong> Lambda<br />
Control.<br />
✎ See section “4.1 Overview of the controls and display<br />
components” in chapter “4 Using the <strong>HDG</strong> <strong>Navora</strong> Wood Boiler”.<br />
Caution!<br />
Danger of burns from hot surfaces.<br />
The surfaces of the boiler can be hot. Even when turned off, they<br />
only cool down slowly.<br />
Do not start with the maintenance work until the surfaces have<br />
cooled down.<br />
2. Press the “Refill” button.<br />
<strong>HDG</strong> <strong>Navora</strong> 20/25/30 with <strong>HDG</strong> Lambda Control 1 - V 2 - en © <strong>HDG</strong> Bavaria GmbH 06/2008
5 Cleaning and maintaining the <strong>HDG</strong> <strong>Navora</strong> – How to proceed<br />
3. Open the fuelling chamber door (2) and the inside doors (1).<br />
Figure 5/17 - Cleaning the primary and secondary air ducts<br />
4. Lift up on the top inside panel.<br />
1<br />
1<br />
Figure 5/18 - Cleaning the primary and secondary air ducts<br />
5. Slide the panel (1) towards the right.<br />
© <strong>HDG</strong> Bavaria GmbH 06/2008 <strong>HDG</strong> <strong>Navora</strong> 20/25/30 with <strong>HDG</strong> Lambda Control 1 - V 2 - en<br />
2<br />
57
58<br />
5 Cleaning and maintaining the <strong>HDG</strong> <strong>Navora</strong> – How to proceed<br />
6. Fold down the panel (1) at the left side and remove it.<br />
1<br />
Figure 5/19 - Cleaning the primary and secondary air ducts<br />
7. Lift all upper panels (1) out of the holder.<br />
Figure 5/20 - Cleaning the primary and secondary air ducts<br />
<strong>HDG</strong> <strong>Navora</strong> 20/25/30 with <strong>HDG</strong> Lambda Control 1 - V 2 - en © <strong>HDG</strong> Bavaria GmbH 06/2008<br />
1
5 Cleaning and maintaining the <strong>HDG</strong> <strong>Navora</strong> – How to proceed<br />
8. Lift all lower panels (2) out of the holder.<br />
Figure 5/21 - Cleaning the primary and secondary air ducts<br />
9. Clean all of the primary air inlets (3) and the panels with a wire<br />
brush and a vacuum cleaner.<br />
Figure 5/22 - Cleaning the primary and secondary air ducts<br />
10.Reinstall the panels in reverse order.<br />
11. Close the boiler.<br />
✓ The panels and the primary air inlets are clean again.<br />
© <strong>HDG</strong> Bavaria GmbH 06/2008 <strong>HDG</strong> <strong>Navora</strong> 20/25/30 with <strong>HDG</strong> Lambda Control 1 - V 2 - en<br />
3<br />
2<br />
59
60<br />
6 Troubleshooting – How to proceed<br />
6 Troubleshooting<br />
6.1 How to proceed<br />
If a fault occurs in the <strong>HDG</strong> <strong>Navora</strong>, it will be indicated in the display<br />
of the <strong>HDG</strong> Lambda Control 1 and the by the indicator lamp on the<br />
<strong>HDG</strong> Lambda Control 1 control panel.<br />
Faults are broken down into two types:<br />
• Faults which permit the heating process to continue<br />
– The fault indicator lamp on the control panel of the <strong>HDG</strong><br />
Lambda Control 1 blinks<br />
• Faults which do not permit the heating process to continue<br />
– The fault indicator lamp on the control panel of the <strong>HDG</strong><br />
Lambda Control 1 lights up (stays on and does not blink)<br />
✎ See section “4 Using the <strong>HDG</strong> <strong>Navora</strong> Wood Boiler” in chapter<br />
“ Control panel <strong>HDG</strong> Lambda Control 1”<br />
1. Look for the displayed fault, its cause and remedy in Table 6/1 -<br />
Faults with blinking indicator lamp.<br />
2. Fix the fault, or have it fixed by an authorised electrician.<br />
3. Acknowledge the fault with the Arrow button.<br />
✓ The fault will be cleared from the display.<br />
<strong>HDG</strong> <strong>Navora</strong> 20/25/30 with <strong>HDG</strong> Lambda Control 1 - V 2 - en © <strong>HDG</strong> Bavaria GmbH 06/2008
6.2 Possible faults<br />
6 Troubleshooting – Possible faults<br />
Faults which do not interrupt the production of heat<br />
The fault indicator lamp on the control panel of the <strong>HDG</strong> Lambda<br />
Control 1 blinks.<br />
Fault message Cause Remedy<br />
Incorrect oxygen<br />
level reading<br />
Sensor is worn out<br />
or needs cleaning<br />
Plug/conductor<br />
Controller is<br />
faulty<br />
Incorrect tank<br />
(accumulator)<br />
temperature reading<br />
Plug/conductor<br />
Sensor is faulty<br />
Controller is<br />
faulty<br />
Incorrect return<br />
temperature reading<br />
Plug/conductor<br />
Sensor is faulty<br />
Controller is<br />
faulty<br />
(For system 5 only)<br />
Boiler temperature<br />
too low<br />
Return valve<br />
Plug/conductor<br />
Motor/controller<br />
• Oxygen sensor is worn<br />
out or needs cleaning<br />
• Sensor is faulty<br />
• Contact is open<br />
• Controller is faulty<br />
• Sensor is faulty<br />
• Contact is open<br />
• Controller is faulty<br />
• Sensor is faulty<br />
• Contact is open<br />
• Controller is faulty<br />
• Return valve<br />
Table 6/1 - Faults with blinking indicator lamp<br />
• Clean and calibrate the oxygen<br />
sensor<br />
✎ See chapter “5 Cleaning and<br />
maintaining the <strong>HDG</strong> <strong>Navora</strong>”<br />
• Can only be reset by calibrating<br />
• Have the fault fixed by an<br />
authorised installer<br />
• Automatically reset after fault is<br />
remedied<br />
• Have the fault fixed by an<br />
authorised installer<br />
• Automatically reset after fault is<br />
remedied<br />
• Have the fault fixed by an<br />
authorised installer<br />
• Reset by pressing the Arrow button<br />
© <strong>HDG</strong> Bavaria GmbH 06/2008 <strong>HDG</strong> <strong>Navora</strong> 20/25/30 with <strong>HDG</strong> Lambda Control 1 - V 2 - en<br />
61
62<br />
6 Troubleshooting – Possible faults<br />
Faults which interrupt the production of heat<br />
The fault indicator lamp on the control panel of the <strong>HDG</strong> Lambda<br />
Control 1 lights up (but does not blink).<br />
Fault message Cause Remedy<br />
STB is triggered -<br />
reset<br />
Insufficient heat<br />
extraction!<br />
Pumps/valves<br />
Incorrect exhaust<br />
temperature reading<br />
Plug/conductor<br />
Sensor is faulty<br />
Controller is<br />
faulty<br />
Incorrect boiler<br />
temperature reading<br />
Plug/conductor<br />
Sensor is faulty<br />
Controller is<br />
faulty<br />
Data loss<br />
Controller is<br />
faulty<br />
• Safety temperature<br />
limiter triggered<br />
• Sensor is faulty<br />
• Contact is open<br />
• Controller is faulty<br />
(exhaust temperature above<br />
300 ˚C, cleaning door open,<br />
door seal defective, fire in<br />
flue)<br />
• Sensor is faulty<br />
• Contact is open<br />
• Controller is faulty<br />
• Have the fault fixed by an<br />
authorised installer<br />
• Have the fault fixed by an<br />
authorised installer<br />
• Have the fault fixed by an<br />
authorised installer<br />
• Controller is faulty • Have the fault fixed by an<br />
authorised installer<br />
Table 6/2 - Faults which cause indicator lamp to stay on<br />
<strong>HDG</strong> <strong>Navora</strong> 20/25/30 with <strong>HDG</strong> Lambda Control 1 - V 2 - en © <strong>HDG</strong> Bavaria GmbH 06/2008
7 Commissioning the <strong>HDG</strong> <strong>Navora</strong> – Conditions<br />
7 Commissioning the <strong>HDG</strong> <strong>Navora</strong><br />
7.1 Conditions<br />
The <strong>HDG</strong> <strong>Navora</strong> will initially be commissioned by specialists from<br />
<strong>HDG</strong> Bavaria or from an authorised <strong>HDG</strong> partner.<br />
The commissioning includes an introduction to the operation and<br />
maintenance of the <strong>HDG</strong> <strong>Navora</strong> as well as the taking of<br />
measurements on the system for pollution and heating capacity.<br />
Danger!<br />
Material damage and injury due to incorrect commissioning.<br />
Commissioning the system requires comprehensive specialist<br />
knowledge. If this commissioning is done by an untrained person,<br />
the <strong>HDG</strong> <strong>Navora</strong> can be damaged.<br />
Only allow authorised specialists to do the commissioning.<br />
The following requirements must be met to ensure there are no<br />
problems during commissioning.<br />
• The <strong>HDG</strong> <strong>Navora</strong> has been filled with water as specified.<br />
• The <strong>HDG</strong> <strong>Navora</strong> has been deaerated.<br />
• The pressure of the membrane expansion container has been<br />
adapted to on-site conditions.<br />
• All required BS EN 12828 safety devices have been installed and<br />
are ready for operation.<br />
• The supply of power to all components has been provided<br />
(makeshift solutions are not sufficient).<br />
• All doors and access areas on the boiler and on the chimney<br />
connection duct have been checked for a proper seal.<br />
• Air supply for combustion has been provided.<br />
• A sufficient amount of fuel is available.<br />
© <strong>HDG</strong> Bavaria GmbH 06/2008 <strong>HDG</strong> <strong>Navora</strong> 20/25/30 with <strong>HDG</strong> Lambda Control 1 - V 2 - en<br />
63
64<br />
7 Commissioning the <strong>HDG</strong> <strong>Navora</strong> – Commissioning the <strong>HDG</strong> <strong>Navora</strong><br />
7.2 Commissioning the <strong>HDG</strong> <strong>Navora</strong><br />
Switching <strong>HDG</strong> <strong>Navora</strong> on<br />
1. Switch on the fused spur in the mains supply.<br />
2. Switch on the emergency heating switch (if one has been<br />
installed).<br />
✓ There is now electrical power in the <strong>HDG</strong> <strong>Navora</strong>.<br />
✓ The indicator light in the emergency heating switch will light up.<br />
✓ The control is activated.<br />
✓ The controller self test is activated.<br />
✓ The “Enter code” message will appear in the display.<br />
Configuring the control<br />
1. Press the Plus button.<br />
✓ The value of the displayed code will be increased by one.<br />
2. Confirm the value with the Arrow button.<br />
Language ✓ The “Language [D] Deutsch” message will appear in the<br />
display.<br />
3. Use the Plus or Minus button to select the desired language.<br />
✓ The selected language will appear in the display.<br />
4. Use the Arrow button to confirm your entry.<br />
✓ The language is set and the menu will advance to the next setting.<br />
Boiler type ✓ The “Boiler type <strong>HDG</strong> <strong>Navora</strong>..” message will appear in<br />
the display.<br />
5. Read the boiler type from the name plate on the boiler.<br />
6. Use the Plus or Minus button to select the appropriate boiler type.<br />
✓ The selected boiler type will appear in the display.<br />
7. Use the Arrow button to confirm your entry.<br />
✓ The boiler type is set and the menu will advance to the next<br />
setting.<br />
Hydraulic system ✓ The following message will appear in the<br />
display.“System no.: 0“.<br />
8. Use the Plus or Minus button to select the appropriate hydraulic<br />
system.<br />
✓ The selected hydraulic system will appear in the display.<br />
9. Use the Arrow button to confirm your entry.<br />
<strong>HDG</strong> <strong>Navora</strong> 20/25/30 with <strong>HDG</strong> Lambda Control 1 - V 2 - en © <strong>HDG</strong> Bavaria GmbH 06/2008
7 Commissioning the <strong>HDG</strong> <strong>Navora</strong> – Commissioning the <strong>HDG</strong> <strong>Navora</strong><br />
✓ The “Are you sure?” message will appear in the display.<br />
10.Press the Arrow button to confirm your selection.<br />
✓ The hydraulic system is set and the menu will advance to the next<br />
setting.<br />
11. Press the Minus button to change the selected hydraulic system.<br />
✓ The menu will return to the selection window for the hydraulic<br />
system.<br />
12.Select another hydraulic system and proceed as instructed in<br />
Step 10.<br />
✓ The hydraulic system is set and the menu will advance to the next<br />
setting.<br />
accumulator sensor ✓ The “Accumulator sensor: yes?” message will appear in<br />
the display.<br />
13.Use the Plus or Minus button to select the setting “Yes” or “No”.<br />
✓ The selected setting will appear in the display.<br />
14.Use the Arrow button to confirm your entry.<br />
✓ The setting is stored and the menu will advance to the next<br />
setting.<br />
Cable length of the<br />
accumulator sensor<br />
Minimum accumulator<br />
temperature<br />
Refer to the planning and installation documentation to determine<br />
the specific hydraulic system.<br />
“Accumulator sensor in [m] 8” will only appear if the “Accumulator<br />
sensor: yes” setting was selected.<br />
✓ The “Accumulator sensor length in [m] 8” message<br />
will appear in the display.<br />
15.Use the Plus or Minus button to select the actual cable length to<br />
ensure that the correct value will be obtained for temperature<br />
readings.<br />
✓ The corresponding value will appear in the display.<br />
16.Use the Arrow button to confirm your entry.<br />
✓ The cable length is set and the menu will advance to the next<br />
setting.<br />
✓ The “Min. tank TS [°C] 45” message will appear in the<br />
display.<br />
17.Use the Plus or Minus button to select the desired minimum<br />
accumulator temperature for load balancing, accumulator or<br />
energy store.<br />
If the preset minimum temperature is not achieved, the “Refill”<br />
indicator is activated and the oil or gas burner is switched on (for<br />
hybrid systems).<br />
© <strong>HDG</strong> Bavaria GmbH 06/2008 <strong>HDG</strong> <strong>Navora</strong> 20/25/30 with <strong>HDG</strong> Lambda Control 1 - V 2 - en<br />
65
66<br />
7 Commissioning the <strong>HDG</strong> <strong>Navora</strong> – Commissioning the <strong>HDG</strong> <strong>Navora</strong><br />
Minimum boiler<br />
temperature<br />
Minimum exhaust<br />
temperature<br />
✓ The selected minimum accumulator temperature will appear in<br />
the display.<br />
18.Use the Arrow button to confirm your entry.<br />
✓ The minimum accumulator temperature is set and the menu will<br />
advance to the next setting.<br />
✓ The “Min. boiler TK<br />
[°C] 60” message will appear in the display.<br />
The “Minimum boiler temperature” should not be set to less than<br />
60 ˚C.<br />
19.Use the Plus or Minus button to select the required “minimum<br />
boiler temperature”.<br />
✓ The selected temperature will appear in the display.<br />
20.Use the Arrow button to confirm your entry.<br />
The setting is stored and the menu will advance to the next setting.<br />
✓ The “Min. exhaust temperature/<br />
TAmin [°C] 100” message will appear in the display.<br />
This value is the required lowest temperature setting for the<br />
chimney. Observe the specifications provided by the chimney<br />
manufacturer and/or installer.<br />
21.Use the Plus or Minus button to select the appropriate minimum<br />
exhaust temperature.<br />
✓ The selected temperature will appear in the display.<br />
22.Confirm the minimum exhaust temperature setting with the Arrow<br />
button.<br />
✓ The minimum exhaust temperature is set and the menu will<br />
advance to the next setting.<br />
Return valve runtime ✓ The “Return valve<br />
[sec.] 150” message will appear in the display.<br />
23.Use the Plus or Minus button to select the runtime for the<br />
installed servo drive for the return valve.<br />
Please note!<br />
Setting range 120 - 240 seconds.<br />
✓ The selected runtime will appear in the display.<br />
24.Use the Arrow button to confirm your entry.<br />
✓ The runtime is set and the menu will advance to the next setting.<br />
Charging valve runtime ✓ The “Charging valve<br />
[sec.] 150” message will appear in the display.<br />
25.Use the Plus or Minus button to select the runtime for the<br />
installed servo drive for the charging valve.<br />
<strong>HDG</strong> <strong>Navora</strong> 20/25/30 with <strong>HDG</strong> Lambda Control 1 - V 2 - en © <strong>HDG</strong> Bavaria GmbH 06/2008
7 Commissioning the <strong>HDG</strong> <strong>Navora</strong> – Commissioning the <strong>HDG</strong> <strong>Navora</strong><br />
Please note!<br />
Setting range 120 - 240 seconds.<br />
✓ The selected runtime will appear in the display.<br />
26.Use the Arrow button to confirm your entry.<br />
✓ The basic settings have been set. The display will revert back to<br />
the standard display mode, which alternately indicates the<br />
operating status and the boiler temperature.<br />
Setting the target boiler temperature<br />
1. Press the Arrow button.<br />
✓ The SELECTION and INFORMATION message will appear in the<br />
display.<br />
2. Press the Plus button.<br />
✓ The SELECTION and SETTINGS message will appear in the<br />
display.<br />
3. Press the Arrow button.<br />
✓ Target boiler temperature TK S [°C] will appear in<br />
the display.<br />
4. Use the Arrow button to select parameters.<br />
✓ The value will blink in the display.<br />
5. Use the Plus or Minus button to increase or decrease the value up<br />
to 82 ˚ C (factory default 80 ˚ C).<br />
6. Confirm the input value with the Arrow button.<br />
✓ The boiler target temperature is set.<br />
✎ See section “4.3 Structure of the menus” in chapter “4 Using the<br />
<strong>HDG</strong> <strong>Navora</strong> Wood Boiler”.<br />
✓ The <strong>HDG</strong> Lambda Control 1 control system has been set-up for<br />
your system and is ready for operation.<br />
7. Record the data and set values in the following table so that the<br />
parameters are readily available in case service is needed.<br />
© <strong>HDG</strong> Bavaria GmbH 06/2008 <strong>HDG</strong> <strong>Navora</strong> 20/25/30 with <strong>HDG</strong> Lambda Control 1 - V 2 - en<br />
67
68<br />
7 Commissioning the <strong>HDG</strong> <strong>Navora</strong> – Commissioning the <strong>HDG</strong> <strong>Navora</strong><br />
Customer data<br />
Customer’s<br />
name<br />
Street<br />
Postcode/city<br />
Telephone<br />
Customer data<br />
Boiler type <strong>HDG</strong> <strong>Navora</strong> kW<br />
Boiler number<br />
Setting description<br />
Table 7/1 - Customer data<br />
Memorandum for set values<br />
Language • GB<br />
Hydraulic system (electrical connection) • O<br />
Accumulator sensor • Yes<br />
Standard<br />
configuration<br />
Accumulator sensor length in [m] • 8 m<br />
Minimum accumulator temperature TS min [˚C] • 45 ˚C<br />
Minimum boiler temperature TK min [˚C] • 60 ˚C<br />
Minimum exhaust temperature TA min [˚C] • 100 ˚C<br />
Return valve runtime [sec] • 150 sec.<br />
Charging valve runtime [sec] • 150 sec.<br />
Table 7/2 - Set values<br />
Alternative settings<br />
<strong>HDG</strong> <strong>Navora</strong> 20/25/30 with <strong>HDG</strong> Lambda Control 1 - V 2 - en © <strong>HDG</strong> Bavaria GmbH 06/2008
7 Commissioning the <strong>HDG</strong> <strong>Navora</strong> – Commissioning the <strong>HDG</strong> <strong>Navora</strong><br />
Testing system components<br />
Caution!<br />
For safety reasons, the system component test may only be<br />
conducted when there is no fuel in the boiler and there are no<br />
remaining embers.<br />
Please note!<br />
Test can only be conducted in “Heat production off” mode.<br />
How to proceed The respective test is initiated by pressing the Plus button.<br />
The respective test is stopped by pressing the Minus button.<br />
The test is conducted on the next component by pressing the Arrow<br />
button.<br />
The component test is stopped by simultaneously pressing the Plus<br />
and Minus buttons.<br />
1. Press the Arrow button.<br />
✓ The “Selection/information” message will appear in the<br />
display.<br />
2. Press the Plus button.<br />
✓ The display changes to Selection/settings.<br />
3. Press the Plus button again.<br />
✓ The display changes to Selection/component test.<br />
4. Press the Arrow button.<br />
✓ The O2 sensor test message will appear in the display.<br />
5. Press the Plus button.<br />
✓ The O2 sensor test will begin. (Duration = 720 seconds)<br />
✎ See the paragraph “ Calibrate the oxygen sensor” in section<br />
“5.2 How to proceed” in the chapter “5 Cleaning and maintaining<br />
the <strong>HDG</strong> <strong>Navora</strong>”.<br />
✓ The O2 sensor test is complete.<br />
6. Press the Arrow button.<br />
✓ The display advances to the next component: primary pump.<br />
© <strong>HDG</strong> Bavaria GmbH 06/2008 <strong>HDG</strong> <strong>Navora</strong> 20/25/30 with <strong>HDG</strong> Lambda Control 1 - V 2 - en<br />
69
70<br />
7 Commissioning the <strong>HDG</strong> <strong>Navora</strong> – Commissioning the <strong>HDG</strong> <strong>Navora</strong><br />
7. Now conduct the test according to steps listed above for each<br />
individual component in the order listed below.<br />
The component testing sequence is as follows.<br />
• Return valve (Y1)<br />
The switch (1) of the servo motor has to be moved in the position<br />
as shown in figure 7/1.<br />
1<br />
Figure 7/1 - Switch servo motor<br />
To change the direction of rotation the black and the brown wire<br />
at the servo motor have to be swapped.<br />
The closed door (1) is shown by groove (2) at the axle of the return<br />
Valve Y1.<br />
Figure 7/2 - Return valve Y1<br />
1<br />
Figure 7/3 - Return valve Y1<br />
The switch (1) of the servo motor has to be moved in the position<br />
as shown in figure 7/4.<br />
1<br />
Figure 7/4 - Switch servo motor<br />
<strong>HDG</strong> <strong>Navora</strong> 20/25/30 with <strong>HDG</strong> Lambda Control 1 - V 2 - en © <strong>HDG</strong> Bavaria GmbH 06/2008<br />
SM 4<br />
M<br />
1<br />
2<br />
N<br />
blue<br />
grey<br />
black<br />
brown
7 Commissioning the <strong>HDG</strong> <strong>Navora</strong> – Commissioning the <strong>HDG</strong> <strong>Navora</strong><br />
The closed door (1) is shown by groove (2) at the axle of the return<br />
Valve Y 1.<br />
Figure 7/5 - Return valve Y1<br />
1 2<br />
Figure 7/6 - Return valve Y1<br />
• Fan<br />
• Door opener (not fitted on <strong>HDG</strong> <strong>Navora</strong> 20/25/30 with <strong>HDG</strong><br />
Lambda Control 1)<br />
• Primary (air) actuator motor<br />
• Secondary (air) actuator motor<br />
• Charging valve (Y2)<br />
✎ See testing sequences „Return valve (Y 1)“ one page before.<br />
• Change-over contact<br />
• Illumination (display)<br />
• Heat production on LED<br />
• Refill LED<br />
• Fault LED<br />
After the last component has been tested, the display will<br />
automatically change the <strong>HDG</strong> Lambda Control 1 control system to<br />
“Heat production off” mode.<br />
The <strong>HDG</strong> <strong>Navora</strong> 20/25/30 with <strong>HDG</strong> Lambda Control 1 log wood<br />
boiler does not require any additional settings.<br />
8. Heat up the <strong>HDG</strong> <strong>Navora</strong>.<br />
✎ See chapter “4 Using the <strong>HDG</strong> <strong>Navora</strong> Wood Boiler”, section<br />
“4.6 Lighting and refuelling the <strong>HDG</strong> <strong>Navora</strong>”.<br />
✓ The <strong>HDG</strong> <strong>Navora</strong> is now fully operational.<br />
© <strong>HDG</strong> Bavaria GmbH 06/2008 <strong>HDG</strong> <strong>Navora</strong> 20/25/30 with <strong>HDG</strong> Lambda Control 1 - V 2 - en<br />
1<br />
71
72<br />
8 Notes on dismantling and disposal – Dismantling<br />
8 Notes on dismantling and<br />
disposal<br />
8.1 Dismantling<br />
Danger!<br />
Material damage and injury due to incorrect disassembly.<br />
Only dismantle the boiler after you have thoroughly read the<br />
manual.<br />
The <strong>HDG</strong> <strong>Navora</strong> can be dismantled as follows.<br />
1. Allow the fire in the <strong>HDG</strong> <strong>Navora</strong> to burn out and for the system to<br />
cool off.<br />
Danger!<br />
Danger from electrical current or voltage<br />
The <strong>HDG</strong> <strong>Navora</strong> can only be completely de-energised by switching<br />
off the mains circuit breaker or the emergency heating switch.<br />
2. Switch off the <strong>HDG</strong> <strong>Navora</strong> at the emergency heating switch or the<br />
mains circuit breaker.<br />
✓ The system has been de-energised.<br />
✓ The control is deactivated.<br />
3. Isolate the <strong>HDG</strong> <strong>Navora</strong> from the electrical power supply.<br />
Caution!<br />
Danger of burns from hot surfaces and liquids.<br />
When operating, the boiler surfaces under the cladding are hot.<br />
Even when turned off, they only cool down slowly.<br />
Switch off the <strong>HDG</strong> <strong>Navora</strong>, and only begin dismantling it after it<br />
has cooled down.<br />
4. Once it has cooled down, drain the heating water from the<br />
system.<br />
5. Whilst maintaining the personal safety regulations, separate the<br />
boiler from the <strong>HDG</strong> <strong>Navora</strong>.<br />
6. Dismantle the individual components of the <strong>HDG</strong> <strong>Navora</strong>.<br />
✓ The combustion chamber has been dismantled.<br />
<strong>HDG</strong> <strong>Navora</strong> 20/25/30 with <strong>HDG</strong> Lambda Control 1 - V 2 - en © <strong>HDG</strong> Bavaria GmbH 06/2008
8.2 Disposal<br />
8 Notes on dismantling and disposal – Disposal<br />
Caution!<br />
Hand injuries<br />
Some of the combustion chamber components are very heavy and<br />
can cause injuries if they are not handled with care.<br />
The following components are made of steel and can be recycled via<br />
a local recycling centre.<br />
• Boiler<br />
• Cladding<br />
The electrical components can also be recycled via the local<br />
recycling centre.<br />
Fibreglass, mineral wool and plastic parts should be handed in to the<br />
relevant waste disposal centres.<br />
Oily or greasy components and capacitors may only be disposed of<br />
through a specialist waste disposal centre.<br />
© <strong>HDG</strong> Bavaria GmbH 06/2008 <strong>HDG</strong> <strong>Navora</strong> 20/25/30 with <strong>HDG</strong> Lambda Control 1 - V 2 - en<br />
73
74<br />
9 Warranty and extended warranty – Specification<br />
9 Warranty and extended<br />
warranty<br />
9.1 Specification<br />
For the boiler body, we have extended the compulsory warranty<br />
period from two to five years.<br />
For electrical and other components, the warranty period is two<br />
years.<br />
9.2 Extended warranty conditions<br />
In additional to any legal stipulations, the following legal<br />
requirements must also be met for all warranty claims:<br />
• The <strong>HDG</strong> <strong>Navora</strong> must be commissioned by our customer service<br />
department or by an authorised specialist company.<br />
• The <strong>HDG</strong> <strong>Navora</strong> must be operated as specified in the operating<br />
manual.<br />
• The installation of the <strong>HDG</strong> <strong>Navora</strong> and the hydraulic components<br />
must meet the requirements in the <strong>HDG</strong> planning and installation<br />
instructions and the specified <strong>HDG</strong> hydraulic schemes.<br />
• The <strong>HDG</strong> <strong>Navora</strong> must be installed to applicable rules, regulations<br />
and guidelines.<br />
• The fuel quality must correspond to the requirements specified by<br />
<strong>HDG</strong> Bavaria GmbH.<br />
• The apparent defect is to be remedied by <strong>HDG</strong> Bavaria GmbH.<br />
<strong>HDG</strong> <strong>Navora</strong> 20/25/30 with <strong>HDG</strong> Lambda Control 1 - V 2 - en © <strong>HDG</strong> Bavaria GmbH 06/2008
9.3 Warranty exclusions<br />
9 Warranty and extended warranty – Warranty exclusions<br />
Unauthorised modifications and damage due to excessive force are<br />
not covered by the warranty.<br />
The warranty does not cover:<br />
• Damage due to improper use or installation, nor damage caused<br />
by inadequate maintenance or by the operation of the the system<br />
and the <strong>HDG</strong> <strong>Navora</strong> in an impermissible way.<br />
• Damage caused by external influences (such as fire, water,<br />
lightning, excess voltage) and normal wear and tear (e.g. of seals<br />
etc).<br />
• Corrosion damage, which is caused by operating the system<br />
below the minimum nominal thermal output level specified by the<br />
manufacturer.<br />
• Corrosion damage, which results from the use of non-approved<br />
fuels.<br />
• Corrosion damage, which is caused by operating the system<br />
below the specified minimum boiler return temperature.<br />
• Damages caused by subjecting the boiler sheeting to extreme<br />
heat, as the result of blockages on the water side.<br />
© <strong>HDG</strong> Bavaria GmbH 06/2008 <strong>HDG</strong> <strong>Navora</strong> 20/25/30 with <strong>HDG</strong> Lambda Control 1 - V 2 - en<br />
75
76<br />
10 Declaration of conformity<br />
10 Declaration of conformity<br />
as well<br />
as:<br />
The construction of the machinery<br />
Make: <strong>HDG</strong> <strong>Navora</strong><br />
Type: <strong>HDG</strong> <strong>Navora</strong> 20/25/30<br />
has been developed, designed and manufactured in accordance with the EC directive/s as above, in the sole<br />
responsibility of<br />
Company:<br />
EC declaration of conformity<br />
in accordance with the EC directive machinery 98/37/EC, annex II A<br />
2006/ 95/ CE - L 374/10 (Voltage limits) Directive of the european Parliament and of the council of<br />
12 December 2006 on the harmonisation of the laws of Member States relating to electrical<br />
equipment designed for use within certain voltage limits (codified version)<br />
EG 89/ 336/EWG - L139/89 (Electromagnetic compatibility) Council directive of 3 MAY 1989 on the<br />
approximation of the laws of the member<br />
states relating to electromagnetic compatibility (89/336/EEC)<br />
97/ 23/ EC (Pressure equipment) Directive 97/23/EC of 1997-05-29 on the approximation of the<br />
laws of the member<br />
states concerning pressure equipment<br />
<strong>HDG</strong> Bavaria GmbH, Heizsysteme für Holz<br />
Siemensstraße 22<br />
D-84323 Massing<br />
The following harmonized and national standards and specifications have been applied:<br />
EN 303-5 : 1998.11.12 Part 5: Heating boilers for solid fuels, hand and automatically stocked, nominal heat output of up to 300<br />
kW Terminology, requirements, testing and marking<br />
EN 1050 : 1996 Safety of machinery - Principles for risk assessment<br />
EN ISO 12100-1 : 2003 Safety of machinery - Basic concepts, general priciples for design - Part 1: Basic terminology,<br />
methodology<br />
EN ISO 12100-2 : 2003 Safety of machinery - Basic concepts, general principles for design - Part 2: Technical principles<br />
EN 60204-1 : 1997 12 Safety of machinery - Electrical equipment of machines - Part 1: General requirements<br />
EN 60335-1 : 2002 Household and similar electrical appliances - Safety - Part 1: General requirements (IEC 60335-1:2001,<br />
modified)<br />
Massing, 16.01.2008<br />
Place, date Signature<br />
Wohlmannstetter<br />
Geschäftsführer<br />
<strong>HDG</strong> <strong>Navora</strong> 20/25/30 with <strong>HDG</strong> Lambda Control 1 - V 2 - en © <strong>HDG</strong> Bavaria GmbH 06/2008
Notes<br />
10 Declaration of conformity<br />
© <strong>HDG</strong> Bavaria GmbH 06/2008 <strong>HDG</strong> <strong>Navora</strong> 20/25/30 with <strong>HDG</strong> Lambda Control 1 - V 2 - en<br />
77
Notes<br />
78<br />
10 Declaration of conformity<br />
<strong>HDG</strong> <strong>Navora</strong> 20/25/30 with <strong>HDG</strong> Lambda Control 1 - V 2 - en © <strong>HDG</strong> Bavaria GmbH 06/2008
Notes<br />
10 Declaration of conformity<br />
© <strong>HDG</strong> Bavaria GmbH 06/2008 <strong>HDG</strong> <strong>Navora</strong> 20/25/30 with <strong>HDG</strong> Lambda Control 1 - V 2 - en<br />
79
<strong>HDG</strong> Bavaria GmbH<br />
Heizsysteme für Holz<br />
Siemensstraße 22<br />
D-84323 Massing<br />
Tel. +49(0)8724/ 897-0<br />
info@hdg-bavaria.com<br />
www.hdg-bavaria.com<br />
Art.Nr: 9980000xxx - V 02 - en - 06/2008 - Translation of the original operating instructions