455 D Control Board - FAAC USA
455 D Control Board - FAAC USA
455 D Control Board - FAAC USA

You also want an ePaper? Increase the reach of your titles
YUMPU automatically turns print PDFs into web optimized ePapers that Google loves.
1.6 Start-Up<br />
1.6.1 LED Check<br />
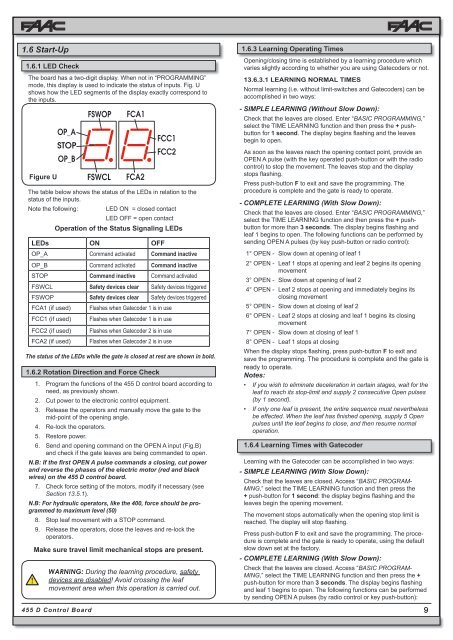
The board has a two-digit display. When not in “PROGRAMMING”<br />
mode, this display is used to indicate the status of inputs. Fig. U<br />
shows how the LED segments of the display exactly correspond to<br />
the inputs.<br />
Figure U<br />
The table below shows the status of the LEDs in relation to the<br />
status of the inputs.<br />
Note the following: LED ON = closed contact<br />
<strong>455</strong> D <strong>Control</strong> <strong>Board</strong><br />
LED OFF = open contact<br />
Operation of the Status Signaling LEDs<br />
LEDs ON OFF<br />
OP_A Command activated Command inactive<br />
OP_B Command activated Command inactive<br />
STOP Command inactive Command activated<br />
FSWCL Safety devices clear Safety devices triggered<br />
FSWOP Safety devices clear Safety devices triggered<br />
FCA1 (if used) Flashes when Gatecoder 1 is in use<br />
FCC1 (if used) Flashes when Gatecoder 1 is in use<br />
FCC2 (if used) Flashes when Gatecoder 2 is in use<br />
FCA2 (if used) Flashes when Gatecoder 2 is in use<br />
The status of the LEDs while the gate is closed at rest are shown in bold.<br />
1.6.2 Rotation Direction and Force Check<br />
1. Program the functions of the <strong>455</strong> D control board according to<br />
need, as previously shown.<br />
2. Cut power to the electronic control equipment.<br />
3. Release the operators and manually move the gate to the<br />
mid-point of the opening angle.<br />
4. Re-lock the operators.<br />
5. Restore power.<br />
6. Send and opening command on the OPEN A input (Fig.B)<br />
and check if the gate leaves are being commanded to open.<br />
N.B: If the first OPEN A pulse commands a closing, cut power<br />
and reverse the phases of the electric motor (red and black<br />
wires) on the <strong>455</strong> D control board.<br />
7. Check force setting of the motors, modify if necessary (see<br />
Section 13.5.1).<br />
N.B: For hydraulic operators, like the 400, force should be programmed<br />
to maximum level (50)<br />
8. Stop leaf movement with a STOP command.<br />
9. Release the operators, close the leaves and re-lock the<br />
operators.<br />
Make sure travel limit mechanical stops are present.<br />
WARNING: During the learning procedure, safety<br />
devices are disabled! Avoid crossing the leaf<br />
movement area when this operation is carried out.<br />
1.6.3 Learning Operating Times<br />
Opening/closing time is established by a learning procedure which<br />
varies slightly according to whether you are using Gatecoders or not.<br />
13.6.3.1 LEARNING NORMAL TIMES<br />
Normal learning (i.e. without limit-switches and Gatecoders) can be<br />
accomplished in two ways:<br />
- SIMPLE LEARNING (Without Slow Down):<br />
Check that the leaves are closed. Enter “BASIC PROGRAMMING,”<br />
select the TIME LEARNING function and then press the + pushbutton<br />
for 1 second. The display begins flashing and the leaves<br />
begin to open.<br />
As soon as the leaves reach the opening contact point, provide an<br />
OPEN A pulse (with the key operated push-button or with the radio<br />
control) to stop the movement. The leaves stop and the display<br />
stops flashing.<br />
Press push-button F to exit and save the programming. The<br />
procedure is complete and the gate is ready to operate.<br />
- COMPLETE LEARNING (With Slow Down):<br />
Check that the leaves are closed. Enter “BASIC PROGRAMMING,”<br />
select the TIME LEARNING function and then press the + pushbutton<br />
for more than 3 seconds. The display begins flashing and<br />
leaf 1 begins to open. The following functions can be performed by<br />
sending OPEN A pulses (by key push-button or radio control):<br />
1° OPEN - Slow down at opening of leaf 1<br />
2° OPEN - Leaf 1 stops at opening and leaf 2 begins its opening<br />
movement<br />
3° OPEN - Slow down at opening of leaf 2<br />
4° OPEN - Leaf 2 stops at opening and immediately begins its<br />
closing movement<br />
5° OPEN - Slow down at closing of leaf 2<br />
6° OPEN - Leaf 2 stops at closing and leaf 1 begins its closing<br />
movement<br />
7° OPEN - Slow down at closing of leaf 1<br />
8° OPEN - Leaf 1 stops at closing<br />
When the display stops flashing, press push-button F to exit and<br />
save the programming. The procedure is complete and the gate is<br />
ready to operate.<br />
Notes:<br />
• If you wish to eliminate deceleration in certain stages, wait for the<br />
leaf to reach its stop-limit and supply 2 consecutive Open pulses<br />
(by 1 second).<br />
• If only one leaf is present, the entire sequence must nevertheless<br />
be effected. When the leaf has finished opening, supply 5 Open<br />
pulses until the leaf begins to close, and then resume normal<br />
operation.<br />
1.6.4 Learning Times with Gatecoder<br />
Learning with the Gatecoder can be accomplished in two ways:<br />
- SIMPLE LEARNING (With Slow Down):<br />
Check that the leaves are closed. Access “BASIC PROGRAM-<br />
MING,” select the TIME LEARNING function and then press the<br />
+ push-button for 1 second: the display begins flashing and the<br />
leaves begin the opening movement.<br />
The movement stops automatically when the opening stop limit is<br />
reached. The display will stop flashing.<br />
Press push-button F to exit and save the programming. The procedure<br />
is complete and the gate is ready to operate, using the default<br />
slow down set at the factory.<br />
- COMPLETE LEARNING (With Slow Down):<br />
Check that the leaves are closed. Access “BASIC PROGRAM-<br />
MING,” select the TIME LEARNING function and then press the +<br />
push-button for more than 3 seconds. The display begins flashing<br />
and leaf 1 begins to open. The following functions can be performed<br />
by sending OPEN A pulses (by radio control or key push-button):<br />
9