OM, Partner, P1033 E, 96432096400, 2005-01, Electric Lawn ...
OM, Partner, P1033 E, 96432096400, 2005-01, Electric Lawn ...
OM, Partner, P1033 E, 96432096400, 2005-01, Electric Lawn ...

You also want an ePaper? Increase the reach of your titles
YUMPU automatically turns print PDFs into web optimized ePapers that Google loves.
GB<br />
DE<br />
FR<br />
NL<br />
NO<br />
FI<br />
SE<br />
DK<br />
ES<br />
PT<br />
IT<br />
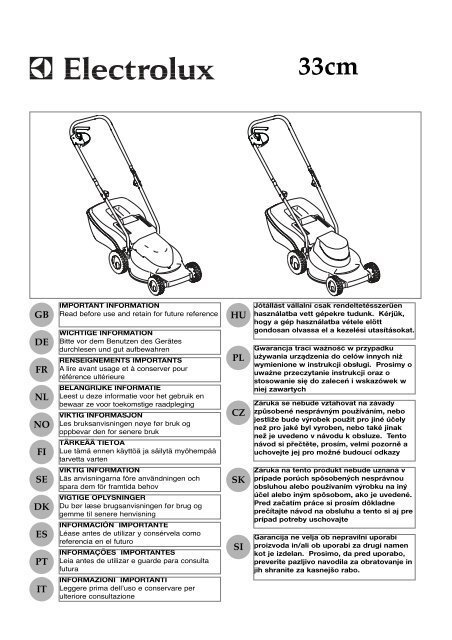
IMPORTANT INFORMATION<br />
Read before use and retain for future reference<br />
WICHTIGE INFORMATION<br />
Bitte vor dem Benutzen des Gerätes<br />
durchlesen und gut aufbewahren<br />
RENSEIGNEMENTS IMPORTANTS<br />
A lire avant usage et à conserver pour<br />
référence ultérieure<br />
BELANGRIJKE INFORMATIE<br />
Leest u deze informatie voor het gebruik en<br />
bewaar ze voor toekomstige raadpleging<br />
VIKTIG INFORMASJON<br />
Les bruksanvisningen nøye før bruk og<br />
oppbevar den for senere bruk<br />
TÄRKEÄÄ TIETOA<br />
Lue tämä ennen käyttöä ja säilytä myöhempää<br />
tarvetta varten<br />
VIKTIG INFORMATION<br />
Läs anvisningarna före användningen och<br />
spara dem för framtida behov<br />
VIGTIGE OPLYSNINGER<br />
Du bør læse brugsanvisningen før brug og<br />
gemme til senere henvisning<br />
INFORMACIÓN IMPORTANTE<br />
Léase antes de utilizar y consérvela como<br />
referencia en el futuro<br />
INFORMAÇÕES IMPORTANTES<br />
Leia antes de utilizar e guarde para consulta<br />
futura<br />
INFORMAZIONI IMPORTANTI<br />
Leggere prima dell’uso e conservare per<br />
ulteriore consultazione<br />
HU<br />
PL<br />
CZ<br />
SK<br />
SI<br />
33cm<br />
Jótállást vállalni csak rendeltetésszerűen<br />
használatba vett gépekre tudunk. Kérjük,<br />
hogy a gép használatba vétele elött<br />
gondosan olvassa el a kezelési utasításokat.<br />
Gwarancja traci ważność w przypadku<br />
używania urządzenia do celów innych niż<br />
wymienione w instrukcji obsługi. Prosimy o<br />
uważne przeczytanie instrukcji oraz o<br />
stosowanie się do zaleceń i wskazówek w<br />
niej zawartych<br />
Záruka se nebude vztahovat na závady<br />
způsobené nesprávným používáním, nebo<br />
jestliže bude výrobek použit pro jiné účely<br />
než pro jaké byl vyroben, nebo také jinak<br />
než je uvedeno v návodu k obsluze. Tento<br />
návod si přečtěte, prosím, velmi pozorně a<br />
uchovejte jej pro možné budoucí odkazy<br />
Záruka na tento produkt nebude uznaná v<br />
prípade porúch spôsobených nesprávnou<br />
obsluhou alebo používaním výrobku na iný<br />
účel alebo iným spôsobom, ako je uvedené.<br />
Pred začatím práce si prosím dôkladne<br />
prečítajte návod na obsluhu a tento si aj pre<br />
prípad potreby uschovajte<br />
Garancija ne velja ob nepravilni uporabi<br />
proizvoda in/ali ob uporabi za drugi namen<br />
kot je izdelan. Prosimo, da pred uporabo,<br />
preverite pazljivo navodila za obratovanje in<br />
jih shranite za kasnejšo rabo.
A<br />
c<br />
F<br />
9<br />
J<br />
8<br />
6<br />
7<br />
5<br />
1<br />
2<br />
4<br />
3<br />
B<br />
D<br />
G<br />
1<br />
1<br />
1<br />
E<br />
H<br />
2<br />
1<br />
3<br />
1<br />
2
K L<br />
1<br />
N<br />
1<br />
Q<br />
2<br />
P<br />
3<br />
1<br />
2<br />
M<br />
4<br />
5
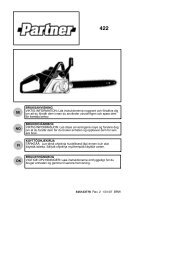
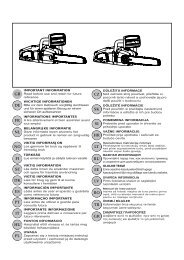
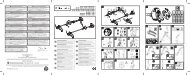
GB - CONTENTS<br />
1. Switchbox<br />
2. Start/stop lever<br />
3. Lock off button<br />
4. Switchbox screws x 2<br />
5. Upper handle<br />
6. Cable clip x 2<br />
7. Upper Handle Bolt x 2<br />
8. Upper handle Washer x<br />
2<br />
9. Upper Handle Wing Knob<br />
x 2<br />
10.Upper Handle Wing<br />
Knob Nut x 2<br />
11.Lower handle x 2<br />
12.Lower Handle Wing<br />
Knob Nut x 2<br />
13.Lower handle Wing Knob x<br />
2<br />
14.Lower Handle Washer<br />
x 2<br />
15.Motor Cover<br />
16.Deck<br />
17 Grassbox Handle (if<br />
applicable)<br />
18.Grassbox Upper<br />
19.Grassbox Lower<br />
20.Spanner<br />
21.Instruction Manual<br />
22.Safety Flap<br />
23.Warning Label<br />
24.Product Rating Label<br />
DE - INHALT<br />
1. Schalter<br />
2. Start-/Stopphebel<br />
3. Knopf zur Festsetzung in<br />
Aus-Position<br />
4. Schrauben für<br />
Schaltergehäuse x 2<br />
5. Oberer Griff<br />
6. Kabelhalter x 2<br />
7. Schrauben für oberen<br />
Bügel x 2<br />
8. Unterlegscheibe für<br />
oberen Bügel x 2<br />
9. Flügelknopf für oberen<br />
Bügel x 2<br />
10.Flügelknopfmutter für<br />
oberen Bügel x 2<br />
11.Unterer Griff x 2<br />
12.Flügelknopfmutter für<br />
unteren Bügel x 2<br />
13.Flügelknopf für unteren<br />
Bügel x 2<br />
14.Unterlegscheibe für<br />
unteren Bügel x 2<br />
15.Motorabdeckung<br />
16.Chassis<br />
17.Grasfangbügel (wenn<br />
zutreffend)<br />
18.Oberteil Fangbox<br />
19.Unterteil Fangbox<br />
20.Schraubenschlüssel<br />
21.Bedienungsanweisung<br />
22.Sicherungsklappe<br />
23.Warnetikett<br />
24.Produkttypenschild<br />
FR- TABLE DES MATIÈRES<br />
1. Boîtier de commande.<br />
2. Levier de démarrage/arrêt<br />
3. Bouton de blocage<br />
4. Vis du boîtier de<br />
commande x 2<br />
5. Guidon supérieur<br />
6. Attache câble x 2<br />
7. Boulons de la partie<br />
supérieure de la<br />
poignée x 2<br />
8. Rondelles de la partie<br />
supérieure de la<br />
poignée x 2<br />
9. Boutons de serrage de<br />
la partie supérieure x 2<br />
10.Écrous des boutons de<br />
serrage de la partie<br />
supérieure x 2<br />
11.Guidon inférieur x 2<br />
12.Écrous des boutons de<br />
serrage de la partie<br />
inférieure de la poignée x 2<br />
13.Boutons de serrage de<br />
la partie inférieure x 2<br />
14.Rondelles de la partie<br />
inférieure de la poignée<br />
x 2<br />
15.Couvercle du moteur<br />
16.Carter<br />
17.Poignée du bac (le cas<br />
échéant)<br />
18.Partie supérieure du bac<br />
19.Partie inférieure du bac<br />
20.Clé<br />
21.Manuel d’Instructions<br />
22.Volet de sécurité<br />
23.Etiquette d’avertissement<br />
24.Plaquette des<br />
Caractéristiques du Produit<br />
NL - INHOUD<br />
1. Schakelaar<br />
2. Start/stop-hendel<br />
3. Grendelknop<br />
4. Schroeven schakeldoos<br />
2 stuks<br />
5. Bovenstuk van duwboom<br />
6. Snoerklem x 2<br />
7. Bout bovenste<br />
handgreep x 2<br />
8. Borgschijfje bovenste<br />
handgreep x 2<br />
9. Vleugelschroef bovenste<br />
handgreep x 2<br />
10.Moer vleugelschroef<br />
bovenste handgreep x 2<br />
11.Onderstuk van duwboom<br />
x 2<br />
12.Moer vleugelschroef<br />
onderste handgreep x 2<br />
13.Vleugelschroef onderste<br />
handgreep x 2<br />
14.Borgschijfje onderste<br />
handgreep x 2<br />
15.Motorkap<br />
16.Dek<br />
17.Handgreep grasbak<br />
(indien van toepassing)<br />
18.Bovenste deel<br />
grasvangbak<br />
19.Onderste deel grasvangbak<br />
20.Sleutel<br />
21.Handleiding<br />
22.Veiligheidsklep<br />
23.Waarschuwingsetiket<br />
24.Product-informatielabel<br />
NO - INNHOLD<br />
1. Bryterboks<br />
2. Start/Stopp hendel<br />
3. Brytersperre<br />
4. Skrue til bryterboks x 2<br />
5. Øvre håndtak<br />
6. Kabelklemme x 2<br />
7. Skrue til øvre håndtak x 2<br />
8. Skive til over håndtak x 2<br />
9. Bolt til over håndtak x 2<br />
10.Vingemutter til øvre<br />
håndtak x 2<br />
11.Nedre håndtak x 2<br />
12.Vingemutter til nedre<br />
håndtak x 2<br />
13.Bolt til nedre håndtak x 2<br />
14.Skive til nedre håndtak<br />
x 2<br />
15.Motordeksel<br />
16.Klippedeksel<br />
17.Håndtak til<br />
gressoppsamler (hvis<br />
aktuelt)<br />
18.Øvre del av<br />
gressoppsamleren<br />
19.Nedre del av<br />
gressoppsamleren<br />
20.Skiftnøkkel<br />
21.Bruksanvisning<br />
22 Luke<br />
23.Advarselsetikett<br />
24.Produktmerking<br />
FI - SISÄLTÖ<br />
1. Kytkinrasia<br />
2. Käynnistyskahva<br />
3. Poislukituspainike<br />
4. Kytkinkotelon ruuvit x 2<br />
5. Ylempi kahva<br />
6. Johdon pidike x 2<br />
7. Yläkahvan pultti x 2<br />
8. Yläkahvan aluslevy x 2<br />
9. Yläkahvan kiristysnuppi<br />
x 2<br />
10.Yläkahvan kiristysnupin<br />
mutteri x 2<br />
11.Alempi kahva x 2<br />
12.Alakahvan kiristysnupin<br />
mutteri x 2<br />
13.Alakahvan kiristysnuppi<br />
x 2<br />
14.Alakahvan aluslaatta x 2<br />
15.Moottorin suojakansi<br />
16.Kansi<br />
17.Ruohonkerääjän kahva<br />
(jos käytössä)<br />
18.Ruoholaatikon yläosa<br />
19.Ruoholaatikon alaosa<br />
20.Kiintoavain<br />
21.Käyttöopas<br />
22.Suojaläppä<br />
23.Varoitusnimike<br />
24.Ruohonleikkurin<br />
arvokilpi<br />
SE - INNEHÅLL<br />
1. Kopplingsdosa<br />
2. Start/stopp-reglage<br />
3. Låsknapp<br />
4 Skruvar för<br />
kopplingsdosa, 2 st<br />
5. Övre handtag<br />
6. Kabelklämma 2 st<br />
7. Bult för övre handtag, 2<br />
st<br />
8. Mellanläggsbricka för<br />
övre handtag, 2 st<br />
9. Vingratt för övre<br />
handtag, 2 st<br />
10.Mutter för övre<br />
handtags vingratt, 2 st<br />
11.Undre handtag x 2<br />
12.Mutter för nedre<br />
handtags vindratt, 2 st<br />
13.Vingratt för nedre<br />
handtag, 2 st<br />
14.Mellanläggsbricka för<br />
nedre handtag, 2 st<br />
15.Motorskydd<br />
16.Kåpa<br />
17.Handtag för<br />
gräsuppsamlare (om<br />
sådan finns)<br />
18.Gräslådans överdel<br />
19.Gräslådans underdel<br />
20.Skiftnyckel<br />
21.Bruksanvisning<br />
22.Säkerhetsklaff<br />
23.Varningsetikett<br />
24.Produktmärkning<br />
DK - INDHOLD<br />
1. Afbryderkontakt<br />
2. Start/stophåndtag<br />
3. Låseknap<br />
4. Skruer til<br />
afbryderkontakt x 2<br />
5. Øvre håndtag<br />
6. Kabelklemme x 2<br />
7. Bolt til øverste håndtag<br />
x 2<br />
8. Pakning til øverste<br />
håndtag x 2<br />
9. Vingegreb til øverste<br />
håndtag x 2<br />
10.Vingegrebsmøtrik til<br />
øverste håndtag x 2<br />
11.Nedre håndtag x 2<br />
12.Vingegrebsmøtrik til<br />
nederste håndtag x 2<br />
13.Vingegreb til nederste<br />
håndtag x 2<br />
14.Pakning til nederste<br />
håndtag x 2<br />
15.Motordæksel<br />
16.Skjold<br />
17.Opsamlerhåndtag (hvis<br />
relevant)<br />
18.Øverste del af<br />
græsboksen<br />
19.Nederste del af<br />
græsboksen<br />
20.Skruenøgle<br />
21.Brugsvejledning<br />
22.Sikkerhedsklap<br />
23.Advarselsmœrkat<br />
24.Produktets mærkeskilt
(GB) CARTON CONTENTS<br />
(DE) KARTONINHALT<br />
(FR) CONTENU DU CARTON<br />
(NL) INHOUD<br />
(NO) KARTONGEN<br />
INNEHOLDER<br />
(FI) PAKETIN SISÄLTÖ<br />
3<br />
4<br />
18<br />
2<br />
17<br />
19<br />
6<br />
7<br />
1<br />
6<br />
20<br />
12<br />
(SE) FÖRPACKNINGENS<br />
INNEHÅLL<br />
(DK) KARTONINDHOLD<br />
(ES) CONTENIDO DEL<br />
CARTON<br />
(PT) LEGENDAS DOS<br />
DESENHOS<br />
13<br />
8<br />
9<br />
14<br />
5<br />
10<br />
22<br />
23<br />
24<br />
11<br />
7<br />
12<br />
14<br />
(IT) CONTENUTO<br />
(HU) A DOBOZ TARTALMA<br />
(PL) ZAWARTOŚĆ KARTONU<br />
(CZ) OBSAH KRABICE<br />
(SK) OBSAH BALENIA<br />
(SI) VSEBINA ŠKATLE<br />
13<br />
15<br />
16<br />
21
Explanation of Symbols on the 33cm<br />
STOP<br />
ENGLISH - 1<br />
Warning<br />
Read the user instructions carefully to<br />
make sure you understand all the controls<br />
and what they do<br />
Always keep the lawnmower on the ground<br />
when mowing. Tilting or lifting the lawnmower<br />
may cause stones to be thrown out<br />
Keep bystanders away. Do not mow<br />
whilst people especially children or pets<br />
are in the mowing area<br />
Switch off! Remove plug from mains<br />
before adjusting, cleaning or if cable is<br />
entangled or damaged. Keep the cable<br />
away from the blade.<br />
Beware of severing toes or hands.<br />
Do not put hands or feet near a rotating<br />
blade.<br />
Blade continues to rotate after the<br />
machine is switched off. Wait until all<br />
machine components have completely<br />
stopped before touching them.<br />
Do not mow in the rain or leave the<br />
lawnmower outdoors while raining<br />
General<br />
1. Never allow children or people unfamiliar with these<br />
instructions to use the mower. Local regulations may<br />
restrict the age of the operator.<br />
2. Only use the lawnmower in the manner and for the<br />
functions described in these instructions.<br />
3. Never operate the lawnmower when you are tired, ill<br />
or under the influence of alcohol, drugs or medicine.<br />
4. The operator or user is responsible for accidents or<br />
hazards occurring to other people or their property.<br />
<strong>Electric</strong>al<br />
1. The use of a Residual Current Device (R.C.D.) with a<br />
tripping current of not more than 30mA is<br />
recommended. Even with a R.C.D. installed 100%<br />
safety cannot be guaranteed and safe working<br />
practice must be followed at all times. Check your<br />
R.C.D. every time you use it.<br />
2. Before use, examine cable for damage, replace it if<br />
there are signs of damage or ageing.<br />
3. Do not use the lawnmower if the electric cables are<br />
damaged or worn<br />
4. Immediately disconnect from the mains electricity<br />
supply if the cable is cut, or the insulation is damaged.<br />
Do not touch the electric cable until the electrical supply<br />
has been disconnected. Do not repair a cut or<br />
damaged cable. Replace it with a new one.<br />
Safety Precautions<br />
If not used properly this lawnmower can be dangerous! This lawnmower can cause serious injury to<br />
the operator and others, the warnings and safety instructions must be followed to ensure reasonable<br />
safety and efficiency in using this lawnmower. The operator is responsible for following the warning<br />
and safety instructions in this manual and on the lawnmower. Never use the mower unless the<br />
grassbox or guards provided by the manufacturer are in the correct position.<br />
5. Your extension cable must be uncoiled, coiled<br />
cables can overheat and reduce the efficiency of<br />
your mower.<br />
6. Keep cable away from lawnmower, always work<br />
away from the power point mowing up and down,<br />
never in circles.<br />
7. Do not pull cable around sharp objects.<br />
8. Always switch off at the mains before disconnecting<br />
any plug, cable connector or extension cable.<br />
9. Switch off, remove plug from mains and examine<br />
electric supply cable for damage or ageing before<br />
winding cable for storage. Do not repair a damaged<br />
cable, replace it with a new one. Use only Electrolux<br />
replacement cable.<br />
10. Always wind cable carefully, avoiding kinking.<br />
11. Never carry the product by the cable.<br />
12. Never pull on the cable to disconnect any of the plugs.<br />
13. Use only on AC mains supply voltage shown on the<br />
product rating label.<br />
14. Electrolux products are double insulated to<br />
EN60335. Under no circumstances should an earth<br />
be connected to any part of the product.<br />
Cables<br />
Use only 1.00mm 2 size cable up to 40 metres length<br />
maximum.<br />
Maximum rating:<br />
1.00mm 2 size cable 10 amps 250 volts AC<br />
1. Mains cables and extensions are available from<br />
your local Electrolux Outdoor Products Approved<br />
Service Centre.<br />
2. Only use extension cables specifically designed for<br />
outdoor use.<br />
Preparation<br />
1. While using your product always wear substantial<br />
footwear and long trousers.<br />
2. Make sure the lawn is clear of sticks, stones, bones,<br />
wire and debris; they could be thrown by the blade.<br />
3. Before using the machine and after any impact,<br />
check for signs of wear or damage and repair as<br />
necessary.<br />
4. Replace worn or damaged blades together with their<br />
fixings in sets to preserve balance.<br />
Use<br />
1. Use the lawnmower only in daylight or good artificial<br />
light.<br />
2. Avoid operating your lawnmower in wet grass,<br />
where feasible.<br />
3. Take care in wet grass, you may lose your footing.<br />
4. On slopes, be extra careful of your footing and wear<br />
non-slip footwear.<br />
5. Mow across the face of slopes, never up and down.<br />
6. Exercise extreme caution when changing direction<br />
on slopes. Walk never run.<br />
7. Mowing on banks and slopes can be dangerous.<br />
Do not mow on banks or steep slopes.<br />
8. Do not walk backwards when mowing, you could trip.<br />
9. Never cut grass by pulling the mower towards you.<br />
10. Switch off before pushing the mower over surfaces<br />
other than grass.<br />
11. Never operate the lawnmower with damaged guards<br />
or without guards in place.<br />
12. Keep hands and feet away from the cutting means at<br />
all times and especially when switching on the motor.
13. Do not tilt lawnmower when the motor is running,<br />
except when starting and stopping. In this case, do<br />
not tilt more than absolutely necessary and lift only<br />
the part which is away from the operator. Always<br />
ensure that both hands are in the operating position<br />
before returning the appliance to the ground.<br />
14. Do not put hands near the grass discharge chute.<br />
15. Never pick up or carry a mower when it is operating<br />
or still connected to the mains supply.<br />
16. Remove the plug from the mains :<br />
- before leaving the mower unattended for any period;<br />
- before clearing a blockage;<br />
- before checking, cleaning or working on the<br />
appliance;<br />
- if you hit an object. Do not use your lawnmower<br />
until you are sure that the entire lawnmower is in a<br />
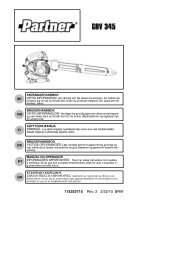
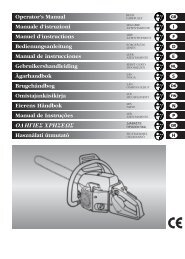
Assembly of Lower Handles to Deck<br />
1. Insert the nuts into the lower handle wing knobs. (A1)<br />
2. Place the hole in the lower handle over the end of<br />
the tie rod (A)<br />
3. Place the washer and wing knob onto the end of the<br />
tie rod and firmly tighten. (A)<br />
4. Repeat on the other side.<br />
Assembly of Upper Handles to Lower Handles.<br />
1. Insert the nuts into the upper handle wing knobs. (B1)<br />
2. Ensure the upper handle and the lower handle are<br />
aligned correctly. (B)<br />
3. Fit the bolts, washers and wing knobs..(B)<br />
4. Fit the cable to the handles with the clips provided,<br />
making sure the cables are not trapped between the<br />
upper and lower handles.<br />
Cutting Height Adjustment (G) and (H)<br />
• Height of cut is adjusted by raising or lowering<br />
the wheels.<br />
• There are five heights of cut on this product.<br />
• NOTE<br />
A medium height of cut is recommended for<br />
most lawns.<br />
The quality of your lawn will suffer and<br />
collection will be poor if you cut too low.<br />
Fitting Fully Assembled Grassbox to <strong>Lawn</strong>mower.<br />
See Fig J.<br />
1. Lift safety flap.<br />
2. Make sure the discharge chute is clean and free<br />
from debris.<br />
3. Locate fully assembled grassbox onto the location<br />
point at the rear of the deck (J1)<br />
4. Locate safety flap onto the top of the grassbox.<br />
Ensure the grassbox is securely located.<br />
Safety Precautions<br />
Assembly Instructions<br />
Adjusting the Cutting Height<br />
Grassbox<br />
safe operating condition.;<br />
- if the lawnmower starts to vibrate abnormally.<br />
Check immediately. Excessive vibration can cause<br />
injury.<br />
Maintenance and storage<br />
1. Keep all nuts, bolts and screws tight to be sure the<br />
lawnmower is in safe working condition.<br />
2. Check the grassbox/grassbag frequently for wear or<br />
deterioration.<br />
3. Replace worn or damaged parts for safety.<br />
4. Only use the replacement blade, blade bolt, spacer<br />
and impeller specified for this product.<br />
5. Be careful during adjustment of the lawnmower to<br />
prevent entrapment of the fingers between moving<br />
blades and fixed parts of the machine.<br />
Assembly of Switchbox to Upper Handle<br />
1. Insert the studs in the switchbox hinge into the holes<br />
in the upper handle as illustrated in Fig C<br />
2. Firmly secure with the two screws (D).<br />
Grassbox Assembly.<br />
1. Insert the grassbox handle into the grassbox upper, as<br />
illustrated in fig E, and press firmly down until the<br />
handle clicks into place - (if applicable).<br />
2. Align the grassbox upper with the grassbox lower.<br />
3. Locate the clips in the order illustrated in Fig F,<br />
ensuring all the clips are firmly in place.<br />
HEIGHT OF CUT WHEELS POSITION<br />
Low Front position 1<br />
Back position 1<br />
Low to Medium Front position 1<br />
Back position 2<br />
Medium Front position 2<br />
Back position 2<br />
Medium to High Front position 2<br />
Back position 3<br />
High Front position 3<br />
Back position 3<br />
• IMPORTANT !<br />
AFTER FITTING ENSURE NO GAP REMAINS<br />
BETWEEN THE SAFETY FLAP AND THE<br />
GRASSBOX.<br />
• Removal is the reverse procedure.<br />
• For larger areas of grass where grass collection is<br />
not required you can use your lawnmower without<br />
the grassbox. Ensure the Safety Flap is fully closed.<br />
The design of the safety flap permits the cut grass to<br />
be discharged downward behind the machine.<br />
ENGLISH - 2
To Start your <strong>Lawn</strong>mower<br />
1. Connect female extension cable connector to the<br />
back of the switchbox.<br />
2. Connect plug to mains and switch on.<br />
3. Tilt the handle downwards to slightly raise the front of<br />
the lawnmower and to reduce the risk of lawn<br />
damage whilst starting.<br />
1. For the best results, mow the outside edge of the<br />
lawn in a clockwise direction first.(N1)<br />
2. Then start mowing the edge of the lawn nearest to<br />
the power point so the cable is laid out on the lawn<br />
you have already cut. (N2)<br />
3. For best grass collection, always mow in a straight line,<br />
do not swing the lawnmower from side to side.<br />
ENGLISH - 3<br />
Starting and Stopping<br />
How to Mow<br />
The switchbox is provided with a lock-off button<br />
(K1) to prevent accidental starting.<br />
4. Press and hold the lock off button on the<br />
switchbox,(K1) then squeeze the Start/Stop lever<br />
towards the upper handle as shown on Fig. L.<br />
5. Continue to squeeze the start/stop lever towards the<br />
upper handle and release the lock-off button.(M)<br />
6. Lower the lawnmower to its proper operating position<br />
and commence mowing.<br />
To Stop your <strong>Lawn</strong>mower<br />
1. Release the pressure on the Start/Stop lever.<br />
Do Not Overload Your Mower<br />
Mowing long thick grass may cause the motor speed to<br />
drop, you will hear a change in the motor sound. If the<br />
motor speed drops you may overload your lawnmower<br />
which may cause damage. When mowing in long thick<br />
grass a first cut with the cutting height set higher will<br />
help reduce the load. See Adjusting the Cutting Height.<br />
Mow twice a week during the growing season, your lawn<br />
will suffer if more than a third of its length is cut at one<br />
time and this may also result in poor collection.<br />
Removing and Fitting the Blade and Fan<br />
P1 - Blade bolt P2 - Blade P3 - Fan<br />
• Always handle the blade with care - sharp edges<br />
could cause injury. USE GLOVES.<br />
Removing the Blade and Fan<br />
1. To remove the blade bolt, hold the fan firmly and with<br />
the spanner provided loosen the blade bolt by turning<br />
it anti-clockwise (P).<br />
2. Remove the blade bolt, blade and fan. (P)<br />
3. Inspect for damage and clean as necessary.<br />
• Renew your metal blade after 50 hours mowing<br />
or 2 years whichever is the sooner - regardless of<br />
condition.<br />
• If the blade is cracked or damaged replace it<br />
Cleaning (Q)<br />
• USE GLOVES<br />
• IMPORTANT<br />
It is very important that you keep your lawnmower<br />
clean. Grass clippings left in any of the air intakes or<br />
under the deck could become a potential fire hazard.<br />
1. Remove grass from under the deck with brush.<br />
2. Using a soft brush - remove grass clippings from all<br />
air intakes, the discharge chute and the grass box.<br />
3. Remove the blade, see Figure P, to gain access to<br />
the fan and clean with a soft brush.<br />
4. Wipe over the surface of your lawnmower with a dry<br />
cloth.<br />
Caring for your <strong>Lawn</strong>mower<br />
Service Recommendations<br />
with a new one.<br />
• Never use a blade bolt if the insulated head is<br />
damaged cracked or missing.<br />
Fitting the Blade and Fan<br />
1. Ensure the fan is located correctly.(P)<br />
2. Fit the blade to the fan with the tilt edges of the blade<br />
(P4) facing towards the mower, ensuring the blade is<br />
located onto the fan location points (P5) correctly<br />
3. Re-assemble blade bolt through blade and fan.<br />
4. Hold the fan firmly and tighten blade bolt firmly with<br />
the spanner provided. Do not over tighten.<br />
5. Do not use a longer spanner.<br />
• IMPORTANT<br />
Never use water for cleaning your lawnmower. Do<br />
not clean with chemicals, including petrol, or<br />
solvents - some can destroy critical plastic parts.<br />
At the End of the Mowing Season<br />
1. Replace blade, bolts, nuts or screws, if necessary.<br />
2. Clean your lawnmower thoroughly.<br />
3. Make sure that the electric cable is coiled properly.<br />
Storing your <strong>Lawn</strong>mower<br />
Store in a dry place where your lawnmower is protected<br />
from damage.<br />
• Your product is uniquely identified by a silver and black product rating label.<br />
• We strongly recommend that your product is serviced at least every twelve months, more often in a<br />
professional application.
Electrolux Outdoor Products are manufactured under<br />
an Environmental Management System (ISO 140<strong>01</strong>)<br />
using, where practical, components manufactured in<br />
the most environmentally responsible manner,<br />
according to company procedures, and with the<br />
potential for recycling at the end of the products’ life.<br />
• Packaging is recyclable and plastic components<br />
have been labelled (where practical) for<br />
categorised recycling.<br />
• Awareness of the environment must be considered<br />
when disposing of ‘end-of-life’ product.<br />
• If necessary, contact your local authority for<br />
disposal information.<br />
Fails to Operate<br />
1. Is the correct Starting procedure being followed?<br />
See ‘To Start your <strong>Lawn</strong>mower’<br />
2. Is the Power Turned On?<br />
3. Check the fuse in the plug, if blown replace.<br />
4. Fuse continues to blow?<br />
Immediately disconnect from the mains<br />
electricity supply and consult your local<br />
approved Service Centre.<br />
Poor Grass Collection<br />
1. Disconnect from the mains electricity supply.<br />
2. Clean the outside of the air intakes, the discharge<br />
chute and the underside of the deck.<br />
3. Raise to a higher height of cut. See Adjusting the<br />
Cutting Height<br />
4. Clean Fan Blades.<br />
5. If poor collection persists.<br />
Immediately disconnect from the mains<br />
electricity supply and consult your local<br />
approved Service Centre.<br />
If any part is found to be defective due to faulty<br />
manufacture within the guarantee period, Electrolux<br />
Outdoor Products, through its Authorised Service<br />
Repairers will effect the repair or replacement to the<br />
customer free of charge providing:<br />
(a) The fault is reported directly to the Authorised<br />
Repairer.<br />
(b) Proof of purchase is provided.<br />
(c) The fault is not caused by misuse, neglect or faulty<br />
adjustment by the user.<br />
(d) The failure has not occurred through fair wear and<br />
tear.<br />
(e) The machine has not been serviced or repaired,<br />
taken apart or tampered with by any person not<br />
authorised by Electrolux Outdoor Products.<br />
(f) The machine has not been used for hire.<br />
(g) The machine is owned by the original purchaser.<br />
(h) The machine has not been used commercially.<br />
* This guarantee is additional to, and in no way<br />
diminishes the customers statutory rights.<br />
Environmental Information<br />
Fault Finding Hints<br />
Guarantee and Guarantee Policy<br />
The symbol on the product or on its packaging<br />
indicates that this product may not be treated as<br />
household waste. Instead it shall be handed over to<br />
the applicable collection point for the recycling of<br />
electrical and electronic equipment.<br />
By ensuring this product is disposed of correctly, you<br />
will help prevent potential negative consequences for<br />
the environment and human health, which could<br />
otherwise be caused by inappropriate waste handling<br />
of this product.<br />
For more detailed information about recycling of this<br />
product, please contact your local council office, your<br />
household waste disposal service or the shop where<br />
you purchased the product.<br />
Excessive Vibration<br />
1. Disconnect from the mains electricity supply.<br />
2. Check that the blade is fitted correctly?<br />
3. If the blade is damaged or worn, replace it with a<br />
new one.<br />
4. If vibration persists, turn the blade through 180o by<br />
first loosening the blade bolt, turning the blade and<br />
re-tightening the blade bolt.<br />
5. If vibration persists?<br />
Immediately disconnect from the mains<br />
electricity supply and consult your local<br />
approved Service Centre.<br />
<strong>Lawn</strong>mower becomes heavy to push<br />
1. Disconnect from the mains electricity supply.<br />
2. In long grass or uneven ground, the height of cut<br />
should be raised to a higher position. See Adjusting<br />
the Cutting Height<br />
3. Check that the wheels and rollers can rotate freely.<br />
4. If problem persists?<br />
Immediately disconnect from the mains<br />
electricity supply and consult your local<br />
approved Service Centre.<br />
Failures due to the following are not covered, therefore<br />
it is important that you read the instructions contained in<br />
this Operator's Manual and understand how to operate<br />
and maintain your machine:<br />
Failures not covered by guarantee<br />
* Replacing worn or damaged blades.<br />
* Failures as a result of not reporting an initial fault.<br />
* Failures as a result of sudden impact.<br />
* Failures as a result of not using the product in<br />
accordance with the instructions and recommendations<br />
contained in this Operator's Manual.<br />
* Machines used for hire are not covered by this guarantee.<br />
* The following items listed are considered as wearing<br />
parts and their life is dependent on regular maintenance<br />
and are, therefore not normally subject to a valid<br />
warranty claim: Blades, <strong>Electric</strong> Mains cable.<br />
* Caution!<br />
Electrolux Outdoor Products does not accept liability<br />
under the warranty for defects caused in whole or part,<br />
directly or indirectly by the fitting of replacement parts or<br />
additional parts that are not either manufactured or<br />
approved by Electrolux Outdoor Products, or by the<br />
machine having been modified in any way<br />
ENGLISH - 4
I, the undersigned M. Bowden of<br />
Electrolux Outdoor Products, Aycliffe<br />
Industrial Park, NEWTON AYCLIFFE, Co.<br />
Durham. DL5 6UP. Certify that the<br />
<strong>Lawn</strong>mower:-<br />
Category........<strong>Electric</strong> Wheeled Rotary<br />
Make..............Electrolux Outdoor<br />
Products<br />
Conforms to the specifications of Directive<br />
2000/14/EEC<br />
Type of Cutting Device....Rotary Blade<br />
Identification of Series......See Product Rating Label<br />
Conformity Assesment Procedure....ANNEX VI<br />
Notified Body....................I.T.S., Cleeve Road, Leatherhead,<br />
Surrey. KT22 7SB England<br />
Other Directives:-.............98/37/EEC, 89/336/EEC, 73/23/EEC<br />
& applicable standards:-. EN60555-2:1987, EN60555-3:1987,<br />
EN55<strong>01</strong>4:1993, EN55<strong>01</strong>4:1995, EN836:1997, IEC335-1:1991,<br />
IEC335-2-77:1996<br />
Ich, der Unterzeichner M. Bowden of<br />
Electrolux Outdoor Products, Aycliffe<br />
Industrial Park, NEWTON AYCLIFFE, Co.<br />
Durham. DL5 6UP. bescheinige hiermit,<br />
dass der Rasenmäher:-<br />
Kategorie....Elektrorasenmähe<br />
Fabrikat...... Electrolux Outdoor<br />
Products<br />
die Spezifikationen der Direktive<br />
2000/14/EG erfüllt<br />
Schneidwerktyp.................... Rotierendes Messer<br />
Identifizierung der reihe....... Siehe Produkttypenschild<br />
Konformitätsbestätigungsverfahren..ANNEX VI<br />
Benachrichtigte Behörde.....I.T.S., Cleeve Road, Leatherhead,<br />
Surrey. KT22 7SB England<br />
Andere Direktiven-.............. 98/37/EEC, 89/336/EEC,<br />
73/23/EEC<br />
und Normen:-..........EN60555-2:1987, EN60555-3:1987,<br />
EN55<strong>01</strong>4:1993, EN55<strong>01</strong>4:1995, EN836:1997, IEC335-1:1991,<br />
IEC335-2-77:1996<br />
Je soussigné M. Bowden of Electrolux<br />
Outdoor Products, Aycliffe Industrial Park,<br />
NEWTON AYCLIFFE, Co. Durham. DL5<br />
6UP. certifie que la tondeuse:-<br />
Catégorie...Rotative à roues électrique<br />
Marque...Electrolux Outdoor Products<br />
est conforme aux spécifications de la<br />
Directive 2000/14/EEC<br />
Type d'outil de coupe........... Lame rotative<br />
Identification de la serie....... Voir la Plaquette<br />
D’identification<br />
Procédure d'évaluation de la conformité........ANNEX VI<br />
Organisme notifié.... I.T.S., Cleeve Road, Leatherhead,<br />
Surrey. KT22 7SB England<br />
Autres directives..... 98/37/EEC, 89/336/EEC, 73/23/EEC<br />
et aux normes........ EN60555-2:1987, EN60555-3:1987,<br />
EN55<strong>01</strong>4:1993, EN55<strong>01</strong>4:1995, EN836:1997, IEC335-1:1991,<br />
IEC335-2-77:1996<br />
Ik, ondergetekende M. Bowden of<br />
Electrolux Outdoor Products, Aycliffe<br />
Industrial Park, NEWTON AYCLIFFE, Co.<br />
Durham. DL5 6UP. verklaar dat de<br />
grasmaaimachine:-<br />
Categorie..Elektrische grasmaaier op<br />
wielen<br />
Merk.....Electrolux Outdoor Products<br />
Voldoet aan de specificaties van directief<br />
2000/14/EEC<br />
Type maaier...................... Roterend mes<br />
Identificatie van serie....... Zie Productlabel<br />
Procedure voor het beoordelen van conformiteit......ANNEX VI<br />
Op de hoogte gestelde instantie...I.T.S., Cleeve Road,<br />
Leatherhead, Surrey.<br />
KT22 7SB England<br />
Andere directieven........98/37/EEC, 89/336/EEC, 73/23/EEC<br />
en aan de volgende normen.......EN60555-2:1987, EN60555-<br />
3:1987, EN55<strong>01</strong>4:1993, EN55<strong>01</strong>4:1995, EN836:1997, IEC335-<br />
1:1991, IEC335-2-77:1996<br />
I, the undersigned M. Bowden of<br />
Electrolux Outdoor Products, Aycliffe<br />
Industrial Park, NEWTON AYCLIFFE, Co.<br />
Durham. DL5 6UP Certify that a sample<br />
of the above product has been tested<br />
using directive 81/1051/EEC as a guide.<br />
The maximum A-weighted sound pressure<br />
level recorded at operator position under<br />
free field semi anechoic chamber<br />
conditions was :-<br />
I, the undersigned M. Bowden of<br />
Electrolux Outdoor Products, Aycliffe<br />
Industrial Park, NEWTON AYCLIFFE, Co.<br />
Durham. DL5 6UP Certify that a sample<br />
of the above product has been tested<br />
using ISO 5349 as a guide. The<br />
maximum weighted root mean square<br />
value of vibration recorded at operator’s<br />
hand position was:-<br />
Type...................................................................... RE330<br />
Width of Cut........................................................... 33cm<br />
Speed of Rotation of Cutting Device..................... 2,800 RPM<br />
Guaranteed sound power level.............................. 86 dB (A)<br />
Measured Sound Power Level............................... 84 dB (A)<br />
Level....................................................................... 73.5 dB (A)<br />
Value...................................................................... 3.49 m/s 2<br />
Weight.................................................................... 10.1 kg<br />
Ich, der Unterzeichner M. Bowden,<br />
Electrolux Outdoor Products, Aycliffe<br />
Industrial Park, NEWTON AYCLIFFE, Co.<br />
Durham, DL5 6UP, bescheinige hiermit, daß<br />
eine Probe des obigen Produkts getestet<br />
wurde und dabei Direktive 81/1051/EWG als<br />
Richtschnur verwendet wurde. Der<br />
maximale A-gewichtete Schalldruckpegel,<br />
der an der Bedienerposition unter Freifeld-<br />
Halbschalltot-Kammerbedingungen<br />
gemessen wurde, betrug:-<br />
Je soussigné M. Bowden, Electrolux<br />
Outdoor Products, Aycliffe Industrial Park,<br />
NEWTON AYCLIFFE, Co. Durham, DL5<br />
6UP, Grande-Bretagne, certifie qu’un<br />
échantillon du produit ci-dessus a été<br />
essayé selon les indications de la<br />
directive 81/1051/EEC. Le niveau<br />
maximum pondéré de pression<br />
acoustique enregistré à la position de<br />
l’opérateur en champ libre en chambre<br />
demi-sourde était de:-<br />
Ik, ondergetekende M. Bowden,<br />
Electrolux Outdoor Products, Aycliffe<br />
Industrial Park, NEWTON AYCLIFFE, Co.<br />
Durham, DL5 6UP, verklaar hierbij dat<br />
een proefexemplaar van het<br />
bovengenoemde product is getest<br />
volgens richtlijn 81/1051/EEC. Het<br />
maximale A-belaste geluidsdrukniveau dat<br />
is geregistreerd bij de positie van de<br />
bediener in een semi geluiddichte ruimte<br />
bij vrije veld condities bedraagt:-<br />
Ich, der Unterzeichner M. Bowden,<br />
Electrolux Outdoor Products, Aycliffe<br />
Industrial Park, NEWTON AYCLIFFE, Co.<br />
Durham, DL5 6UP, bescheinige hiermit,<br />
daß eine Probe des obigen Produkts<br />
getestet wurde und dabei ISO 5349 als<br />
Richtschnur verwendet wurde. Der<br />
maximale gewichtete<br />
Vibrationseffektivwert, der an der<br />
Handposition des Bedieners gemessen<br />
wurde, betrug:-<br />
Typ............................................................................ RE330<br />
Schnittbreite............................................................. 33cm<br />
Umdrehungsgeschwindigkeit des Schneidwerks.... 2,800 RPM<br />
Garantierter Geräuschpegel.................................... 86 dB (A)<br />
Gemessener Geräuschpegel................................... 84 dB (A)<br />
Höhe ........................................................................ 73.5 dB (A)<br />
Wert.......................................................................... 3.49 m/s 2<br />
Gewicht.................................................................... 10.1 kg<br />
Je soussigné M. Bowden, Electrolux<br />
Outdoor Products, Aycliffe Industrial Park,<br />
NEWTON AYCLIFFE, Co. Durham, DL5<br />
6UP, Grande-Bretagne, certifie qu’un<br />
échantillon du produit ci-dessus a été<br />
essayé selon les indications de la norme<br />
ISO 5349. La moyenne quadratique<br />
pondérée des vibrations enregistrées à la<br />
position de la main de l’opérateur était<br />
de:-<br />
Type................................................................... RE330<br />
Largeur de coupe.............................................. 33cm<br />
Vitesse de rotation de l'outil de coupe.............. 2,800 RPM<br />
Niveau garanti de puissance sonore................. 86 dB (A)<br />
Niveau mesuré de puissance sonore................ 84 dB (A)<br />
Niveau............................................................... 73.5 dB (A)<br />
Valeur................................................................ 3.49 m/s 2<br />
Poids................................................................. 10.1 kg<br />
Ik, ondergetekende M. Bowden,<br />
Electrolux Outdoor Products, Aycliffe<br />
Industrial Park, NEWTON AYCLIFFE, Co.<br />
Durham, DL5 6UP, verklaar hierbij dat<br />
een proefexemplaar van het<br />
bovengenoemde product is getest<br />
volgens ISO 5349 als richtlijn. De<br />
maximale belaste effectieve waarde van<br />
trilling, geregistreerd bij de positie van de<br />
hand van de bediener, bedraagt:-<br />
Type................................................................. RE330<br />
Maaibreedte..................................................... 33cm<br />
Toerental maaier.............................................. 2,800 RPM<br />
Gegarandeerd geluidsvermogen..................... 86 dB (A)<br />
Gemeten geluidsvermogen.............................. 84 dB (A)<br />
Niveau.............................................................. 73.5 dB (A)<br />
Waarde............................................................ 3.49 m/s 2<br />
Gewicht............................................................ 10.1 kg
Já, níže podepsaný M. Bowden of<br />
Electrolux Outdoor Products, Aycliffe<br />
Industrial Park, NEWTON AYCLIFFE,<br />
Co. Durham. DL5 6UP.<br />
potvrzuji, že sekačka:-<br />
Kategorie.......Elektrická rotační kolová<br />
sekačka<br />
Značka..........Electrolux Outdoor<br />
Products<br />
splňuje specifikace Směrnice<br />
2000/14/EEC<br />
Typ řezného nástroje......Rotační nůž<br />
Identifikace Série........... Viz Śtítek Technických Údajů<br />
Výrobku<br />
Postup vyhodnocování souladu..........ANNEX VI<br />
Oznámeno orgánu......... I.T.S., Cleeve Road, Leatherhead,<br />
Surrey. KT22 7SB England<br />
Jiné směrnice.................98/37/EEC, 89/336/EEC,<br />
73/23/EEC<br />
a normy.......................... EN60555-2:1987, EN60555-3:1987,<br />
EN55<strong>01</strong>4:1993, EN55<strong>01</strong>4:1995, EN836:1997, IEC335-<br />
1:1991, IEC335-2-77:1996<br />
Ja, dolupodpísaný, M. Bowden of<br />
Electrolux Outdoor Products, Aycliffe<br />
Industrial Park, NEWTON AYCLIFFE,<br />
Co. Durham. DL5 6UP. týmto<br />
potvrdzujem, že kosačka:-<br />
Kategória....Elektrická rotačná<br />
kolesová kosačka<br />
Výroba....... Electrolux Outdoor<br />
Products<br />
Vyhovuje špecifikáciám uvedeným v<br />
Norme 2000/14/EEC<br />
Typ rezného telesa...... Rotačný nôž<br />
Identifikácia série......... Vid Štítok Parametrov Výrobku<br />
Postupy určenia právnej spôsobilosti tovaru.........ANNEX VI<br />
Informované orgány..... I.T.S., Cleeve Road, Leatherhead,<br />
Surrey. KT22 7SB England<br />
Ďalšie nariadenia......... 98/37/EEC, 89/336/EEC,<br />
73/23/EEC<br />
a normám..................... EN60555-2:1987, EN60555-3:1987,<br />
EN55<strong>01</strong>4:1993, EN55<strong>01</strong>4:1995, EN836:1997, IEC335-<br />
1:1991, IEC335-2-77:1996<br />
Spodaj podpisani M. Bowden of<br />
Electrolux Outdoor Products, Aycliffe<br />
Industrial Park, NEWTON AYCLIFFE,<br />
Co. Durham. DL5 6UP. potrjujem, da je<br />
kosilnica:kategorija..........Električni<br />
aparat z<br />
gibljivimi kolesi<br />
blagovna znamka..Electrolux Outdoor<br />
Products<br />
v skladu z določbami Direktive<br />
2000/14/EEC<br />
Vrsta naprave za rezanje...Rotacijsko rezilo<br />
Identifikacija serije..............Glej Etiketo Označbe Proizvoda<br />
Postopek ugotavljanja skladnosti........................ANNEX VI<br />
Obveščeno telo..................I.T.S., Cleeve Road,<br />
Leatherhead,<br />
Surrey. KT22 7SB England<br />
Druge direktive...................98/37/EEC, 89/336/EEC,<br />
73/23/EEC<br />
in po standardih ................EN60555-2:1987, EN60555-<br />
3:1987, EN55<strong>01</strong>4:1993, EN55<strong>01</strong>4:1995, EN836:1997,<br />
IEC335-1:1991, IEC335-2-77:1996<br />
Já, níže podepsaný M. Bowden,<br />
Electrolux Outdoor Products, (Aycliffe<br />
Industrial Park, NEWTON AYCLIFFE,<br />
Co. Durham. DL5 6UP) prohlašuji, že<br />
exemplář svrchu uvedeného výrobku byl<br />
odzkoušen za použití směrnice<br />
81/1051/EEC jako vodítka. Maximální Avážená<br />
úroveň zvukového tlaku, která<br />
byla zaznamenána pro pozici uživatele<br />
za podmínek volného pole polobezdozvukové<br />
komory, byla-<br />
Ja, dopupodpísaný, M. Bowden,<br />
Electrolux Outdoor Products, Aycliffe<br />
Industrial Park, v meste NEWTON<br />
AYCLIFFE, Co. Durham, DL5 6UP,<br />
týmto potvrdzujem, že vzorka hore<br />
menovaného výrobku bola otestovaná v<br />
súlade s predpisom 81/1051/EEC. Pri<br />
maximálnom zaažení úroveň tlaku<br />
zvuku nameraná u operátora za<br />
podmienok voného poového<br />
pôsobenia polo-anechoického priestoru<br />
bola:-<br />
Spodaj podpisani M. Bowden, Electrolux<br />
Outdoor Products, Aycliffe Industrial<br />
Park, NEWTON AYCLIFFE, Co. Durham<br />
DL5 6UP potrjujem,da je bil primerek<br />
zgornjega proizvoda testiran glede na<br />
pravilnik 81/1051/EEC. Maximalni nivo<br />
pritiska zvoka A-jakosti, ki je bil<br />
zabeležen na poziciji upravnika v<br />
pogojih prostega polja semi-anakoične<br />
komore je bil:-<br />
Já, níže podepsaný M. Bowden,<br />
Electrolux Outdoor Products, (Aycliffe<br />
Industrial Park, NEWTON AYCLIFFE,<br />
Co. Durham. DL5 6UP) prohlašuji, že<br />
exemplář svrchu uvedeného výrobku byl<br />
odzkoušen za použití normy ISO 5349<br />
jako vodítka. Maximální vážená<br />
odmocnina střední kvadratické hodnoty<br />
vibrace, která byla zaznamenána v<br />
pozici ruky uživatele, byla:-<br />
Typ......................................................................... RE330<br />
Šířka sekání........................................................... 33cm<br />
Rotační rychlost řezného nástroje......................... 2,800 RPM<br />
Zaručená hladina akustického výkonu.................. 86 dB (A)<br />
Naměřená hladina akustického výkonu.................84 dB (A)<br />
Úroveň....................................................................73.5 dB (A)<br />
Hodnota................................................................. 3.49 m/s2 Hmotnost............................................................... 10.1 kg<br />
Ja, dopupodpísaný, M. Bowden,<br />
Electrolux Outdoor Products Park,<br />
Aycliffe Industrial Park, v meste<br />
NEWTON AYCLIFFE, Co. Durham, DL5<br />
6UP, týmto potvrdzujem, že vzorka hore<br />
menovaného výrobku bola otestovaná v<br />
súlade s predpisom ISO 5349. Pri<br />
maximálnom zaažení základný priemer<br />
druhej mocniny vibrácie nameraný v<br />
operátorovej ruke bol:-<br />
Typ........................................................................ RE330<br />
Šírka skosu........................................................... 33cm<br />
Rýchlost rotácií rezného telesa............................ 2,800 RPM<br />
Garantovaný stupeň sily zvuku............................ 86 dB (A)<br />
Nameraný stupeň sily zvuku................................ 84 dB (A)<br />
Úroveň.................................................................. 73.5 dB (A)<br />
Hodnota................................................................ 3.49 m/s2 Hmotnos.............................................................. 10.1 kg<br />
Spodaj podpisani M. Bowden, Electrolux<br />
Outdoor Products, Aycliffe Industrial<br />
Park, NEWTON AYCLIFFE, Co.<br />
Durham. DL5 6UP potrjujem, da je bil<br />
primerek zgornjega proizvoda testiran<br />
glede na pravilnik ISO 5349.<br />
Maksimalna povprečna zmerjena<br />
vrednost korena na kvadrat za<br />
vibriranje, zabeležena na poziciji<br />
upravnikove je bila roke je bila:-<br />
Tip..................................................................RE330<br />
Širina reza......................................................33cm<br />
Hitrost rotacije naprave za rezanje................2,800 RPM<br />
Zajamčen nivo hrupa.....................................86 dB (A)<br />
Izmerjen nivo hrupa.......................................84 dB (A)<br />
Nivo............................................................... 73.5 dB (A)<br />
Vrednost........................................................ 3.49 m/s2 Teža............................................................... 10.1 kg<br />
Newton Aycliffe, 22/10/2004<br />
M. Bowden,<br />
Research & Development Director
BELGIQUE/BELGIË Flymo Belgique/België<br />
Tel: 02 363 0311, Fax: 02 363 0391<br />
ČESKÁ REPUBLIKA Electrolux, spol. s.r.o., oz Electrolux Outdoor Products,<br />
Dobronická 635, 148 25 Praha 4<br />
Tel: 02/6111 2408-9, Info-linka: 0800/110 220<br />
Internet: www.partner-flymo.cz E-mail: info@husqvarna.cz<br />
DANMARK Electrolux Outdoor Products, Flymo/<strong>Partner</strong> A/S,<br />
Lundtoftegårdsvej 93A, DK 2800 Kgs.Lyngby<br />
Tel: 45 877577, www.flymo-partner.dk<br />
DEUTSCHLAND Flymo Deutschland<br />
Tel: 097 21 7640, Fax:097 21 764202<br />
ESTONIA Electrolux Estonia Ltd (Electrolux Eesti AS)<br />
Tel: (372) 6650<strong>01</strong>0<br />
FRANCE Flymo France SNC<br />
Tel <strong>01</strong> 46 67 8141, Fax <strong>01</strong> 43 34 2491<br />
FINLAND SU<strong>OM</strong>I Flymo Finland Suomi<br />
Tel: 00 39611, Fax: 00 39 612632<br />
ITALIA McCulloch Italiana s.r.l. - Via Como 72, 23868 Valmadrera<br />
(LECCO) - ITALIA<br />
Tel: 800 <strong>01</strong>7829, Fax: 0341 581671<br />
IRELAND Flymo Ireland<br />
Tel: <strong>01</strong> 4565222, Fax: <strong>01</strong> 4568551<br />
MAGYARORSZÁG Electrolux Lehel Kft<br />
Tel: 00 36 1 251 41 47<br />
NORGE Flymo/<strong>Partner</strong>, div. av Electrolux Motor a.s.<br />
Tel: 69 10 47 90<br />
NEDERLAND Flymo Nederland<br />
Tel: <strong>01</strong>72-468322, Fax: <strong>01</strong>72-468219<br />
ÖSTERREICH HUSQVARNA Zentralwerkstätte, Industriezeile 36, 4020 LINZ,<br />
Tel: 0732 77<strong>01</strong><strong>01</strong>-60, Fax: 0732 795922<br />
POLSKA Electrolux Poland Sp. z.o.o. Husqvarna, <strong>01</strong>-612 Warszawa<br />
Myslowicka 10/2<br />
Tel:- (22) 8332949<br />
SLOVENIJA SKANTEH d.o.o.<br />
Tel:- (061) 133 70 68, Fax:-(061) 133 70 68<br />
SLOVENSKA Electrolux Slovakia s.r.o., Borova Sihot 211, 033 <strong>01</strong> Lipt.<br />
Hradok<br />
Tel: 044 522 14 19, Fax: 044 522 14 18, www.flymo-partner.sk<br />
SCHWEIZ/SUISSE/SUIZZERA Flymo Schweiz/Suisse/Suizzera<br />
Tel 062 889 93 50 / 889 94 25, Fax 062 889 93 60 / 889 94 35<br />
SVERIGE Electrolux Outdoor Products, Sverige<br />
Tel: 036 – 14 67 00, Fax: 036 – 14 60 70<br />
UNITED KINGD<strong>OM</strong> Electrolux Outdoor Products United Kingdom<br />
Tel: <strong>01</strong>325 300303, Fax: <strong>01</strong>325 310339
Electrolux Outdoor Products<br />
Aycliffe Industrial Park<br />
NEWTON AYCLIFFE<br />
Co.Durham DL5 6UP<br />
ENGLAND<br />
Telephone - (00) 44 1325 300303 Fax - (00) 44 1325 310339<br />
Our policy of continuous improvement means that the specification of products may be altered from time to time without prior notice.<br />
Electrolux Outdoor Products manufacture products for a number of well known brands under various registered patents, designs and<br />
trademarks in several countries.<br />
© Electrolux Outdoor Products Ltd. Registered Office, Electrolux Works, Oakley Road, Luton LU4 9QQ<br />
Registered number 974979 England<br />
The Electrolux Group. The world’s No.1 choice.<br />
The Electrolux Group is the world’s largest producer of powered appliances for kitchen, cleaning and outdoor use. More than 55 million<br />
Electrolux Group products (such as refrigerators, cookers, washing machines, vacuum cleaners, chain saws and lawn mowers) are<br />
sold each year to a value of approx. USD 14 billion in more than 150 countries around the world.<br />
5119452-02