A Free Project Sheet From - Henry Glass & Co
A Free Project Sheet From - Henry Glass & Co
A Free Project Sheet From - Henry Glass & Co

You also want an ePaper? Increase the reach of your titles
YUMPU automatically turns print PDFs into web optimized ePapers that Google loves.
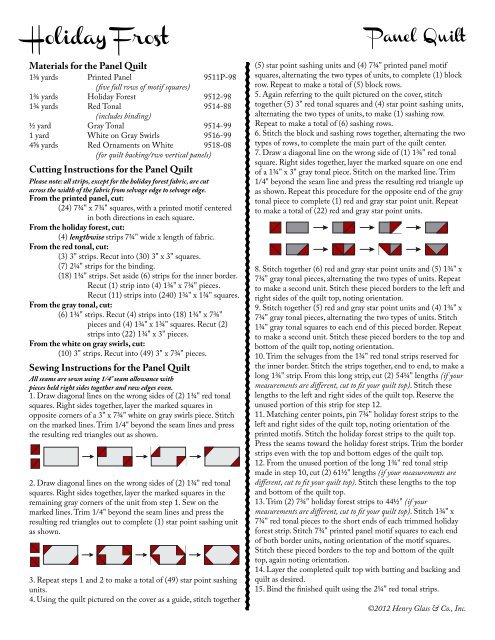
Holiday Frost<br />
Materials for the Panel Quilt<br />
1⅜ yards Printed Panel 9511P-98<br />
(five full rows of motif squares)<br />
1¾ yards Holiday Forest 9512-98<br />
1¾ yards Red Tonal 9514-88<br />
(includes binding)<br />
½ yard Gray Tonal 9514-99<br />
1 yard White on Gray Swirls 9516-99<br />
4⅝ yards Red Ornaments on White 9518-08<br />
(for quilt backing/two vertical panels)<br />
Cutting Instructions for the Panel Quilt<br />
Please note: all strips, except for the holiday forest fabric, are cut<br />
across the width of the fabric from selvage edge to selvage edge.<br />
<strong>From</strong> the printed panel, cut:<br />
(24) 7¾" x 7¾" squares, with a printed motif centered<br />
in both directions in each square.<br />
<strong>From</strong> the holiday forest, cut:<br />
(4) lengthwise strips 7¾" wide x length of fabric.<br />
<strong>From</strong> the red tonal, cut:<br />
(3) 3" strips. Recut into (30) 3" x 3" squares.<br />
(7) 2¼" strips for the binding.<br />
(18) 1¾" strips. Set aside (6) strips for the inner border.<br />
Recut (1) strip into (4) 1¾" x 7¾" pieces.<br />
Recut (11) strips into (240) 1¾" x 1¾" squares.<br />
<strong>From</strong> the gray tonal, cut:<br />
(6) 1¾" strips. Recut (4) strips into (18) 1¾" x 7¾"<br />
pieces and (4) 1¾" x 1¾" squares. Recut (2)<br />
strips into (22) 1¾" x 3" pieces.<br />
<strong>From</strong> the white on gray swirls, cut:<br />
(10) 3" strips. Recut into (49) 3" x 7¾" pieces.<br />
Sewing Instructions for the Panel Quilt<br />
All seams are sewn using 1/4" seam allowance with<br />
pieces held right sides together and raw edges even.<br />
1. Draw diagonal lines on the wrong sides of (2) 1¾" red tonal<br />
squares. Right sides together, layer the marked squares in<br />
opposite corners of a 3" x 7¾" white on gray swirls piece. Stitch<br />
on the marked lines. Trim 1/4" beyond the seam lines and press<br />
the resulting red triangles out as shown.<br />
2. Draw diagonal lines on the wrong sides of (2) 1¾" red tonal<br />
squares. Right sides together, layer the marked squares in the<br />
remaining gray corners of the unit from step 1. Sew on the<br />
marked lines. Trim 1/4" beyond the seam lines and press the<br />
resulting red triangles out to complete (1) star point sashing unit<br />
as shown.<br />
3. Repeat steps 1 and 2 to make a total of (49) star point sashing<br />
units.<br />
4. Using the quilt pictured on the cover as a guide, stitch together<br />
Panel Quilt<br />
(5) star point sashing units and (4) 7¾" printed panel motif<br />
squares, alternating the two types of units, to complete (1) block<br />
row. Repeat to make a total of (5) block rows.<br />
5. Again referring to the quilt pictured on the cover, stitch<br />
together (5) 3" red tonal squares and (4) star point sashing units,<br />
alternating the two types of units, to make (1) sashing row.<br />
Repeat to make a total of (6) sashing rows.<br />
6. Stitch the block and sashing rows together, alternating the two<br />
types of rows, to complete the main part of the quilt center.<br />
7. Draw a diagonal line on the wrong side of (1) 1¾" red tonal<br />
square. Right sides together, layer the marked square on one end<br />
of a 1¾" x 3" gray tonal piece. Stitch on the marked line. Trim<br />
1/4" beyond the seam line and press the resulting red triangle up<br />
as shown. Repeat this procedure for the opposite end of the gray<br />
tonal piece to complete (1) red and gray star point unit. Repeat<br />
to make a total of (22) red and gray star point units.<br />
8. Stitch together (6) red and gray star point units and (5) 1¾" x<br />
7¾" gray tonal pieces, alternating the two types of units. Repeat<br />
to make a second unit. Stitch these pieced borders to the left and<br />
right sides of the quilt top, noting orientation.<br />
9. Stitch together (5) red and gray star point units and (4) 1¾" x<br />
7¾" gray tonal pieces, alternating the two types of units. Stitch<br />
1¾" gray tonal squares to each end of this pieced border. Repeat<br />
to make a second unit. Stitch these pieced borders to the top and<br />
bottom of the quilt top, noting orientation.<br />
10. Trim the selvages from the 1¾" red tonal strips reserved for<br />
the inner border. Stitch the strips together, end to end, to make a<br />
long 1¾" strip. <strong>From</strong> this long strip, cut (2) 54¼" lengths (if your<br />
measurements are different, cut to fit your quilt top). Stitch these<br />
lengths to the left and right sides of the quilt top. Reserve the<br />
unused portion of this strip for step 12.<br />
11. Matching center points, pin 7¾" holiday forest strips to the<br />
left and right sides of the quilt top, noting orientation of the<br />
printed motifs. Stitch the holiday forest strips to the quilt top.<br />
Press the seams toward the holiday forest strips. Trim the border<br />
strips even with the top and bottom edges of the quilt top.<br />
12. <strong>From</strong> the unused portion of the long 1¾" red tonal strip<br />
made in step 10, cut (2) 61½" lengths (if your measurements are<br />
different, cut to fit your quilt top). Stitch these lengths to the top<br />
and bottom of the quilt top.<br />
13. Trim (2) 7¾" holiday forest strips to 44½" (if your<br />
measurements are different, cut to fit your quilt top). Stitch 1¾" x<br />
7¾" red tonal pieces to the short ends of each trimmed holiday<br />
forest strip. Stitch 7¾" printed panel motif squares to each end<br />
of both border units, noting orientation of the motif squares.<br />
Stitch these pieced borders to the top and bottom of the quilt<br />
top, again noting orientation.<br />
14. Layer the completed quilt top with batting and backing and<br />
quilt as desired.<br />
15. Bind the finished quilt using the 2¼" red tonal strips.<br />
©2012 <strong>Henry</strong> <strong>Glass</strong> & <strong>Co</strong>., Inc.